- Adjust the size of a filesystem
- Resize a filesystem/partition
- Как изменить размер раздела Linux
- Работа с разделами в GParted
- Меняем размер разделов диска с помощью fdisk
- Resizing a Partition + Filesystem on Linux from the CLI
- Looking to buy a Virtual or Dedicated server? Do you like privacy and low prices? Try Privex!
- Order a server TODAY! Privacy is affordable™
- 1. Installing GNU parted
- 2. Check fdisk to find the right disk / partition + disk/partition info
- 3. Resize the disk partition («physical» partition) on your partition table using parted
- 4. Resize the actual filesystem to fit the grown partition
- Looking to buy a Virtual or Dedicated server? Do you like privacy and low prices? Try Privex!
- Аникин
- Изменение размера раздела в linux без потери данных.
Adjust the size of a filesystem
A filesystem can be grown to make use of the free space after its partition. Often this is even possible while the filesystem is mounted.
To make space for another partition after the filesystem, it can be shrunk according to the free space within it.
Not all filesystems have resize support.
The partition size will be changed together with the filesystem size. It is also possible to resize a partition without a filesystem in the same way.
Resize a filesystem/partition
- Open Disks from the Activities overview.
- Select the disk containing the filesystem in question from the list of storage devices on the left. If there is more than one volume on the disk, select the volume which contains the filesystem.
- In the toolbar underneath the Volumes section, click the menu button. Then click Resize Filesystem… or Resize… if there is no filesystem.
- A dialog will open where the new size can be chosen. The filesystem will be mounted to calculate the minimum size by the amount of current content. If shrinking is not supported the minimum size is the current size. Leave enough space within the filesystem when shrinking to ensure that it can work fast and reliably. Depending on how much data has to be moved from the shrunk part, the filesystem resize may take longer time.
The filesystem resize automatically involves repairing of the filesystem. Therefore it is advised to back up important data before starting. The action must not be stopped or it will result in a damaged filesystem.
Как изменить размер раздела Linux
Изменение размеров логических томов в Linux осуществляется сложнее, нежели в Windows, что связано с особенностями использования консольных команд и доступных графических приложений. Однако эта задача под силу любому пользователю, и приведенные далее инструкции помогут разобраться с тем, как выполнить ее быстро.
Работа с разделами в GParted
Не все юзеры Linux предпочитают использовать терминал, когда можно обойтись без него. К тому же новички в этой операционной системе не особо желают разбираться с активацией сложных команд. Поэтому в качестве первого варианта предлагаю ознакомиться с использованием программы GParted, которая представляет собой полноценную систему управления дисками.
GParted по умолчанию установлена в большинстве популярных дистрибутивов и их оболочках. Однако если при запуске окажется, что она отсутствует, используйте менеджер приложений или пользовательские репозитории для стандартной процедуры инсталляции. После этого приступайте к выполнению следующей инструкции.
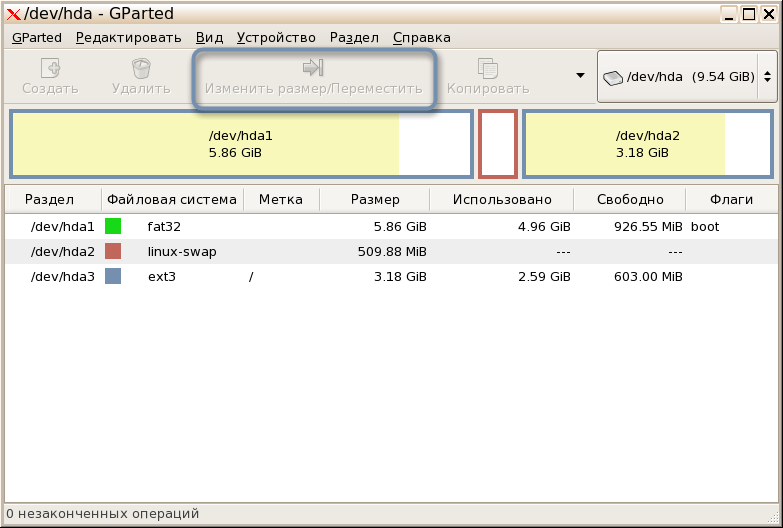
- Запустите приложение через терминал, введя там gparted, или нажмите по созданному значку. В главном окне сразу можно выбрать диск, размер которого необходимо изменить, и нажать по кнопке «Изменить размер/Переместить» .

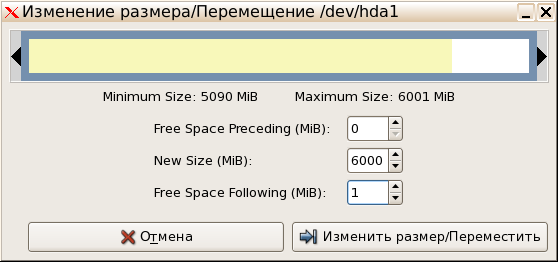
- Отобразится новое окно, где вы можете добавить свободное пространство к диску или же сжать том, освободив тем самым определенное количество мегабайт. Как только выставите новые настройки, подтвердите действие, чтобы закрыть это окно.
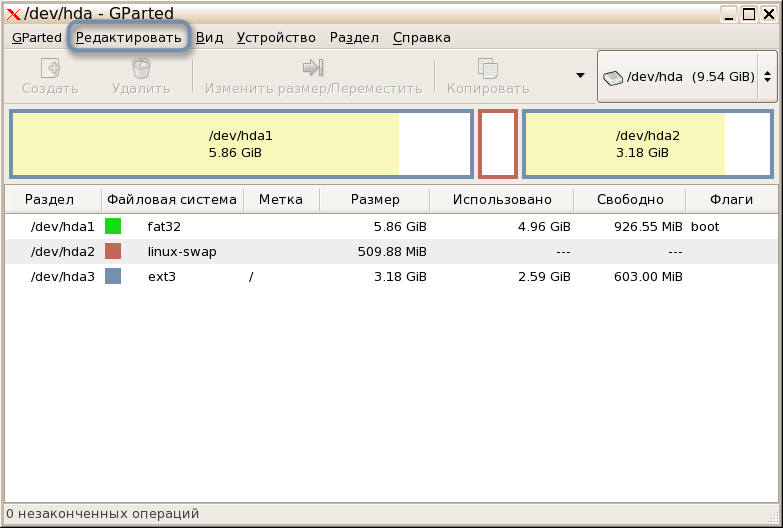
- В главном меню разверните всплывающее меню «Редактировать» и нажмите «Применить все операции» .
- В новом окне следите за прогрессом операции, а по ее завершении можете убедиться в том, что размер был успешно изменен.

Если все пространство уже распределено по разделам, учитывайте, что сначала его придется вернуть к нераспределенному, сжав один или несколько логических томов. Затем свободные мегабайты уже можно будет отнести к новому тому, расширив его.
Меняем размер разделов диска с помощью fdisk
Более гибкий, но сложный вариант изменения размера диска в Linux подразумевает использование консольной утилиты fdisk. Для выполнения расширения тома на все свободное пространство понадобится выполнить более десятка разных действий, но на все про все уйдет не больше 10 минут.
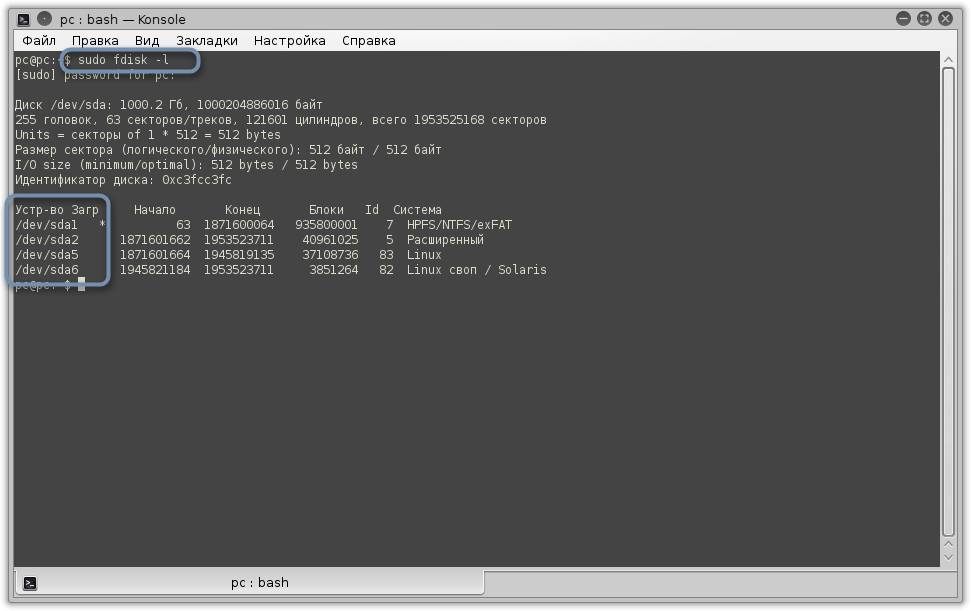
- Если вы пока не знаете, под какими метками располагается сам диск и его логические тома, используйте команду sudo fdisk -l, отобразив список со всеми секторами.
- Используйте команду umount /dev/sdb2 для размонтирования раздела. Замените его название на необходимое и учитывайте, что корневой том размонтировать так просто нельзя, понадобится загрузка с LiveCD.
- Далее укажите fdisk /dev/sdb , подключившись тем самым к указанному диску.
- Посмотрите все разделы, введя p и нажав на Enter .
- За удаление отвечает d; после активации этого атрибута понадобится ввести цифру раздела, который вы хотите удалить (при этом форматирования не происходит, все данные сохраняются).
- Последовательно активируйте n (новый раздел), p (основной) и 2 (замените на номер тома). При появлении уведомления о создании первого и последнего сектора подтверждайте операцию нажатием на Enter .
- Проверьте список томов еще раз через p , а затем нажмите w для сохранения изменений.
Осталось только указать файловой системе, что размер тома был расширен до максимального, поскольку пока отображается старое значение. Для этого сначала определите используемую файловую систему через df -T . Введите одну из трех следующих команд, отталкиваясь от полученной информации:
Для ext2/ext3/ext4 :
resize2fs /dev/vg_centos/lv_root В командах номера разделов указаны в качестве примеров, вы же заменяете их на свои. Еще оставлю пример команды для монтирования диска, если ранее он был отключен:
Сделать это нужно уже после внесения всех изменений.
Для уменьшения размера раздела используйте последовательность команд:
umount /dev/vdb1 fsck -f /dev/vdb1 resize2fs /dev/vdb1 100M fdisk /dev/vdb
После ввода последней снова используйте последовательную активацию букв так, как это было показано в предыдущей инструкции, чтобы создать новый раздел. Кроме того, не забудьте смонтировать его обратно!
Resizing a Partition + Filesystem on Linux from the CLI
Note that we’ll only be covering EXPANSION / GROWING, and not shrinking, since it’s much more difficult to shrink a partition than to grow it.
- A system running Linux (Ubuntu, Debian, Linux Mint, Fedora, CentOS, RedHat or anything else)
- Free space in your partition table — AFTER the partition you want to resize — to extend the partition into.
- The third-party program parted (available in most package managers)
Looking to buy a Virtual or Dedicated server? Do you like privacy and low prices? Try Privex!
We have virtual servers starting from just US$0.99/mo, and dedicated servers starting from as low as US$50/mo
Unlike other hosts, we don’t ask for any personal details — only a name (can be an alias / username), and an e-mail address so we can send you your server details and renewal invoices.
We also accept several different cryptocurrencies with our own in-house payment processor — no third parties involved in processing your payments.
At the time of writing, we currently accept: Bitcoin (BTC), Litecoin (LTC), Monero (XMR), Dogecoin (DOGE), HIVE, and HBD
Order a server TODAY! Privacy is affordable™
1. Installing GNU parted
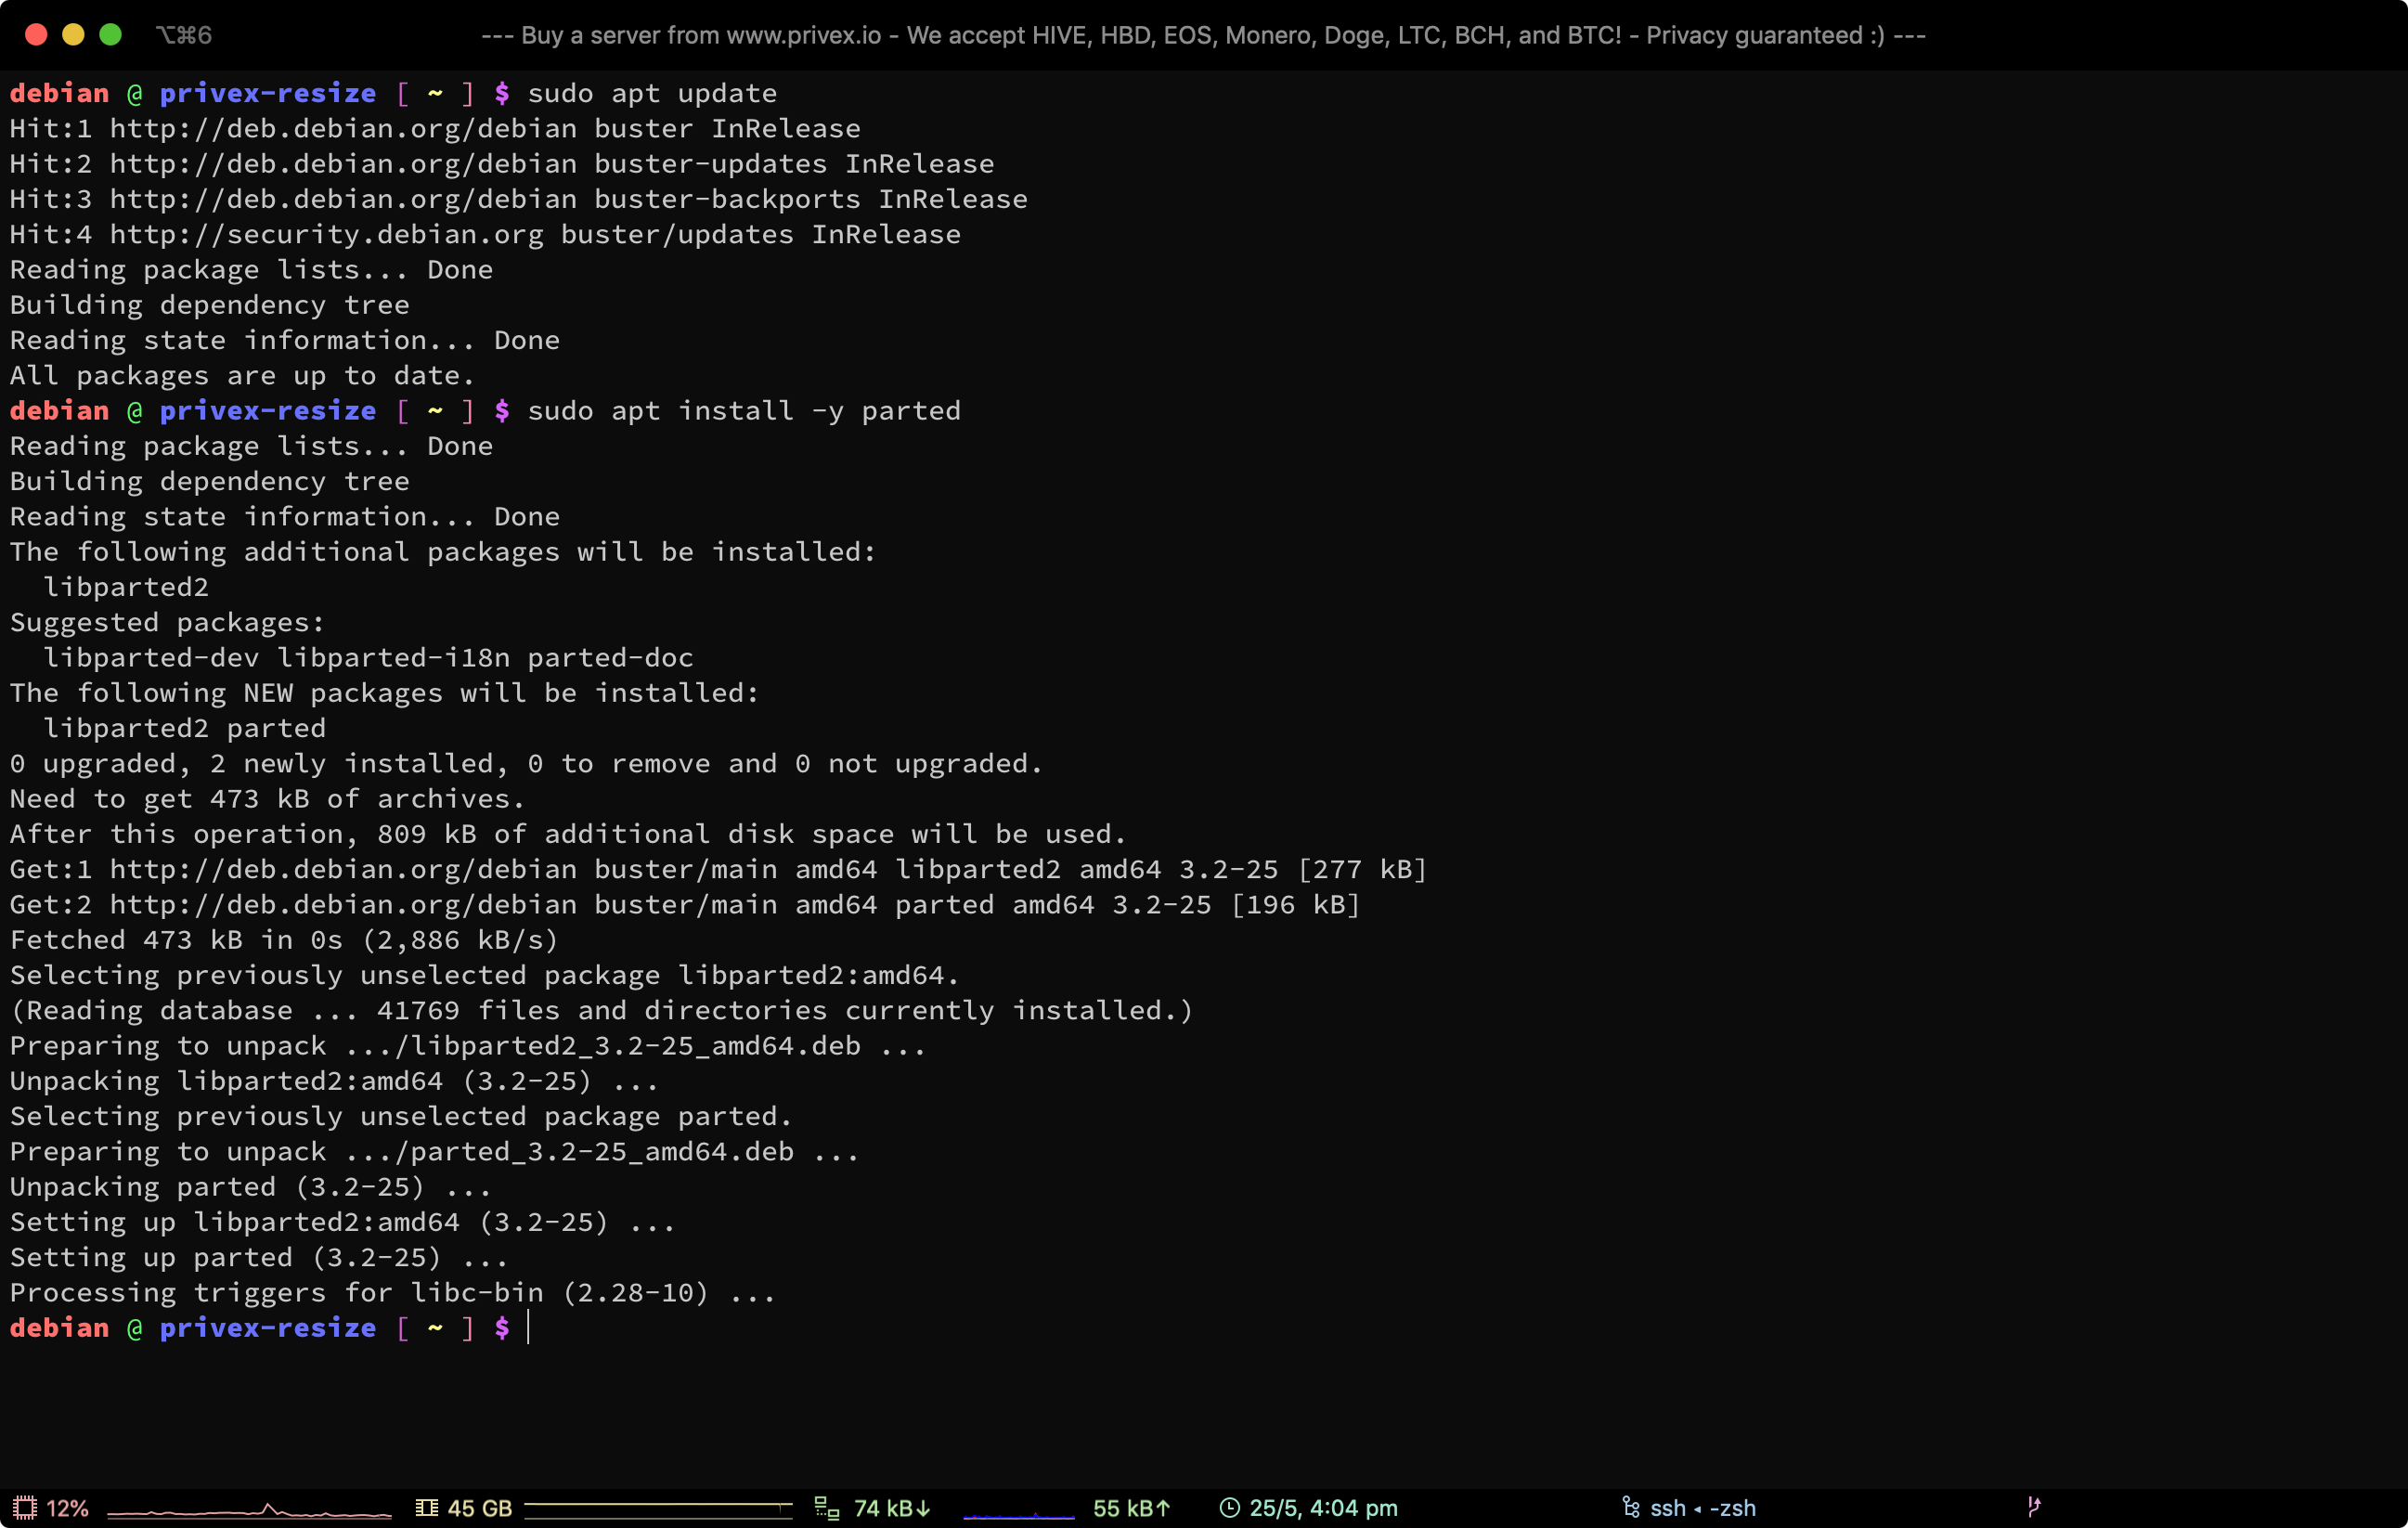
For Debian-based distros such as Ubuntu, Debian, Linux Mint, etc. — you can install parted from apt:
sudo apt update sudo apt install -y parted For Redhat-based distros (Fedora, Redhat, CentOS, Oracle, Amazon Linux, etc.), you can use either dnf (for modern distros) or yum (for older distros):
# for modern distros sudo dnf install -y parted # for older distros, or if you get an error saying dnf isn't installed sudo yum install -y parted For Arch Linux, you can use pacman :
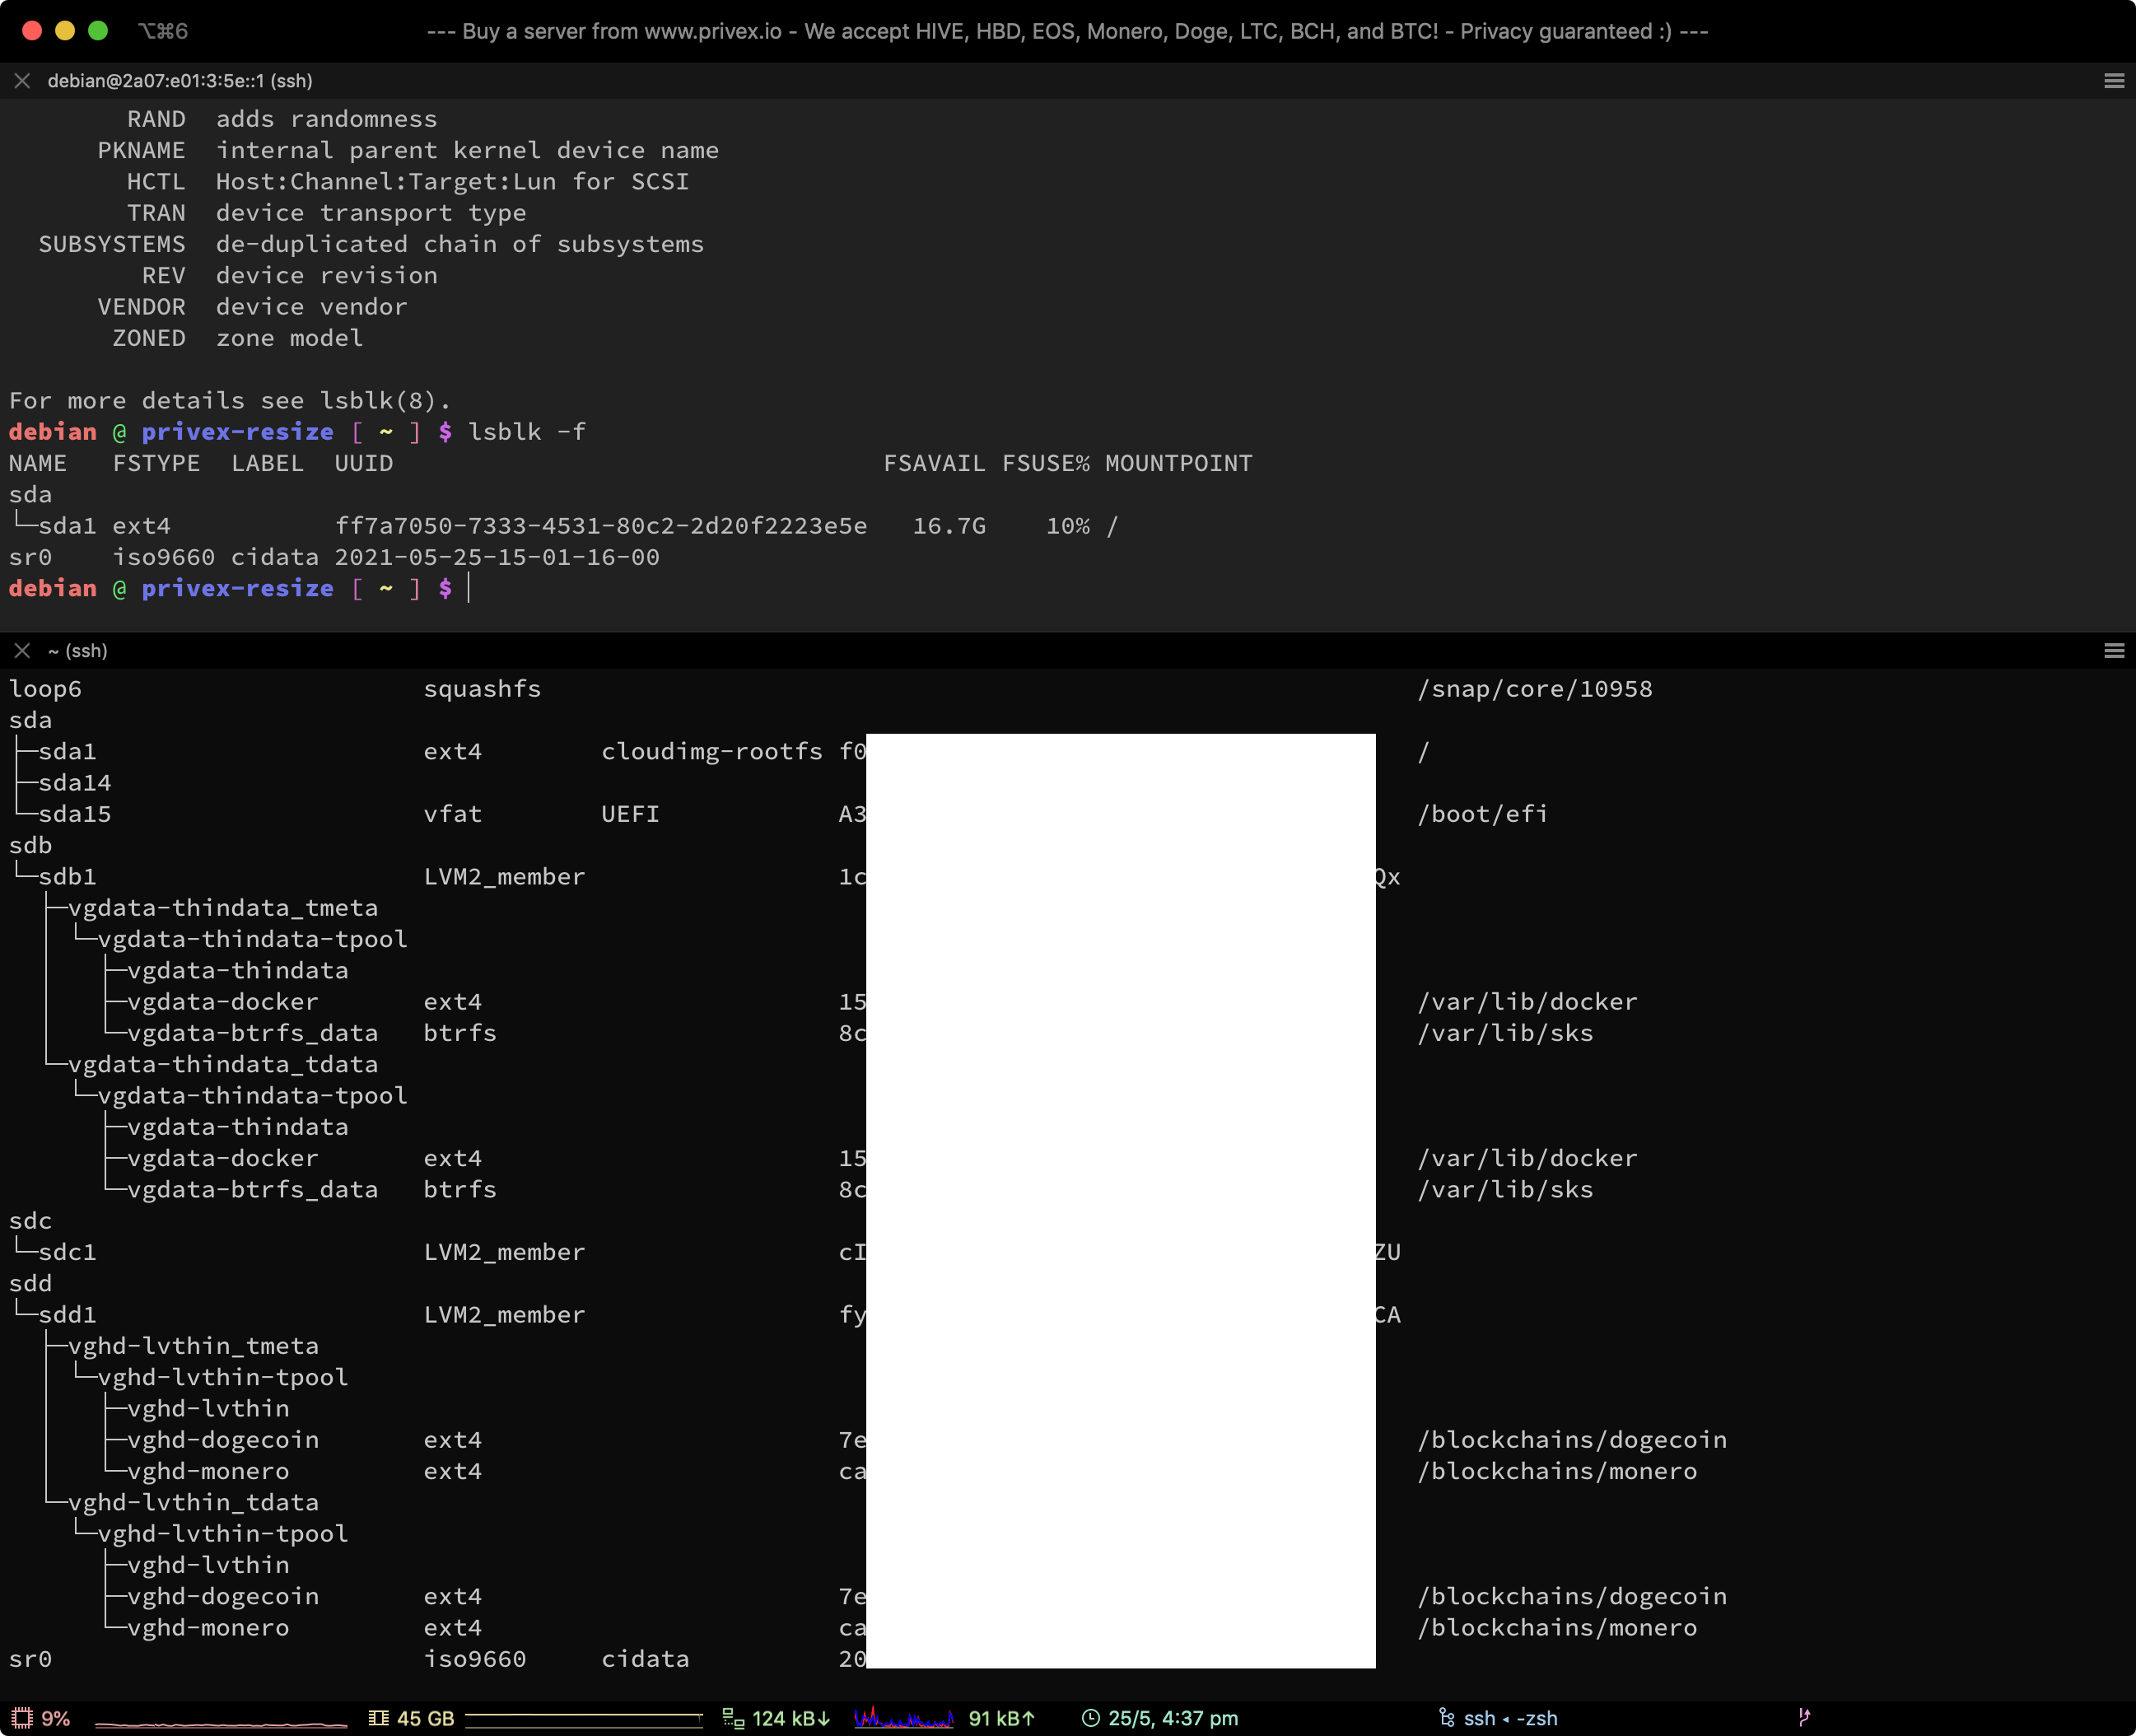
2. Check fdisk to find the right disk / partition + disk/partition info
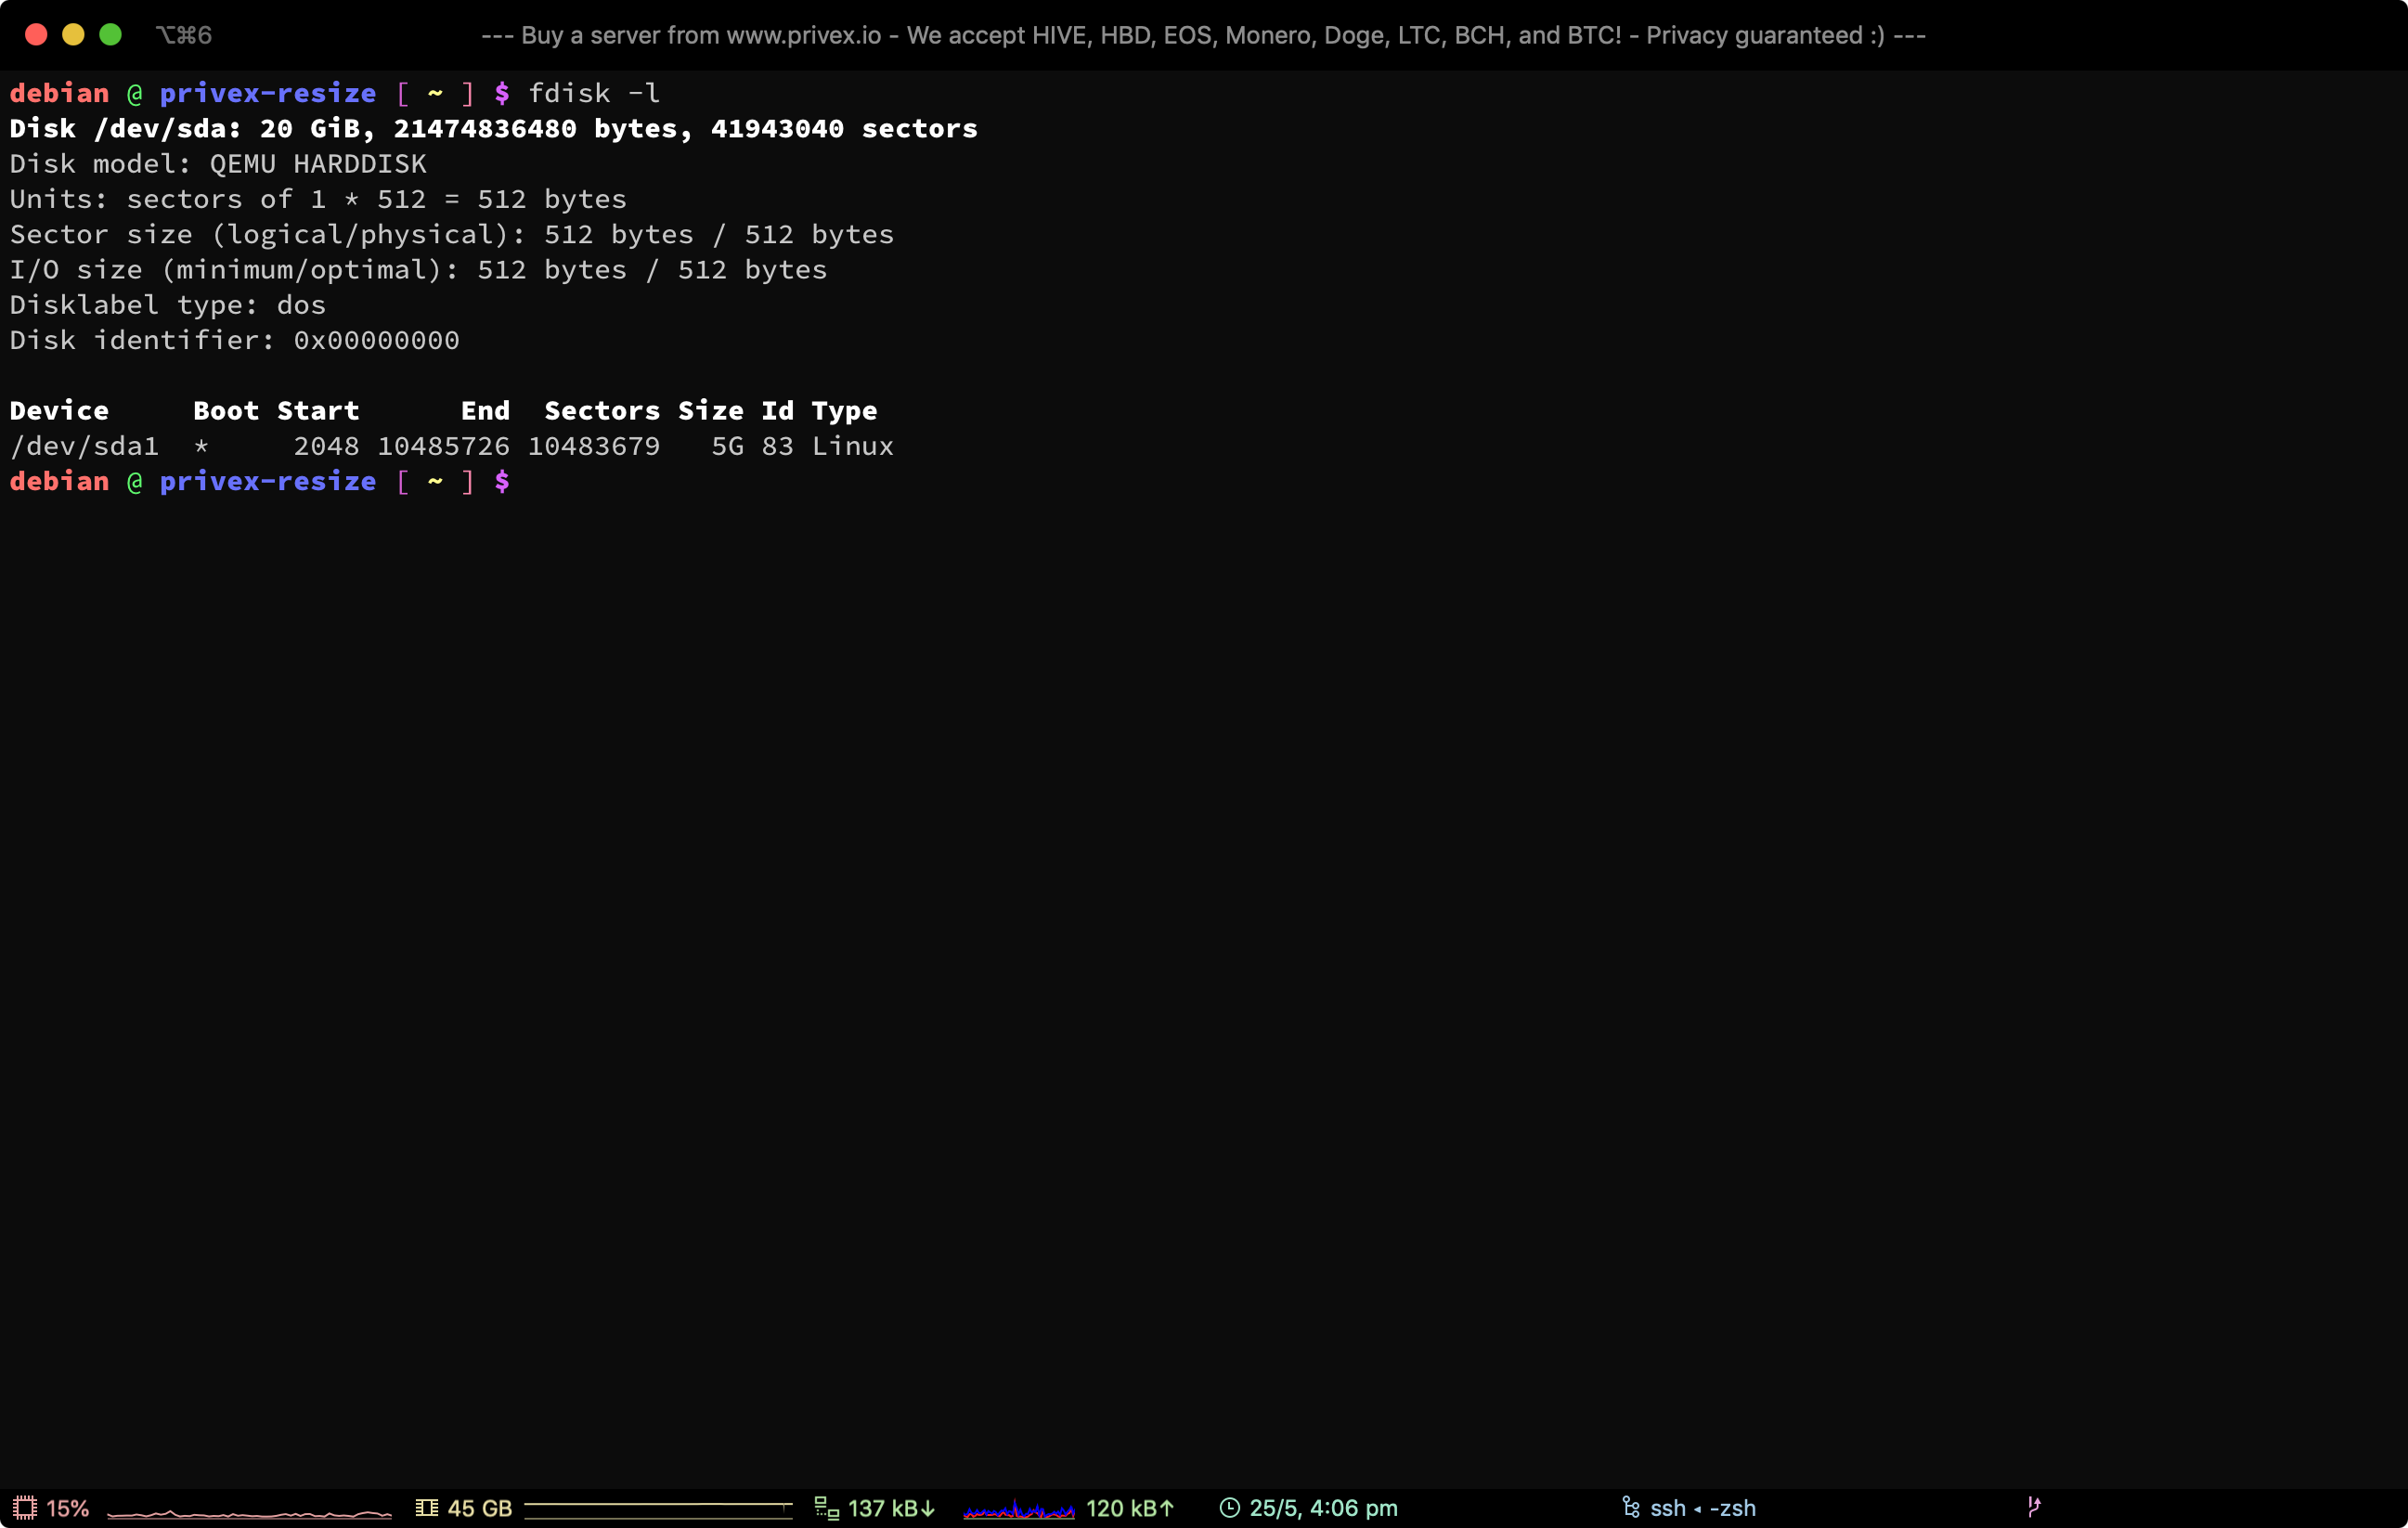
Run the following command to get information about all disks and partitions on your system:
Look through the output to find the disk (e.g. /dev/sda ) that you want to resize, as well as the partition you want to resize.
You might also be able to find the disk /dev/ path by running df -h / (if you want to resize a different partition instead of the rootfs / — then replace / with the mountpoint of the partition you want to resize)
3. Resize the disk partition («physical» partition) on your partition table using parted
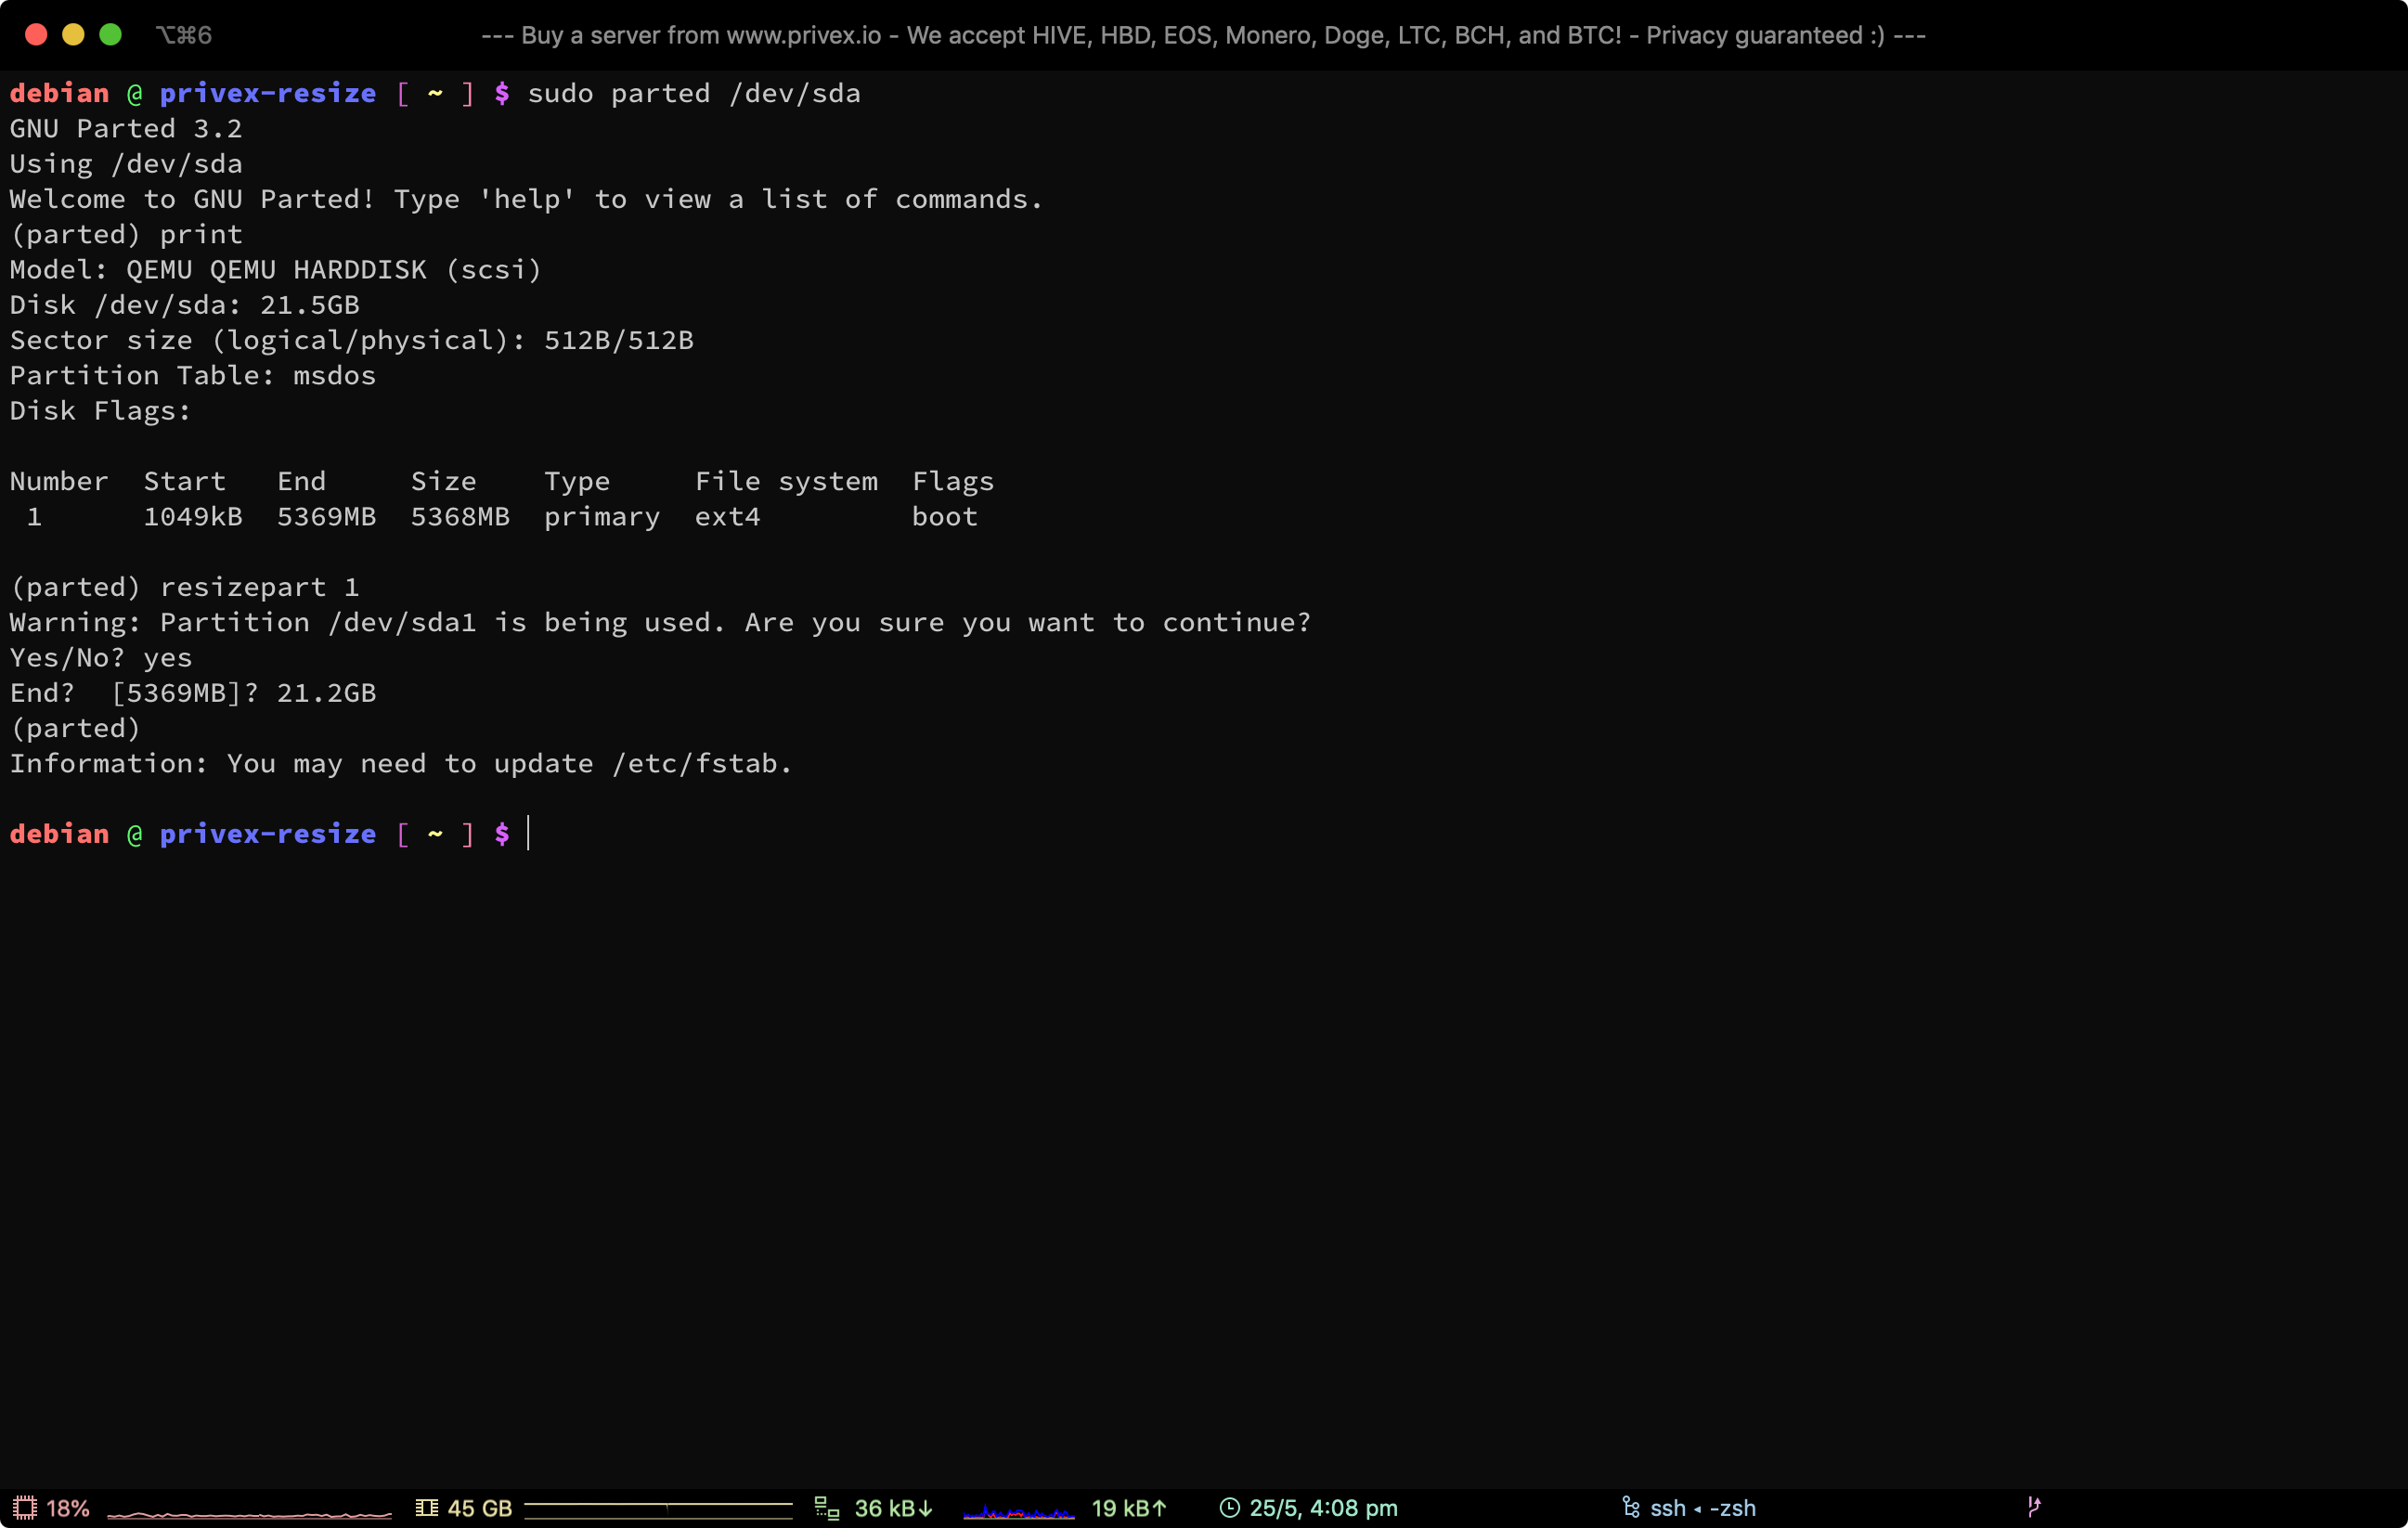
Once you’ve located the disk you want to resize a partition on (e.g. /dev/sda ), open it using parted:
Now use the print command within parted, which will print information about that disk, and the partitions on the disk, so you can figure out how much space you have available to expand the partition into, and the partition number of the partition you want to resize:
Finally, use resizepart [partition_number] with the number of the partition you want to resize, to actually resize the partition:
You may be warned that the disk is in use, this is generally okay, so enter yes
When asked to enter the End: — if the partition is at the end of the disk, you can enter the size of the disk outputted by print , but take off 0.2GB for safety, e.g. if it was 48.5GB — you’d enter 48.3G.
If the partition is between two partitions, then you’ll want to enter an end location at least 100mb before the «Start» of the following partition. For example, if you’re resizing partition 1 (start: 1020MB, end: 20GB), and partition 2 starts at 41.2GB — then you could set the End of part 1 to 41GB (~200mb before part 2).
4. Resize the actual filesystem to fit the grown partition
The command you’d run to grow a filesystem, depends on what filesystem the partition is actually formatted with.
Most Linux systems use the filesystem ext4 (or an older version such as ext3 — which uses the same command to resize anyway), though either yourself or the installer for your distro may have formatted some/all of the partitions with an alternative filesystem such as XFS, or Btrfs.
To discover the filesystem used by each partition on your system, use the following command:
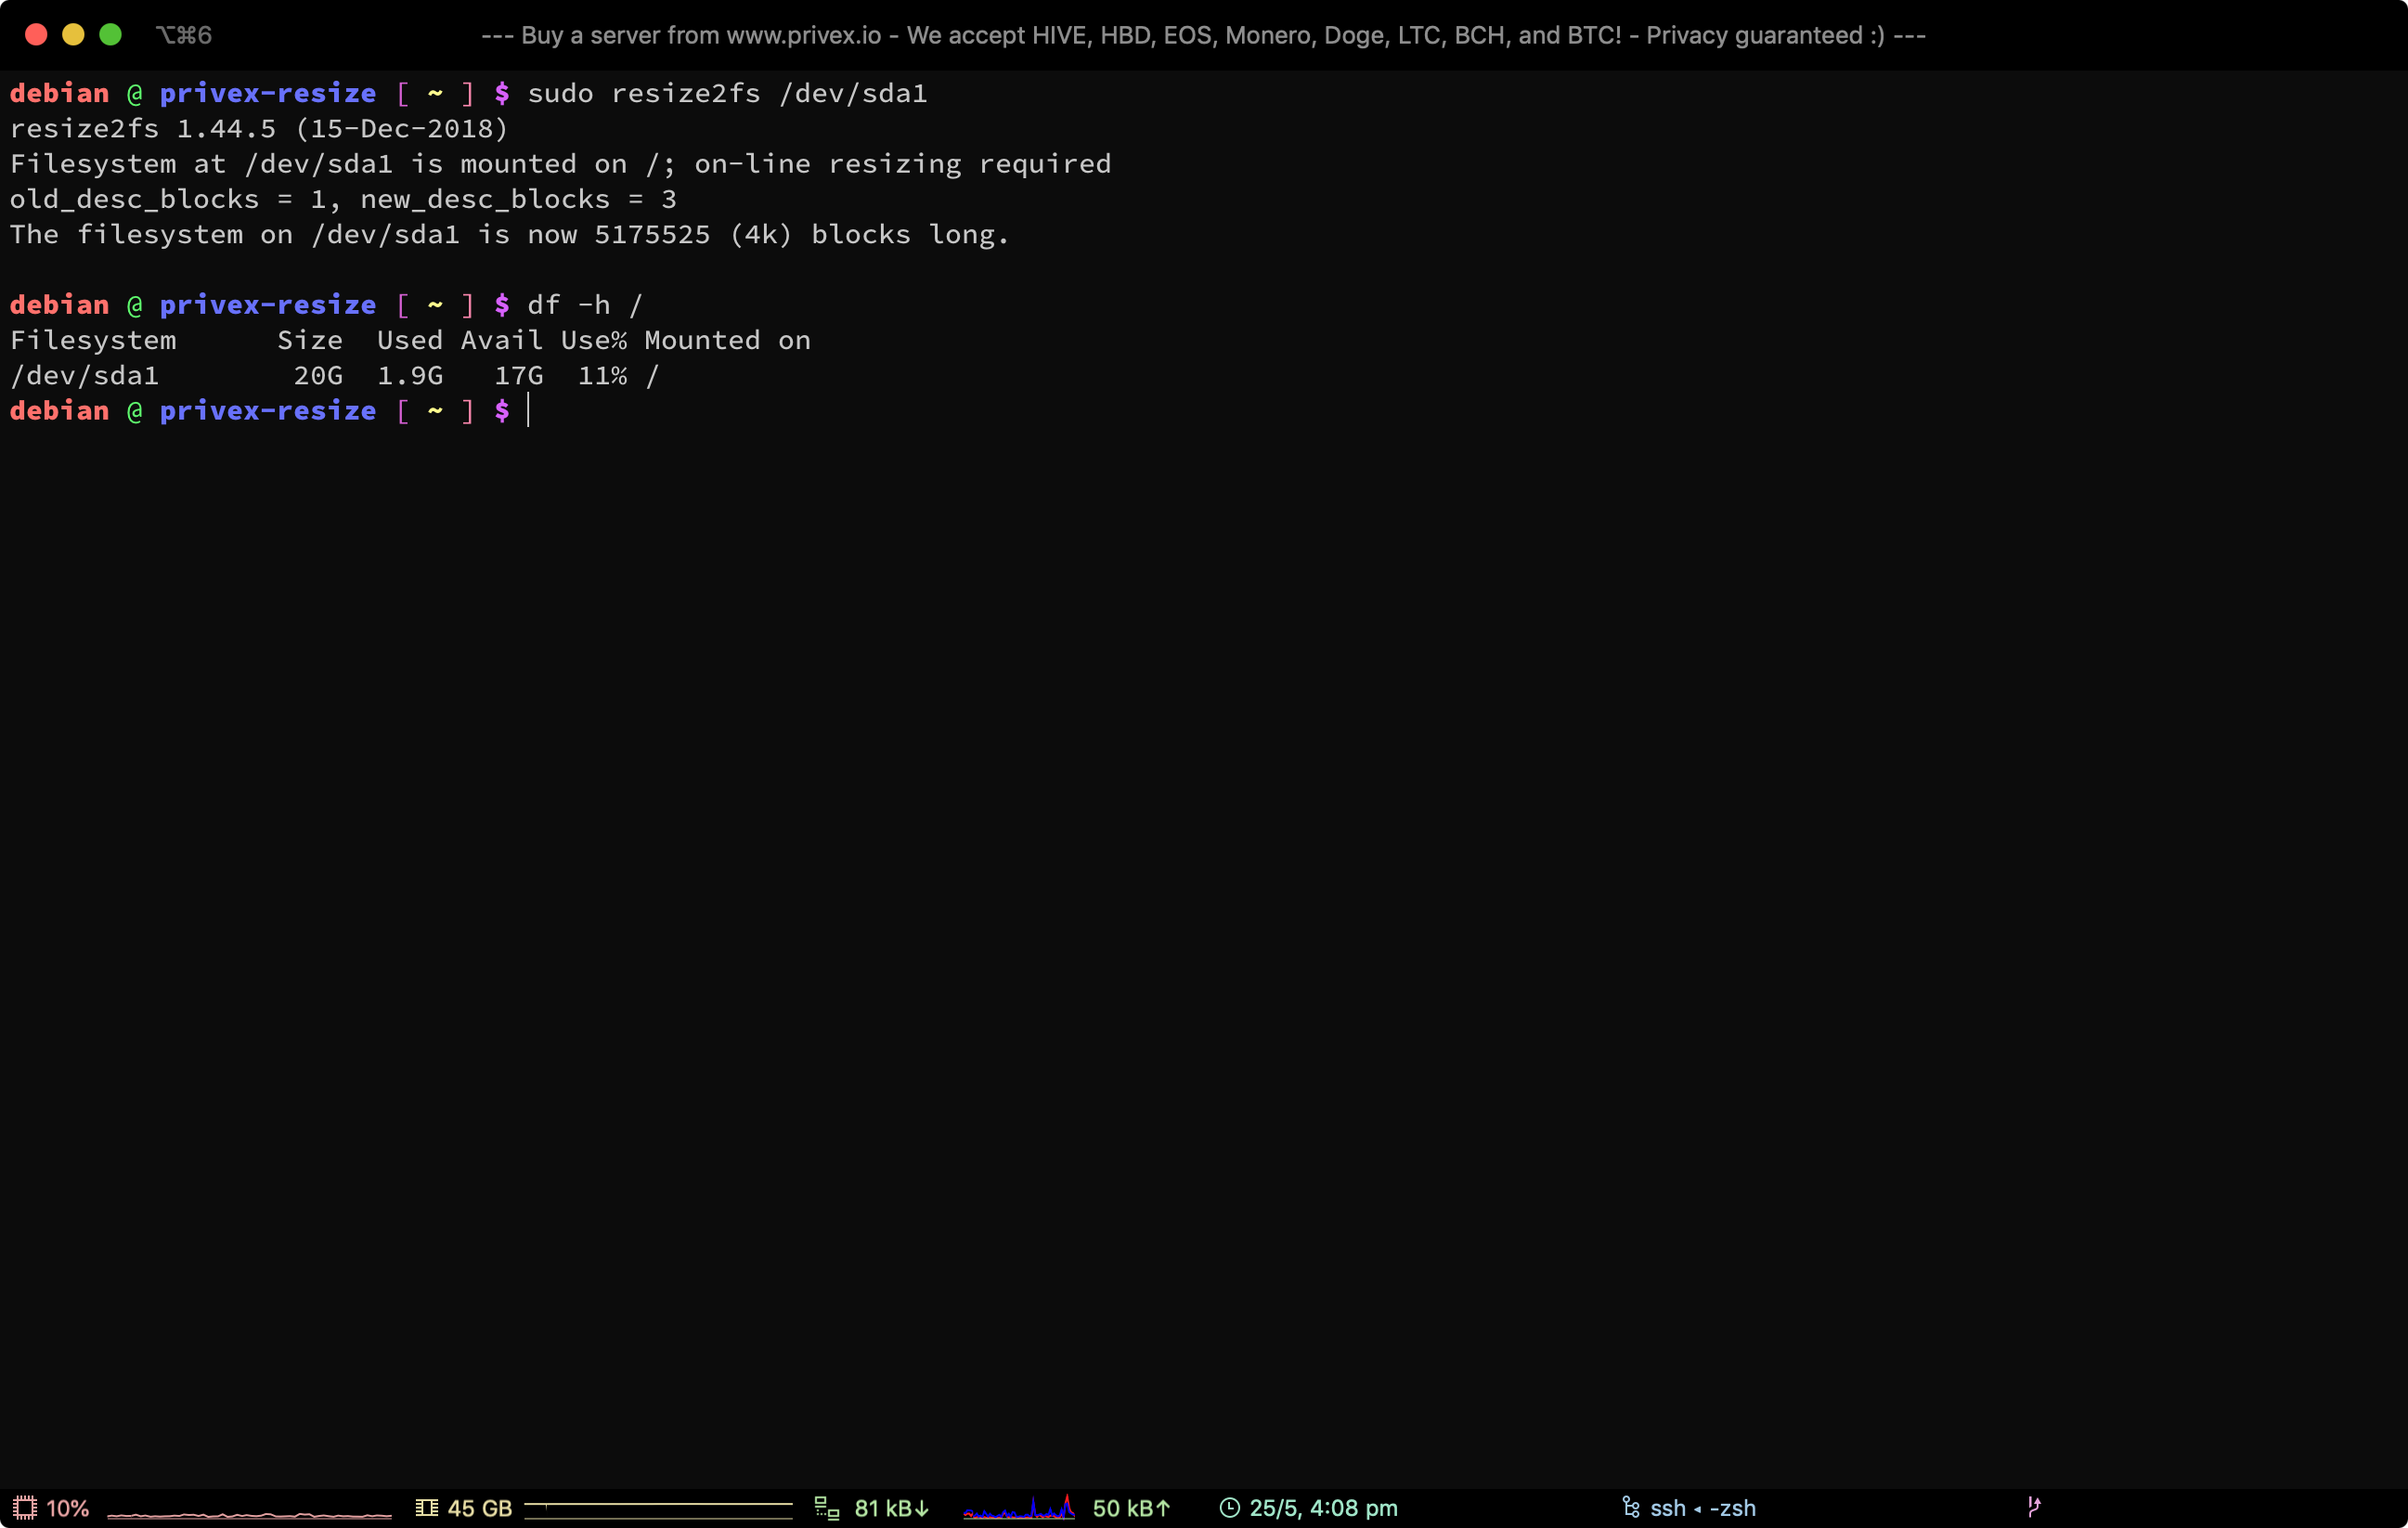
To grow an ext2 , ext3 or ext4 filesystem, use the command (where /dev/sda1 is the partition device to resize):
To grow an xfs filesystem, use the command (where / is the MOUNTPOINT of the XFS formatted device):
To grow a btrfs filesystem, use the command (where / is the MOUNTPOINT of the Btrfs formatted device):
sudo btrfs filesystem resize max / Finally, check the filesystem was resized by running df -h to list the size, used space, and avail space on all mounts:
Looking to buy a Virtual or Dedicated server? Do you like privacy and low prices? Try Privex!
We have virtual servers starting from just US$0.99/mo, and dedicated servers starting from as low as US$50/mo
Unlike other hosts, we don’t ask for any personal details — only a name (can be an alias / username), and an e-mail address so we can send you your server details and renewal invoices.
We also accept several different cryptocurrencies with our own in-house payment processor — no third parties involved in processing your payments.
At the time of writing, we currently accept: Bitcoin (BTC), Litecoin (LTC), Monero (XMR), Dogecoin (DOGE), HIVE, and HBD
Аникин

Изменение размера раздела в linux без потери данных.
Условие: диск размечен так
Number Start End Size File system Name Flags 1 1049kB 2097kB 1049kB bios_grub 2 2097kB 514MB 512MB ext2 boot 3 514MB 8706MB 8193MB linux-swap(v1) 4 8706MB 2000GB 1992GB ext4Раздел 4 это корень установленной на сервере ОС, требуется уменьшить этот раздел до 1000GB не поломав установленуую ОС и данные на разделе.
Для решения этой проблемы нам поможет утилита resize2fs, но для начала нам требуется чтобы модифицируемый раздел был отмонтирован. Поэтому загружаем сервер в recovery/rescue, т. е. с LiveCD.
В LiveCD выполняем
root@server:~# resize2fs /dev/sda4 1000G resize2fs 1.42 (29-Nov-2011) Please run 'e2fsck -f /dev/sda4' first.В первый раз у меня программа ругнулась, что сначала нужно сделать e2fsck, делаем
root@server:~# e2fsck -f /dev/sda4 e2fsck 1.42 (29-Nov-2011) /dev/sda4: recovering journal Pass 1: Checking inodes, blocks, and sizes Pass 2: Checking directory structure Pass 3: Checking directory connectivity Pass 4: Checking reference counts Pass 5: Checking group summary information Free blocks count wrong (478307399, counted=478307291). Fix? yes Free inodes count wrong (121507397, counted=121507389). Fix? yes /dev/sda4: ***** FILE SYSTEM WAS MODIFIED ***** /dev/sda4: 61891/121569280 files (0.1% non-contiguous), 7945765/486253056 blocksТеперь повторно запускаем resize2fs
root@server:~# resize2fs /dev/sda4 1000G resize2fs 1.42 (29-Nov-2011) Resizing the filesystem on /dev/sda4 to 262144000 (4k) blocks. The filesystem on /dev/sda4 is now 262144000 blocks long.На этот раз все выполнилось успешно и раздел уменьшился. Грузимся в нормальный режим, проверяем что все работает. А освобожденное на диске место размечаем по своему усмотрению.