- How to reduce size of swap after a system is already installed?
- 4 Answers 4
- Change Swap Size in Ubuntu
- Finding out available swap file(s)
- Deleting the swap file
- About the author
- Sidratul Muntaha
- Создание, редактирование и удаление SWAP в Linux
- Общая информация
- Создание SWAP файла
- Удаление SWAP файла
- Редактирование размера SWAP файла
- Linux abc
- Lvm, swap изменить размер файла подкачки
How to reduce size of swap after a system is already installed?
I’m running Debian Squeeze 6.0.5. Does the use of swap memory make my computer run slower? If so, how can I reduce the size of the swap memory after the system is already installed?
4 Answers 4
One doesn’t always want to reduce it, but often to increase its lazy usage instead — the more clean pages are already in swap, the better, it means they can easily be set off RAM when free RAM is needed. Linux VM, though, has some weird behavior regarding swapping — intensive disk I/O (like huge file cp ) can make your system swap unwanted heavily. It can be mitigated to some degree by decreasing vm.swappinness and increasing vfs_cache_pressure although the effect of such countermeasures isn’t always meeting expectations. I think it also makes sense to mention zswap here — for some workloads it can be useful.
@palik sysctl-explorer is a nice idea, but it uses outdated reference material; the kernel docs are more accurate.
To turn off swap temporarily, use (as root) the command:
To turn it off permanently, edit the file /etc/fstab and comment out any lines with swap in the type column.
More swap does not always improve performance. There are times when reducing it or turning it off is better — it all depends on the mix of applications.
I did a quick google and came up with this good article on the subject:
swap serves basically two purposes. It allows the system to continue to operate when physical memory runs out at a performance cost — run out of physical memory without it, you get crashes, lockups, and processes being killed with out of memory errors the second they ask for more memory than the system has. The reduced performance in this case is a symptom of being forced to use it for active processes, rather than a symptom of having too much swap.
It also lets physical memory be used more efficiently, by moving less-used pages in memory to disk until they are needed again. This frees up memory for cacheing purposes, which is usually a more efficient use of space than having infrequently used segments of program memory just sitting there locked in physical ram.
A long-standing best practice has been to size swap space at twice the physical memory, in other words, if you have 1GB of ram, devote 2GB to swap. This is still good advice, but in practice more modern systems with 4GB or more of physical ram can usually drop this to the same amount of swap as the system has of physical memory.
There are a few things you can do to improve performance when using swap. If you have multiple drives, moving swap to a faster or less used hard drive is recommended, and on a very IO-bound system, you may get significant performance increases by doing this. For traditional hard drives, moving swap closer to the center of the physical disk may help, as seek times are generally shorter at the center due to less travel of the drive heads.
Having swap on an SSD can help significantly as well, but I’d caution you that this may create a lot of wear and tear on a SSD, and will give it a shorter lifespan.
Of course, the best solution to improving memory performance is usually to throw more RAM into the box, and if you look at your memory usage and see heavy usage of swap along with little or no free memory, it’s a good indication that it’s time to invest in more ram.
Change Swap Size in Ubuntu
![]()
In the case of Linux, the swap file is an important part. It’s not a must-have option but having one is crucial for a number of purposes. Generally, when installing the system, you have to declare the size of the swap file. The recommended size is 4GB but you can either decrease or increase it depending on your demand. Today, let’s have a look at changing the swap size in Ubuntu.
Note – Running all these commands require root privilege, so I recommend running a “root” terminal.

Finding out available swap file(s)
Before we get to change the swap, let’s find out how much swap size we have.

According to the result, the system has a swap file at “/swapfile”.
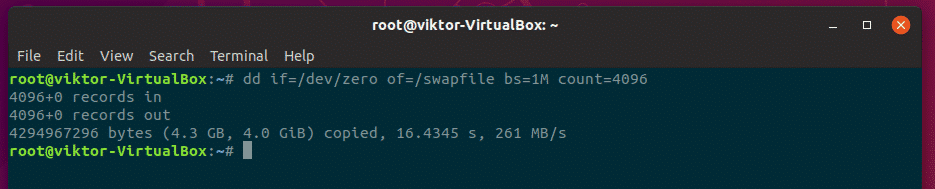
For manipulating the swap file, we have to disable it first.
Now, change the size of the swap file –
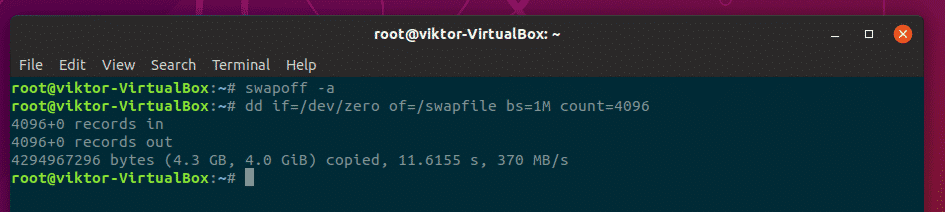
Here, the total size of the swap file will be bs*count = 1M x 4096 = 4GB
Make the “/swapfile” usable again –


After restarting your system, check out the result –

Deleting the swap file
If your RAM space is high enough, then you probably want to get rid of the swap file. If that’s your case, then let’s get rid of the swap file!
Don’t worry! I’ll also show you how to set a completely fresh swap file.
For deleting the swap file, run the following commands –

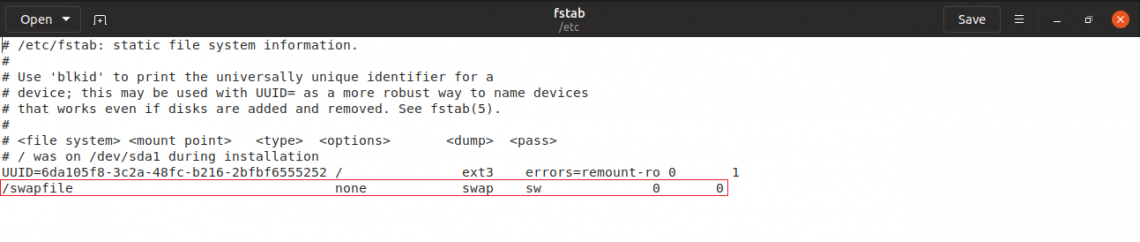
Remove the swap file entry from “/etc/fstab” file. It should be the last line of the file.

Now, time to remove the actual swap file.

Don’t forget to restart your system!
For getting back the swap file, use the following commands –
# Adding permission where only root user can read the swap file

# Setup the file for swap space


Edit the “/etc/fstab” file and add the following line at the end of the file –


Voila! Your swap file is back!
What if you had a swap partition? You have to perform actions on the partition itself. That’s more troublesome than just simply managing your swap files directly using the methods above, right?
I recommend deleting the “swap” partition and use the above method to create a new swap file.
About the author
Sidratul Muntaha
Student of CSE. I love Linux and playing with tech and gadgets. I use both Ubuntu and Linux Mint.
Создание, редактирование и удаление SWAP в Linux
Оперативной памяти много не бывает. Виртуальная память предназначена для рационального распределения оперативной памяти между пользовательскими и системными процессами. Проще говоря, чтобы не расходовать оперативную память на хранение статичной информации, выделяют некоторую область жесткого диска для ее размещения.
Общая информация
В системе Линукс для размещения виртуальной памяти можно выделить отдельный раздел жесткого диска или использовать обычный файл. Линукс позволяет комбинировать эти два способа. По умолчанию в Unix системах применяется SWAP раздел. Производительность отдельного SWAP раздела жесткого диска выше, чем производительность виртуальной памяти размещенной в файле. Единственным минусом SWAP раздела является сложность его редактирования.
Если Вы до эксплуатации сервера знаете какой емкости нужна SWAP область, то обязательно используйте отдельный раздел жесткого диска. Если нагрузка на SWAP область пока неизвестна, то лучше разместить виртуальную память в файле, после чего определив потребности системы, создать раздел нужного размера.
Система Linux позволяет одновременно использовать несколько SWAP разделов и SWAP файлов. Это позволяет более гибко подойти к вопросу расширения виртуальной памяти в случае нехватке размера SWAP области на сервере. Чаще всего, на работающем сервере с существующим SWAP разделом выясняется, что текущего размера виртуальной памяти уже не хватает. Целесообразнее добавить тестовый файл подкачки для определения нагрузки на SWAP область, а уже после увеличить размер раздела.
Создание, редактирование и удаление любых разделов из под загруженной в данный момент операционной системы не безопасно, поэтому создание SWAP раздела, вместо SWAP файла, делается только с использованием LiveCD. Статья на тему безопасного редактирования разделов будет написана в будущее время.
В системе Windows виртуальная память размещена только в отдельном файле – pagefile.sys (для Windows 2000 и выше) и win386.swp (для Windows 9x).
Для любой операционной системы, если используется спящий режим (Hebernation), размер виртуальной памяти следует делать не меньше объема оперативной памяти. В общих случаях наиболее эффективно использовать размер виртуальной памяти кратный 4 (1024 Мб, 2048 Мб и т.д.), так как ядро системы производит обмен страницами с памятью по 4 Кб в каждой. Размер виртуальной памяти легче посчитать от объема оперативной памяти *2, *3. Область подкачки стоит размещать на самом быстром жестком диске ближе к началу.
Хочу обратить Ваше внимани, что приведенные ниже инструкции касается только изменения размера ФАЙЛА ВИРТУАЛЬНОЙ ПАМЯТИ , а не изменение размера отдельной директории SWAP .
Ниже приведены пошаговые инструкции, которые позволят создать, изменить и удалить файл SWAP .
Создание SWAP файла
- Создаем файл необходимого размера для swap области, где /home/swap-tmp – это имя и путь файла, а count=1024K его размерв, в данном случае – 1024 Мб):
[user@localhost user]#sudo dd if=/dev/zero of=/home/swap-tmp bs=1024 count=1024K
1048576+0 записей считано
1048576+0 записей написано
скопировано 1073741824 байта (1,1 GB), 137,509 c, 7,8 MB/c
[user@localhost user]# sudo mkswap /home/swap-tmp
Устанавливается пространство для свопинга версии 1, размер = 1073737 кБ
без метки, UUID =54c60583-e61a-483a-a15c-2f1be966db85
Для просмотра результата просматриваем все объекты, которые используются для размещения виртуальной памяти:
Удаление SWAP файла
Если Вы раньше добавляли строчку в fstab, для автоматической загрузки SWAP файла при старте операционной системы, то следует ее удалить. Выводим файл /etc/fstab для редактирования на экран:
Редактирование размера SWAP файла
Действия по редактирование объема SWAP файла сводятся к удалению уже созданного файла SWAP и созданию нового файла требуемого размера. То есть нужно сначало сделать пункт 3, а после пункт 2.

Парашютист со стажем. Много читаю и слушаю подкасты. Люблю посиделки у костра, песни под гитару и приближающиеся дедлайны. Люблю путешествовать.
Linux abc
На страницах моего блога я постараюсь поделиться полезными приемами работы в различных ОС и не только.
- Получить ссылку
- Электронная почта
- Другие приложения
Lvm, swap изменить размер файла подкачки
Как вы могли убедиться из предыдущей статьи, изменять размеры логических томов под управлением LVM одно удовольствие и в этом нет ничего сложного. Изменять размер swap еще проще.
root@irt:/home/irt# swapoff /dev/irt.ds/swap_1 root@irt:/home/irt#
Напоминаю что irt.ds это имя VG.
Для того чтобы уменьшить размер воспользуемся утилитой lvreduce
root@irt:/home/irt# lvreduce -L-1G /dev/irt.ds/swap_1 WARNING: Reducing active logical volume to 1,00 GiB THIS MAY DESTROY YOUR DATA (filesystem etc.) Do you really want to reduce swap_1? [y/n]: y Reducing logical volume swap_1 to 1,00 GiB Logical volume swap_1 successfully resized root@irt:/home/irt#
Сейчас я уменьшил размер swap на 1G
Чтобы увеличить размер swap во первых надо убедиться что у вас доступная неразмеченная область.
root@irt:/home/irt# vgdisplay --- Volume group --- VG Name irt.ds System ID Format lvm2 Metadata Areas 1 Metadata Sequence No 21 VG Access read/write VG Status resizable MAX LV 0 Cur LV 6 Open LV 5 Max PV 0 Cur PV 1 Act PV 1 VG Size 232,64 GiB PE Size 4,00 MiB Total PE 59557 Alloc PE / Size 59301 / 231,64 GiB Free PE / Size 256 / 1,00 GiB VG UUID ed5U2o-Cnfa-dweY-d99r-dQtz-fgxi-mn7pDo
Free PE / Size 256 / 1,00 GiB
Если свободной области недостаточно, отрежьте ее у любого логического тома.
Как это сделать читайте в предыдущей статье Lvm изменение размера логического тома.
Увеличим swap на 512M.
oot@irt:/home/irt# lvextend -L+512M /dev/irt.ds/swap_1 Extending logical volume swap_1 to 1,50 GiB Logical volume swap_1 successfully resized root@irt:/home/irt#
root@irt:/home/irt# mkswap /dev/irt.ds/swap_1 mkswap: /dev/irt.ds/swap_1: warning: don't erase bootbits sectors on whole disk. Use -f to force. Setting up swapspace version 1, size = 1572860 KiB no label, UUID=952fb62c-419a-4b5f-934d-00cf96512b75 root@irt:/home/irt#
root@irt:/home/irt# swapon /dev/irt.ds/swap_1
- Получить ссылку
- Электронная почта
- Другие приложения