- VMware, Linux: уменьшение размера диска с логическими томами
- Shrinking VMDK Virtual Disk Size on VMWare ESXi
- How to Shrink the Partition Size in the Guest OS?
- Reduce the VMDK File Size of the VMWare Virtual Machine
- Shrinking a VMDK Using VMware vCenter Converter Standalone
- Уменьшить размер vmdk linux
- Уменьшение размера виртуального диска на ESXi
- Популярные Похожие записи:
- One Response to Как уменьшить размер виртуального диска (vmdk) виртуальной машины ESXI
VMware, Linux: уменьшение размера диска с логическими томами
Нет ничего более постоянного, чем временное. Когда я делал тестовую машинку, чтобы настроить на ней почтовый обменник, в дальнейших планах было установить чистую Linux (RHEL) на виртуалку и перенести на нее готовую конфигурацию. Однако после того, как мы с помощью VMware Converter успешно сконвертировали в виртуалку машину с сайтом (по сути, потом пришлось только восстановить загрузчик), мы решили продолжить эту практику и поступили так же с почтовым обменником.
Проблема была в том, что в свое время меня не волновало, какого размера будет дисковый раздел на тестовой машине, и он занимал предложенные по умолчанию 80 Гб. Разумеется, столько же получилось и на виртуальном диске. Перед запуском в промышленную эксплуатацию надо было его уменьшить.
С уменьшением обычно бывает сложнее, чем с увеличением. Итак, мы имеем большой диск (файл .vmdk), на котором находится группа LVM-разделов VolGroup00 . Том, который нужно уменьшить — LogVol00 . Для него 20 Гб кажется разумным размером. Прежде всего добавляем виртуальной машине второй диск (я сделал 22 Гб с учетом места под swap с запасом). Исходный диск мы позднее отключим и удалим, а сейчас неплохо было бы сделать его резервную копию на случай, если что-то пойдет не так.
Дальше нужно с чего-нибудь загрузиться — например, с установочного диска Linux (при загрузке набрать linux rescue ). При этом следует отказаться от монтирования файловой системы.
Получив командную строку, смотрим, что у нас есть:
Активируем группу томов; без этого ничего не сделать с файловой системой:
lvm vgchange —available y VolGroup00
Проверяем, что получилось (искомое состояние — ACTIVE):
Проверяем раздел на наличие ошибок и исправляем их, если таковые имеются:
e2fsck -f /dev/VolGroup00/LogVol00
Изменяем размер файловой системы:
resize2fs /dev/VolGroup00/LogVol00 20G
e2fsck -f /dev/VolGroup00/LogVol00
Теперь можно уменьшить размер тома:
lvm lvreduce -L 20G /dev/VolGroup00/LogVol00
Не забываем, что у нас есть еще LogVol01 , где находится swap, а расположен он в конце диска. Поэтому придется его удалить и снова создать. Посмотрим, какой у него размер:
Допустим, у нас 512 Мб. Тогда делаем так:
lvm lvremove /dev/VolGroup00/LogVol01
lvm lvcreate —size 512M —name LogVol01 VolGroup00
mkswap /dev/VolGroup00/LogVol01
Далее уменьшаем физический том:
lvm pvresize /dev/sda2 —setphysicalvolumesize 22G
И немного поработаем с fdisk. Предположим, наши разделы находятся на /dev/hda .
Вводим команду p:
Disk /dev/hda: 23.6 GB, 23622320128 bytes
255 heads, 63 sectors/track, 2871 cylinders
Units = cylinders of 16065 * 512 = 8225280 bytes
Device Boot Start End Blocks Id System
/dev/hda1 * 1 13 104391 83 Linux
/dev/hda2 14 2871 22956885 8e Linux LVM
Мы видим, что на диске 2871 цилиндр, но в последней строчке вместо 2871 будет другое, большее число. Чтобы исправить это, удалим раздел 2 и создадим его снова: вводим команду d, затем 2. Создаем новый: n, p — основной, 2 — номер, дальше можно два раза нажать Enter, чтобы принять значения по умолчанию: 14 — начало, 2871 (максимальный номер цилиндра, у вас может быть другое число). Устанавливаем тип раздела LVM: t, 2, 8e. Еще раз посмотрим командой p, все ли в порядке. Если да, записываем изменения — w и выходим — q.
Теперь нужно перезагрузиться. Не помешает еще раз проверить том:
lvm vgchange —available y VolGroup00
e2fsck -f /dev/VolGroup00/LogVol00
Осталось все скопировать со старого диска на новый. Если новый диск — /dev/hdc , команда будет выглядеть так:
Это длительная операция, прогресс здесь не отображается и нужно потерпеть. Ошибка в конце, связанная с нехваткой места — нормальное явление.
После выключения машины можно удалить в клиенте VMware старый диск, оставив на его месте новый.
Shrinking VMDK Virtual Disk Size on VMWare ESXi
In this article we will show how to reduce the size of a virtual disk (vmdk) file of the virtual machine running on VMWare ESXi. Unlike expanding a disk of a VMWare virtual machine you can do on-the-fly without shutting the virtual machine down, it is more complicated to reduce the size of a vmdk file on the VMWare ESXi hypervisor, and you cannot do it via the vSphere Web Client graphical interface. The vSphere Client doesn’t allow you to specify a smaller virtual disk size.
Important. This guide is not an officially supported solution on how to reduce the size of vmdk disks in VMWare. However, I used this method dozens of times. VMWare ESXi 6.7 is used in this article.
Prior to reducing the size of a virtual disk, do the following on your VMWare ESXi host:
- Delete all snapshots of the virtual machine (otherwise, you may damage the virtual disk);
- Create a full backup of the virtual machine, or create a copy of the vmdk and flat files you want to shrink. Use these commands:
cp vmname.vmdk backup_vmname.vmdk
cp vmname-flat.vmdk backup_vmname-flat.vmdk
The procedure of reducing a virtual disk size consists of two steps:
- Shrink the partition inside the guest OS;
- Reduce the size of the VMDK file of the VMWare virtual machine on the VMFS (NFS) datastore.
How to Shrink the Partition Size in the Guest OS?
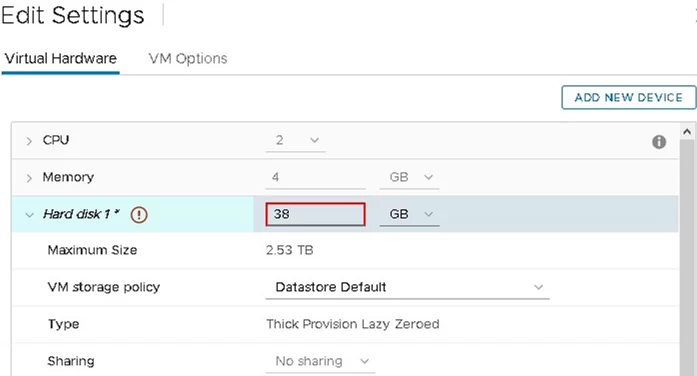
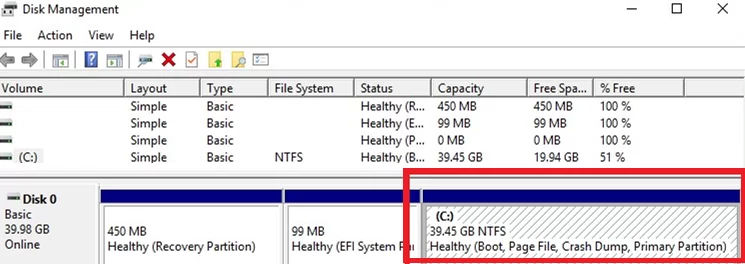
First of all, reduce the size of the disk partition in the guest operating system. If your virtual machine is running Windows OS, use the Disk Manager diskmgmt.msc (the Shrink Volume operation is available in all supported Windows versions; sdelete tool is used in older Windows versions to reduce the partition size) or third-party tools (like Acronis Disk Director). If you don’t do it, after then your file system may crash after shrinking the virtual disk size.
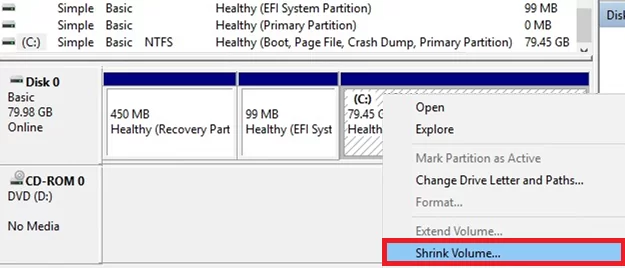
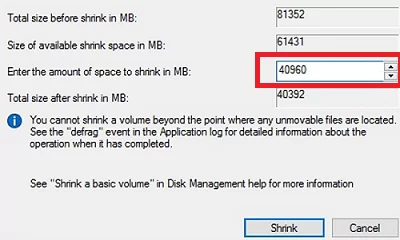
Suppose, you want to reduce the disk size by 40 GB. So the volume size must be reduced by 40960 MB ( 40 GB x 1024 ). Enter this value in the corresponding field of the Shrink Volume wizard. After reducing the partition size, there will be some unallocated space (40 GB in our example) to the right of your partition.
Note that the OEM or Windows Recovery partition may sometimes prevent extending or reducing the disk.

In Linux, you can reduce the partition size using parted. If LVM logical volumes are used, the scenario is different.
Reduce the VMDK File Size of the VMWare Virtual Machine
Then reduce the size of the VMDK file on the VMWare VMFS file system.
- Shut down the virtual machine you want to reduce disk size;
- Using SSH, connect to the console of the ESXi host the VM is registered on (you can use putty or the built-in Windows SSH client);
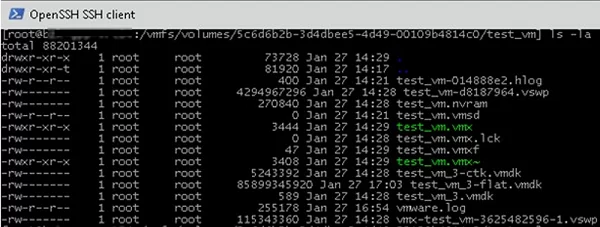
- Go the directory the VMDK file of your VM is located in (you can get a path to it in the virtual disk properties of the vSphere client):
cd /vmfs/volumes/datastore/test-VM
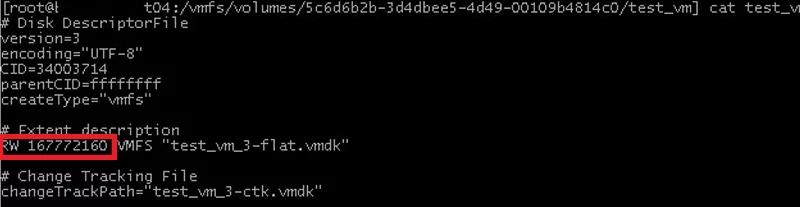
- Display the contents of the virtual disk configuration file (*.vmdk) using the cat command:
# cat test_vm_3.vmdk
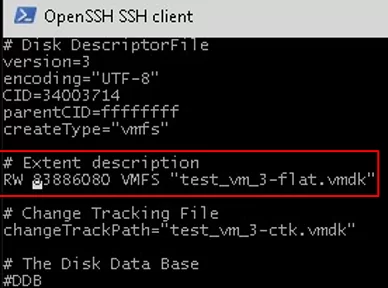
The size of the vmdk disk is shown in the #Extent description section (after the RW characters). In this case, it is 167772160 ( 80 GB *1024*1024*1024 / 512 ); - I want to reduce my VMDK disk from 80 to 40 GB. It means that I have to specify 83886080 ( 40 GB*1024*1024*1024 / 512 ) in the Extent description section. Set a new size of your virtual disk using a text editor (vi or nano);
- I am using vi: # vi test_vm_3.vmdk
- Using the down arrow key, go to the line containing the disk size and press i (to edit it). Specify the new size of the virtual disk. Press ESC to exit the edit mode and then type :wq -> Enter to save the changes;
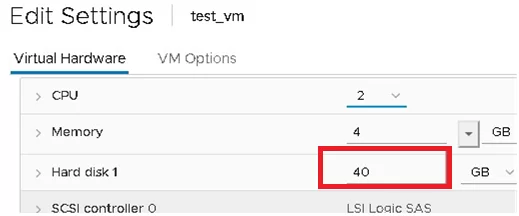
- Then just clone or migrate (using Storage vMotion) the virtual machine to another datastore. After moving the virtual machine files, the new size of its virtual disk will be displayed in its properties.

Tip. If you have only one ESXi host, one VMFS datastore, you won’t be able to use the Storage vMotion. Then you can clone vmdk using this command: vmkfstools -i test_vm_3.vmdk test_vm_3_newsize.vmdk
Remove the source VMDK disk, clone the reaming VMDK disk again and rename it by specifying its original name:
rm test_vm_3.vmdk
rm test_vm_3-flat.vmdk
vmkfstools -i test_vm_3_newsize.vmdk test_vm_3.vmdk
Tip. If you have used vmkfstools in the previous step, reconnect the virtual disk in the VM settings, since its new size may not be displayed correctly.
- Reducing the virtual disk size by converting a virtual machine using VMware vCenter Converter. Specify a disk size smaller than the source one to convert it (we will show it in the next section);
- You can clone virtual disk contents using third-party software (like Acronis True Image or Symantec Ghost32). This task in performed by adding a new smaller disk to the virtual machine and cloning the contents of a larger disk to it. You can remove the larger disk then.
Shrinking a VMDK Using VMware vCenter Converter Standalone
Another way to reduce a virtual disk size of a VMWare virtual machine is to use a free GUI tool VMware vCenter Converter Standalone.
- V2V conversion is slow;
- There must be enough space on the datastore to save the new VM;
- The new virtual machine will have a new MAC address.
- You don’t need to open the vCenter or ESXi host console;
- An exact copy of a VM is created;
- The source disk cannot be damaged in case of any errors in conversion task settings.
Note. The virtual machine you want to convert (change disk size, etc.) must be shut down (using Shut down or Power Off, instead of Suspend ).
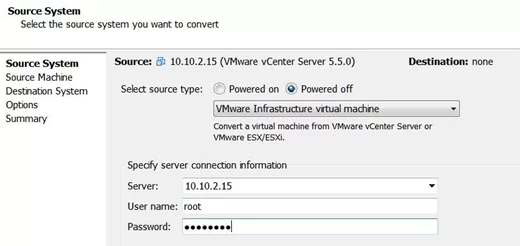
Specify the ESXi host address.
Set the parameters of your new VM.
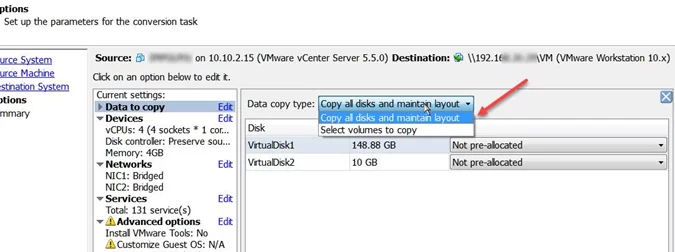
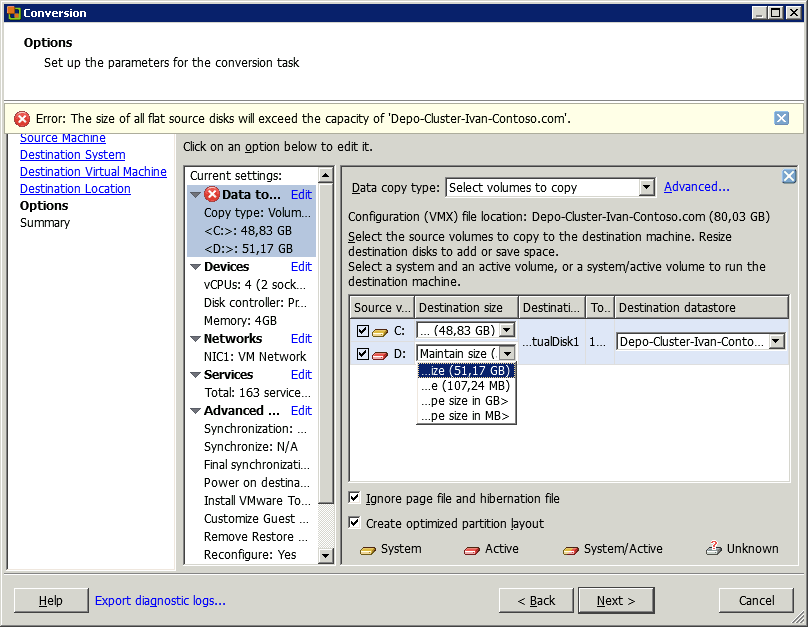
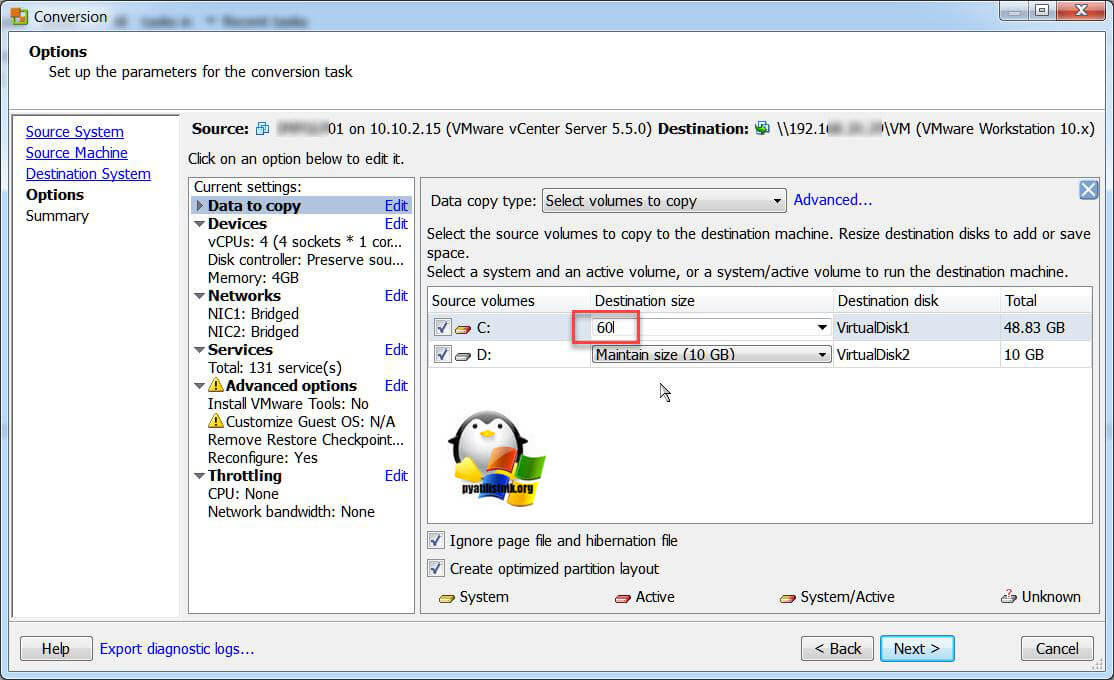
Go to the disk edit mode (Data to copy -> Edit).
Select the copy mode: Select volumes to copy.
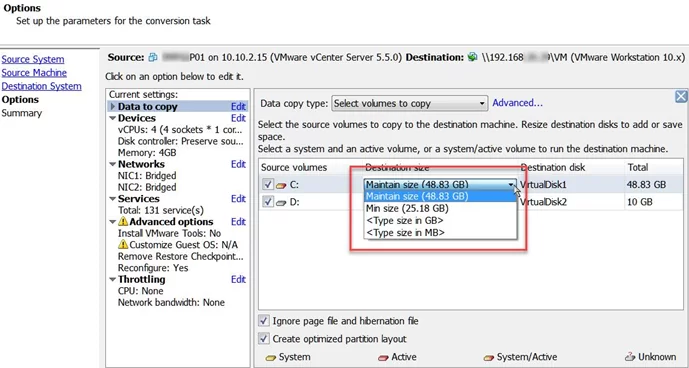
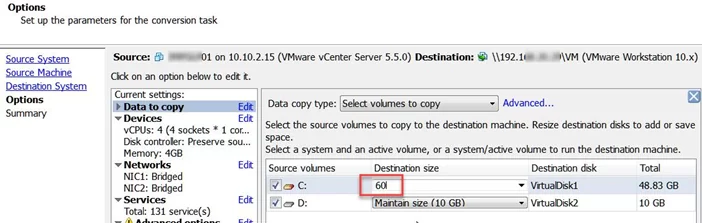
Specify the new disk size for your new VM. As you can see, 48 GB is occupied in the guest OS, and the disk size is 150 GB. We will reduce the size of the virtual disk to 60 GB.
Run the VM conversion process. Then you can power off the source VM and power on the new one. Make sure that the disk size has been reduced. After that the original VM may be removed.
Note. In the latest versions of Microsoft Hyper-V, you can use Hyper–V Online VHDX Resize tool to dynamically resize (both expanding and shrinking) virtual disks.
Уменьшить размер vmdk linux
Уменьшение размера виртуального диска на ESXi
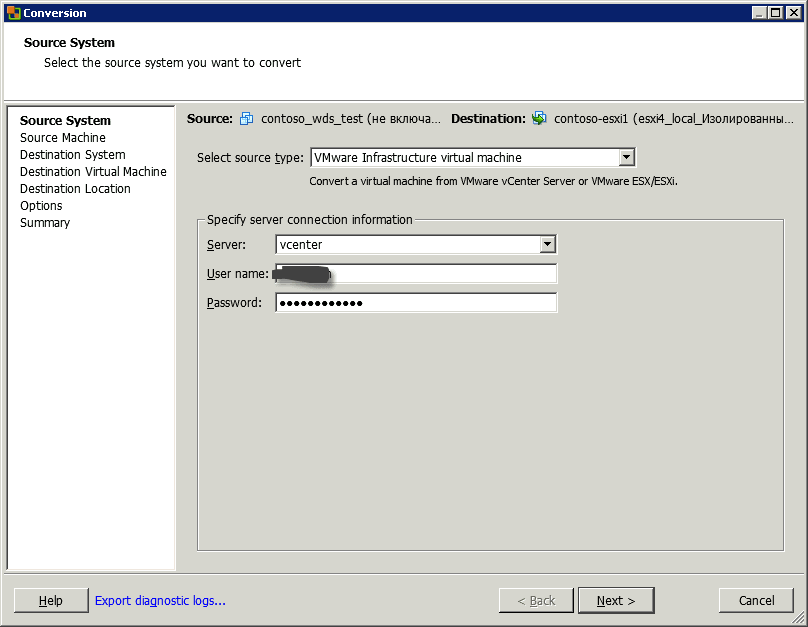
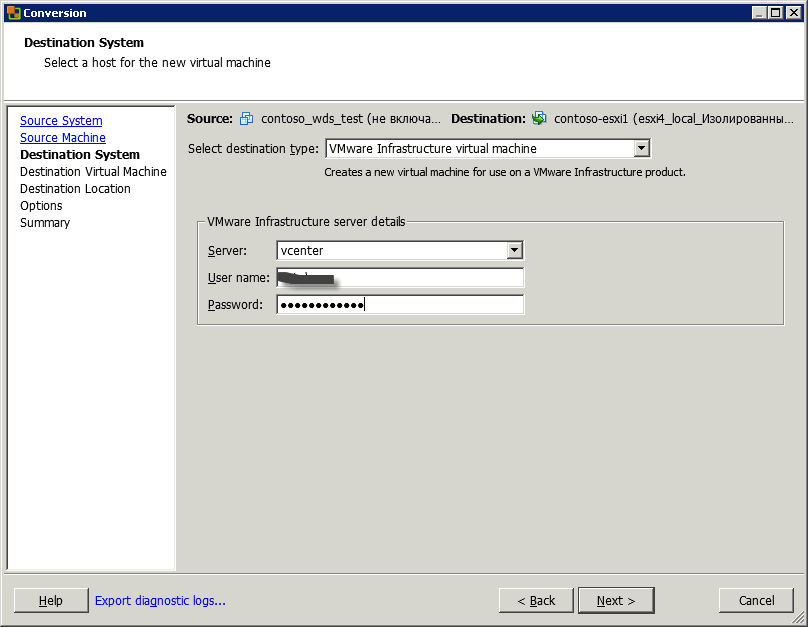
Открываем утилиту. Выбираем «VMware Infrastructure virtual machine», и вводим учетные данные для подключения к вашему хосту или vCenter серверу. Затем next.
Как уменьшить размер виртуального диска (vmdk) виртуальной машины ESXI 5.x.x-01
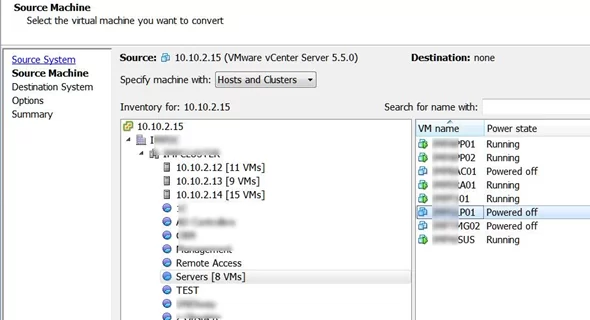
Выбираем хост и виртуальную машину для уменьшения дисков.
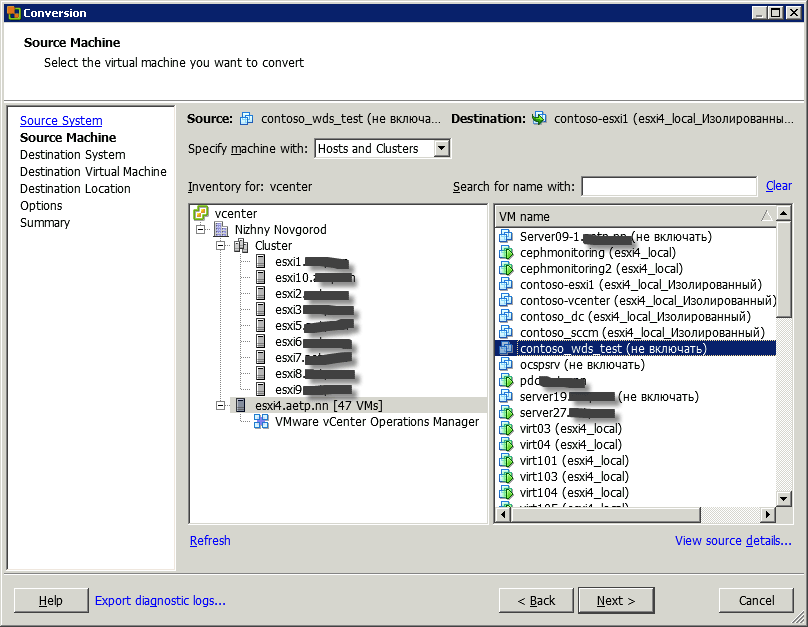
Как уменьшить размер виртуального диска (vmdk) виртуальной машины ESXI 5.x.x-02
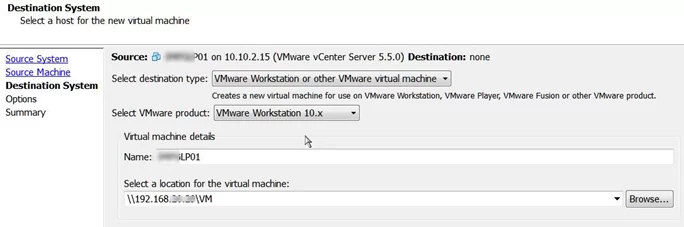
Вводим место назначения и данные дл доступа, в моем примере это тот же vcenter сервер.
Как уменьшить размер виртуального диска (vmdk) виртуальной машины ESXI 5.x.x-03
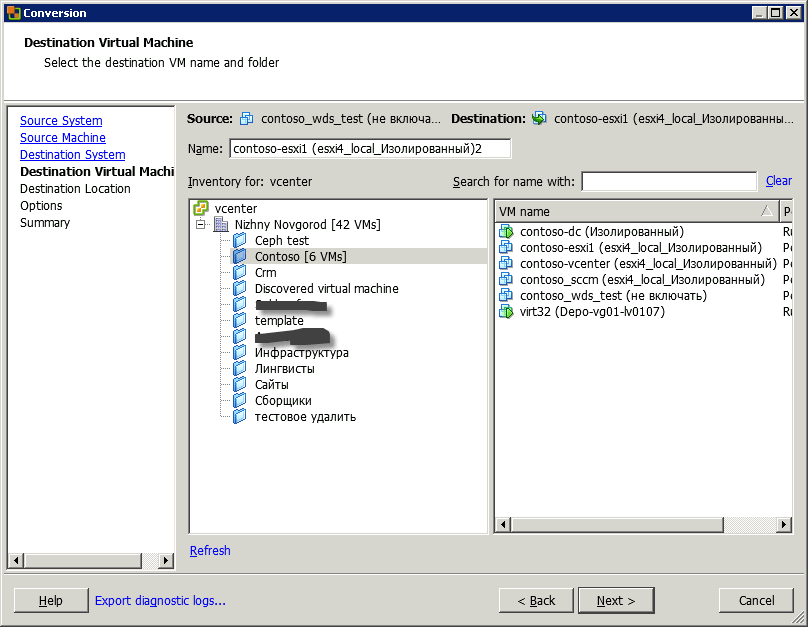
Выбираем папку установки и имя
Как уменьшить размер виртуального диска (vmdk) виртуальной машины ESXI 5.x.x-04
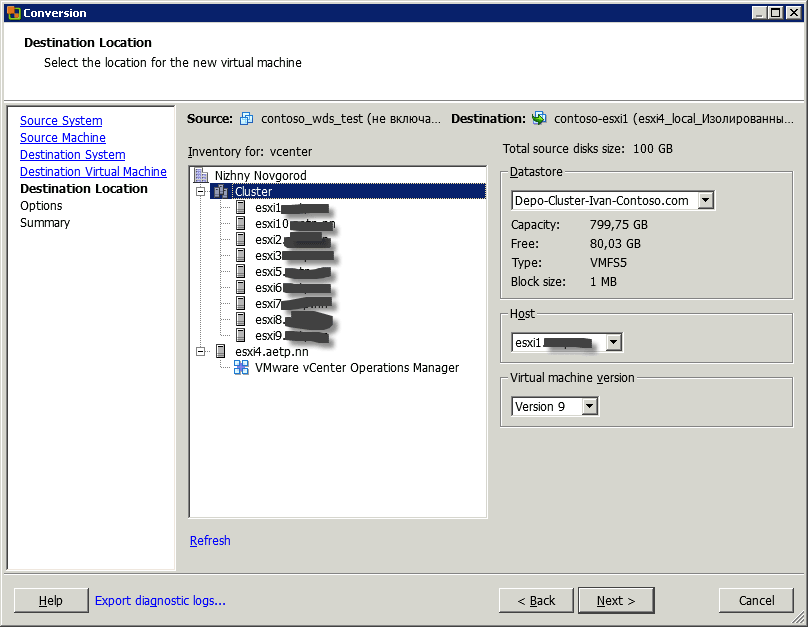
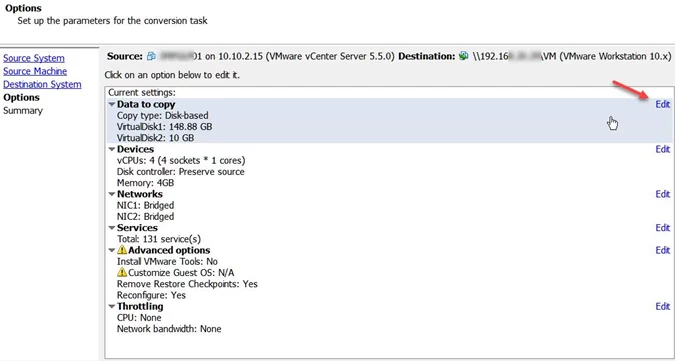
Как уменьшить размер виртуального диска (vmdk) виртуальной машины ESXI 5.x.x-05
И теперь самое интересное, уменьшение дисков. Data copy type выбираем Select volume и ниже на против жесткого диска кнопка edit, в выпадающем меню можно выбрать текущий размер или самый минимальный, выбирайте минимальный, потом после выполнения конвертации расширите до такого как вам нужно, собственно все жмем next и процесс пошел.
Как уменьшить размер виртуального диска (vmdk) виртуальной машины ESXI 5.x.x-06
Далее вы задаете нужный вам размер виртуального диска, который будет виден в вашей виртуальной машине.Это официальный метод компании Vmware, есть еще не официальный с использованием команды cp.
Популярные Похожие записи:
- Ошибка Invalid operation for device ‘0’ в ESXI 6.5
- Как мигрировать отдельный диск виртуальной машины ESXI
- Удаление застрявших VMDK из прокси Veeam
 Не активно поле migrate на виртуальной машине ESXI
- Отличия Global Hot Spare и Dedicated Hot Spare
- Как обновить версию виртуальной машины ESXI

One Response to Как уменьшить размер виртуального диска (vmdk) виртуальной машины ESXI
На пункте место назначение машины ошибка: Произошла системная ошибка исключения SSL. А при попытке подключения к вм серверу а к хосту — тоже ошибка, Подключитесь к серверу — так как он владелец операций.