- How to Resolve Phone Won’t Connect to WiFi on Android
- Part 1. Why My Phone Won’t Connect to Wi-Fi
- Part 2. How to Fix Android Phone/Tablet Won’t Connect To Wi-Fi
- Way 1. Turn Off and On WiFi on Your Phone
- Way 2. Switch Off Bluetooth
- Way 3. Check the Wi-Fi Name and Password You Connected
- Way 4. Forget the Wi-Fi Network and Reconnect
- Way 5. Restart Your Phone
- Way 6. Restart Your Router
- Way 7. Turn «Keep Wi-Fi on During Sleep» On
- Way 8. Remove the Cache and Data of Wi-Fi Direct
- Way 9. One Click to Wipe Cache Partition
- Way 10. Perform a Factory Reset
- Conclusion
- How to Fix Android Phone Not Connecting to WiFi
- Android Phone Not Connecting to WiFi
- Make Sure WiFi is Set to ON
- Toggle WiFi On/OFF
- Check IP Address
- Restart Your Android Phone
- Disable Bluetooth
- Disable Smart Network Switch
- Forget WiFi Network and Rejoin
- Disable Power Saving Mode
- Disable Location Services For WiFi Network
- Switch to Google DNS
How to Resolve Phone Won’t Connect to WiFi on Android
If your phone won’t connect to WiFi and you are having trouble accessing the Internet on your device, there are a few things you can do to get rid of this issue on your device. Not having access to the Internet causes you to lose access to your emails, online files, and many other services that you use on the Internet.
Fortunately, there are several methods to help you fix the phone not connecting to WiFi issue on your device and get connected to the Internet again. The following guide shows all the ways to get rid of Wi-Fi issues on your device.
Part 1. Why My Phone Won’t Connect to Wi-Fi
Before you jump onto the solutions, you may want to know what it is that is causing the issue on your device. There are several possible things that may be causing the issue on your device including the configuration of your network settings, your router, and even Bluetooth.
The following section has fixes for all these possible culprits, so you do not face the issue ever again on your phone.
Part 2. How to Fix Android Phone/Tablet Won’t Connect To Wi-Fi
Here are the methods you can use to resolve your phone not connecting to a WiFi network issue. All the methods are easy to follow, and you should be able to fix the issue within minutes on your device.
Way 1. Turn Off and On WiFi on Your Phone
The first thing we suggest you do is toggle the Wi-Fi option on your device. What it does is it de-activates the Wi-Fi option and then activates it again which gives your phone a second chance to establish a proper connection to your Wi-Fi router.
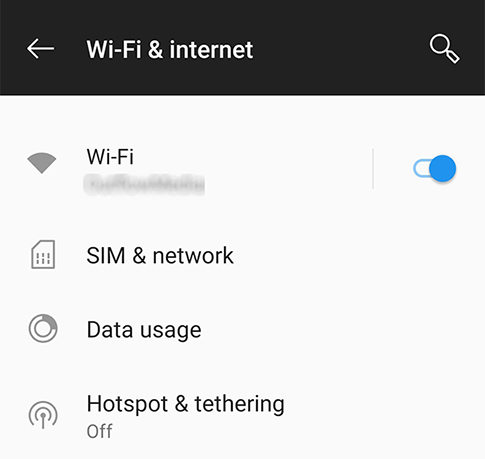
To toggle Wi-Fi, open the Settings app on your device and tap on Wi-Fi & internet. Turn the toggle to the OFF position on the following screen to disable Wi-Fi on your device. Wait for about thirty seconds and turn the toggle back to the ON position.
It should likely fix the Wi-Fi issue you are facing on your device.
Way 2. Switch Off Bluetooth
If you do not use the Bluetooth feature while using Wi-Fi on your device, you may want to turn it off as it may be interfering with the Wi-Fi signals.
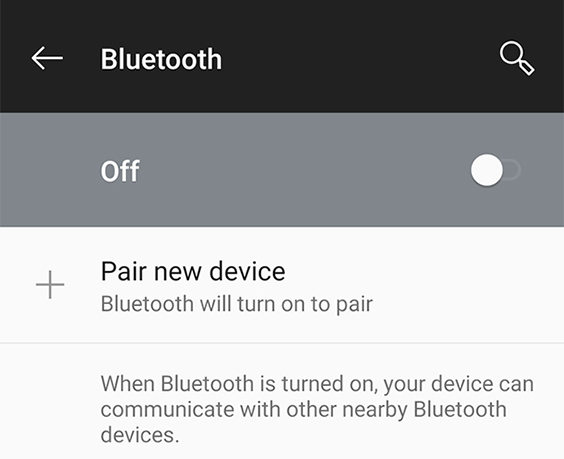
To turn Bluetooth off, head to Settings > Bluetooth & device connection > Connection preferences > Bluetooth and turn the toggle to the OFF position. It will disable Bluetooth on your device.
Way 3. Check the Wi-Fi Name and Password You Connected
You may want to verify the Wi-Fi network you are trying to connect to is the one you really want to use. You may also want to check if the password you are entering is the correct one to join the network as entering a wrong password will prevent you from accessing the network on your device.
Your network provider should be able to provide you with the correct Wi-Fi name and passwords for you to successfully join the network from your device.
Way 4. Forget the Wi-Fi Network and Reconnect
If you connected to the Wi-Fi network in the past, it may be in the saved networks list of your device. You may try removing the network from the list and then re-connect to it to see if it works.
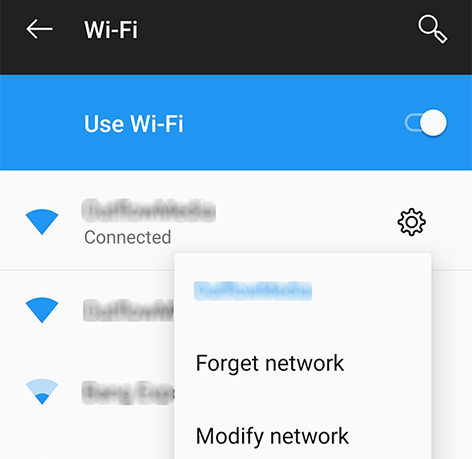
Launch the Settings app on your device and tap on Wi-Fi & internet followed by Wi-Fi. Tap and hold on the WiFi network you want to remove and select the option that says Forget network. You can then re-connect to the network by entering in the correct login details. That should also fix your phone keeps disconnecting from WiFi issue on your device.
Way 5. Restart Your Phone
If there is an issue with the temporary files or settings on your device, you may reboot your device to clear the cache stuff on the phone. Then, you may connect to your chosen Wi-Fi network to see if it works.

Press and hold down the Power button on your device and choose the Reboot option to reboot your device.
Way 6. Restart Your Router
It could also be the issue is not with your device but with your router. If that is the case, the most basic thing you can do to possibly fix the issue is reboot your router. Press the power key on your router to turn it off. Then, press the same key again to turn the router on.
Way 7. Turn «Keep Wi-Fi on During Sleep» On
Your phone will automatically disconnect from your Wi-Fi network at certain times if the Keep Wi-Fi on during sleep option is disabled on your device. If you enable the option, your phone will remain connected to the network all the time. The following is how you do it.
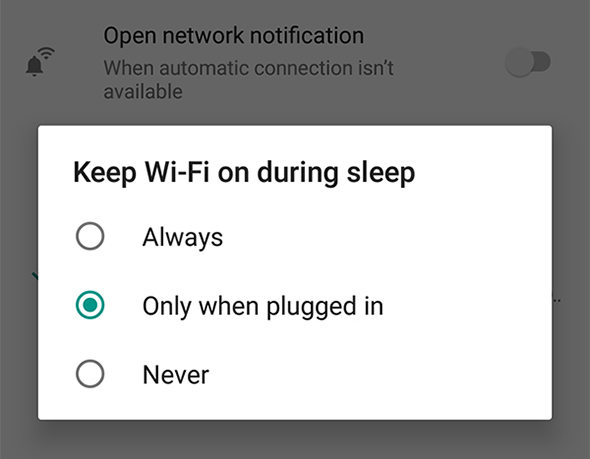
Head to Settings > Wi-Fi > Wi-Fi preferences > Advanced > Keep Wi-Fi on during sleep and choose the Always option. It should enable the option and it should likely fix your Wi-Fi connection issue on your device.
Way 8. Remove the Cache and Data of Wi-Fi Direct
If you are a Samsung user, you may try removing the Wi-Fi Direct cache and data files from your device to see if that helps resolve the issue on your device. Steps for doing the task vary with the device and you may want to have a look at Google to find out the exact steps for your device.
Way 9. One Click to Wipe Cache Partition
Removing the old data from your cache partition helps remove old and faulty configurations and lets your system create fresh files. It should fix your Wi-Fi issue as well and the following is how you do it.
Use a software like Free ReiBoot for Android to reboot your device into the Android recovery mode. The reason you want to use the software is because it lets you enter the recovery mode on any of your Android device with the click of a button.
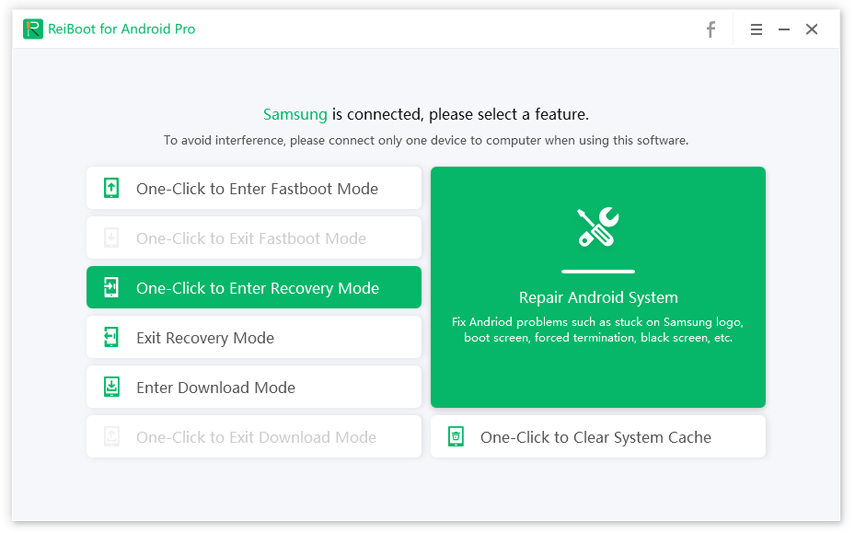
Once you are inside the recovery, choose the wipe cache partition option to get your task done.
Way 10. Perform a Factory Reset
Factory resetting your device will reset all the settings and configurations to the factory defaults on your device. If you would like to do it to fix your issue, here’s how you do it.
Open the Settings app on your device and tap on System followed by Reset options. Tap on Erase all data (factory reset) on the following screen to reset your device.
Conclusion
If you are wondering «why wont my phone connect to WiFi», the above guide answers your question by listing out the possible culprits and shows you how you can fix the Wi-Fi issues on your device with multiple methods.
Updated on 2019-07-25 / Update for Fix Android
How to Fix Android Phone Not Connecting to WiFi
In case your Android Phone is Not Connecting to WiFi, you will find below a number of methods to troubleshoot and fix the most common WiFi connectivity problems on Android Phones and Tablets.

Android Phone Not Connecting to WiFi
There could be a number of reasons for Android Phone Not Connecting to WiFi Network and this common problem has been reported by a number of users on internet forums.
You will find below some of the methods that other users have found useful in fixing the problem of Android Phone Not Connecting to WiFi Network.
Before trying out any of the methods as listed below, make sure that your Modem/Router is working properly and there is no problem with internet connectivity in your area or with your Internet Service Provider.
Make Sure WiFi is Set to ON
It is quite possible that you may have accidentally disabled the WiFi option on your Android Phone. Hence, follow the steps below to take a look and Enable WiFi on your Android Phone (in case it was disabled).
1. From the Home Screen of your Android Phone, tap on Settings .
2. On the Settings screen, tap on WiFi .
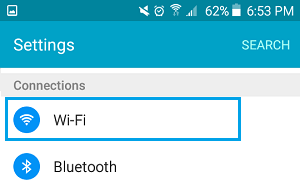
3. On the WiFi screen, make sure that WiFi is set to ON position and your WiFi Network shows as being connected (See image below).
Toggle WiFi On/OFF
The simple act of Switching WiFi Network ON/OFF is known to fix the problem of Android Phone Not Connecting to WiFi Network.
1. Tap on Settings > WiFi
2. On the WiFi Screen, toggle OFF WiFi and Switch it back to ON position again.
Check IP Address
Sometimes it is noticed that Android Phones and Tablets are unable to connect to the Router/Modem IP address. You can check if this is the case on your Android Phone or Tablet by following the steps below.
1. Tap on Settings > WiFi
2. On the WiFi screen, tap on the More (3 dots icon) to open a drop-down menu.
3. From the drop-down menu, tap on the Advanced option.

4. On the Advanced screen, scroll down and take a look at IP Address section. In case there is no IP Address listed and it says Unavailable , it confirms that your Android Phone is unable to obtain Routers IP Address for some reason.
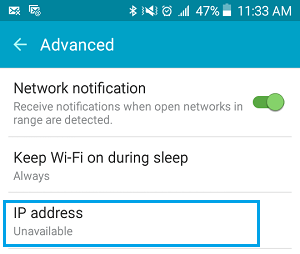
The solution for this problem is really simple. Just power OFF your Modem/Router and then Power it ON after 60 seconds. After this take a look at IP Address section on the WiFi Advanced Settings screen.
You should be able to see IP Addresses listed and your Android Phone should now be connecting to WiFi network without any problem.
Restart Your Android Phone
Sometimes, the problem of Android Phone Not Connecting to WiFi Network might be related to minor software glitches on your Android Phone. The simple act of restarting Android Phone has the potential to fix such minor software glitches on your Android Phone.
1. Press and hold the Power Button on your Android Phone for a few seconds, until your Android Phone gets turned OFF.
2. Wait for about 2 minutes and Restart your Android Phone
3. Check to see if your Android Phone is now able to connect to WiFi Network.
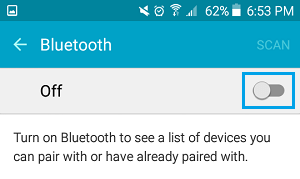
Disable Bluetooth
Sometimes the Bluetooth option on your Android Phone can interfere with WiFi connectivity. Follow the steps below to Turn OFF Bluetooth on your Android Phone and see if this helps in fixing the problem of Android Phone Not Connecting to WiFi.
1. Tap on Settings > Bluetooth.
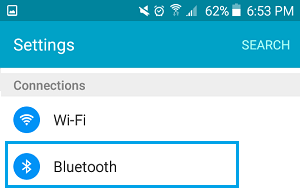
2. On the next screen, disable the option for Bluetooth (See image below)
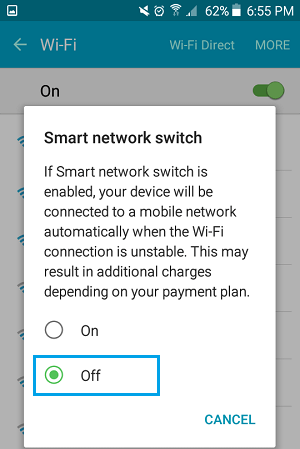
Disable Smart Network Switch
Samsung Galaxy phones and other Android Phones come with the Smart Network Switch feature. This feature is designed to automatically connect your Android Phone to Cellular Network, whenever your phone detects that it is encountering a weak WiFi Network.
However, keeping this option enabled is known to result in dropped WiFi connections. Hence, follow the steps below to disable the option for Smart Network Switch on your Android Phone.
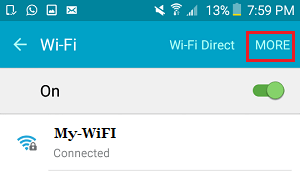
1. Tap on Settings > WiFi .
2. On the WiFi screen, tap on More (3 dots Menu icon) to launch a drop-down menu
3. From the menu that appears, tap on Smart Network Switch option.
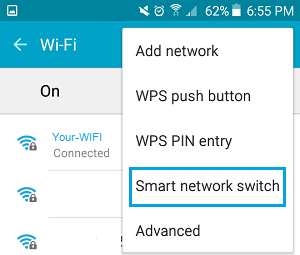
4. On the next screen, make sure that Smart Network Switch is set to OFF position.
Forget WiFi Network and Rejoin
Follow the steps below to make your Android Phone forget the WiFi Network and then connect back to your WiFi Network again.
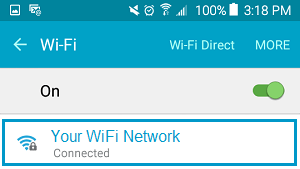
1. Tap on Settings > WiFi
2. On the WiFi screen, Tap and Hold on the WiFi Network that you are currently connected to (See image below).
3. On the pop-up, tap on the Forget Network Option.
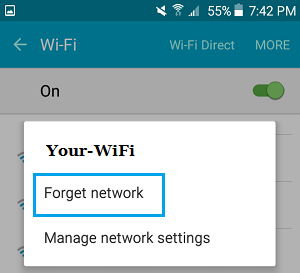
After forgetting WiFi Network, rejoin your WiFi Network by following the steps below.
1. Tap on your WiFi Network Name.
2. On the pop-up, Enter your WiFi Network Password and then tap on Connect to Join your WiFi Network.
Disable Power Saving Mode
As you must be aware, the Power Saving Mode on your Android Phone is designed to make the battery on your phone last longer by disabling power consuming features on your Android Phone.
However, Power saving mode can also end up disabling WiFi on your Android Phone in order to conserve power. Hence, in case you want to connect to WiFi, you will need to disable power saving mode on your Android Phone.
1. Swipe down from the top of the screen on your Android Phone.
2. On the slide down menu, locate the option for Power Saving Mode and tap on it.
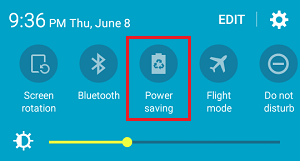
3. Make sure that Power Saving Mode is disabled on your Android Phone.
Disable Location Services For WiFi Network
Follow the steps below to disable Location Services for WiFi on your Android Phone.
1. Tap on Settings > WiFi
2. On the WiFi screen, tap on the More (Menu icon) to open a drop-down menu.
3. From the drop-down menu, tap on the Advanced option.
4. On the Advanced Screen, turn OFF the option for Always Allow scanning (See image below).
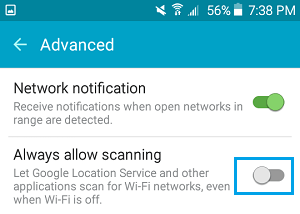
Note: This will only disable location services for WiFi networking, your WiFi functionality will not be affected.
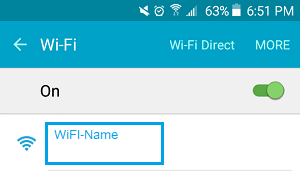
Switch to Google DNS
In case your Android Phone continues to have network connectivity issues, it is possible that the DNS server of your Internet Service Provider is busy or going through problems.
In such a case, you may want to switch the DNS Settings on your Android Phone to Google DNS by following the steps below.
1. Tap on Settings > WiFi .
2. On the WiFi screen, tap and hold on your WiFi Network Name .
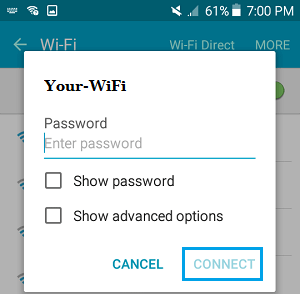
3. On the pop-up, tap on Manage Network Settings option.
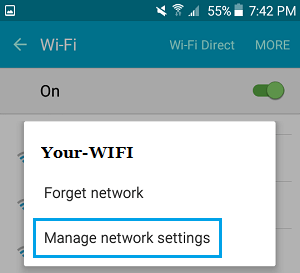
4. On the next popup, tap on Show Advanced options .

5. Once you are able to see Advanced options, scroll down the list of Advanced options to entries labeled as DNS1 and DNS2 (See image below)
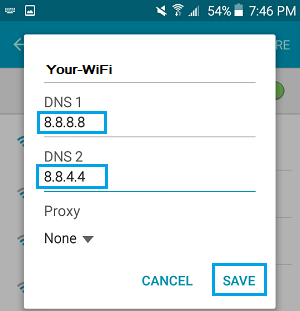
6. Change DNS1 to 8.8.8.8 and DNS2 to 8.8.4.4 and tap on Save (See image above).