- Unetbootin: How to Install Bootable USB Creator
- A Quick Introduction to Ubuntu Live Drives
- Installing Unetbootin
- Create A Bootable USB
- Final Words
- UNetbootin
- Features
- Using UNetbootin
- Supported Distributions
- Installing Other Distributions Using UNetbootin
- FAQs
- Distribution X isn’t on the list of supported distributions, will it work?
- UNetbootin isn’t able to download the distribution, what should I do?
- My USB stick isn’t booting, what should I do?
- My USB stick/hard drive isn’t detected, what should I do?
- How do I use UNetbootin from the command line?
- How does UNetbootin work, and what does it do?
- Where can I report bugs, submit patches, etc?
- Does UNetbootin have any spyware, viruses, trojans, or other malware?
- What translations are available, and how can I use them?
- Can I help translate?
- Removal Instructions (Applicable only to Hard Disk installs)
- Where’s the source code, and how can I compile or modify it?
- License
- Other open-source projects from the creators of UNetbootin
- HabitLab
- How to install and Use Unetbootin Linux Live USB Creator
- Install Unetbootin on Debian, Ubuntu, Linux Mint, Elementary OS
- How to Use Unetbootin Linux Live USB Creator
- Troubleshooting
Unetbootin: How to Install Bootable USB Creator
Unetbootin is a software program that helps users create Live USB drives. These drives are like regular flash drives, but they’re able to boot your computer into a special operating system instead of the standard one. The process of creating such a drive is called live media creation, and it involves three different types of media: CD/DVD images, ISO files, and USB devices. If you’re trying to create an Ubuntu live drive, this article will help you with that task using the LiveUSB Creator tool. It’s a third-party app that simplifies the process of creating an Ubuntu live drive without needing any command-line knowledge. This guide will show you how to install the LiveUSB Creator on Ubuntu so that you can follow along and get the same result.
A Quick Introduction to Ubuntu Live Drives
Live drives are special types of drives that allow you to boot a computer from a USB device rather than from the hard drive. They’re used in situations where you need a functioning operating system but the computer doesn’t have the OS installed. The most common example of this is when you want to repair a computer that’s been infected with malware or other viruses. You don’t want the infection to spread to your own computer, so you need to use a clean computer to access the infected computer over a network and clean up the drive.
There are two types of live drives: persistent and non-persistent. A persistent live drive keeps the data that’s on the computer even after you turn off the computer. This is helpful for fixing computers because you can leave data on the computer if you want to come back later. A non-persistent live drive deletes all the data on the computer after you turn it off. This is useful for situations where you don’t want to leave anything on the computer you’re accessing.
Installing Unetbootin
The first thing you need to do is install the LiveUSB Creator on Ubuntu. Start by opening a Terminal window and entering the following command: This package isn’t available in the default Ubuntu repositories, so you’ll need to install it from a third-party source. Enter the following command to add the LiveUSB Creator’s repository: You may be asked to enter your computer’s administrative password. After that, you should see a new prompt at the bottom of the Terminal window that says “Added”. Now that you’ve added the LiveUSB Creator’s source, you can install the app with this command:
- Add the PPA to your system:
sudo add-apt-repository ppa:gezakovacs/ppa sudo apt install unetbootin Create A Bootable USB
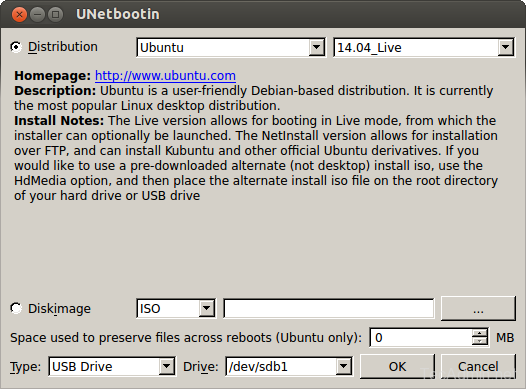
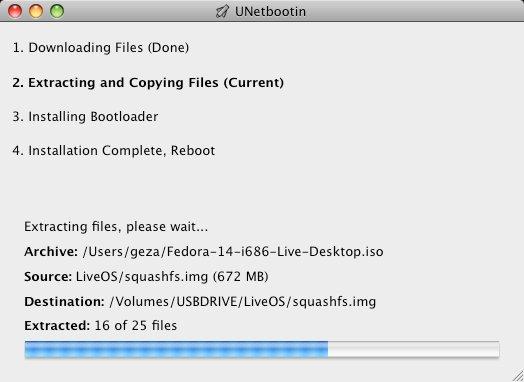
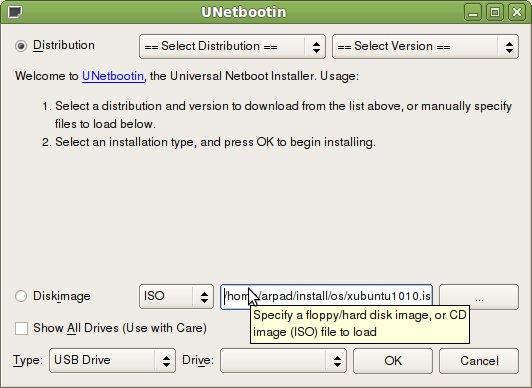
Start the Unetbootin application and attach your USB drive to your system. Now select the distribution name and version from the drop-down for which you need to create a bootable USB. Else you can select ISO from your system.
Final Words
Once you’ve created a live drive, you can use it to boot into a live version of Ubuntu on any computer. This lets you test out Ubuntu to see if you like it without touching your current setup. It’s also helpful if you have a computer that you need to get fixed but is running an operating system on which you don’t have the necessary software. In this case, you can boot into Ubuntu on your live drive and use the computer without installing anything. A LiveUSB drive is a useful tool to have around, and it’s easy to create one with the LiveUSB Creator.
UNetbootin
UNetbootin allows you to create bootable Live USB drives for Ubuntu and other Linux distributions without burning a CD.
You can either let UNetbootin download one of the many distributions supported out-of-the-box for you, or supply your own Linux .iso file.
Features
UNetbootin can create a bootable Live USB drive
It loads distributions either by downloading a ISO (CD image) files for you, or by using an ISO file you’ve already downloaded.
Using UNetbootin
Select an ISO file or a distribution to download, select a target drive (USB Drive or Hard Disk), then reboot once done. If your USB drive doesn’t show up, reformat it as FAT32.
If you used the «USB Drive» install mode: After rebooting, boot from the USB drive. On PCs, this usually involves pressing a button such as Esc or F12 immediately after you turn on your computer, while on Macs, you should hold the Option key before OSX boots.
If you used the «Hard Disk» install mode: After rebooting, select the UNetbootin entry from the Windows Boot Menu.
Supported Distributions
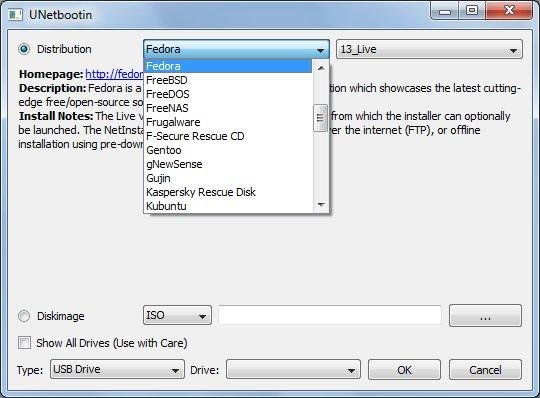
UNetbootin has built-in support for automatically downloading and loading the following distributions, though installing other distributions is also supported:
UNetbootin can also be used to load various system utilities, including:
Installing Other Distributions Using UNetbootin
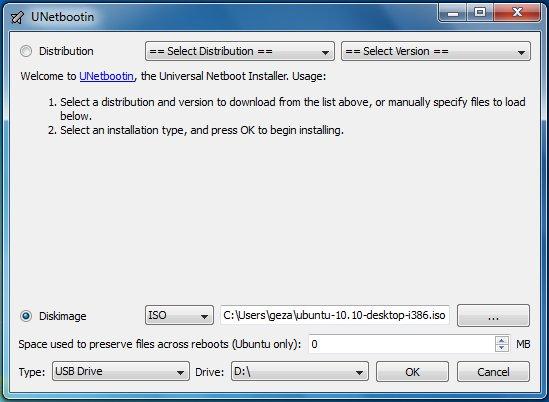
Download and run UNetbootin, then select the «disk image» option and supply it with an ISO (CD image).
UNetbootin doesn’t use distribution-specific rules for making your live USB drive, so most Linux ISO files should load correctly using this option. However, not all distributions support booting from USB, and some others require extra boot options or other modifications before they can boot from USB drives, so these ISO files will not work as-is. Also, ISO files for non-Linux operating systems have a different boot mechanism, so don’t expect them to work either.
FAQs
Distribution X isn’t on the list of supported distributions, will it work?
UNetbootin isn’t able to download the distribution, what should I do?
Download the ISO straight from the website, then provide it to UNetbootin via the diskimage option.
My USB stick isn’t booting, what should I do?
Reformat the USB drive as FAT32, then use UNetbootin again to put your distribution on the USB stick.
My USB stick/hard drive isn’t detected, what should I do?
Reformat the USB drive as FAT32, then use UNetbootin again. If it still isn’t showing up, use the targetdrive command line option.
How do I use UNetbootin from the command line?
How does UNetbootin work, and what does it do?
Where can I report bugs, submit patches, etc?
First, make sure you are using the latest version available on this website.
» See Github Issues to file a bug report.
Does UNetbootin have any spyware, viruses, trojans, or other malware?
No; though some anti-virus products may raise «Trojan.generic» warnings due to the auto-uninstall feature, these are false positives. Just make sure you obtain UNetbootin from this site, not some shady third-party source. If you’re absolutely paranoid, you can check the source code and compile it yourself.

What translations are available, and how can I use them?
A number of translations are included in the latest UNetbootin release. See the Translations Page for the status of each.
If a translation corresponding to your system’s native language has already been included into UNetbootin, it should automatically load the corresponding translation. Alternatively, you can force the language to use via the lang=es command-line option, where you substitute es with the the 2-letter ISO 639-1 code for your language.
Can I help translate?
If you’d like to help translate this website, join the project on Transifex, then edit translations either on this website or on Transifex.
If you’d like to help translate the UNetbootin program itself, please use Launchpad Translations. If you are new to Launchpad, you will first have to join the corresponding Ubuntu Translators group for the language you intend to translate. For information on using the Launchpad Translations system, see the translations help page.
Removal Instructions (Applicable only to Hard Disk installs)
If using Windows, UNetbootin should prompt you to remove it the next time you boot into Windows. Alternatively, you can remove it via Add/Remove Programs in the Control Panel.
If using Linux, re-run the UNetbootin executable (with root priveledges), and press OK when prompted to uninstall.
Removal is only required if you used the «Hard Drive» installation mode; to remove the bootloader from a USB drive, back up its contents and reformat it.
Uninstalling UNetbootin simply removes the UNetbootin entry from your boot menu; if you installed an operating system to a partition using UNetbootin, removing UNetbootin will not remove the OS.
To manually remove a Linux installation, you will have to restore the Windows bootloader using «fixmbr» from a recovery CD, and use Parted Magic to delete the Linux partition and expand the Windows partition.
Where’s the source code, and how can I compile or modify it?
Source code is on Github, though you may prefer a tarball of the latest release.
License
UNetbootin was created and written by Geza Kovacs (Github: gkovacs, Launchpad: gezakovacs, contact info).
Translators are listed on the translations page.
UNetbootin is licensed under the GNU General Public License (GPL) Version 2 or above. Site materials, documentation, screenshots, and logos are licensed as Creative Commons Attribution-Share-Alike 3.0.
Other open-source projects from the creators of UNetbootin

HabitLab
A Chrome extension to help you waste less time online (on sites like Facebook, Youtube, etc) by experimenting with different interventions (news feed blockers, comment hiders, and more) to find the ones that work best for you.
How to install and Use Unetbootin Linux Live USB Creator
Unetbootin, aka Universal Netboot Installer, is a free and open-source, lightweight program to create Linux live USB. A live USB is a USB drive that has a live OS installed and can be used to install the OS onto your hard drive. Written in C++, Unetbootin Linux live USB creator can run on Linux, OS X and Windows. The latest stable version (625) was released on May 16, 2016.
Unetbootin also supports creating FreeBSD and NetBSD live USB. In this tutorial we will look at how to install Unetbootin and use it to create Linux live USB.
Install Unetbootin on Debian, Ubuntu, Linux Mint, Elementary OS
To install it on Debian-based Linux distros, fire up a terminal window and run the following command.
sudo apt install unetbootin

The above command will install unetbootin from your distribution’s repository. However, it’s not likely to install the latest release of Unetbootin. To achieve that, you can install it from official PPA. Run these 3 commands one by one in the terminal.
sudo add-apt-repository ppa:gezakovacs/ppa sudo apt-get update sudo apt-get install unetbootin
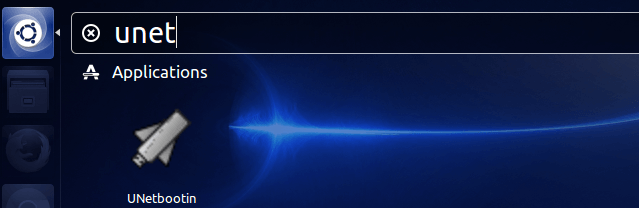
This PPA works on Ubuntu 16.04/14.04 and derivatives. Once done, Unetbootin can be started from applications menu or Unity Dash if you are using Ubuntu.
How to Use Unetbootin Linux Live USB Creator
Before you start Unetbootin, the USB drive should be inserted into your computer first so that Unetbootin can detect USB drive. You should also back up any important data in your USB drive.
Then you will be asked to enter your password when it’s started. To create a Linux live USB, you have two options: distribution and disk image.
If you select distribution, then you are going to select your favourite Linux distribution and version from the drop-down menu.
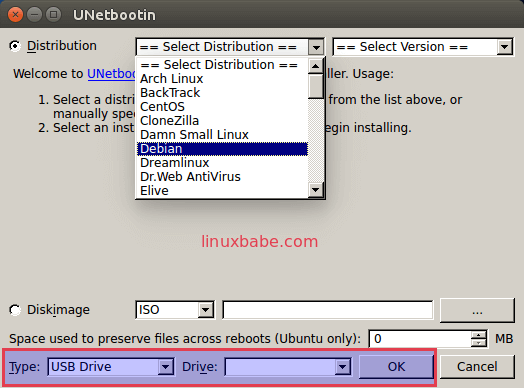
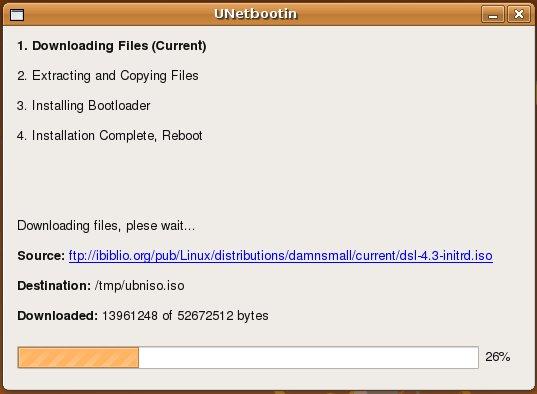
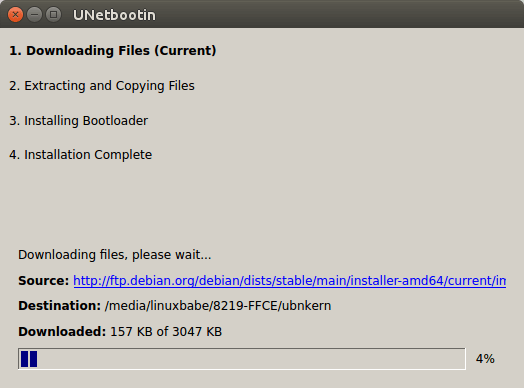
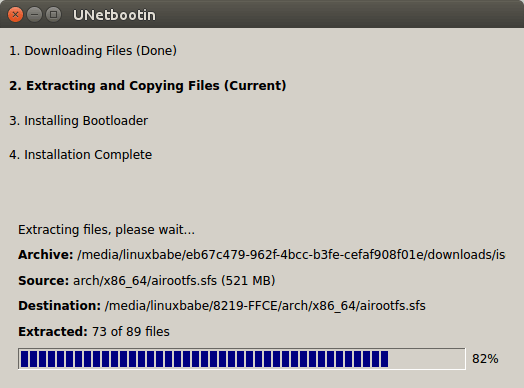
Then choose USB drive as the installation type and select your USB drive. Once you hit OK button, Unetbootin will download necessary files and install a live OS on to your USB drive.
If you already downloaded the ISO file of your Linux distribution on hard drive, then you are gonna need to select disk image instead of distribution.
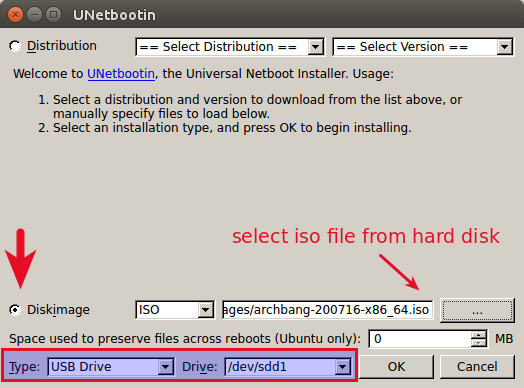
Select your ISO file, USB drive and hit OK button.
Once the live USB is created, you can restart your computer, boot it from USB, use your live Linux OS or install the OS to your hard disk.
Troubleshooting
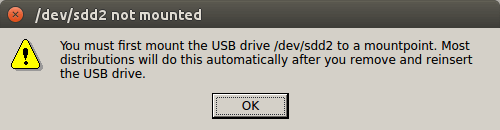
If you see an error message like below, you will need to mount your USB drive in file manager.
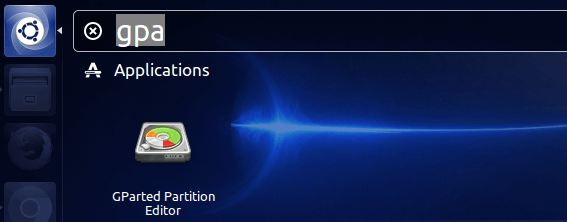
If that doesn’t help, then you need to format your USB drive. install Gparted partition manager.
Start Gparted from application menu or Unity Dash.
Select your USB drive in the top right menu. Please note that your USB drive may not be /dev/sdd. You can recognize your USB drive by its capacity.
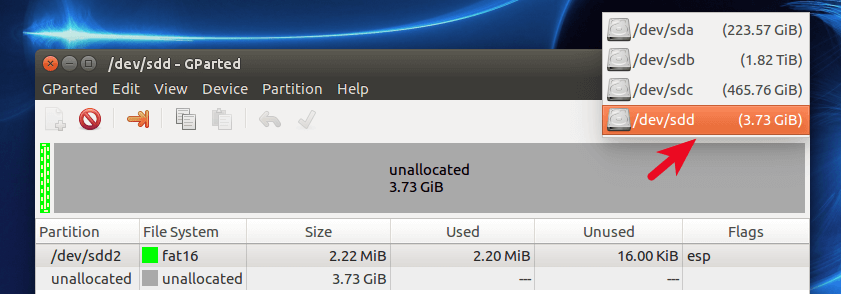
Before you move on, you should back up your data in USB drive, if there’s any, because we’re going to wipe it out and create a new partition table.
Data is backed up? Ok, Let’s go on.
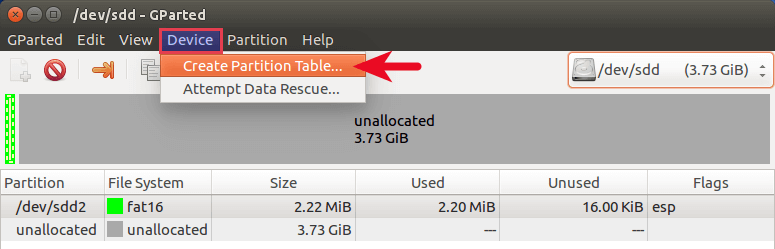
Next, go to Device menu and select Create partition Table.
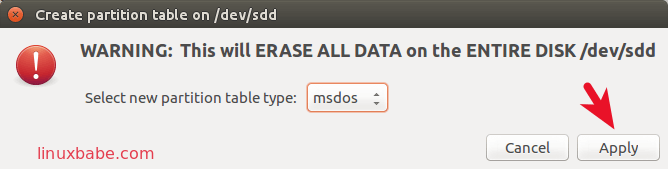
Then choose msdos as the type of partition table, click Apply.
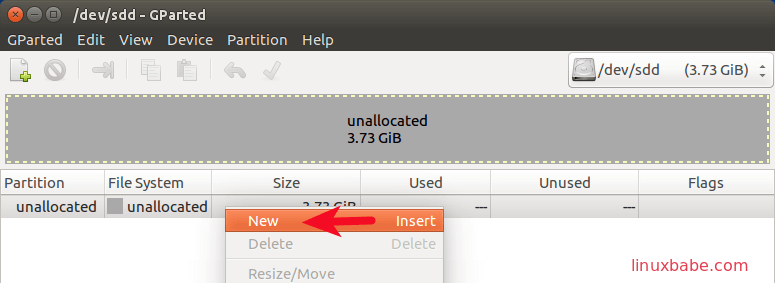
Once it’s done, let’s create a new partition on the USB drive by right-clicking on unallocated space and selecting New.
In the next window, select fat32 as the file system and click Add.
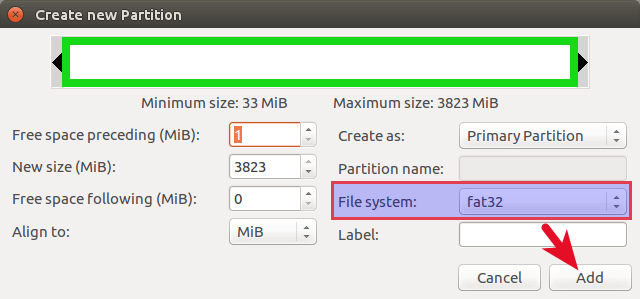
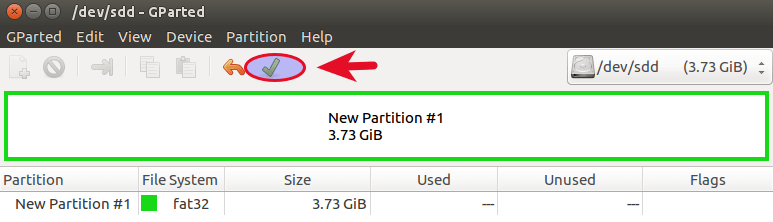
Finally, hit the green check button to apply these changes.
And now Unetbootin should correctly recognize your USB drive.
Do you like Unetbootin Linux live USB creator? What other tool do you recommend? As always, if you found this post useful, subscribe to our free newsletter or follow us onGoogle+,Twitter or like our Facebook page.