- Remove VirtualBox Guest Additions from a VM that has already been migrated to Hyper V
- 4 Answers 4
- How to Install & Use VirtualBox Guest Additions on Ubuntu
- Why should you use VirtualBox Guest Additions?
- Installing VirtualBox Guest Additions on Ubuntu guest system
- Troubleshooting tips
- Using VirtualBox Guest Addition features
- Change the Virtual Screen Resolution
- Configure Drag And Drop (any files)
- Configure Shared Clipboard (for copy-pasting)
- Uninstalling VirtualBox Guest Additions
- Wrapping Up
- Uninstall the VirtualBox guest addition on CentOS 7?
Remove VirtualBox Guest Additions from a VM that has already been migrated to Hyper V
I have moved a Centos 6 VM (used as a desktop) from Virtualbox to HyperV, and the performance is terrible. I have installed Linux Integration Services but this has hardly helped, so I would now like to try and remove Guest Additions. The only documentation I have found involves inserting the VirtualBox virtual DVD and running:
sudo sh VBoxLinuxAdditions.run uninstall Find your version of vbox here and download the guest additions ISO file, mount it, and then run the command you listed in your post.
On a Windows install, you can just use add/remove programs to remove the guest additions. Can’t you remove it the same way on linux?
4 Answers 4
Since you can no longer insert the Virtualbox Guest Additions CD through the Virtualbox app, you can just download the ISO image from the official site, mount it, and then run the uninstall command from there.
- Go to download.virtualbox.org/virtualbox and find the link to the version of Virtualbox Geust Additions you have installed (for this example, we will be using version 6.0.0). Look for a file with a name similar to VBoxGuestAdditions_6.0.0.iso . Download it to your virtual machine.
- Create directory to mount your ISO by running the following:
sudo mkdir /mnt/iso - Run the following command to mount your ISO image to the directory you just created:
sudo mount -t iso9660 -o loop ~/Downloads/VBoxGuestAdditions_6.0.0.iso /mnt/iso (or replace ~/Downloads/ with wherever you had downloaded your ISO file) - The contents of your ISO will now be copied into /mnt/iso , so change directory into that and run:
sudo sh VBoxLinuxAdditions.run uninstall
How to Install & Use VirtualBox Guest Additions on Ubuntu
Install VirtualBox Guest Additions in Ubuntu and with this, you’ll be able to copy-paste, drag and drop between the host and guest system. It makes using Ubuntu on virtual machines a lot easier.
The VirtualBox Guest Additions consist of device drivers and system applications that optimize the operating system for better performance and usability. These drivers provide a tighter integration between the guest and host systems. No matter how you are using your Virtual Machine, Guest Additions can be very helpful for you. For example, I test many installations and applications inside a VM and take a lot of screenshots. It comes in very handy to be able to move those screenshots freely between the Host OS and the Guest OS.
The host system is your actual operating system installed on your physical system. The guest system is the virtual machine you have installed inside your host operating system.
Before you see the steps to install VirtualBox Guest Additions in Ubuntu, let’s first talk about its features.
Why should you use VirtualBox Guest Additions?
With VirtualBox Guest Additions enabled, using the virtual machine becomes a lot more comfortable. Don’t believe me? Here are the important features that the Guest Additions offer:
- Mouse pointer integration: You no longer need to press any key to “free” the cursor from the Guest OS.
- Shared clipboard: With the Guest Additions installed, you can copy-paste between the guest and the host operating systems.
- Drag and drop: You can also drag and drop files between the host and the guest OS.
- Shared folders: My favorite feature; this feature allows you to exchange files between the host and the guest. You can tell VirtualBox to treat a certain host directory as a shared folder, and the program will make it available to the guest operating system as a network share, irrespective of whether guest actually has a network.
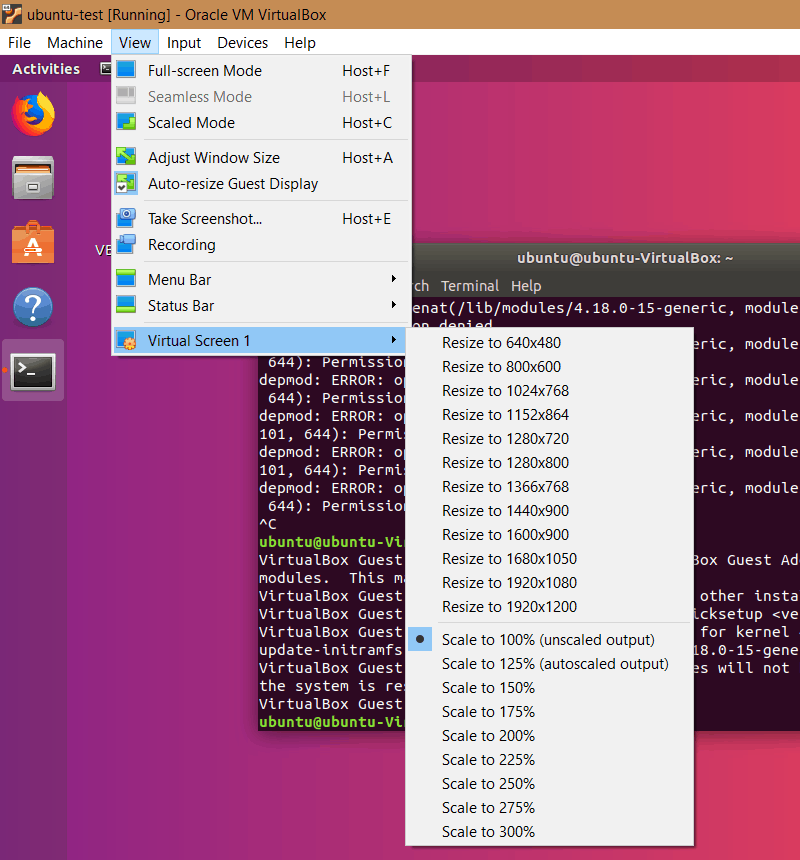
- Better video support: The custom video drivers that are installed with the Guest Additions provide you with extra high and non-standard video modes, as well as accelerated video performance. It also allows you to resize the virtual machine’s window. The video resolution in the guest will be automatically adjusted, as if you had manually entered an arbitrary resolution in the guest’s Display settings.
- Seamless windows: The individual windows that are displayed on the desktop of the virtual machine can be mapped on the host’s desktop, as if the underlying application was actually running on the host.
- Generic host/guest communication channels: The Guest Additions enable you to control and monitor guest execution. The “guest properties” provide a generic string-based mechanism to exchange data bits between a guest and a host, some of which have special meanings for controlling and monitoring the guest. Applications can be started in the Guest machine from the Host.
- Time synchronization: The Guest Additions will resynchronize the time with that of the Host machine regularly. The parameters of the time synchronization mechanism can be configured.
- Automated logins: Basically credentials passing, it can be a useful feature.
Impressed by the features it provides? Let’s see how you can install VirtualBox Guest Additions on Ubuntu Linux.
Installing VirtualBox Guest Additions on Ubuntu guest system
The scenario here is that you have Ubuntu Linux installed inside VirtualBox. The host system could be any operating system.
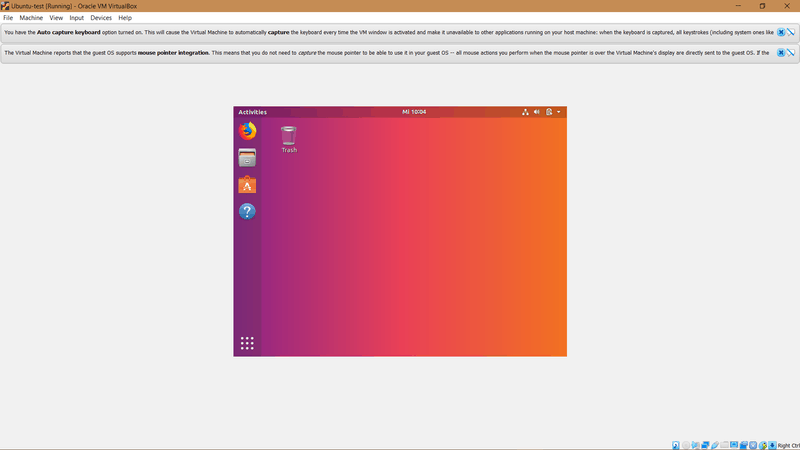
I’ll demonstrate the installation process on a minimal install of a Ubuntu virtual machine. First, run your virtual machine:
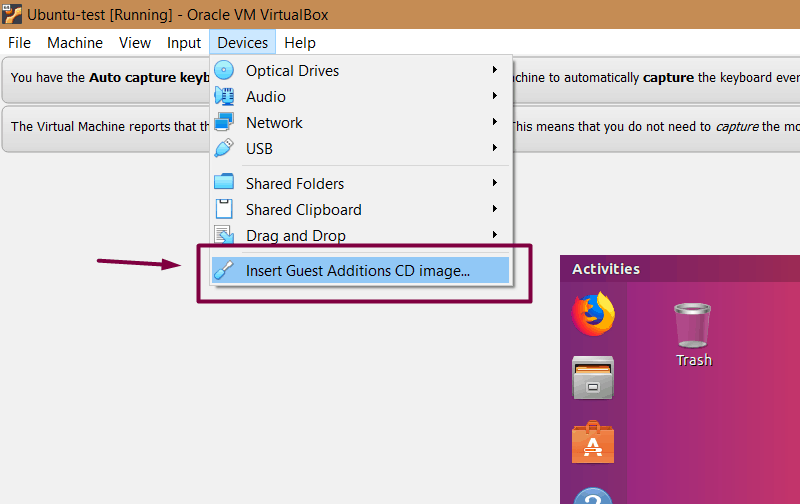
To get started, select Device > Insert Guest Additions CD image…:
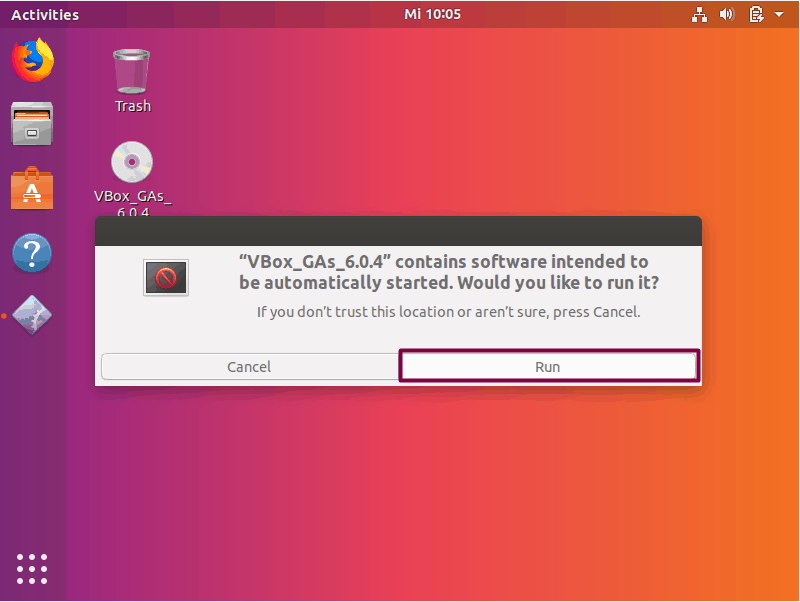
This will provide you with the required installer inside the guest system (i.e. the virtual operating system). It will try auto-running, so just click Run:
This should open up the installation in a terminal window. Follow the on-screen instructions and you’ll have the Guest Additions installed in a few minutes at most.
Troubleshooting tips
If you get an error like this one, it means you are missing some kernel modules which happens in some cases, such as minimal installs:
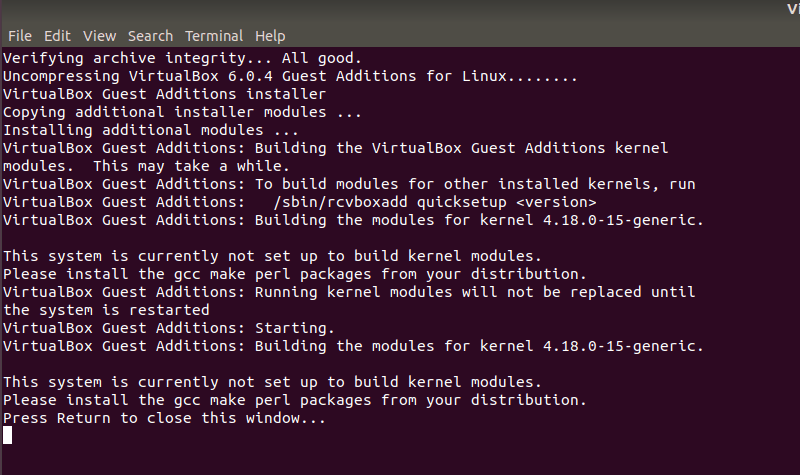
You need to install a few more packages here. Just to clarify, you need to run these commands in the virtual Ubuntu system:
sudo apt install build-essential dkms linux-headers-generic Now run the Guest Addition setup again:
Using VirtualBox Guest Addition features
Here are some screenshots for enabling/using helpful features of VirtualBox Guest Additions in use:
Change the Virtual Screen Resolution
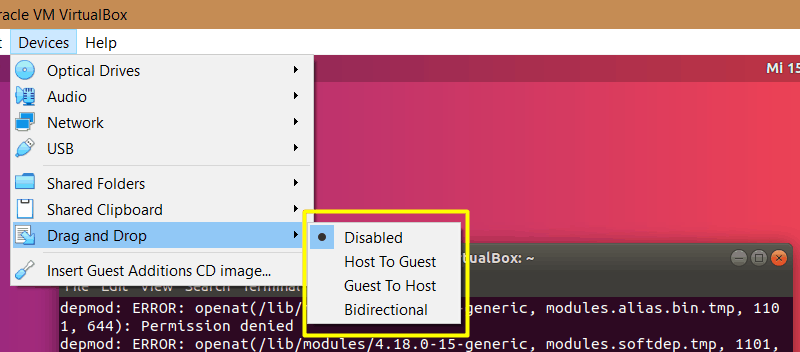
Configure Drag And Drop (any files)
You can enable drag and drop from the top menu -> Devices ->Drag and Drop -> Bidirectional.
With Bidirectional, you can drag and drop from guest to host and from host to guest, both.
Configure Shared Clipboard (for copy-pasting)
Similarly, you can enable shared clipboard from the top menu -> Devices -> Shared Clipboard -> Bidirectional.

Uninstalling VirtualBox Guest Additions
For some reasons, if you don’t want to use it anymore, here’s how you can remove it.
Navigate to the CD image and open it in terminal (Right Click inside the directory > Open in Terminal):

sh ./VBoxLinuxAdditions.run uninstallHowever, in some cases you might have to do some more cleanup. Use the command:
/opt/VBoxGuestAdditions-version/uninstall.shNote: Replace VBoxGuestAdditions-version with the right version (you can hit tab to autocomplete; in my case it is VBoxGuestAdditions-6.0.4).
Wrapping Up
Hopefully by now you have learned how to install and use the VirtualBox Guest Additions in Ubuntu. Let us know if you use these Additions, and what feature you find to be the most helpful!
Uninstall the VirtualBox guest addition on CentOS 7?
In adittion, to direclty open the terminal in the location where GuestAdittion is installed, just right click on the folder located in media/username/ghestadittion and select ‘Open in Terminal’. Then just run ‘sudo sh VBoxLinuxAdditions.run uninstall’
@Jonathan Host OS doesn’t really matter here, VBoxLinuxAdditions will be present in /media only when you click on Devices > Insert Guest Additions Image
@Jonathan that statement is illogical. The VBoxLinuxAdditions.run is a Linux executable and will be present on the Guest Additions ISO file which you have to insert for the Linux guest system to see and read it. The host system is irrelevant, it can be Linux or Windows. And of course, VBoxLinuxAdditions.run will not run on a Windows guest system if that’s what you imply, as it is a Linux executable and not a Windows executable.
Replace the /media with /run if you’re on Fedora 31. Also, uninstall is not a valid option. Where did you get that from? The linked blog post? Take note that it’s «Published April 26, 2012». I did this today using Guest Additions ISO of VirtualBox 6.0.10 and when you run sudo sh VBoxLinuxAdditions.run (with or without uninstall because that’s not an option) you will get a long text warning you of existing Guest Additions and telling you to uninstall it using the uninstall procedure of the operating system which on Fedora is rpm -e virtualbox-guest-additions-6.0.12-1.fc31.x86_64 .
f you have a version of the Guest Additions installed on your virtual machine and wish to remove it without installing new ones, you can do so by inserting the Guest Additions CD image into the virtual CD-ROM drive as described above. Then run the installer for the current Guest Additions with the uninstall parameter from the path that the CD image is mounted on in the guest, as follows:
sh ./VBoxLinuxAdditions.run uninstall While this will normally work without issues, you may need to do some manual cleanup of the guest in some cases, especially of the XFree86Config or xorg.conf file. In particular, if the Additions version installed or the guest operating system were very old, or if you made your own changes to the Guest Additions setup after you installed them.
You can uninstall the Additions as follows:
/opt/VBoxGuestAdditions-version/uninstall.sh Replace /opt/VBoxGuestAdditions-version with the correct Guest Additions installation directory.