Как размонтировать диск в Linux
При прекращении работы с диском в Linux, чтобы полностью закрыть к нему доступ и избежать повреждения данных при выключении, следует его размонтировать. Для этих целей существует утилита umount, которая запускается через терминал.
В данной статье мы разберемся с ее синтаксисом и опциями. А заодно рассмотрим, как размонтировать диск в Linux. Для удобства все будет описано на конкретных примерах.
Синтаксис и опции umount
В отличие от mount, команда umount Linux размонтирует указанный диск. В результате он становится недоступным. Это относится и к любым подключенным устройствам. У команды достаточно понятный синтаксис:
$ umount опции /путь/к/точке/монтирования
$ umount опции название_устройства
Перейдем к списку доступных опций:
- -a, —all – размонтировать все файловые системы, указанные в /proc/self/mountinfo. Исключение составляют roc, devfs, devpts, sysfs, rpc_pipefs и nfsd.
- -A, —all-targets – размонтировать все точки монтирования в текущем пространстве имен для указанной файловой системы.
- -c, —no-canonicalize – не канонизировать пути.
- -d, —detach-loop – освободить петлевое устройство при размонтировании.
- —fake – не выполнять никаких реальных действий, но посмотреть результат выполнения команды.
- -f, —force – принудительно размонтировать, когда диск недоступен.
- -l, —lazy – размонтировать файловую систему, когда она перестанет быть занятой.
- -N, —namespace – размонтировать указанное пространство имен.
- -n, —no-mtab – выполнение операции без записи в /etc/mtab.
- -O, —test-opts – размонтировать только те файловые системы, которые имеют указанный набор опций, записанный в /etc/fstab.
- -q, —quiet – не выводить сообщения с ошибкой not mounted.
- -R, —recursive – рекурсивное размонтирование.
- -r, —read-only – при появлении ошибки попробовать перемонтировать файловую систему в режиме read only.
- -t, —types – размонтировать файловую систему указанного типа. При необходимости параметры следует разделить запятыми.
- -v, —verbose – подробное протоколирование действий.
- -V, —version – вывести информацию о версии утилиты.
- -h, —help – получить справочную информацию.
Это были основные опции, которые могут пригодиться при выполнении команды umount. А теперь перейдем к практическим примерам ее использования.
Как размонтировать диск в Linux
Для удобства мы разберем четыре популярных сценария, с которыми может столкнуться каждый: размонтировать диск, все подключенные устройства и разделы, конкретный путь и рекурсивное размонтирование.
1. Размонтировать диск
В качестве примера возьмем USB-диск, на который были загружены бэкапы данных. Перед отключением от компьютера его следует размонтировать. Сначала посмотрим полный список доступных дисков:
sudo lsblk -o NAME,FSTYPE,SIZE,MOUNTPOINT,LABEL
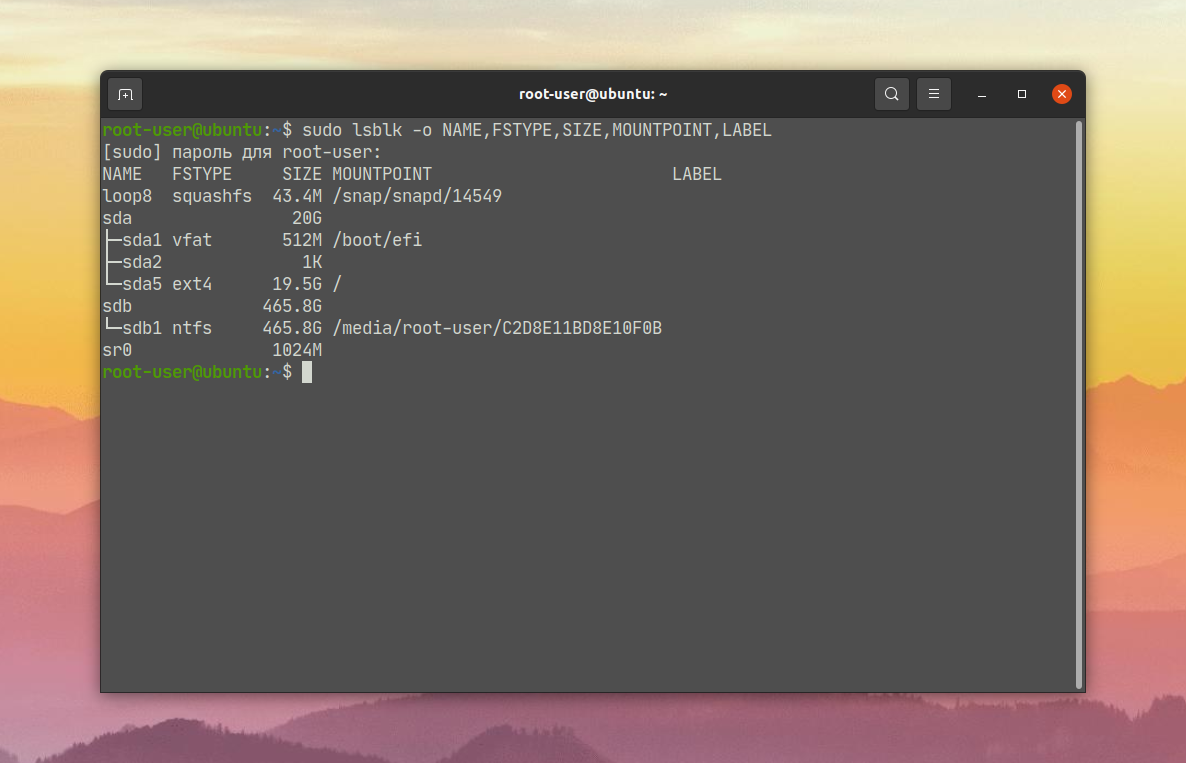
USB-диск объемом 500 ГБ маркирован как sdb1. Для его размонтирования следует выполнить команду:
2. Размонтировать все устройства
Опция -a, которая упоминалась в самом начале списка, отвечает за размонтирование всех смонтированных файловых систем. Но есть несколько разделов с исключениями: roc, devfs, devpts, sysfs, rpc_pipefs и nfsd. Запускать ее нужно с осторожностью, ведь будут размонтированы важные разделы.
Перед выполнением основной команды вы можете посмотреть то, какие устройства будут затронуты. Для этого пригодятся опции —fake (fake-команда) и -v для вывода подробной информации:
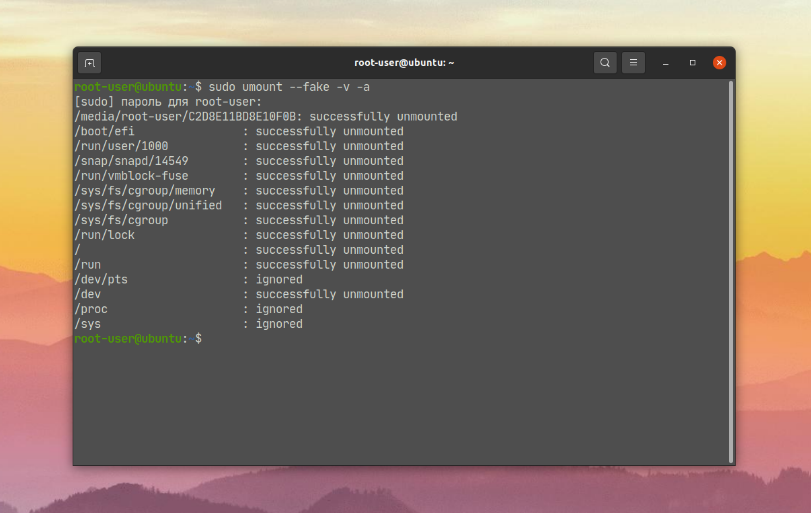
В результате отобразится полный список путей и устройств, которые будут размонтированы. Для полноценного запуска процедуры выполните команду без опций —fake и -v:
3. Размонтировать путь
Если вы хотите отключить конкретный путь от корневой файловой системы Linux, то подход будет несколько иной. В качестве примера возьмем каталог, расположенный по пути /run/lock/tmpfs. Команда для размонтирования будет выглядеть следующим образом:
Для рекурсивного размонтирования определенной директории, например, каталога, к описанной выше команде следует добавить опцию -R или —recursive:
sudo umount -R /run/lock/tmpfs
Выводы
В начале данной статьи мы описали утилиту umount Linux, особенности ее синтаксиса и доступные опции. А затем перешли к конкретным примерам использования, с которыми может столкнуться каждый. По описанным принципам можно понять, как размонтировать диск linux, а также любой раздел или директорию.
Обнаружили ошибку в тексте? Сообщите мне об этом. Выделите текст с ошибкой и нажмите Ctrl+Enter.
DESCRIPTION
The umount command detaches the mentioned filesystem(s) from the file hierarchy. A filesystem is specified by giving the directory where it has been mounted. Giving the special device on which the filesystem lives may also work, but is obsolete, mainly because it will fail in case this device was mounted on more than one directory.
Note that a filesystem cannot be unmounted when it is ‘busy’ — for example, when there are open files on it, or when some process has its working directory there, or when a swap file on it is in use. The offending process could even be umount itself — it opens libc, and libc in its turn may open for example locale files. A lazy unmount avoids this problem, but it may introduce other issues. See —lazy description below.
OPTIONS
All of the filesystems described in /proc/self/mountinfo (or in deprecated /etc/mtab) are unmounted, except the proc, devfs, devpts, sysfs, rpc_pipefs and nfsd filesystems. This list of the filesystems may be replaced by —types umount option.
Unmount all mountpoints in the current mount namespace for the specified filesystem. The filesystem can be specified by one of the mountpoints or the device name (or UUID, etc.). When this option is used together with —recursive, then all nested mounts within the filesystem are recursively unmounted. This option is only supported on systems where /etc/mtab is a symlink to /proc/mounts.
-c, —no-canonicalize
Do not canonicalize paths. The paths canonicalization is based on stat(2) and readlink(2) system calls. These system calls may hang in some cases (for example on NFS if server is not available). The option has to be used with canonical path to the mount point.
This option is silently ignored by umount for non-root users.
For more details about this option see the mount(8) man page. Note that umount does not pass this option to the /sbin/umount.type helpers.
When the unmounted device was a loop device, also free this loop device. This option is unnecessary for devices initialized by mount(8), in this case «autoclear» functionality is enabled by default.
Causes everything to be done except for the actual system call or umount helper execution; this ‘fakes’ unmounting the filesystem. It can be used to remove entries from the deprecated /etc/mtab that were unmounted earlier with the -n option.
Note that this option does not guarantee that umount command does not hang. It’s strongly recommended to use absolute paths without symlinks to avoid unwanted readlink(2) and stat(2) system calls on unreachable NFS in umount.
Do not call the /sbin/umount.filesystem helper even if it exists. By default such a helper program is called if it exists.
Lazy unmount. Detach the filesystem from the file hierarchy now, and clean up all references to this filesystem as soon as it is not busy anymore.
A system reboot would be expected in near future if you’re going to use this option for network filesystem or local filesystem with submounts. The recommended use-case for umount -l is to prevent hangs on shutdown due to an unreachable network share where a normal umount will hang due to a downed server or a network partition. Remounts of the share will not be possible.
-N, —namespace ns
Perform umount in the mount namespace specified by ns. ns is either PID of process running in that namespace or special file representing that namespace.
umount switches to the namespace when it reads /etc/fstab, writes /etc/mtab (or writes to /run/mount) and calls umount(2) system call, otherwise it runs in the original namespace. It means that the target mount namespace does not have to contain any libraries or other requirements necessary to execute umount(2) command.
See mount_namespaces(7) for more information.
-O, —test-opts option.
Unmount only the filesystems that have the specified option set in /etc/fstab. More than one option may be specified in a comma-separated list. Each option can be prefixed with no to indicate that no action should be taken for this option.
Recursively unmount each specified directory. Recursion for each directory will stop if any unmount operation in the chain fails for any reason. The relationship between mountpoints is determined by /proc/self/mountinfo entries. The filesystem must be specified by mountpoint path; a recursive unmount by device name (or UUID) is unsupported. Since version 2.37 it umounts also all over-mounted filesystems (more filesystems on the same mountpoint).
-t, —types type.
Indicate that the actions should only be taken on filesystems of the specified type. More than one type may be specified in a comma-separated list. The list of filesystem types can be prefixed with no to indicate that no action should be taken for all of the mentioned types. Note that umount reads information about mounted filesystems from kernel (/proc/mounts) and filesystem names may be different than filesystem names used in the /etc/fstab (e.g., «nfs4» vs. «nfs»).
NON-SUPERUSER UMOUNTS
Normally, only the superuser can umount filesystems. However, when fstab contains the user option on a line, anybody can umount the corresponding filesystem. For more details see mount(8) man page.
Since version 2.34 the umount command can be used to perform umount operation also for fuse filesystems if kernel mount table contains user’s ID. In this case fstab user= mount option is not required.
Since version 2.35 umount command does not exit when user permissions are inadequate by internal libmount security rules. It drops suid permissions and continue as regular non-root user. This can be used to support use-cases where root permissions are not necessary (e.g., fuse filesystems, user namespaces, etc).
LOOP DEVICE
The umount command will automatically detach loop device previously initialized by mount(8) command independently of /etc/mtab.
In this case the device is initialized with «autoclear» flag (see losetup(8) output for more details), otherwise it’s necessary to use the option —detach-loop or call losetup -d device. The autoclear feature is supported since Linux 2.6.25.
EXTERNAL HELPERS
The syntax of external unmount helpers is:
umount.suffix directory|device> [-flnrv] [-N namespace] [-t type.subtype]
where suffix is the filesystem type (or the value from a uhelper= or helper= marker in the mtab file). The -t option can be used for filesystems that have subtype support. For example:
umount.fuse -t fuse.sshfs
A uhelper=something marker (unprivileged helper) can appear in the /etc/mtab file when ordinary users need to be able to unmount a mountpoint that is not defined in /etc/fstab (for example for a device that was mounted by udisks(1)).
A helper=type marker in the mtab file will redirect all unmount requests to the /sbin/umount.type helper independently of UID.
Note that /etc/mtab is currently deprecated and helper= and other userspace mount options are maintained by libmount.