- How to Extract (Unzip) tar.xz File
- Extracting tar.xz File #
- Extracting Specific Files from a tar.xz File #
- Extracting tar.xz File from stdin #
- Listing tar.xz File Content #
- Conclusion #
- How to unzip a tar.gz file
- Installing tar
- Creating a tarball
- Compressing archives
- Extracting archives
- Advanced tar
- Add a file or directory to an existing tarball
- View a list of files within a tarball
- Extract just one file or directory
- Extract a tarball to another directory
- GNU tar and BSD tar
How to Extract (Unzip) tar.xz File
The tar command allows you to create and extract tar archives. It supports a vast range of compression programs such as gzip, bzip2, lzip, lzma, lzop, xz and compress.
Xz is a popular algorithm for compressing files based on the LZMA algorithm. By convention, the name of a tar archive compressed with xz ends with either .tar.xz or .txz.
This article explains how to use the tar command to extract (or unzip) .tar.xz or .txz archives.
Extracting tar.xz File #
The tar utility is pre-installed by default on all Linux distributions and macOS.
To extract a tar.xz file, invoke the tar command with the —extract ( -x ) option and specify the archive file name after the -f option:
tar auto-detects compression type and extracts the archive. The same command can be used to extract tar archives compressed with other algorithms, such as .tar.gz or .tar.bz2 .
If the command-line is not your thing, you can use the GUI File manager. To extract (unzip) a tar.xz file simply right-click the file you want to extract and select “Extract”. Windows users need a tool named 7zip to extract tar.xz files.
For more verbose output, use the -v option. This option tells tar to display the names of the files being extracted on the terminal.
By default, tar extracts the archive contents in the current working directory . To extract archive files in a specific directory, use the —directory ( -C ).
The following example shows how to extract the archive contents to the /home/linuxize/files directory:
tar -xf archive.tar.xz -C /home/linuxize/filesExtracting Specific Files from a tar.xz File #
To extract a specific file(s) from a tar.xz file, append a space-separated list of file names to be extracted after the archive name:
tar -xf archive.tar.xz file1 file2When extracting files, you must provide their exact names including the path, as printed when the tar is invoked with the —list ( -t ) option.
Extracting one or more directories from an archive is the same as extracting multiple files:
tar -xf archive.tar.xz dir1 dir2If you try to extract a file that doesn’t exist in the archive, an error message similar to the following will be shown:
tar -xf archive.tar.xz READMEtar: README: Not found in archive tar: Exiting with failure status due to previous errors The —wildcards option allows you to extract files from a tar.xz file based on a wildcard pattern. The pattern must be quoted to prevent the shell from interpreting it.
For example, to extract only the files whose names end in .png , you would use:
tar -xf archive.tar.xz --wildcards '*.png'Extracting tar.xz File from stdin #
When extracting a compressed tar.xz file by reading the archive from standard input (usually through piping), you must specify the decompression option. The -J option tells tar that the file is compressed with xz.
In the example below we are downloading the Linux kernel using the wget command and pipe its output to the tar command:
wget -c https://cdn.kernel.org/pub/linux/kernel/v5.x/linux-5.5.3.tar.xz -O - | sudo tar -xjIf you don’t specify a decompression option, tar will show you which option you should use:
tar: Archive is compressed. Use -J option tar: Error is not recoverable: exiting now Listing tar.xz File Content #
To list the content of a tar.xz file, use the —list ( -t ) option:
The output will look something like this:
If you add the —verbose ( -v ) option, tar will print more information, such as owner, file size, timestamp ..etc:
-rw-r--r-- linuxize/users 0 2020-02-15 01:19 file1 -rw-r--r-- linuxize/users 0 2020-02-15 01:19 file2 -rw-r--r-- linuxize/users 0 2020-02-15 01:19 file3 Conclusion #
tar.xz file is a Tar archive compressed with xz. To extract a tar.xz file, use the tar -xf command, followed by the archive name.
If you have any questions, please leave a comment below.
How to unzip a tar.gz file

Open Clip Art Library (public domain). Modified by Jen Wike Huger.
If you use open source software, chances are you’ll encounter a .tar file at some point. The open source tar archive utility has been around since 1979, so it is truly ubiquitous in the POSIX world. Its purpose is simple: It takes one or more files and «wraps» them into a self-contained file, called a tape archive because when tar was invented it was used to place data on storage tapes.
People new to the tar format usually equate it to a .zip file, but a tar archive is notably not compressed. The tar format only creates a container for files, but the files can be compressed with separate utilities. Common compressions applied to a .tar file are Gzip, bzip2, and xz. That’s why you rarely see just a .tar file and more commonly encounter .tar.gz or .tgz files.
Installing tar
On Linux, BSD, Illumos, and even Mac OS, the tar command is already installed for you.
On Windows, the easiest way to handle .tar files is to install the LGPL open source 7-Zip utility. Its name implies it’s a zip utility, but it also works with tar archives, and even provides commands for the cmd command-line interface.
If you really want an actual tar utility on Windows, GNU tar is installable through WSL on Windows 10 or through Cygwin.
Creating a tarball
A tar archive is often referred to as a tarball, presumably because we hackers love to shorten words to as few syllables as possible, and «tarball» is shorter and easier than «tar archive.»
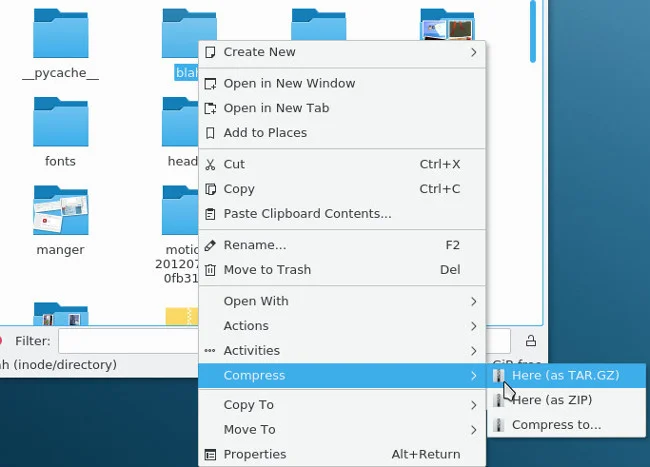
In a GUI, creating a tarball is, at the most, a three-step process. I’m using KDE, but the process is essentially the same on Gnome or XFCE:
- Create a directory
- Place your files into the directory
- Right-click on the directory and select «Compress»
In a shell, it’s basically the same process.
To gather a group of files into one archive, place your files in a directory and then invoke tar, providing a name for the archive that you want to create and the directory you want to archive:
$ tar --create --verbose --file archive.tar myfiles The tar utility is unique among commands, because it doesn’t require dashes in front of its short options, allowing power users to abbreviate complex commands like this:
$ tar cvf archive.tar myfiles You don’t have to put files into a directory before archiving them, but it’s considered poor etiquette not to, because nobody wants 50 files scattered out onto their desktop when they unarchive a directory. These kinds of archives are sometimes called a tarbomb, although not always with a negative connotation. Tarbombs are useful for patches and software installers; it’s just a matter of knowing when to use them and when to avoid them.
Compressing archives
Creating a tar archive does not compress your files, it just makes them easier to move around as one blob. For compression, you can have tar call Gzip or bzip:
$ tar --create --bzip2 --file foo.tar.bz2 myfiles $ tar --create --gzip --file foo.tar.gz myfiles Common extensions are tar.gz and .tgz for a Gzipped tar file, and .tbz and .tar.bz2 for a bzipped tar file.
Extracting archives
If you’ve received a tarball from a friend or a software project, you can extract it in either your GUI desktop or in a shell. In a GUI, right-click the archive you want to extract and select «Extract.»
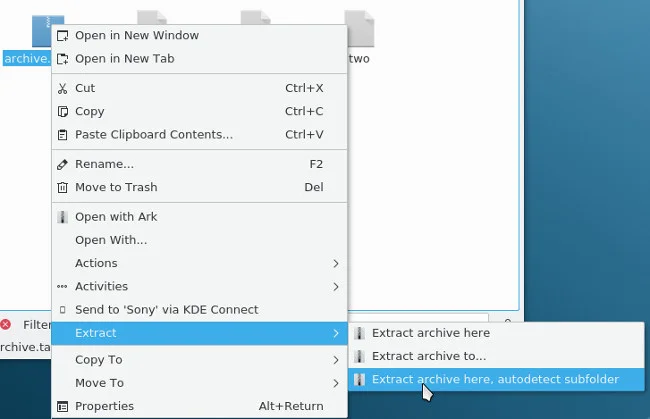
The Dolphin file manager offers a feature to autodetect whether the files extracted from an archive are contained in a directory or if a new directory needs to be created for them. I use this option so that when I extract files from a tarbomb, they remain tidy and contained.
In a shell, the command to extract an archive is pretty intuitive:
$ tar --extract --file archive.tar.gz Power users shorten this to:
You can even use the tar utility to unzip .zip files:
$ tar --extract --file archive.zip Advanced tar
The tar utilities are very robust and flexible. Once you’re comfortable with the basics, it’s useful to explore other features.
Add a file or directory to an existing tarball
If you have an existing tarball and want to add a new file into it, you don’t have to unarchive everything just to add a new file.
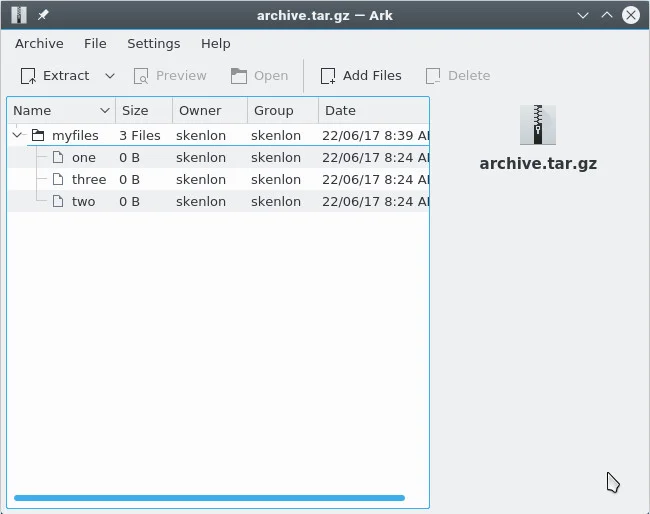
Most Linux and BSD desktops come with a graphical archive utility. Using it, you can open a tar archive as if it were any other directory, have a look inside, extract individual files, add files to it, and even preview the text files and images it contains.
In the shell, you can add a file or directory to a tar archive as long as it is not compressed. If your archive has been compressed, you must uncompress it, but you do not need to unarchive it.
For instance, if an archive has been compressed with Gzip:
$ gunzip archive.tar.gz $ ls archive.tar Now that you have an uncompressed tar archive, add a file and a directory to it:
$ tar --append --file archive.tar foo.txt $ tar --append --file archive.tar bar/ $ tar rf archive.tar foo.txt $ tar rf archive.tar bar/ View a list of files within a tarball
To see the files in an archive, compressed or uncompressed, use the —list option:
$ tar --list --file archive.tar.gz myfiles/ myfiles/one myfiles/two myfiles/three bar/ bar/four foo.txt Power users shorten this to:
Extract just one file or directory
Sometimes you don’t need all the files in an archive, you just want to extract one or two. After listing the contents of a tar archive, use the usual tar extract command along with the path of the file you want to extract:
$ tar xvf archive.tar.gz bar/four bar/four Now the file «four» is extracted to a new directory called «bar.» If «bar» already exists, then «four» is placed inside the existing directory.
Extracting multiple files or directories is basically the same:
$ tar xvf archive.tar.gz myfiles/one bar/four myfiles/one bar/four You can even use wildcards:
$ tar xvf archive.tar.gz --wildcards '*.txt' foo.txt Extract a tarball to another directory
Previously, I mentioned that some tarballs were tarbombs that left files scattered around your computer. If you list a tar archive and see that its files are not contained in a directory, you can create a destination directory for them:
$ tar --list --file archive.tar.gz foo bar baz $ mkdir newfiles $ tar xvf archive.tar.gz -C newfiles This places all of the files in the archive neatly into the «newfiles» directory.
The destination directory option is useful for a lot more than just keeping extracted files tidy, for example, distributing files that are intended to be copied into an existing directory structure. If you’re working on a website and want to send the admin some new files, you can do it a few different ways. The obvious way is to email the files to the site admin along with some text explaining where each file is to be placed: «The attached index.php file goes into /var/www/example.com/store, and the vouchers.php file goes into /var/www/example.com/deals. «
The more efficient way would be to create a tar archive:
$ tar cvf updates-20170621.tar.bz2 var var/www/example.com/store/index.php var/www/example.com/deals/voucher.php var/www/example.com/images/banner.jpg var/www/example.com/images/badge.jpg var/www/example.com/images/llama-eating-apple-pie.gif Given this structure, the site admin could extract your incoming archive directly to the server’s root directory. The tar utility autodetects the existence of /var/www/example.com as well as the subdirectories store, deals, and images, and distributes the files into the proper directories. It’s bulk copying and pasting, done quickly and easily.
GNU tar and BSD tar
The tar format is just a format, and it’s an open format, so it can be created by more than just one tool.
There are two common tar utilities: the GNU tar utility, installed by default on Linux systems, and the BSD tar utility, installed by default on BSD, Mac OS, and some Linux systems. For general use, either tar will do. All examples in this article work the same on either GNU or BSD tar, for example. However, the two utilities do have some minor differences, so once you get comfortable with one, you should try the other.
You’ll probably have to install the «other» tar (whatever that may be on your system) manually. To avoid confusion between utilities, GNU tar is often named gtar and BSD tar is named bsdtar, with the command tar being a symlink, or an alias, to the one that came preinstalled on your computer.