- HowTo: Create a Password Protected ZIP File in Linux
- Password Protected ZIP File in Linux
- Encrypt and Decrypt ZIP Archive in Linux
- How to Unzip Files in Linux
- Installing unzip #
- Install unzip on Ubuntu and Debian #
- Install unzip on CentOS and Fedora #
- How to Unzip a ZIP file #
- Suppress the Output of the unzip Command #
- Unzip a ZIP File to a Different Directory #
- Unzip a Password Protected ZIP file #
- Exclude Files when Unzipping a ZIP File #
- Overwrite Existing Files #
- Unzip a ZIP File Without Overwriting Existing Files #
- Unzip Multiple ZIP Files #
- List the Contents of a Zip File #
- Conclusion #
- How to create a password protected zip file on Linux
- How to create a password protected zip file using CLI
- How to create a password protected zip file using GUI
- Conclusion
HowTo: Create a Password Protected ZIP File in Linux
This is a small note that describes how to encrypt and decrypt a ZIP file from the Linux command line.
I’ll show how to create a password protected ZIP archive from one or several unprotected files or folders.
Warning! The standard ZIP encryption is very weak and could be cracked easily.
Password Protected ZIP File in Linux
Create an encrypted ZIP file secure.zip from some file:
$ zip --encrypt secure.zip file Enter password: Verify password: adding: file (deflated 8%)
Create password protected ZIP archive secure.zip from the several files:
$ zip --encrypt secure.zip file1 file2 file3 Enter password: Verify password: adding: file1 (stored 15%) adding: file2 (deflated 30%) adding: file3 (deflated 45%)
Create an encrypted ZIP archive secure.zip from a folder /var/log/ :
$ zip --encrypt -r secure.zip /var/log/ Enter password: Verify password: adding: var/log/ (stored 0%) adding: var/log/dmesg.0 (deflated 74%) adding: var/log/dpkg.log.9.gz (deflated 0%) adding: var/log/samba/log.asc-nb (deflated 96%) ***
Use the following command to uncompress a ZIP file:
$ unzip secure.zip Enter password: ***
Encrypt and Decrypt ZIP Archive in Linux
You were interactively prompted for the password in the examples above.
If you want to create a password protected ZIP file from some shell script, you may want to do it non-interactively.
This method is more insecure, as the password is entered as plain text.
You can easily encrypt and decrypt ZIP files from the Linux command line without being prompted for the password.
$ zip -P passw0rd secure.zip file $ zip -P passw0rd secure.zip file1 file2 file3 $ zip -P passw0rd -r secure.zip /var/log/
Uncompress a password protected ZIP archive:
$ unzip -P passw0rd secure.zip
How to Unzip Files in Linux
ZIP is the most widely used archive file format that supports lossless data compression. A ZIP file is a data container containing one or more compressed files or directories.
In this tutorial, we will explain how to unzip files in Linux systems through the command line using the unzip command.
Installing unzip #
unzip is not installed by default in most Linux distributions, but you can easily install it using the package manager of your distribution.
Install unzip on Ubuntu and Debian #
Install unzip on CentOS and Fedora #
How to Unzip a ZIP file #
In it’s simplest form, when used without any option, the unzip command extracts all files from the specified ZIP archive to the current directory.
As an example, let’s say you downloaded the WordPress installation ZIP file. To unzip this file to the current directory, you’d simply run the following command:
ZIP files do not support Linux-style ownership information. The extracted files are owned by the user that runs the command.
You must have write permissions on the directory where you are extracting the ZIP archive.
Suppress the Output of the unzip Command #
By default, unzip prints the names of all the files it’s extracting and a summary when the extraction is completed.
Use the -q switch to suppress the printing of these messages.
Unzip a ZIP File to a Different Directory #
To unzip a ZIP file to a different directory than the current one, use the -d switch:
unzip filename.zip -d /path/to/directoryFor example, to unzip the WordPress archive latest.zip to the /var/www/ directory, you’d use the following command:
sudo unzip latest.zip -d /var/wwwIn the command above, we are using sudo because usually the user we are logged in as doesn’t have write permissions to the /var/www directory. When ZIP files are decompressed using sudo , the extracted files and directories are owned by the user root.
Unzip a Password Protected ZIP file #
To unzip a file that is password-protected, invoke the unzip command with the -P option followed by the password:
unzip -P PasswOrd filename.zipTyping a password on the command line is insecure and should be avoided. A more secure option is to extract the file normally without providing the password. If the ZIP file is encrypted, unzip will prompt you to enter the password:
archive: filename.zip [filename.zip] file.txt password: unzip will use the same password for all encripted files as long as it is correct.
Exclude Files when Unzipping a ZIP File #
To exclude specific files or directories from being extracted, use the -x option followed by space-separated list of archive files you want to exclude from extracting:
unzip filename.zip -x file1-to-exclude file2-to-excludeIn the following example we are extracting all files and directories from the ZIP archive except the .git directory:
Overwrite Existing Files #
Let’s say you’ve already unzipped a ZIP file and you are running the same command again:
By default, unzip will ask you whether you like to overwrite only the current file, overwrite all files, skip extraction of the current file, skip extraction of all files, or rename the current file.
Archive: latest.zip replace wordpress/xmlrpc.php? [y]es, [n]o, [A]ll, [N]one, [r]ename: If you want to overwrite existing files without prompting, use the -o option:
Use this option with caution. If you made any changes to the files, the changes are lost.
Unzip a ZIP File Without Overwriting Existing Files #
Let’s say you’ve already unzipped a ZIP file, and you made changes to some files, but you accidentally deleted few files. You want to keep the changes and to restore the deleted files from the ZIP archive.
In this case, use the -n option which forces unzip to skip the extraction of a file that already exists:
Unzip Multiple ZIP Files #
You can use regular expressions to match multiple archives.
For example, if you have multiple ZIP files in your current working directory you can unzip all files using only one command:
Note the single quotes around the *.zip . If you forgot to quote the argument, the shell will expand the wildcard character, and you will get an error.
List the Contents of a Zip File #
To list the contents of a ZIP file, use the -l option:
In the example below, we are listing all WordPress installation files:
The output will look like this:
Archive: latest.zip Length Date Time Name --------- ---------- ----- ---- 0 2018-08-02 22:39 wordpress/ 3065 2016-08-31 18:31 wordpress/xmlrpc.php 364 2015-12-19 12:20 wordpress/wp-blog-header.php 7415 2018-03-18 17:13 wordpress/readme.html . . 21323 2018-03-09 01:15 wordpress/wp-admin/themes.php 8353 2017-09-10 18:20 wordpress/wp-admin/options-reading.php 4620 2017-10-24 00:12 wordpress/wp-trackback.php 1889 2018-05-03 00:11 wordpress/wp-comments-post.php --------- ------- 27271400 1648 files Conclusion #
unzip is a utility that helps you list, test, and extract compressed ZIP archives.
To create a ZIP archive on a Linux system, you’ll need to use the zip command .
Feel free to leave a comment if you have any questions.
How to create a password protected zip file on Linux
![]()
In the computing era, the data must be secure enough as it has to revolve around multiple machines around the globe. Password protection is the primary aspect to ensure the secure transmission of files or data.
The zip is a file format that compresses the file, and this file format serves various purposes, such as combining multiple files into a single file to make it easy to transfer.
Like most of the tasks on Linux can be carried out using CLI and GUI, similarly, a password protected zip file can also be created using both ways. This article provides the command line and graphical method to create an encrypted zip file on linux.
How to create a password protected zip file using CLI
The following steps would lead you to creating a password protected zip file on Linux.
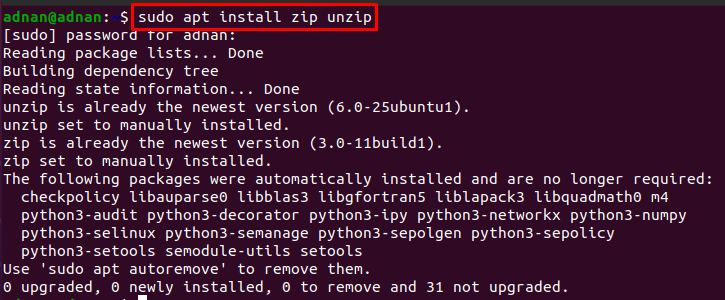
Step 1: First open the terminal and write the following command to install the zip, and unzip command line tools (if not installed).
Step 2: The “-e and –encrypt” parameters would assist you to set a password for your zip file. For instance, the command provided below will create a zip file named linuxhint that contains two files (linux.txt and debian.txt).

Note: The command in step 2 would create a password protected zip file in the current working directory and the files contained by it also lie inside the present directory.
To include the files from other than the current directory, you have to give the complete path of the files as we did in the following command.
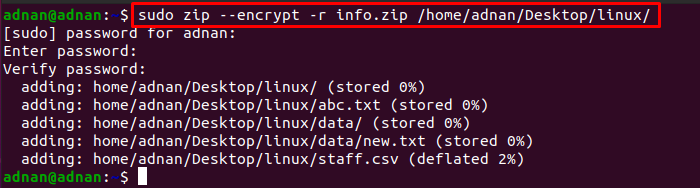
Note that all the files and directories from the specified target folder are added to the zip file named info.zip.
Step 3 (Optional): You can unzip the .zip files as we did in the below-mentioned command.
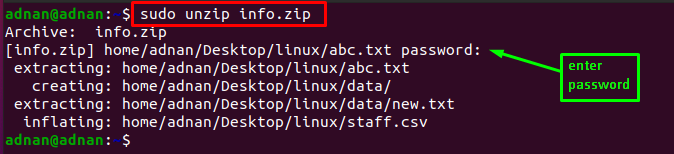
The output shows that the zipped file was protected, and the extraction is performed after entering the password set for that file.
Note: If in case you have entered the wrong password, you would not be able to extract files as can be seen in the following image.

How to create a password protected zip file using GUI
To create the password encrypted zip file using a graphical interface, the following steps are recommended to follow.
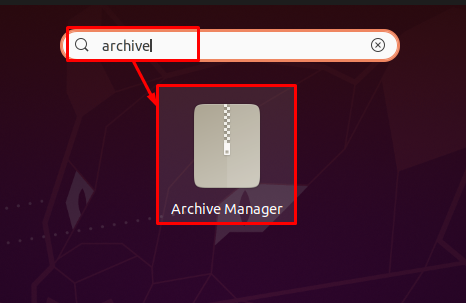
Step 1: Click on the “Show Applications” icon placed on the dock or press “Super Key + A” to open the applications menu.

Step 2: Search here for “Archive Manager” and click on it to open:
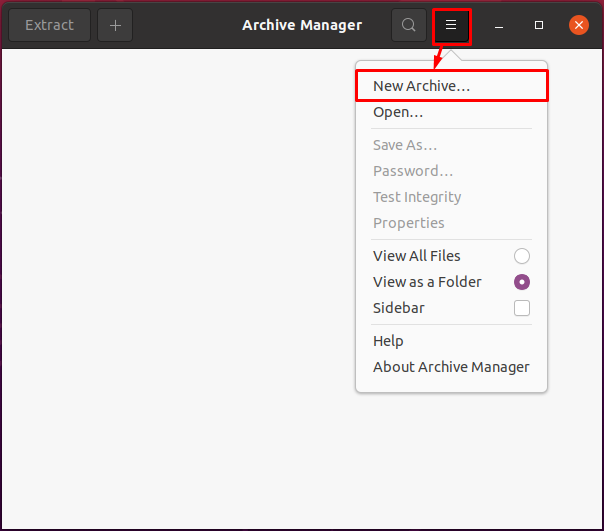
Step 3: Click on the three lines placed on the menu bar of the “Archive Manager” and click on “New Archive…“.
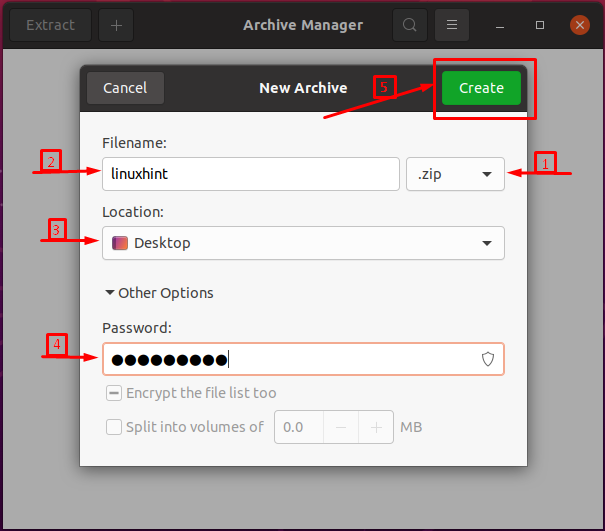
After doing so, the following box will appear, where you have to ensure the following content.
– extension must be set to “.zip”
– set a Filename, Location and Password for that zip file
At the end, click on “Create” to accomplish the process.
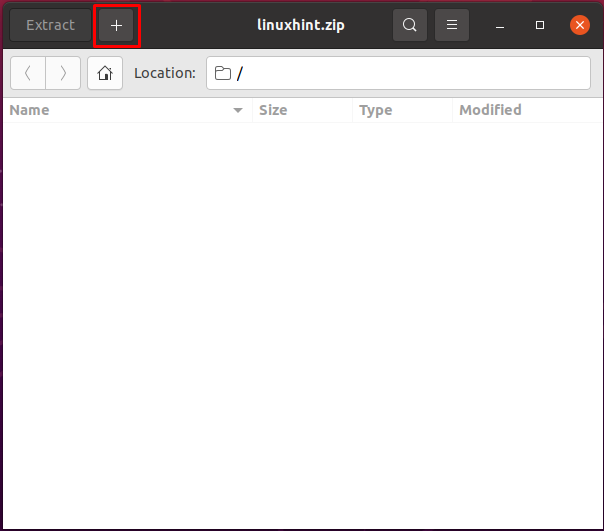
Step 4: Once the file is created, click on the “+” icon to add files in the zip file.
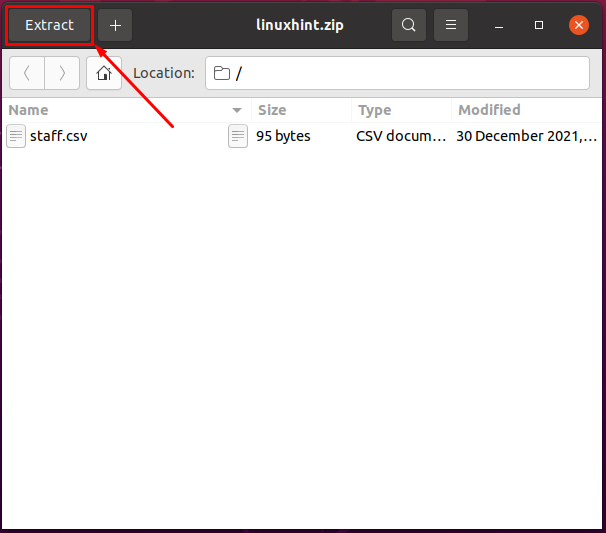
After adding files, click on the “Extract” button placed on the menu bar.
The time you click on the “Extract” button, you have to choose the extraction location. After doing so, a dialogue box will appear which requires a password for completing the extraction process as shown in the following image.
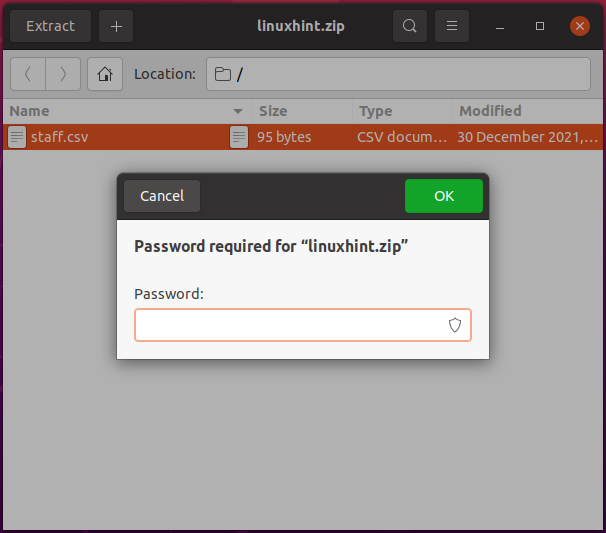
As shown in the output, the password dialogue shows that the file is now protected with some password.
Conclusion
The password protected zip file can be created using the zip and unzip command line tool. Moreover, the graphical interface of Linux can also be exercised to create a password protected zip file. This guide outlines the methods and steps that are recommended for the creation of a password protected zip file. A terminal enthusiast may prefer the CLI method over GUI as it is fast and easy to adopt. However, a novel Linux user may adopt a GUI method to do the same process.