- How To Flush DNS Cache On Linux (For systemd-resolved, BIND, Dnsmasq Or nscd)
- How to flush the DNS cache when using systemd-resolved
- How to flush the DNS cache when using BIND
- How to flush the DNS cache when using Dnsmasq
- How to flush the DNS cache when using nscd
- Flush DNS Cache on Ubuntu
- How DNS Works:
- DNS Caching:
- Problems with DNS Caching:
- Checking If DNS Caching is Enabled:
- Flushing DNS on Ubuntu 18.04 LTS:
- Flushing DNS Cache on Ubuntu 16.04:
- About the author
- Shahriar Shovon
How To Flush DNS Cache On Linux (For systemd-resolved, BIND, Dnsmasq Or nscd)
This article explains how to flush the DNS cache (clear it) on Linux, not only for systems that use systemd-resolved (e.g. Ubuntu 18.04 and newer), but also for those using nscd, BIND or Dnsmasq to cache DNS queries.
DNS, or Domain Name System, is like the Internet’s phonebook, translating human-friendly computer hostnames into IP addresses. For example, google.com is translated to the 216.58.214.238 IPv4 address, and 2a00:1450:400d:808::200e IPv6 address. This way the domain name can change the IP address without affecting its users, and without changing the its name.
The DNS cache (or DNS resolver cache) is a temporary database that stores these records, which is used to quickly lookup a website when you’re trying to visit it.
If the DNS is cached, you might not be able to access some hostnames that were changed recently — until your DNS cache is updated or cleared, that’s why it’s useful in some situations to flush / clear the DNS cache. After the DNS cache is cleared, the new addresses are taken from the DNS server set for your network.
How to flush the DNS cache when using systemd-resolved
systemd-resolved is a network name resolution manager. It implements a caching and validating DNS/DNSSEC stub resolver, as well as an LLMNR and MulticastDNS resolver and responder.
systemd-resolved is used by default on recent versions of many Linux distributions, including Ubuntu, Linux Mint and Fedora.
Don’t know if you system uses systemd-resolved? Use:
systemctl is-active systemd-resolvedIn case this command returns active , then your system has systemd-resolved enabled and active. If anything else (e.g. inactive ) is shown, then systemd-resolved is not used on your system.
Flush the DNS cache when using systemd-resolved:
sudo systemd-resolve --flush-cachesCheck the DNS cache using:
systemd-resolve --statisticsThe Current Cache Size is the value you’re looking for. If it’s 0 , you just flushed the DNS cache.
Example with output (ran immediately after flushing the DNS cache, so the cache size is 0):
$ systemd-resolve --statistics DNSSEC supported by current servers: no Transactions Current Transactions: 0 Total Transactions: 5538 Cache Current Cache Size: 0 Cache Hits: 3482 Cache Misses: 2096 DNSSEC Verdicts Secure: 0 Insecure: 0 Bogus: 0 Indeterminate: 0How to flush the DNS cache when using BIND
BIND or «named» acts as an authoritative name server for one or more specific domain, as well as a recursive resolver for the DNS system generally, and it can act as a caching DNS server. Bind had three major revisions, with BIND4 and BIND8 being technically obsolete, and BIND9 being the supported version, which features DNSSEC in addition to other features and enhancements.
To check if BIND (the service name is «named») is active on your system (though note that most cases it’s active only if you install and enable it explicitly), you could run:
When active is returned by this command, it means the service is active on your system.
On older systems, or systems without systemd, you could check the service status instead, using
To flush the DNS cache for BIND (named), use:
Checking if the DNS cache has been cleared is a bit more complicated for BIND. After flushing the DNS cache, run the command that follows below to dump the cache:
The cache file is now saved in /var/named/data/cache_dump.db . You can look at this file as root to check if there are any cached DNS entries:
sudo cat /var/named/data/cache_dump.dbIf the cache was flushed (so there are no cached DNS entries), this file should look like this:
$ sudo cat /var/named/data/cache_dump.db ; ; Start view _default ; ; ; Cache dump of view '_default' (cache _default) ; $DATE 20190711141232 ; ; Address database dump ; ; [edns success/4096 timeout/1432 timeout/1232 timeout/512 timeout] ; [plain success/timeout] ; ; ; Unassociated entries ; ; ; Bad cache ;If it contains entries like the ones that follow below, the DNS cache was not flushed:
102397 IN DNSKEY 256 3 8 ( AwEAAeVDC34GZILwsQJy97K6Fst4P3XYZrXL yrkausYzStEjSUulgh+iLgHg0y7FIF890+sI jXsk7KLJUmCOWfYWPorNKEOKLk5Zx/4M6D3I HZE3O3m/Eahrc28qQzmTLxiMZAW65MvR2UO3 LxVtYOPBEBiDgAQA47x2JLsJYtavCzNL5WiU k59OgvHmDqmcC7VXYBhK8V8Tic089XJgExGe plKWUt9yyc31ra1swJX51XsOaQz17+vyLVH8 AZP26KvKFiZeoRbaq6vl+hc8HQnI2ug5rA2z oz3MsSQBvP1f/HvqsWxLqwXXKyDD1QM639U+ XzVB8CYigyscRP22QFnwKIU= ) ; ZSK; alg = RSASHA256 ; key >
How to flush the DNS cache when using Dnsmasq
Dnsmasq is a DNS forwarder and DHCP server that can be used as a caching DNS server.
To check if dnsmasq is active on your system, you could run:
systemctl is-active dnsmasqWhen active is returned by this command, it means the service is active on your system.
On older systems, or systems without systemd, you could check the service status instead, using:
To flush the DNS cache when using Dnsmasq, restart its service:
sudo systemctl restart dnsmasqOn older systems, or systems without systemd, use this command to flush the DNS cache for Dnsmasq:
sudo service dnsmasq restartI couldn’t find a way of checking if the dnsmasq has been flushed.
How to flush the DNS cache when using nscd
nscd is a name service cache daemon.
To check if nscd is active on your system (though note that most cases it’s active only if you install and enable it explicitly), you could run:
When «active» is returned by this command, it means the service is active on your system.
On older systems, or systems without systemd, you could check the service status instead, using:
While most guides you’ll find online mention to restart the nscd service, that doesn’t actually flush the DNS cache, since the files are still stored in /var/db/nscd , and are used after the nscd service starts again. What you actually want to do to flush the DNS cache for nscd is to invalidate the cache.
To invalidate the hosts cache (to flush the DNS hosts cache) when using nscd, use:
sudo nscd --invalidate=hostsTo check if the DNS cache was flushed, run:
And look under the hosts section (if you have multiple enabled), and you should see 0 as the value for used data pool size if the DNS cache was just flushed. It will slowly increase as the DNS are used to access various hosts / domains names.
Example with output (after the DNS cache was flushed):
$ sudo nscd -g nscd configuration: 0 server debug level 1m 5s server runtime 5 current number of threads 32 maximum number of threads 0 number of times clients had to wait no paranoia mode enabled 3600 restart internal 5 reload count . hosts cache: yes cache is enabled yes cache is persistent yes cache is shared 211 suggested size 216064 total data pool size 0 used data pool size 3600 seconds time to live for positive entries 20 seconds time to live for negative entries 0 cache hits on positive entries 0 cache hits on negative entries 5 cache misses on positive entries . Flush DNS Cache on Ubuntu
![]()
The full form of DNS is Domain Name System. It is used to translate domain names to IP addresses. It seems really simple, but without it the internet won’t be what it is today. Can you imagine memorizing thousands of IP addresses? Can you imagine a world without google.com or yourwebsite.com? DNS makes everything about the internet very easy for us.
This article is about flushing DNS on Ubuntu. But to understand why it is necessary, first you have to understand how DNS works and a little bit about DNS caching.
How DNS Works:
Simply, DNS can be thought of a table of domain names and IP addresses as given below:
| Domain Name | IP Address |
| linuxhint.com | 1.2.3.4 |
| support.linuxhint.com | 3.4.5.7 |
| google.com | 8.9.5.4 |
| www.google.com | 8.9.5.4 |
Please know that, none of the data in this table is real. It’s just for the purpose of demonstration. So let’s get back to our original topic.
When you visit, let’s say, linuxhint.com, the browser asks the DNS server (set on your computer) a few questions.
Your Computer: Hey, do you know linuxhint.com?
DNS Server: No, I do not. But the DNS server 4.4.4.4 may know about it.
Your Computer: Contacts the DNS server 4.4.4.4 and asks, “hey, do you know linuxhint.com?”
DNS Server 2: Yes, I do. What can I do for you?
Your Computer: I need the IP address of linuxhint.com. Can I have it?
DNS Server 2: No fear, that’s why I am here. Here is the IP address of linuxhint.com 1.2.3.4.
Your Computer: You’re a life saver. Thanks.
Now your computer connects to 1.2.3.4 and your favorite website linuxhint.com shows up. That was really hard, wasn’t it?
The next time you visit linuxhint.com, the same thing happens again.
DNS Caching:
In the earlier section, you saw how a domain name is resolved to IP addresses. This journey through the DNS servers takes a while and till it’s complete and a domain name can be resolved to IP addresses, you won’t be able to connect to any website or server on the internet.
To solve this issue, DNS caching is used. Here, when you try to resolve a domain name to IP addresses for the first time, it takes a little bit longer. But once the domain name is resolved, the IP addresses are stored in your own computer. So, the next time you need to resolve the same domain name, it won’t take as long as it did on the first time.
Problems with DNS Caching:
DNS caching is good. How come DNS caching is problematic? Well, the world of internet is so dynamic that the DNS information is changing constantly. It may have changed a few times even while I am writing this article.
So, what happens when the DNS information changes and we are using the DNS information that is cached on our own computer? Well, that’s where it gets problematic. In that case, we will be using the old DNS information. We may have connectivity issues, false redirection issues and many other issues.
To solve this problem, we have to delete the cache (also called DNS flushing) and rebuild it. This is the topic of this article.
Checking If DNS Caching is Enabled:
You can check whether DNS caching is enabled very easily on Ubuntu. You need to have the nslookup or dig utility installed on your computer for this to work.
nslookup or dig command may not be available by default on your Ubuntu machine. But you can easily install it from the official package repository of Ubuntu.
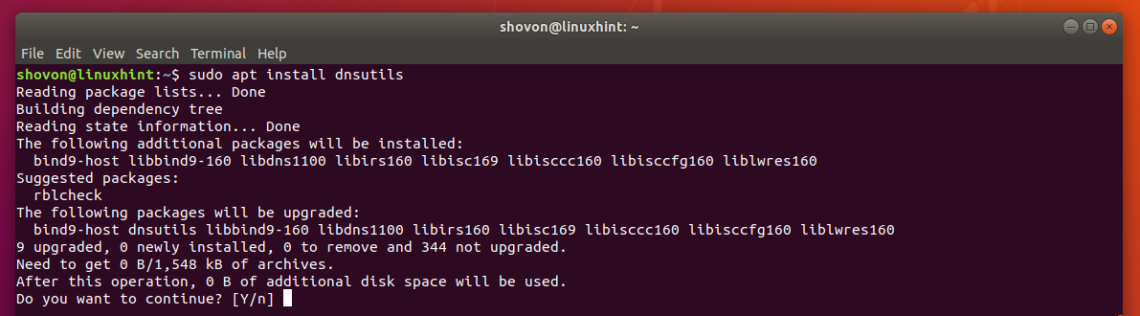
First, update the APT package repository cache with the following command:

The APT package repository cache should be updated.

Now install the nslookup and dig with the following command:

Now press y and then press to continue.
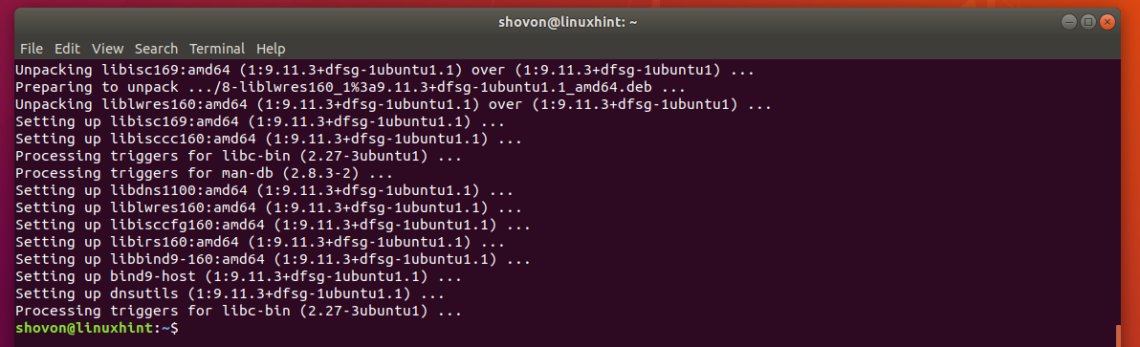
nslookup and dig commands should now be available.
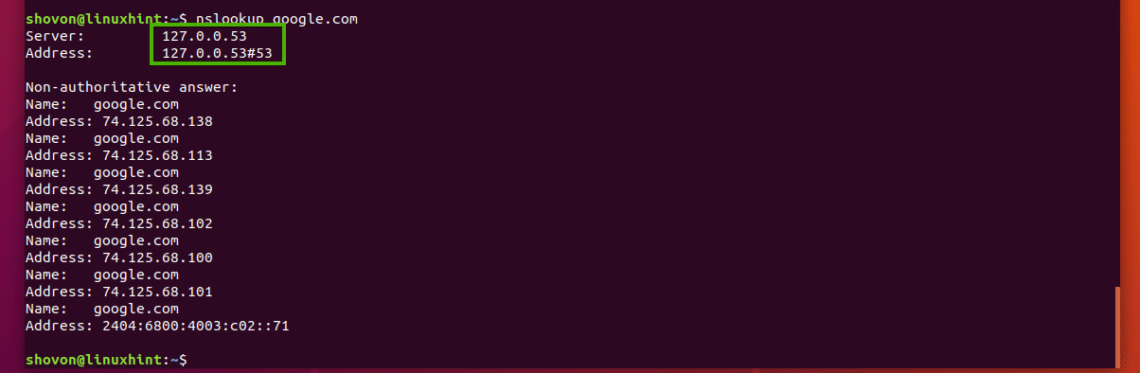
Now to test whether caching is enabled, run the following command:
As you can see, the DNS server used to resolve the domain name is 127.0.0.53, which is a loopback IP address. So DNS caching is enabled. If you have it disabled, then the DNS server should be anything other than 127.0.0.X.
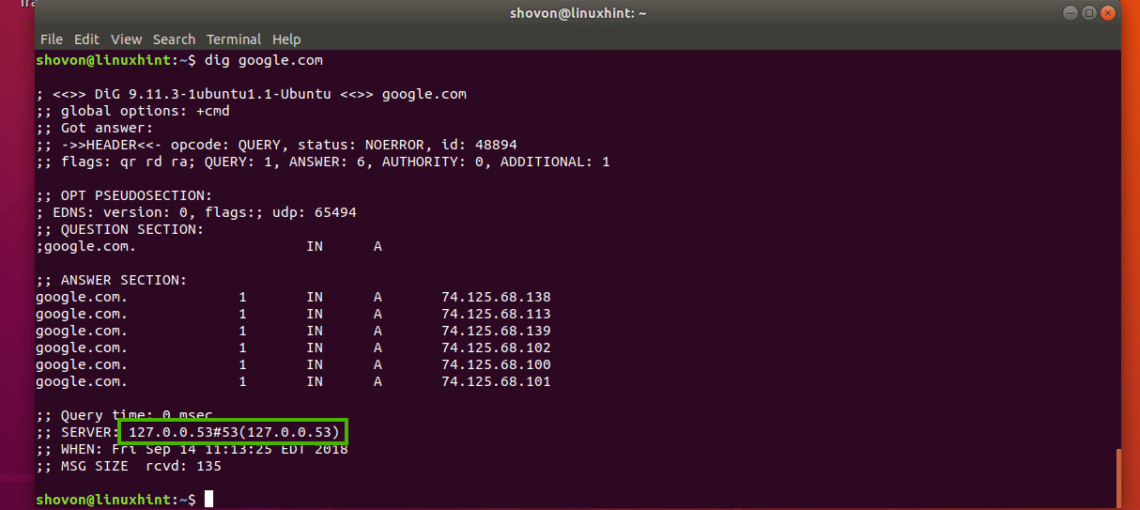
You can check the same thing with the dig command as well as follows:
As you can see, the loopback IP addresses is used as the DNS server addresses here as well. So, DNS caching is enabled.
Flushing DNS on Ubuntu 18.04 LTS:
Ubuntu 18.04 LTS uses a local DNS server and caches DNS queries by default. Ubuntu 18.04 LTS uses systemd for this purpose.
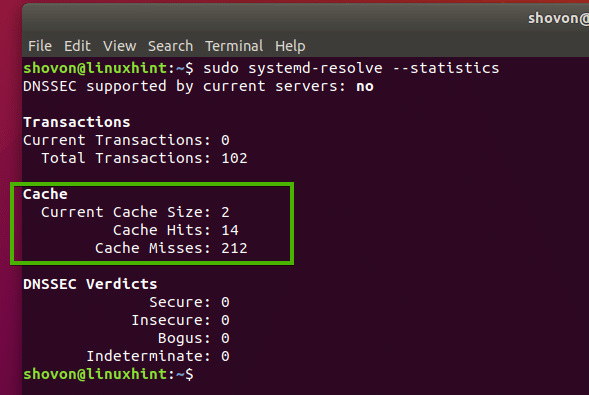
You can run the following command to check how many DNS entries are cached and many other information on Ubuntu 18.04 LTS:

As you can see, information about DNS cache is listed in the marked section of the screenshot below.
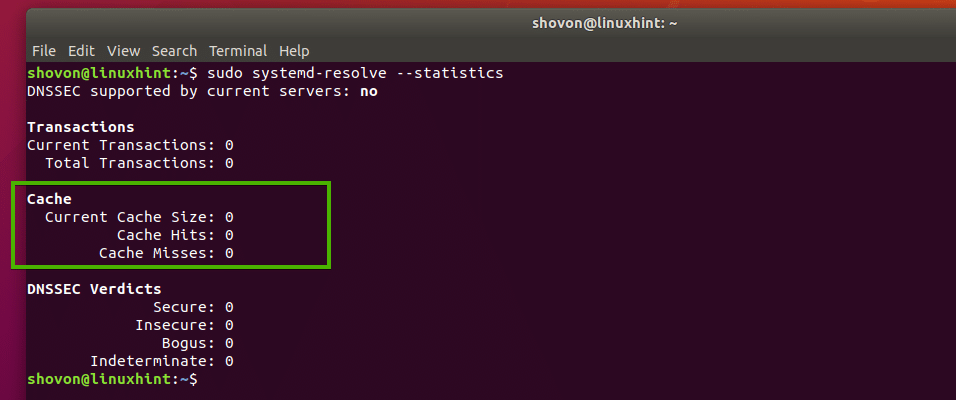
To flush the DNS cache on Ubuntu 18.04 LTS, run the following command:

You can also restart the systemd-resolved service to flush the DNS caches on Ubuntu 18.04 LTS.
To restart the systemd-resolved service, run the following command:

As you can see, the caches are cleared.
Flushing DNS Cache on Ubuntu 16.04:
On Ubuntu 16.04 LTS, DNS cache is not enabled by default. But some applications like bind, dnsmasq, nscd etc. may cache it.
If you’re using nscd for caching DNS queries, then you can flush the DNS cache by simply restarting the nscd service.
You can restart the nscd service on Ubuntu 16.04 LTS to flush DNS caches with the following command:
If you’re using dnsmasq for caching DNS, then restarting dnsmasq service with the following command should flush the DNS cache.
So, that’s how you flush DNS cache on Ubuntu 18.04 LTS and 16.04 LTS. Thanks for reading this article.
About the author
Shahriar Shovon
Freelancer & Linux System Administrator. Also loves Web API development with Node.js and JavaScript. I was born in Bangladesh. I am currently studying Electronics and Communication Engineering at Khulna University of Engineering & Technology (KUET), one of the demanding public engineering universities of Bangladesh.