- how to change DNS server permanently on Ubuntu 20.04?
- Записки IT специалиста
- Настраиваем динамическое обновление DNS-сервера BIND 9 при помощи ISC DHCP
- Общая схема сети
- Настройка первичного DNS-сервера BIND 9
- Настройка DHCP-серверов ISC DHCP
- How to set DNS Nameserver on Ubuntu 20.04
- Change DNS Nameserver via GUI
- Change DNS Nameserver via Config File
- Why Change DNS Nameserver on Ubuntu?
how to change DNS server permanently on Ubuntu 20.04?
I know there are other posts here asking this, but those suggestions do not help, the configuration keeps changing and I simply cannot get my own changes to persist. I have the Google 8.8.8.8 and 8.8.4.4 servers in my Network Manager configuration in the GUI, and systemd-resolv —status returns
Link 2 (enp38s0f1) Current Scopes: DNS DefaultRoute setting: yes LLMNR setting: yes MulticastDNS setting: no DNSOverTLS setting: no DNSSEC setting: no DNSSEC supported: no Current DNS Server: 8.8.8.8 DNS Servers: 8.8.8.8 8.8.4.4 DNS Domain: ~. ;; Query time: 0 msec ;; SERVER: 192.168.1.1#53(192.168.1.1) ;; WHEN: Mon Oct 05 11:08:26 EDT 2020 ;; MSG SIZE rcvd: 83 so my default route 192.168.1.1 as DNS . Furthermore, /etc/resolv.conf is a symlink to /run/systemd/resolve/resolv.conf , which in turn reads
# Generated by dhcpcd from enp38s0f1.dhcp, wlp0s20f3.dhcp # /etc/resolv.conf.head can replace this line domain fios-router.home nameserver 192.168.1.1 # /etc/resolv.conf.tail can replace this line The only enp38s0f1.dhcp file on this system (I’ve searched / ) is /run/dhcpcd/resolv.conf/enp38s0f1.dhcp , which reads
# Generated by dhcpcd from enp38s0f1.dhcp domain fios-router.home search fios-router.home nameserver 192.168.1.1 I have tried to write in other nameservers there, but they do not persist. In the past I’ve made the changes persistent by making the file immutable with chattr +i , but
lsattr /run/dhcpcd/resolv.conf/enp38s0f1.dhcp lsattr: Inappropriate ioctl for device While reading flags on /run/dhcpcd/resolv.conf/enp38s0f1.dhcp so that attribute is not available here. And besides, I shouldn’t have to make the file immutable anyway: there should presumably be some way I can control the DNS server.. Edit: In response to comments below:
$ dpkg -l *dnsmasq* --- Desired=Unknown/Install/Remove/Purge/Hold | Status=Not/Inst/Conf-files/Unpacked/halF-conf/Half-inst/trig-aWait/Trig-pend |/ Err?=(none)/Reinst-required (Status,Err: uppercase=bad) ||/ Name Version Architecture Description +++-================-===============-============-============================================ un dnsmasq (no description available) ii dnsmasq-base 2.80-1.1ubuntu1 amd64 Small caching DNS proxy and DHCP/TFTP server un dnsmasq-base-lua (no description available) Записки IT специалиста
Настраиваем динамическое обновление DNS-сервера BIND 9 при помощи ISC DHCP
Ранее мы рассматривали как создать отказоустойчивые конфигурации DNS и DHCP на базе открытых решений от ISC. Сегодня мы дополним цикл завершающей статьей, в которой расскажем, как настроить автоматическое обновление зон DNS-сервера на основе выданных DНСP-сервером адресов. Это полезно для больших сетей, где пользователи активно взаимодействуют друг с другом, так как для обращения к узлу будет достаточно знать его сетевое имя. Всю остальную необходимую информацию нам предоставит DNS-сервер, а DHCP-сервера будут следить за ее актуальностью.
Научиться настраивать MikroTik с нуля или систематизировать уже имеющиеся знания можно на углубленном курсе по администрированию MikroTik. Автор курса, сертифицированный тренер MikroTik Дмитрий Скоромнов, лично проверяет лабораторные работы и контролирует прогресс каждого своего студента. В три раза больше информации, чем в вендорской программе MTCNA, более 20 часов практики и доступ навсегда.
В рамках данной статьи мы будем подразумевать, что у вас уже есть настроенные и нормально функционирующие BIND 9 и ISC DHCP и будем в дальнейшем опираться на конфигурации, описанные в статьях:
Перед тем, как продолжать настройку рекомендуем внимательно с ними ознакомиться на предмет расположения файлов и настроек. Все инструкции актуальны для текущих выпусков операционных систем Debian и Ubuntu.
Общая схема сети
Чтобы вам было легче ориентироваться в адресах и настройках мы привели ниже общую схему сети. В ней мы будем использовать диапазон адресов 192.168.72.0/24 и домен interface31.lab. В данной сети у нас развернуты отказоустойчивые конфигурации DNS и DHCP, и мы добавили на схему все важные узлы.
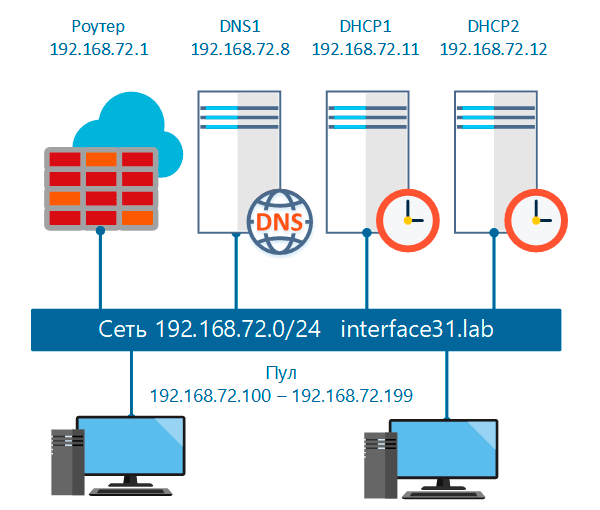
Внимательный читатель сразу может спросить, а почему мы изобразили на схеме два DHCP-сервера и только один DNS? Все очень просто, в отказоустойчивой конфигурации оба DHCP-сервера являются активными, выдают IP-адреса и, следовательно, должны уметь обновлять DNS-зону. В структуре DNS за внесение изменений в файлы зоны отвечает первичный сервер, все остальные реплицируют информацию с него и вносить изменения не имеют права, поэтому оба наших DHCP-сервера должны взаимодействовать только с первичным DNS, который мы и указали на схеме.
Настройка первичного DNS-сервера BIND 9
Прежде всего убедимся, что файлы зоны находятся в /var/lib/bind, это важно, так как AppArmor блокирует для службы named возможность записи в другие расположения. Если это не так, то просто скопируйте файлы зон в /var/lib/bind.
Затем откроем файл /etc/bind/named.conf.local и в самом начале добавим строку:
Она указывает на RNDC-ключ, который нужен для проверки подлинности серверов, имеющих право вносить изменения в зону, данный ключ создается автоматически при установке BIND.
Теперь приведем описания зон к следующему виду. Для прямой:
zone "interface31.lab" type master;
file "/var/lib/bind/db.interface31.lab";
allow-transfer < 192.168.72.9; >;
allow-update < key rndc-key; >;
>;
zone "72.168.192.in-addr.arpa" type master;
file "/var/lib/bind/db.192.168.72";
allow-transfer < 192.168.72.9; >;
allow-update < key rndc-key; >;
>;Обращаем внимание на опцию allow-update, которая разрешает обновлять зоны предъявителю RNDC-ключа и опцию file, которая обязательно должна указывать на расположение файлов зон в /var/lib/bind.
Проверяем отсутствие ошибок в конфигурации:
И перезапускаем службу DNS-сервера:
Более никаких настроек DNS-сервера не требуется.
Настройка DHCP-серверов ISC DHCP
Для каждого из серверов нам потребуется провести одинаковые настройки, поэтому разберем их только для одного из них.
Прежде всего скопируем с первичного DNS-сервера файл RNDC-ключа /etc/bind/rndc.key и поместим его в /etc/dhcp, затем установим на него следующие права:
chown root:root /etc/dhcp/rndc.key
chmod 640 /etc/dhcp/rndc.key
После этого откроем /etc/dhcp/dhcpd.conf и найдем в нем опцию ddns-update-style, которую заменим следующим блоком:
ddns-updates on;
ddns-update-style interim;
ignore client-updates;
update-static-leases on;
Данные опции включают динамическое обновление DNS и предписывают делать это в том числе и для статических записей. Это общие настройки сервера, сохраняем изменения и входим.
Теперь будем настраивать непосредственно область, настройки которой в нашем случае хранятся в файле /etc/dhcp/dhcpd.d/subnet.conf. Прежде всего добавим в самое его начало строки:
include "/etc/dhcp/rndc.key";zone interface31.lab. primary 192.168.72.8;
key rndc-key;
>zone 72.168.192.in-addr.arpa. primary 192.168.72.8;
key rndc-key;
>
В них мы импортировали RNDC-ключ и указали DNS-зоны, которые мы хотим обновлять. Обратите внимание, что имена зон мы пишем в абсолютном формате, т.е. с точкой на конце. Внутри каждой секции указываем адрес первичного DNS-сервера и ключ доступа к нему.
Ниже, в секцию subnet добавляем следующие опции:
option domain-name "interface31.lab";
option domain-search "interface31.lab";
Проверяем конфигурацию на ошибки:
dhcpd -t -cf /etc/dhcp/dhcpd.confИ перезапускаем DHCP-сервер:
systemctl restart isc-dhcp-serverЗатем выполняем аналогичные настройки на втором сервере.
На этом настройка закончена. Проверить работу мы можем после получения клиентом адреса выполнив DNS-запрос по его имени хоста:
Либо с явным указанием DNS-сервера, которому направляем запрос:
nslookup WIN10LAB 192.168.72.9 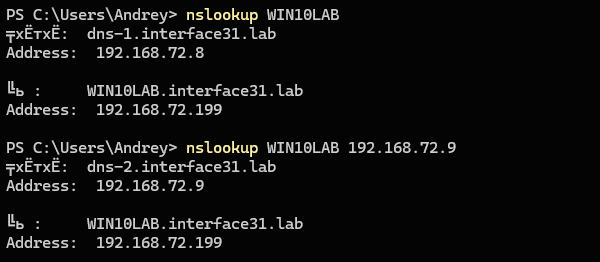
Как видим, настроить динамическое обновление DNS-зон на основе данных аренды DHCP-сервера совсем несложно, получив при этом полноценное управление инфраструктурой при помощи доменных имен, не задумываясь какой именно IP-адрес в данный момент получен узлом.
Научиться настраивать MikroTik с нуля или систематизировать уже имеющиеся знания можно на углубленном курсе по администрированию MikroTik. Автор курса, сертифицированный тренер MikroTik Дмитрий Скоромнов, лично проверяет лабораторные работы и контролирует прогресс каждого своего студента. В три раза больше информации, чем в вендорской программе MTCNA, более 20 часов практики и доступ навсегда.
Помогла статья? Поддержи автора и новые статьи будут выходить чаще:
![]()
![]()
Или подпишись на наш Телеграм-канал:
How to set DNS Nameserver on Ubuntu 20.04
The Domain Name System (DNS) translates text-based domain names to numeric IP addresses. By default, most networks are configured to work with DNS servers supplied by the internet service provider. However, users are free to change the DNS nameservers.
This tutorial will show you how to change DNS nameservers on your Ubuntu machine using GUI or the command line.
- Ubuntu 20.04 (both methods also work on Ubuntu 18.04 and later)
- Access to the terminal
- Sudo privileges
Change DNS Nameserver via GUI
Use Ubuntu Settings to complete all the steps to change DNS addresses via the graphical user interface.
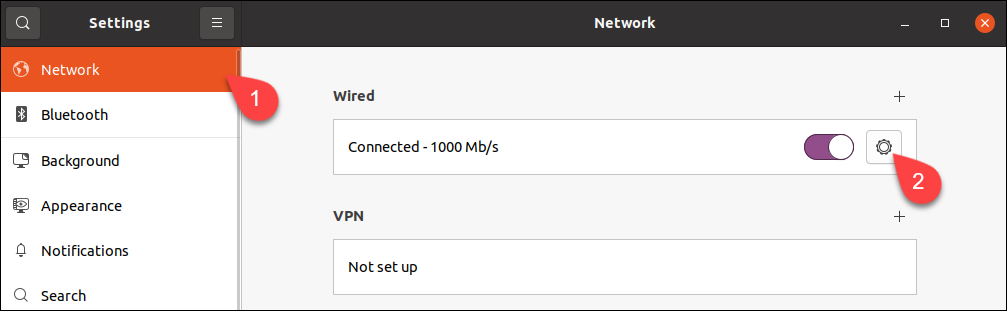
1. Launch Settings and click the Network tab in the menu on the left.
2. Click the cogwheel next to the connection you wish to set up.
Note: To change the settings for a wireless connection, select the Wi-Fi tab, choose a wireless network and proceed with the steps below.
3. Go to the IPv4 tab.
4. Disable automatic DNS configuration by turning off the switch next to the DNS field.
5. Type new DNS addresses in the field. The example shows Google’s public DNS nameservers.
6. Click Apply.
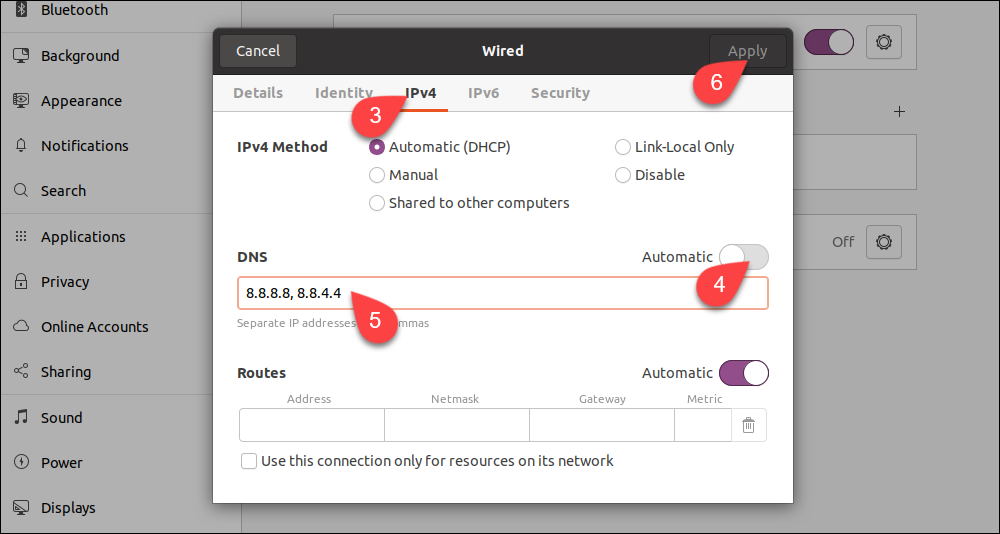
The system is now configured to work with the new DNS servers.
Note: If you wish to set up IPv6 nameservers, go to the IPv6 tab and enter them there. The IPv6 address format is different from IPv4. For example, Google’s IPv6 DNS servers are: 2001:4860:4860::8888 and 2001:4860:4860::8844 .
Change DNS Nameserver via Config File
If you do not use a GUI, change DNS settings with the command line Netplan tool.
1. Go to the Netplan directory:
2. List the directory contents with ls to see the name of the yaml file containing network configuration.

Open the file in a text editor. Your file may have a different name.
sudo nano 01-network-manager.yamlEthernet connections are listed in the ethernets section of the file. If there are any wireless connections, you can find them in the wifis section. Netplan stores the current DNS configuration parameters in nameservers subsections of each section.
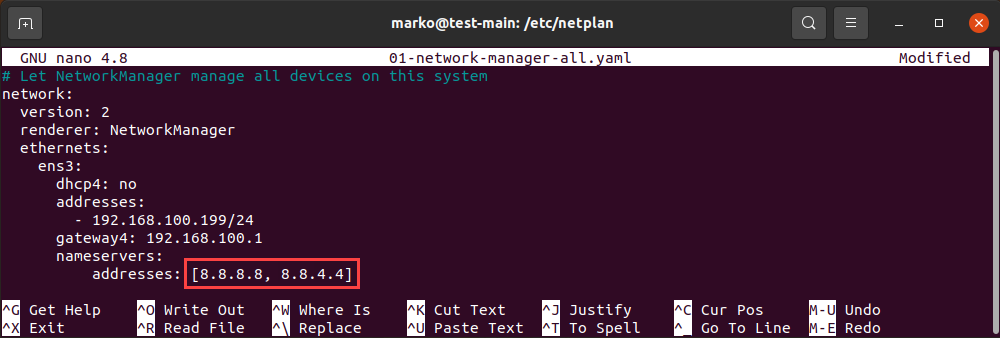
Replace the addresses located in the file with the DNS addresses you want to use. You can enter more than two addresses. Save the changes and exit.
Note: The file on your system may lack the entire ethernets or wifis section. In that case, add the lines that are missing, making sure you respect the indentation provided in the example.
3. Apply the changes you made in the config file:
If the operation is successful, there is no output. To check if the system successfully applied the changes, type:
resolvectl status | grep "DNS Server" -A2The output lists your current DNS servers:

Why Change DNS Nameserver on Ubuntu?
In most cases, your default DNS settings offer optimal performance. However, there are scenarios in which you should consider switching to a third-party DNS provider:
- Large companies with better infrastructure are usually more capable of providing uninterrupted DNS service. If your ISP is unreliable and you experience frequent downtimes, switching the DNS provider may be the solution.
- Third-party DNS servers can be faster than those provided to you by your ISP.
Note: Since latency is the primary consideration for DNS, a fast third-party server located far away may provide inferior service to a slower one that is closer to you.
- Some DNS providers offer filters that prevent phishing sites from reaching your computer. The same mechanism is also used to block sensitive content on the internet. Businesses often employ this DNS feature.
- Internet Service Providers sometimes block content on the DNS level, so switching to another DNS nameserver may help you access some geo-restricted websites.
Note: Learn how to install PowerDNS on Ubuntu, a flexible and robust DNS solution.
This tutorial showed you how to set your DNS nameservers on Ubuntu, either using a GUI or CLI.