- how to change DNS server permanently on Ubuntu 20.04?
- How to refresh/obtain new DNS servers on Ubuntu Server 20.04?
- Update your DNS server on Linux
- Updating DNS by editing “/etc/resolv.conf”
- Updating DNS by editing “/etc/systemd/resolved.conf”
- Change DNS Server Settings in Linux
- When must the DNS Server be Changed?
- Tutorial Change DNS Server Settings in Linux
- How to Change your DNS Server in GNOME
- How to Change DNS settings in Plasma
- Change your DNS Server Using Command line
- Change DNS on Linux Permanently
- Changing systemd configurations
- Use resolvconf
- FAQ
- How to change DNS Server in through an Ethernet cable?
- Conclusion
how to change DNS server permanently on Ubuntu 20.04?
I know there are other posts here asking this, but those suggestions do not help, the configuration keeps changing and I simply cannot get my own changes to persist. I have the Google 8.8.8.8 and 8.8.4.4 servers in my Network Manager configuration in the GUI, and systemd-resolv —status returns
Link 2 (enp38s0f1) Current Scopes: DNS DefaultRoute setting: yes LLMNR setting: yes MulticastDNS setting: no DNSOverTLS setting: no DNSSEC setting: no DNSSEC supported: no Current DNS Server: 8.8.8.8 DNS Servers: 8.8.8.8 8.8.4.4 DNS Domain: ~. ;; Query time: 0 msec ;; SERVER: 192.168.1.1#53(192.168.1.1) ;; WHEN: Mon Oct 05 11:08:26 EDT 2020 ;; MSG SIZE rcvd: 83 so my default route 192.168.1.1 as DNS . Furthermore, /etc/resolv.conf is a symlink to /run/systemd/resolve/resolv.conf , which in turn reads
# Generated by dhcpcd from enp38s0f1.dhcp, wlp0s20f3.dhcp # /etc/resolv.conf.head can replace this line domain fios-router.home nameserver 192.168.1.1 # /etc/resolv.conf.tail can replace this line The only enp38s0f1.dhcp file on this system (I’ve searched / ) is /run/dhcpcd/resolv.conf/enp38s0f1.dhcp , which reads
# Generated by dhcpcd from enp38s0f1.dhcp domain fios-router.home search fios-router.home nameserver 192.168.1.1 I have tried to write in other nameservers there, but they do not persist. In the past I’ve made the changes persistent by making the file immutable with chattr +i , but
lsattr /run/dhcpcd/resolv.conf/enp38s0f1.dhcp lsattr: Inappropriate ioctl for device While reading flags on /run/dhcpcd/resolv.conf/enp38s0f1.dhcp so that attribute is not available here. And besides, I shouldn’t have to make the file immutable anyway: there should presumably be some way I can control the DNS server.. Edit: In response to comments below:
$ dpkg -l *dnsmasq* --- Desired=Unknown/Install/Remove/Purge/Hold | Status=Not/Inst/Conf-files/Unpacked/halF-conf/Half-inst/trig-aWait/Trig-pend |/ Err?=(none)/Reinst-required (Status,Err: uppercase=bad) ||/ Name Version Architecture Description +++-================-===============-============-============================================ un dnsmasq (no description available) ii dnsmasq-base 2.80-1.1ubuntu1 amd64 Small caching DNS proxy and DHCP/TFTP server un dnsmasq-base-lua (no description available) How to refresh/obtain new DNS servers on Ubuntu Server 20.04?
I work with a «virtual private server» in the cloud, which has Ubuntu 20.04 installed. I’ve noticed that — occasionally — when I reboot the server, I cannot ping anything:
$ ping yahoo.com ping: yahoo.com: Temporary failure in name resolution $ resolvectl query yahoo.com yahoo.com: resolve call failed: No appropriate name servers or networks for name found As far as I understand, since this is Ubuntu 20.04, /etc/resolv.conf is not really used anymore, and systemd overtakes handling of DNS. But, in any case, I would not want to manually specify DNS servers (as the old trick of putting Google’s 8.8.8.8 in /etc/resolv.conf ) — apparently, most of the time when DNS works: when the server boots, it somehow «obtains» a DNS server. So, I would like to repeat this process, except I have no idea how. (By analogy, if I wanted to refresh/obtain new IP address for a machine, I’m aware that the machine should ask the DHCP server for it — so eventually, it is easy to lookup, that in order to do that, I should do sudo dhclient -r eth0 for instance) Note also, that when DNS name resolution does not work, I do not have DNS Servers listed in this output:
$ systemd-resolve --status Global LLMNR setting: no MulticastDNS setting: no DNSOverTLS setting: no DNSSEC setting: no DNSSEC supported: no DNSSEC NTA: 10.in-addr.arpa 16.172.in-addr.arpa 168.192.in-addr.arpa 17.172.in-addr.arpa 18.172.in-addr.arpa 19.172.in-addr.arpa 20.172.in-addr.arpa 21.172.in-addr.arpa 22.172.in-addr.arpa 23.172.in-addr.arpa 24.172.in-addr.arpa 25.172.in-addr.arpa 26.172.in-addr.arpa 27.172.in-addr.arpa 28.172.in-addr.arpa 29.172.in-addr.arpa 30.172.in-addr.arpa 31.172.in-addr.arpa corp d.f.ip6.arpa home internal intranet lan local private test Link 2 (eth0) Current Scopes: none DefaultRoute setting: no LLMNR setting: yes MulticastDNS setting: no DNSOverTLS setting: no DNSSEC setting: no DNSSEC supported: no sudo /etc/init.d/networking restart . however, I’d rather not run this command, since I’m connected to the server over ssh , so I imagine that the restart of whole network, would also kill my ssh terminal session, and possibly have other unintended consequences. So, I am wondering: is there a command I could run in an ssh session, that would refresh or obtain new DNS servers for this machine — using a similar mechanism that is used upon boot, when DNS actually works on this machine?
Update your DNS server on Linux
On the top right of your desktop, open the drop down and select either Wired Settings or WiFi Settings .
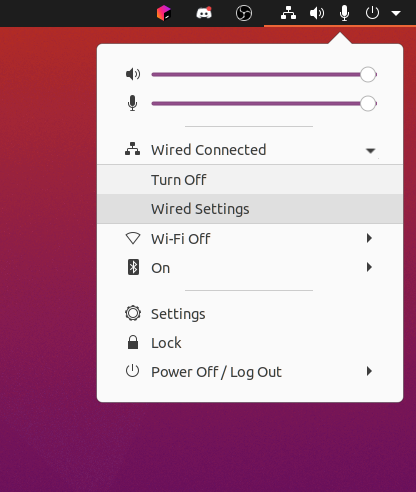
Next press the gear icon next to the connection.

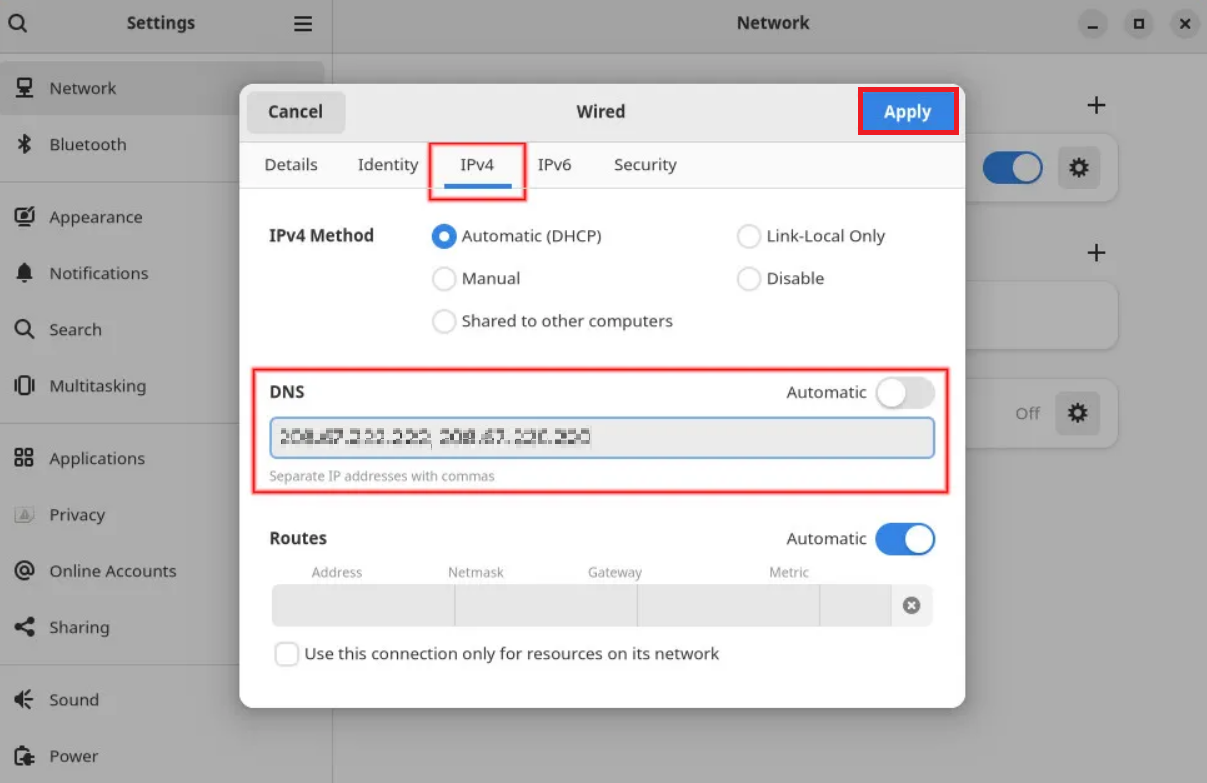
A window should pop up, nagivate to the IPv4 tab, disable Automatic in the DNS row and put 8.8.8.8,8.8.4.4 in the text field.

Updating DNS by editing “/etc/resolv.conf”
Linux uses the file /etc/resolv.conf to define the DNS servers it uses. However, this file is often managed by another program on the computer.
View the contents of /etc/resolv.conf by running cat /etc/resolv.conf . If you see a warning similar to

If you do not see this warning, change the file contents to
nameserver 8.8.8.8 nameserver 8.8.4.4 Updating DNS by editing “/etc/systemd/resolved.conf”
Systemd is a program on many linux distributions that help manage the operating system. To update the DNS we’ll edit /etc/systemd/resolved.conf . Find A part in the file that looks like
[Resolve] DNS=192.168.1.1 FallbackDNS=8.8.8.8 Change lines DNS=. and FallbackDNS=. to be
[Resolve] DNS=8.8.8.8 FallbackDNS=8.8.4.4 Save the file and run service systemd-resolved restart .
Change DNS Server Settings in Linux

Domain name server (DNS) translates the internet address to the numeric machine address. A DNS server converts each domain name you enter into your browser into an IP address. The website you want to visit can then be found and connected to using that address by your browser. Since your internet speed is affected by the DNS server you use, this article will teach you how to change DNS server settings in Linux.
After buying Linux VPS, you might need to change the DNS server on Linux whenever you find the servers your internet provider has set are not what you consider. Join us with this article to learn two different methods to change DNS server settings in Linux to troubleshoot the misconfiguration of your device’s DNS.
When must the DNS Server be Changed?
Previously, you have learned all about DNS and Trustable DNS servers were introduced to you. The setup and performance of DNS servers can have a significant impact on your online experience because they are such a fundamental component of internet communication. Every time you attempt to connect to a website, slow DNS servers will result in delays. You may find up on websites you didn’t plan to visit if DNS servers are misconfigured. DNS servers can also be configured to prevent you from viewing particular websites by your internet service provider, the government, or another organization. All of these potential issues can be fixed by switching your DNS servers.
This article will provide step-by-step instructions on how to modify your device’s DNS if it is incorrectly configured or if you want to do so to get around a website block. In the end, you will be able to change your DNS server with any version of Linux you are using fast and easily.
Tutorial Change DNS Server Settings in Linux
In this article, you will learn to change your DNS settings in Desktop and Terminal environments. Regardless of whether you are using Linux or windows, you can test the method of clearing DNS cache to solve some issues like getting 404 error or the problem accessing the site.
Let’s go through this guide by learning how to find the current DNS server on Linux. Simply, open your terminal and run the command below to see the current DNS server(s).
Your current network connections, together with the DNS servers utilized by each, are displayed in the output. Most of the time, only one connection will be active, and DNS information won’t be displayed for other entries.
How to Change your DNS Server in GNOME
Open the system setting app and click on Wi-Fi at the top left to switch to a new DNS server in GNOME. Once the list of available network connections is shown, you can see the network you are connected to at the top of the list (which displays the word Connected). Right beside that, click on the gear icon.
Click on the IPv4 tab in the dialog box that appears. Your preferred DNS servers can be entered in the space provided in the dialog box’s center. There is a toggle switch with the word Automatic right above the box. Just turn off automated settings and type your new DNS servers in the box provided, separating them with commas. After configuring your new DNS server addresses, simply click Apply in the top right corner to save your settings. To make sure the modifications were applied, use the resolvectl status command once more.
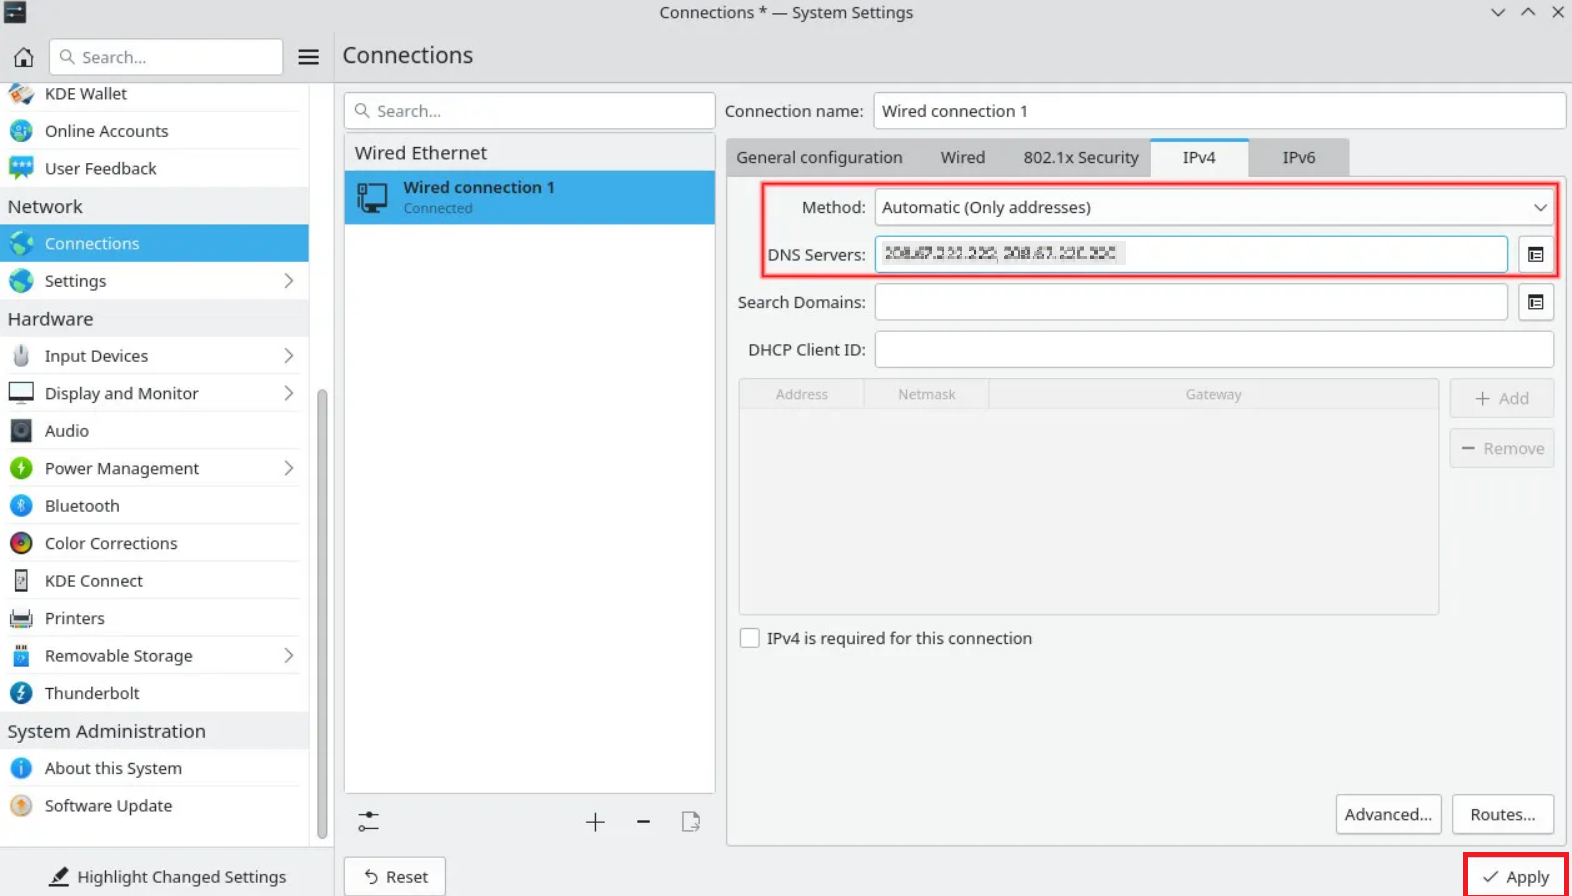
How to Change DNS settings in Plasma
Switching to a new DNS server in KDE Plasma is very similar to the above method. First, open the system settings app and go to the Network section. Choose your current connection from the list of connections by clicking Connections under Network. To access advanced settings, click the IPv4 tab on the right-hand side of the page.
The top two input fields are what you want to modify here. The first one, titled “Method,” will by default read “Automatic.” Select Automatic from the drop-down menu by clicking on it (Only Addresses). Now, enter your DNS server IP addresses in the second field, separated by commas. A minimum of two servers should be entered, though you are free to enter more. Finally, press Apply in the bottom right corner, and your system will begin utilizing the new DNS servers.
Change your DNS Server Using Command line
For any reason, if you are not interested in using your graphical interface to change DNS server settings in Linux, do this at the command line. Since the DNS configurations are stored in a file named resolv.conf, use your favorite text editor to open /etc/resolv.conf with sudo privileges.
Then, add the line for Domain nameservers you consider to use.] Finally, you can save resolv.conf. If you are using the nano text editor, press Crtl + X and then Y to save the file. All these changes are done Temporarily and resolv.conf will be reset when you run dhclient. So, if you need to change DNS server settings in Linux Permanently, continue reading this tutorial.
Change DNS on Linux Permanently
Let’s see what ways you can use to make DNS changes permanent in Linux.
Changing systemd configurations
Firstly, you can use the method of changing systemd configurations to change the DNS changes permanently. To do this, again with sudo privileges open /etc/systemd/resolved.conf.
sudo nano /etc/systemd/resolved.confThen, uncomment the DNS and Fallback DNS lines and add your considered name servers and save the file to change the nameservers.
Use resolvconf
The second way to permanently change DNS on Linux, you can install the resolvconf software to control DNS. Between applications that consume DNS information and programs that provide DNS information, this package serves as a middleman. This package automatically generates DNS settings upon installation and replaces the data in /etc/resolv.conf with its own settings.
Therefore, if we change the program’s default DNS settings, our new, permanent DNS settings will be those that are consistently added to /etc/resolv.conf.
To install resolvconf on Debian/Ubuntu, run:
sudo apt install resolvconfAnd use the following command to install resolvconf on Arch:
Finally, we want to add our DNS to the header file of the automatically created settings. Open /etc/resolvconf/resolv.conf.d/head and place the nameservers there, just as we did for resolv.conf, to do this.
sudo vim /etc/resolvconf/resolv.conf.d/headIn the end, you can check which DNS is in use. In this way, you will view the result of your modifications and verify if the changes have been reflected. To do this, run the command below:
Well done. That was all you could do to change DNS server settings in Linux.
FAQ
How to change DNS Server in through an Ethernet cable?
Open the system settings app, click on Wi-Fi at the top left, and click on Network. The other required steps are the same you reviewed in the article.
Conclusion
In this article, you learned how to Change DNS Server Settings in Linux. Also, you reviewed how to do this temporarily and permanently. If you follow the above steps properly then you can smoothly install without any errors. If you encounter any problems, please do not hesitate to contact us. Our technical support team will try their best to solve your problems.