- How to Install UrBackup [Server/Client] Backup System in Ubuntu
- Testing Environment Setup
- Installing Urbackup Server on Ubuntu 20.04
- Step 2: Create Admin User on Urbackup Server
- Step 3: Add a New Backup Client in Urbackup
- Step 4: Configure Client Backups on Urbackup
- Быстрая настройка резервного копирования под Linux и не только (UrBackup)
How to Install UrBackup [Server/Client] Backup System in Ubuntu
Backups are an integral part of any operating system. They ensure that critical copies of data are always available in the unfortunate event that the system crashes or something goes wrong.
Urbackup is an efficient and easy-to-use Client-Server backup system for Linux and Windows Systems. It’s a fast and reliable Linux backup tool that provides a web interface that allows you to add clients whose files and directories need to be backed up.
Urbackup employs deduplication to store backups on either Windows or Linux servers. Backups are created quietly without interrupting other running processes in the system. Once backed up, files can be restored through a web interface while drive volumes can be restored with a bootable USB-Stick.
In this guide, we walk you through how to install Urbackup and perform a backup on Ubuntu-based distributions.
Testing Environment Setup
To illustrate Urbackup in action, we are going to have a setup of two nodes as you can see below.
- Urbackup Server (Ubuntu 20.04) with IP 192.168.2.104
- Client System (Linux Mint 20.03) with IP 192.168.2.105
Installing Urbackup Server on Ubuntu 20.04
The first step is to install Urbackup on the server. So, log into the server and refresh the repositories.
Next, install the following dependencies that will be required along the way during the installation.
$ sudo apt install curl gnupg2 software-properties-common -y
The urbackup server is not provided by default on Ubuntu repositories. As such, we are going to install it from the PPA provided by the developer.
$ sudo add-apt-repository ppa:uroni/urbackup
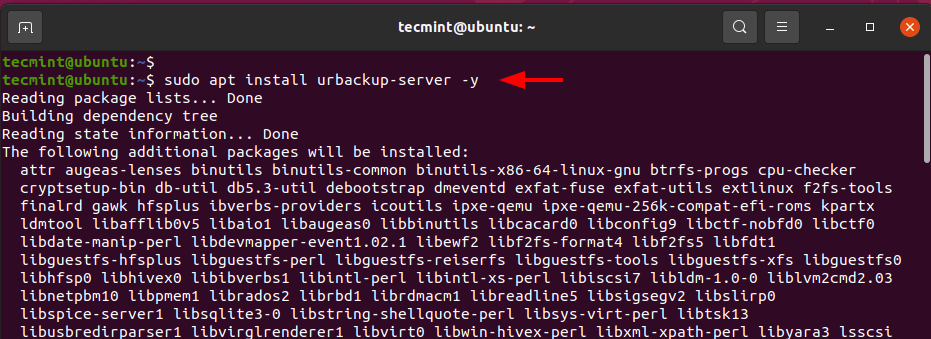
Once the PPA is added to the system, refresh the repositories once more and install the urbackup server.
$ sudo apt update $ sudo apt install urbackup-server -y
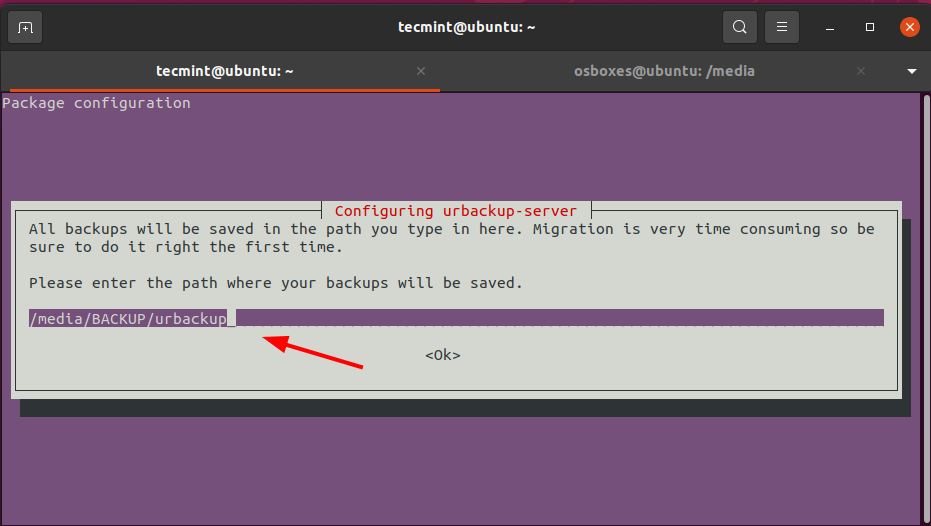
Along the way, you will be required to provide a path where your backups will be saved. A default path will be provided for at /media/BACKUP/urbackup. This works just fine, and you can as well specify your own path. In this case, we will go with the default path and press the TAB key and hit ENTER.
Once installed, the Urbackup service starts automatically. You can confirm this run by running the following command.
$ sudo systemctl status urbackupsrv
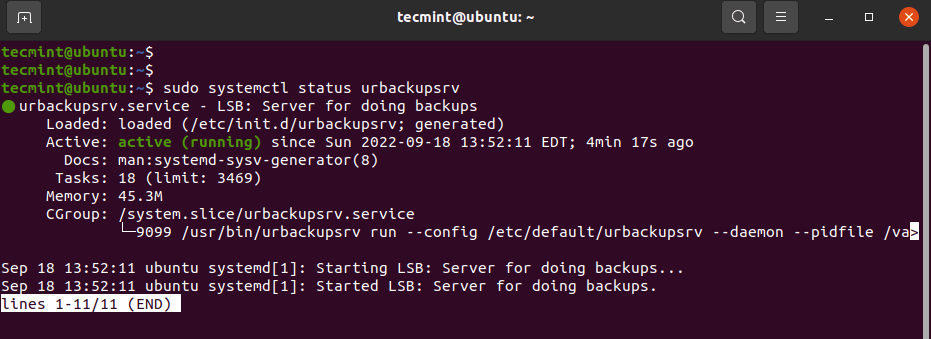
The output above shows that the service is up and running. You can also enable it to start on system startup as follows.
$ sudo systemctl enable urbackupsrv
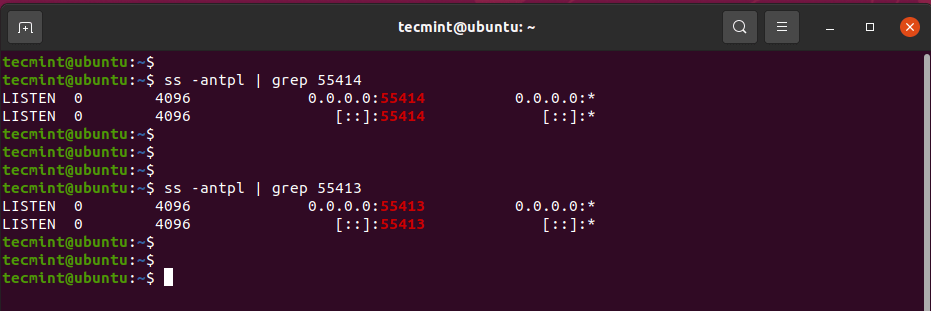
The Urbackup server listens on ports 55414 and 55413. You can confirm this using the ss commands:
$ ss -antpl | grep 55414 $ ss -antpl | grep 55413
You can now access the Urbackup web UI by browsing your server’s IP address.
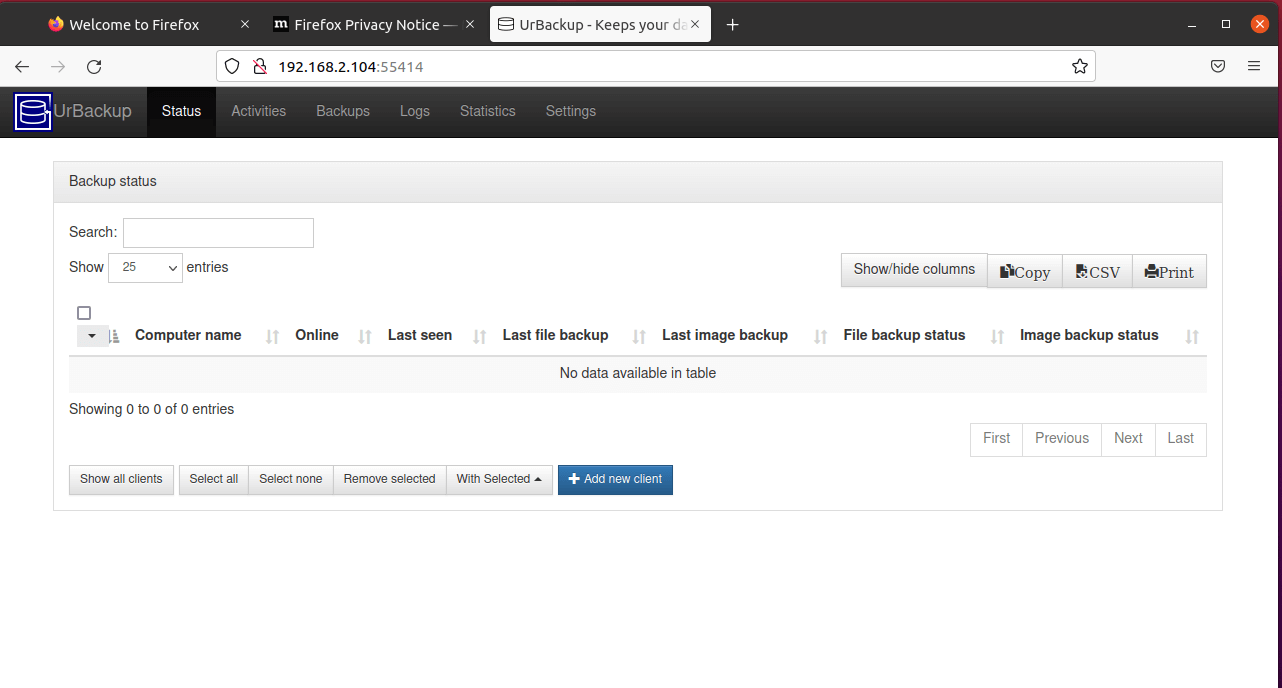
Step 2: Create Admin User on Urbackup Server
Urbackup has successfully been installed, but it is accessible to everyone since there’s no authentication required. In this step, we will create an administrative user in order to provide authentication.
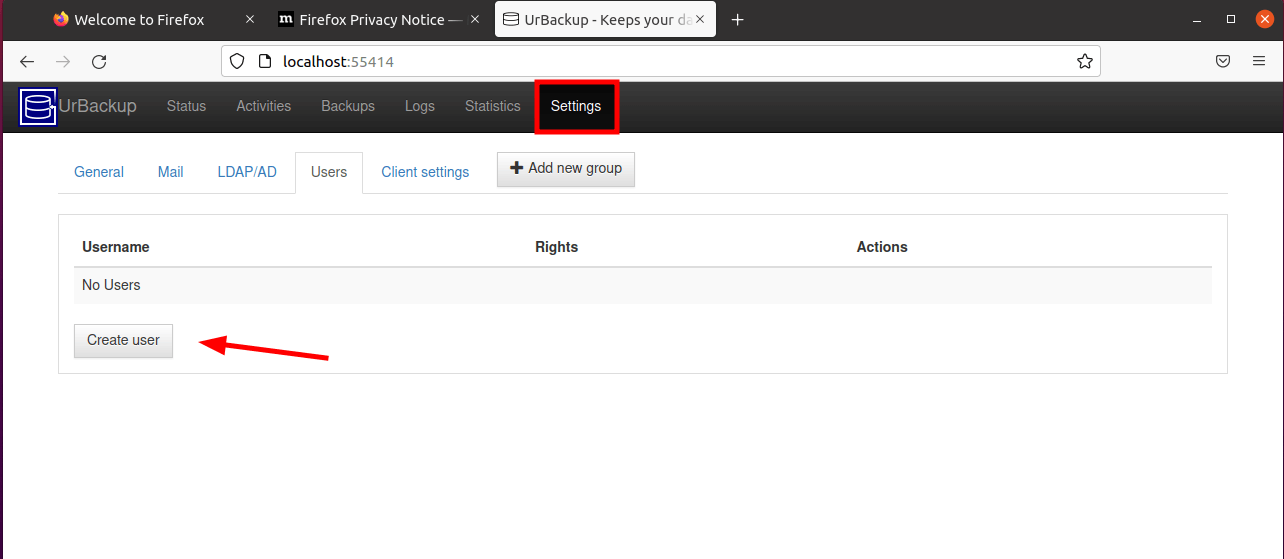
On the WebUI, click on Settings –> Create User.
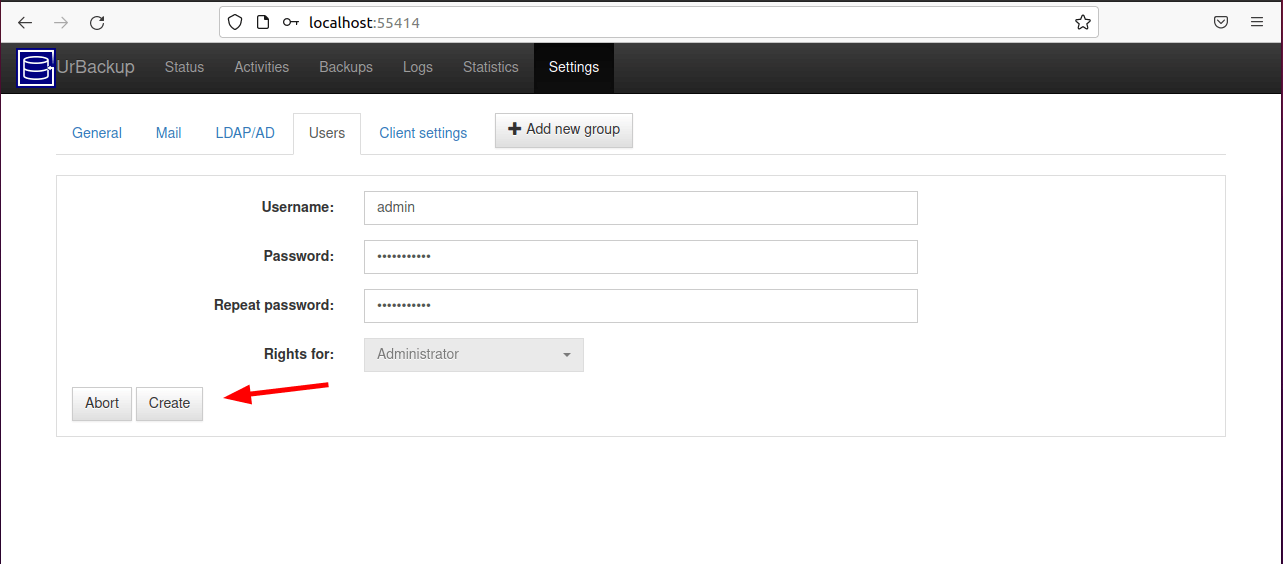
Provide the username and password and click ‘Create’ to add the user.
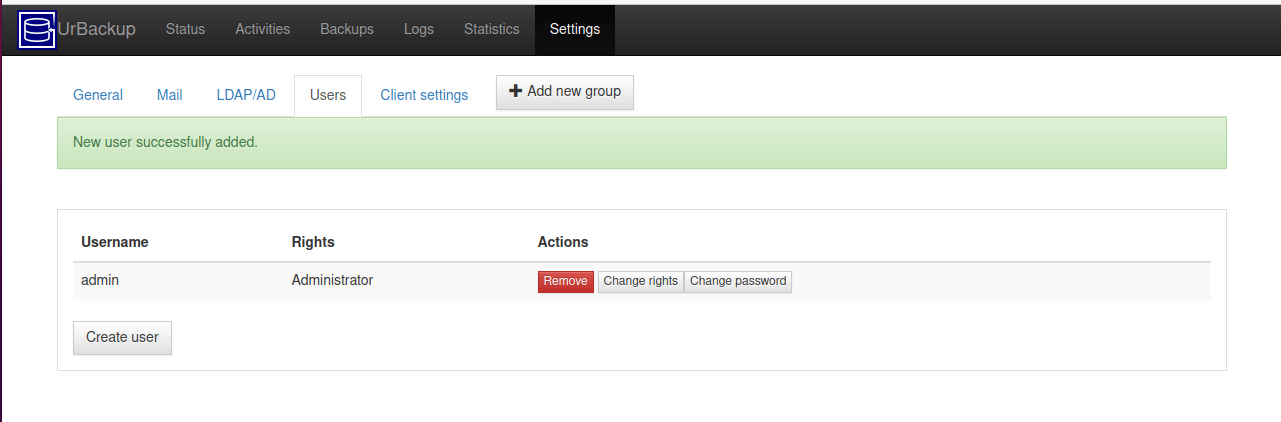
Thereafter, the user will be listed on the dashboard as shown.
Step 3: Add a New Backup Client in Urbackup
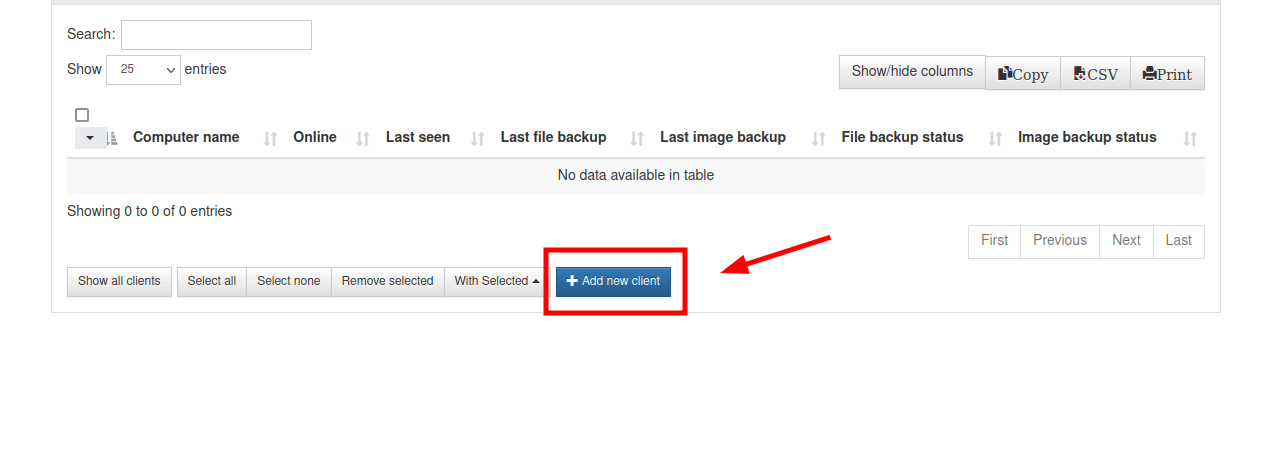
After successfully installing the UrBackup server, the next item on the list is to add a client whose files and directories will be backed up on the server.
To do this, click the ‘Add New Client‘ button.
On the page that appears, click ‘Add new internet/active client‘ and provide your preferred name for the client. Then provide the IP address of the client system and click ‘Add Client‘.
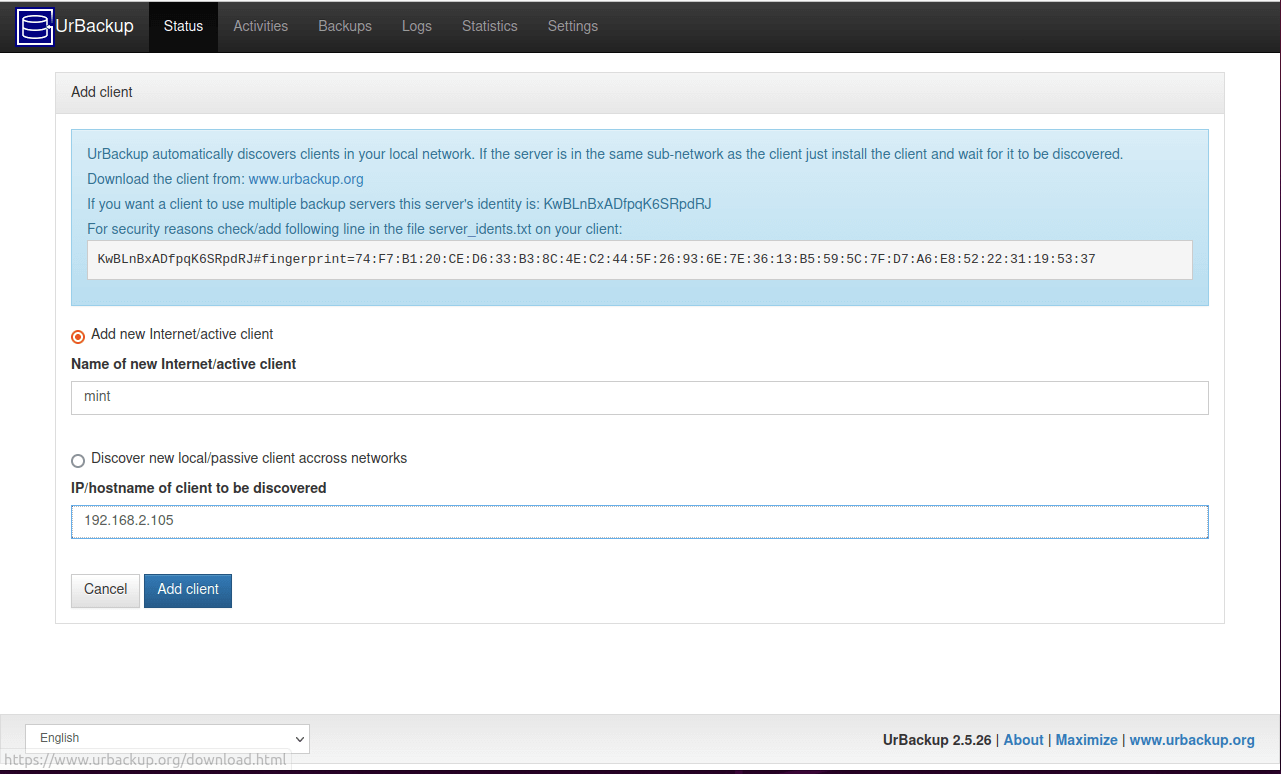
A command to be executed on the remote client system will be displayed as shown.

So, head over to the client system and execute the command. In this case, we are running the command on the Linux Mint system which is our client system.
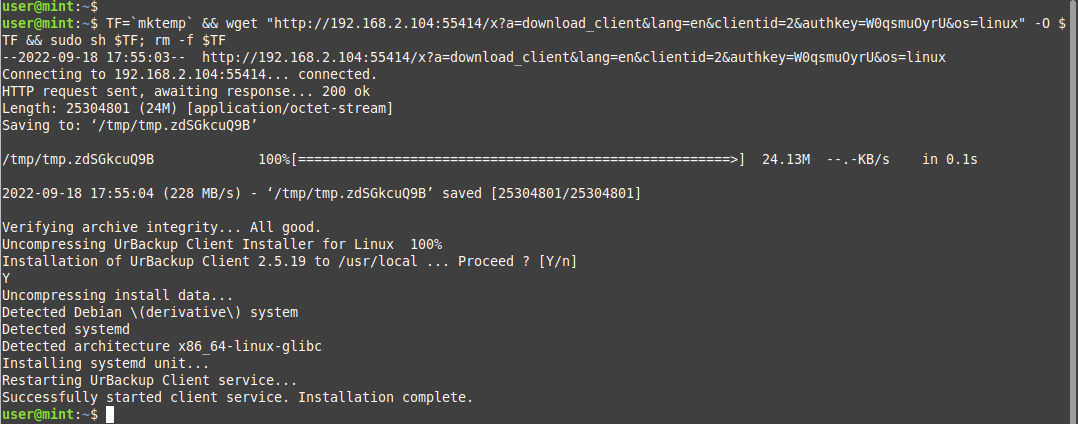
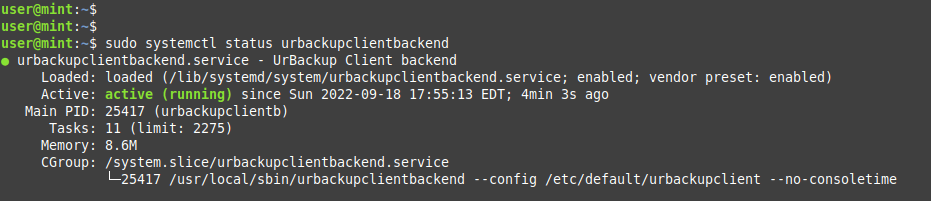
Running the command starts the Urbackup client service. You can verify its status as shown.
$ sudo systemctl status urbackupclientbackend
Step 4: Configure Client Backups on Urbackup
The next step is to configure backups. On the client system, we are going to back up the home directory by running the following command. Feel free to provide your own preferred directory.
# /usr/local/bin/urbackupclientctl add-backupdir -x -f -d /home
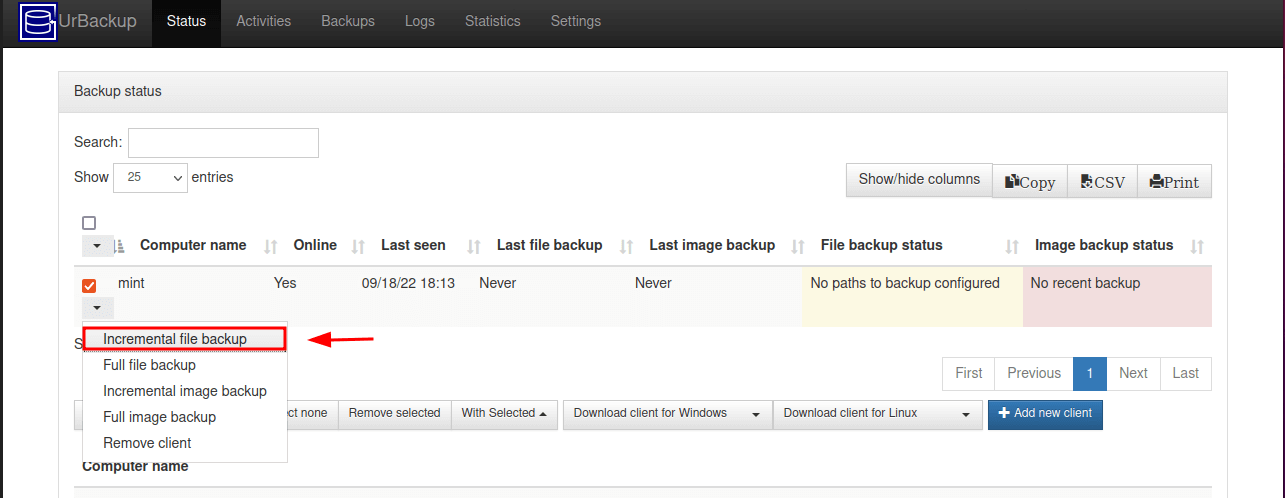
Now head back to your Urbackup server and you will notice that the client system has been listed as online. You can now run the backup manually otherwise, the backup will run as per the default schedule.
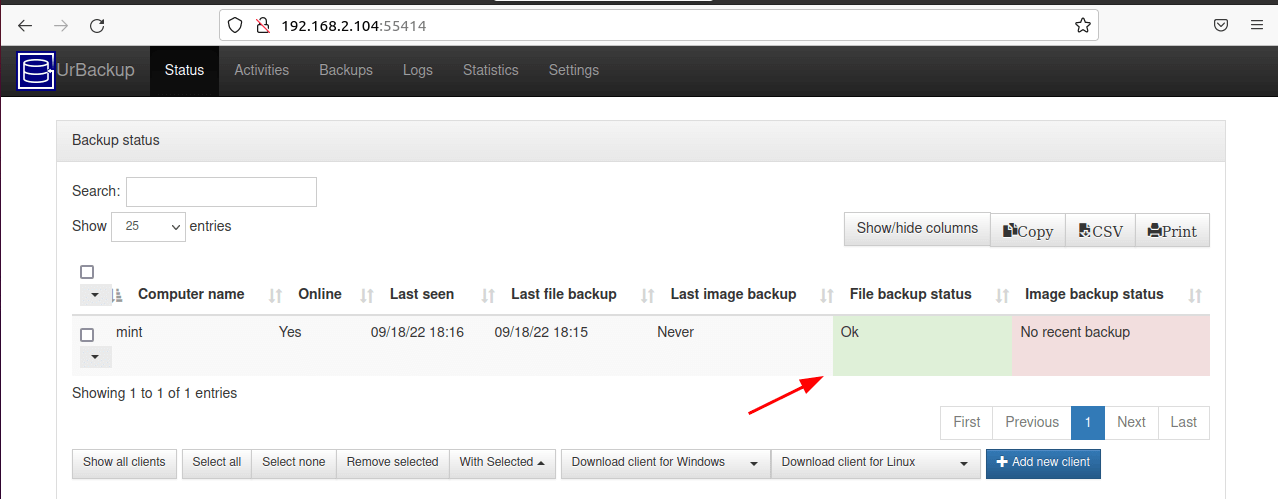
Soon after that, you will get an ‘Ok’ status showing that the backup was complete.
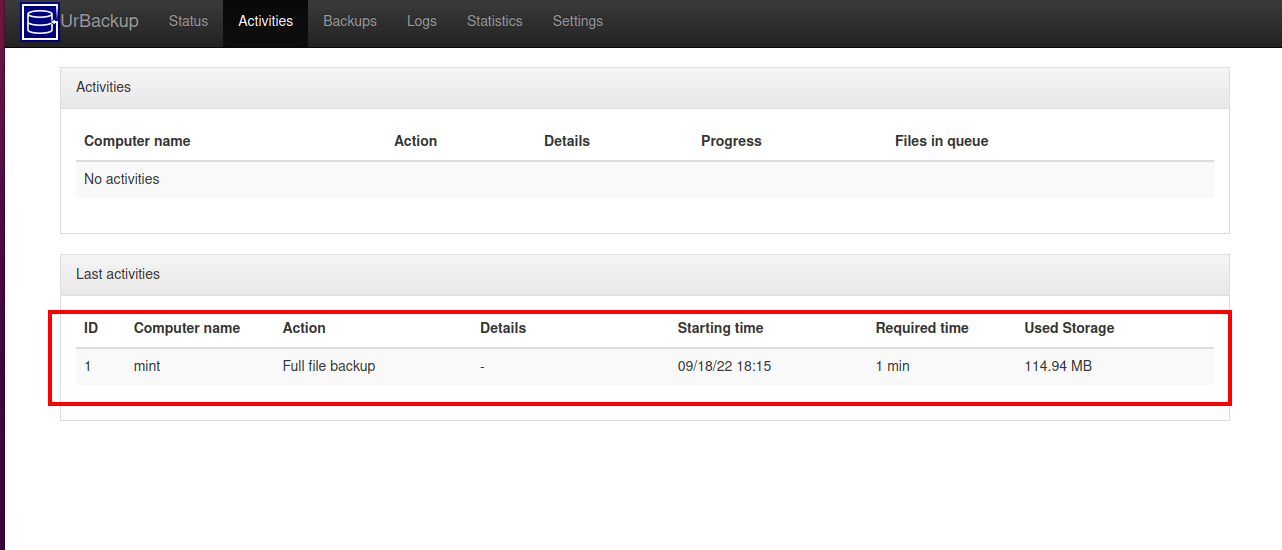
To confirm that the backup was created, click the ‘Activities’ tab and you will see details of the backup.
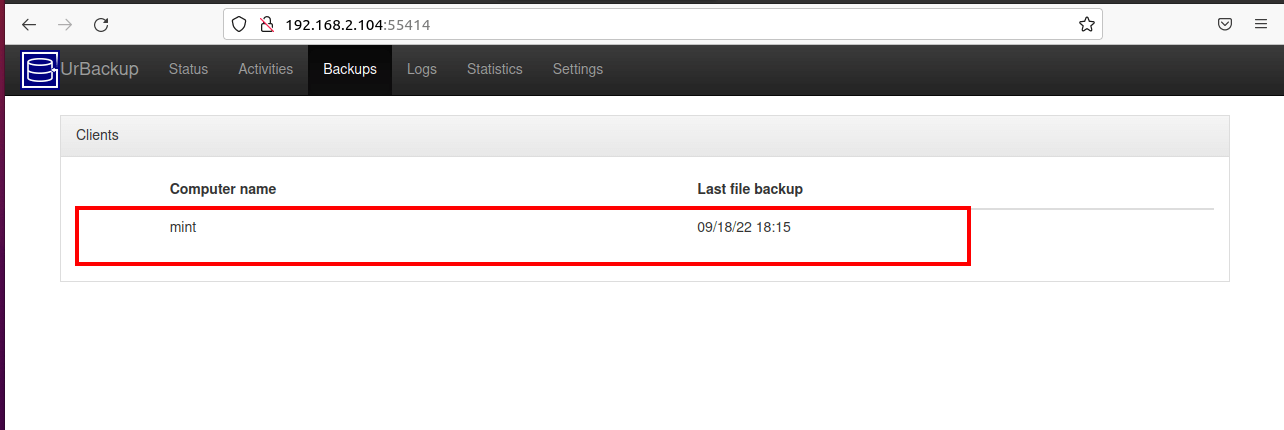
Alternatively, you can click ‘Backups‘ to see details of the file backup.
In this tutorial, we have installed and configured Urbackup on Ubuntu-based distributions and installed a client service to our client machine whose home directory we backed up.
Visit the Urbackup documentation page for more information about the Ubackup utility.
Быстрая настройка резервного копирования под Linux и не только (UrBackup)
Примерно год назад у меня возникла «острая» необходимость перевести систему резервного копирования данных в корпоративной сети на бесплатные рельсы. До этого использовался платный продукт от Symantec, по нему, конечно, много нареканий, но он работал, хоть и не всегда справлялся. Как обычно, все надо было сделать «вчера», и я приступил к поиску вариантов.
Для начала начал искать решение для резервного копирования файлов, очевидным решением было простая настройка скриптов на Linux по cron, но это не очень удобное и надежное решение, если серверов более одного(а у меня их около 50-ти) и структура достаточно динамична. Тем более если инфраструктура смешанная, Linux + Windows. Хотелось что-нибудь простое в дальнейшем обслуживании и извлечении самих копий, например, переложить восстановление пользовательских файлов на группу поддержки. Порывшись пару часов в интернете, я наткнулся на интересный проект UrBackup, он удовлетворял всем моим условиям.
Как операционную систему я выбрал CentOS 6 в конфигурации minimal, взять можно тут. Подробно на установке и первичной настройке останавливаться не будут, т.к. манулов по этой процедуре уже достаточно на Хабре. Перейдем к установке виновника топика UrBackup.
Предыдущие версии UrBackup приходилось собирать из исходников, но слава разработчикам, для последних версий появились репозитории для большинства популярных систем. Хотя собрать из исходников проблем не составляло, репозиторий сильно упрощает жизнь, особенно при обновлениях.
yum install wget nano -y cd /etc/yum.repos.d/ wget http://download.opensuse.org/repositories/home:kot1grun/CentOS_6/home:kot1grun.repo yum install urbackup-server -y Тут мы подключаем репозиторий и устанавливаем собственно сервер. Далее, чтобы мы могли подключится к серверу из вне, нам необходимо поправить iptables:
# nano /etc/sysconfig/iptables # Firewall configuration written by system-config-firewall # Manual customization of this file is not recommended. *filter :INPUT ACCEPT [0:0] :FORWARD ACCEPT [0:0] :OUTPUT ACCEPT [0:0] -A INPUT -m state --state ESTABLISHED,RELATED -j ACCEPT -A INPUT -p icmp -j ACCEPT -A INPUT -i lo -j ACCEPT -A INPUT -m state --state NEW -m tcp -p tcp --dport 22 -j ACCEPT # правило для urbackup -A INPUT -m state --state NEW -m tcp -p tcp --dport 55414 -j ACCEPT -A INPUT -j REJECT --reject-with icmp-host-prohibited -A FORWARD -j REJECT --reject-with icmp-host-prohibited COMMIT Так же для серверов внутри сети отключаем selinux:
# This file controls the state of SELinux on the system. # SELINUX= can take one of these three values: # enforcing - SELinux security policy is enforced. # permissive - SELinux prints warnings instead of enforcing. # disabled - No SELinux policy is loaded. SELINUX=disabled # SELINUXTYPE= can take one of these two values: # targeted - Targeted processes are protected, # mls - Multi Level Security protection. SELINUXTYPE=targeted Отключаем selinux без перезагрузки:
Устанавливаем сервис в автозагрузку и запускаем:
chkconfig urbackup-server on service urbackup-server restart Готово. Можно подключаться и настраивать.
При желании выбираем язык и идем в настройки:
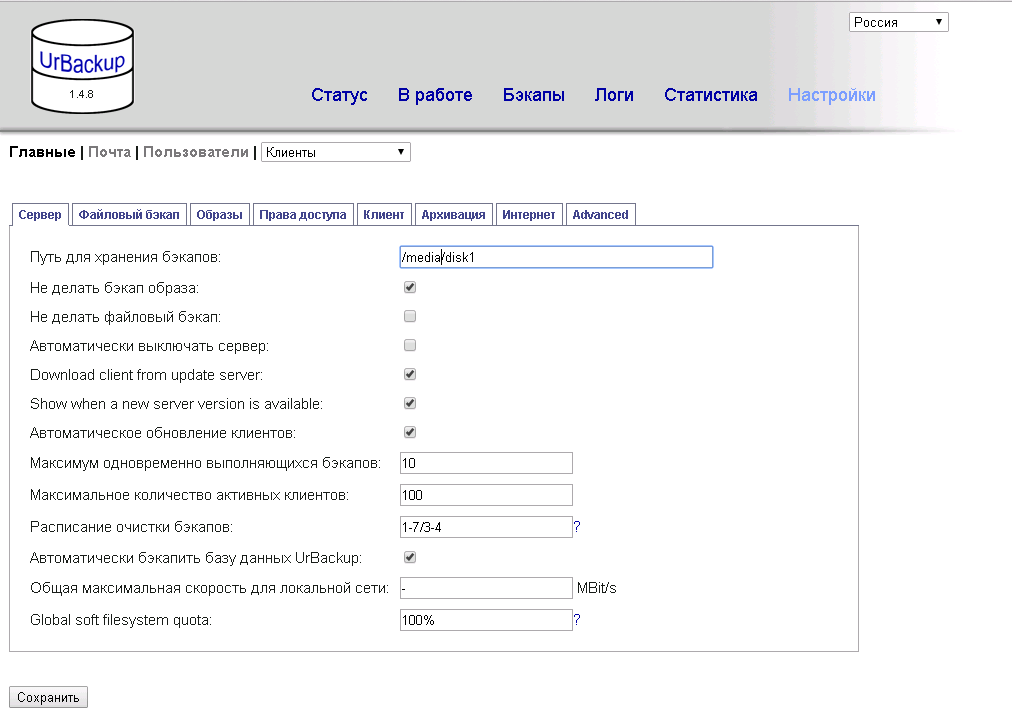
Тут для первичной настройки нам необходимо указать только путь для хранения бекапов. Не забываем нажать кнопку «сохранить» и мы можем переходить к настройке клиентов.
Для начала нам необходимо установить клиент на сервер, который мы хотим копировать. Клиент для Windows систем можно скачать с сайта разработчиков, но так как мы в данный момент рассматриваем linux-системы, рассмотрим установку на тот же CentOS 6:
cd /etc/yum.repos.d/ wget http://download.opensuse.org/repositories/home:kot1grun/CentOS_6/home:kot1grun.repo yum install urbackup-client-nogui -y chkconfig urbackup-client on service urbackup-client start Добавляем правила в iptables:
# nano /etc/sysconfig/iptables # Firewall configuration written by system-config-firewall # Manual customization of this file is not recommended. *filter :INPUT ACCEPT [0:0] :FORWARD ACCEPT [0:0] :OUTPUT ACCEPT [0:0] -A INPUT -m state --state ESTABLISHED,RELATED -j ACCEPT -A INPUT -p icmp -j ACCEPT -A INPUT -i lo -j ACCEPT -A INPUT -m state --state NEW -m tcp -p tcp --dport 22 -j ACCEPT # правила для urbackup -A INPUT -m state --state NEW -m tcp -p tcp --dport 35621 -j ACCEPT -A INPUT -m state --state NEW -m udp -p udp --dport 35622 -j ACCEPT -A INPUT -m state --state NEW -m tcp -p tcp --dport 35623 -j ACCEPT -A INPUT -j REJECT --reject-with icmp-host-prohibited -A FORWARD -j REJECT --reject-with icmp-host-prohibited COMMIT Не забываем отключить selinux, если, конечно, в нем нет необходимости. И можно добавлять клиента на сервер. Возвращаемся на сервер

Вбиваем в поле «Имя/IP» IP-адрес сервера, с которого мы хотим бекапить данные, и нажимаем добавить. Ждем пару минут, пока клиент появится в списке.
Для клиента с GUI этого достаточно, настройки папок для копирования можно сделать прямо на клиенте, резервное копирование начнется по расписанию, но у нас минимальный Linux и мы ставили клиент без GUI, его, как впрочем и полноценного клиента, можно настраивать прямо с сервера.

Выбираем наш сервер из списка и настраиваем «каталоги по умолчанию для бекапа».
Готово. Сервер настроен и работает. Во время работы мы видим нечто подобное:

Сервер работает на удивление быстро и очень компактно использует место на диске, используя подобие дедубликации на основе симлинков.
Это минимальная настройка сервера, при желании можно настроить авторизацию, архивацию, создание образов систем (Windows), резервное копирование через интернет и т.д. В дальнейших статьях планирую рассказать, как на этот же сервер настроить резервное копирование MSSQL и Exchange, если это, конечно, будет интересно читателям.