- Как отформатировать USB-накопитель в Linux?
- Как отформатировать USB в Linux?
- Использование GParted
- GNOME Disks
- Создать файловую систему (mkfs)
- Использование «dd»
- Использование уничтожения
- Проблемы при форматировании USB
- How To Format USB In Linux (5 Easy Ways)
- How to Format USB in Linux
- Using GParted
- GNOME Disks
- Make File System (mkfs)
- Using dd
- Using Shred
- Problems When Formatting USB
Как отформатировать USB-накопитель в Linux?
Форматирование USB-накопителя в Linux по большей части является простым процессом, но на этом пути вы можете столкнуться с несколькими препятствиями.
Например, пользователи часто не уверены, в какой файловой системе им следует форматировать USB-накопитель.
Как правило, вы должны придерживаться «ext4» для лучшей производительности и стабильности.
Но если вас беспокоит межплатформенная совместимость, вы можете вместо этого использовать «exFAT» или «FAT32».
Пользователи также сообщали о проблемах с невозможностью использования USB после форматирования.
В этой статье мы подробно описали, как правильно отформатировать USB-накопитель и решить все подобные проблемы.
Как отформатировать USB в Linux?
Мы будем использовать «ext4» в качестве примера, но вы можете выбрать предпочтительную файловую систему при форматировании USB-накопителя.
Не забудьте заранее сделать резервную копию всех важных данных.
Кроме того, убедитесь, что вы указали правильное устройство для форматирования при выполнении методов командной строки, так как это легко испортить и отформатировать не тот диск.
Использование GParted
GParted — это менеджер разделов с графическим интерфейсом.
Использование GParted, как правило, является самым простым способом форматирования USB-накопителей в большинстве дистрибутивов, поэтому, если вы новичок в Linux, это должен быть ваш вариант.
Вот необходимые шаги для этого:
Во-первых, вам нужно установить GParted.
В дистрибутивах на базе Debian это можно сделать с помощью следующей команды:
Откройте GParted и введите свой пароль для аутентификации.
Выберите USB в правом верхнем углу.
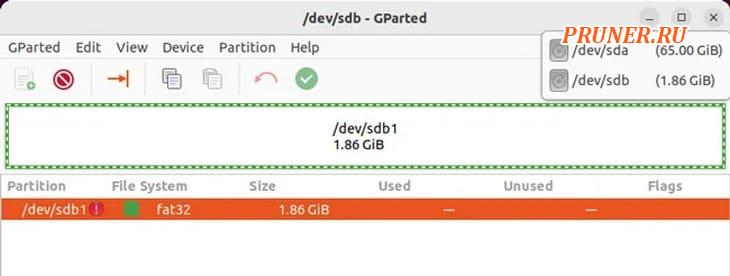
Щелкните правой кнопкой мыши USB и выберите «Размонтировать».
Затем щелкните правой кнопкой мыши раздел данных и выберите «Форматировать в — ext4».
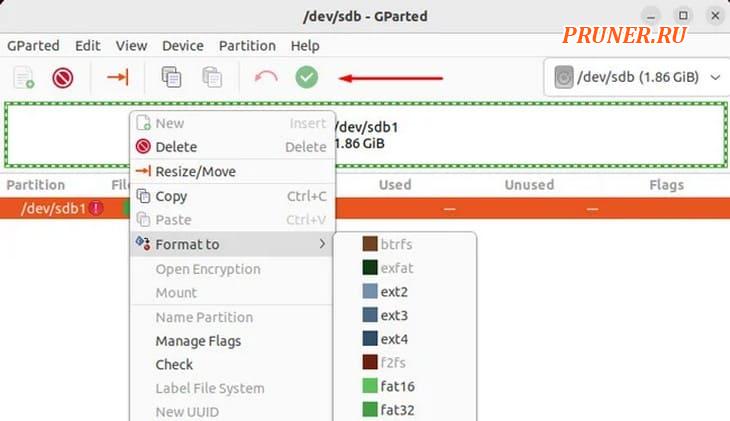
Нажмите «Применить все операции».
После этого щелкните его правой кнопкой мыши еще раз и выберите «Mount».
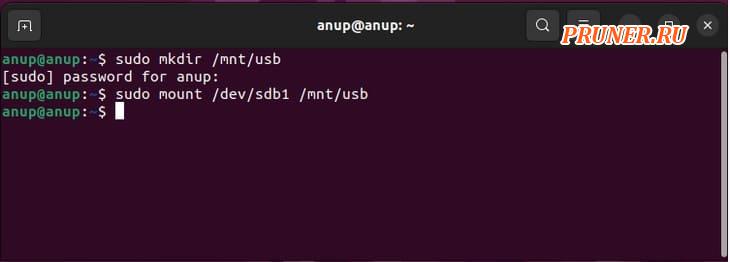
Если опция «Mount» неактивна, выполните следующие команды в терминале:
GNOME Disks
GNOME Disks — это менеджер разделов по умолчанию для сред рабочего стола GNOME.
Он предустановлен в большинстве популярных дистрибутивов Linux, включая Ubuntu.
Вот шаги для форматирования USB с помощью этой утилиты:
Откройте утилиту «Диски» и выберите USB.
Выберите раздел, который вы хотите отформатировать, и нажмите на шестеренку настроек.
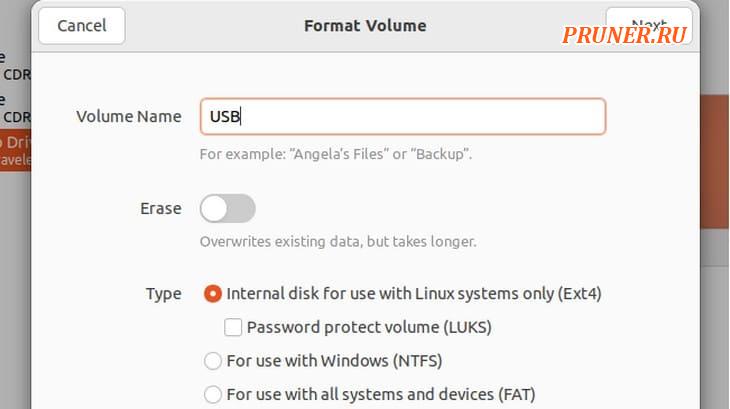
Выберите «Форматировать раздел» и переименуйте том, если хотите.
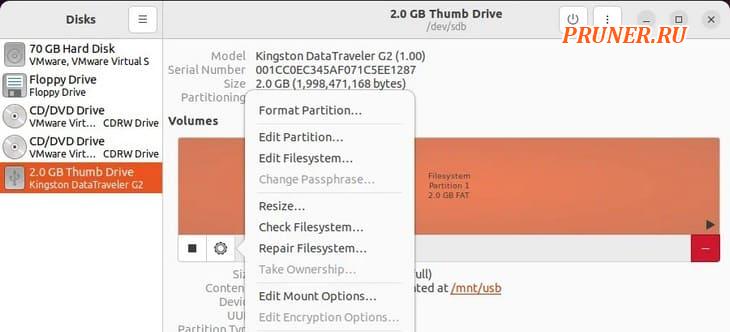
Вы можете включить «Erase», чтобы перезаписать существующие данные, а также выбрать файловую систему.
После этого нажмите «Далее — Форматировать».
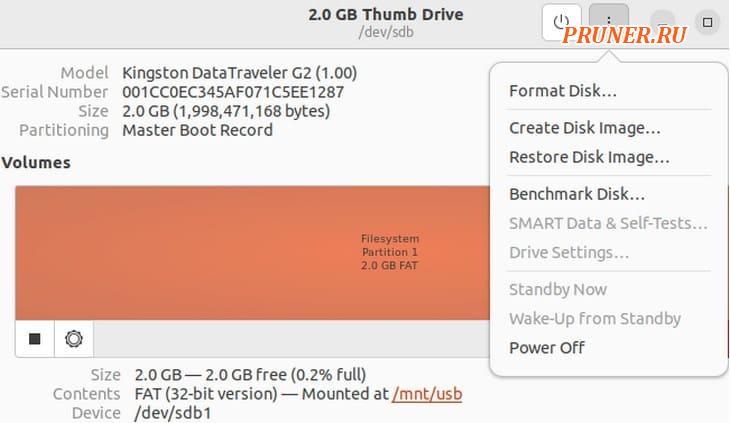
Если вы хотите отформатировать весь диск сразу, нажмите кнопку с тремя точками и выберите «Форматировать диск — Форматировать».
Нажмите кнопку «+», чтобы создать раздел в нераспределенном пространстве.
Отрегулируйте размер раздела и другие значения, как и раньше, и создайте раздел.
Теперь смонтируйте USB, чтобы снова сделать его доступным.
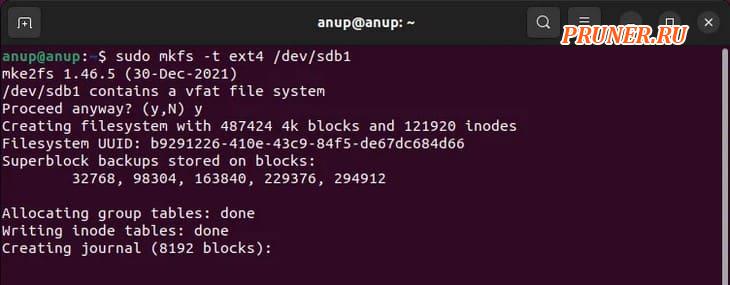
Создать файловую систему (mkfs)
GParted выполняет операции с диском через утилиту «mkfs».
Таким образом, вы можете думать об этом методе как об использовании GParted, но через командную строку, хотя их происхождение на самом деле наоборот.
В любом случае, вот шаги по форматированию USB с помощью mkfs:
Используйте «df -h» для проверки пути устройства USB.
Размонтируйте USB с помощью «sudo umount ».
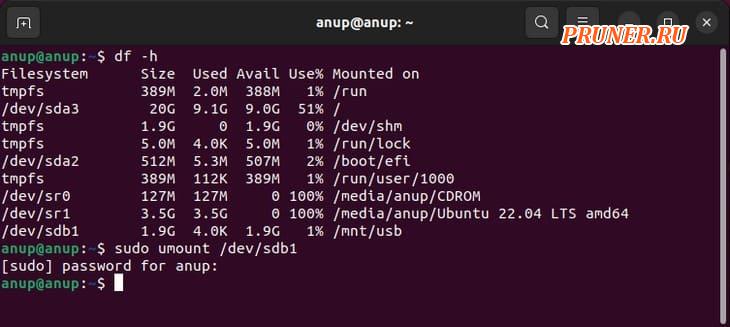
Замените предпочитаемой файловой системой (ext4, vfat, nfts и т. д.) и выполните команду.
После этого смонтируйте USB с помощью следующих команд:
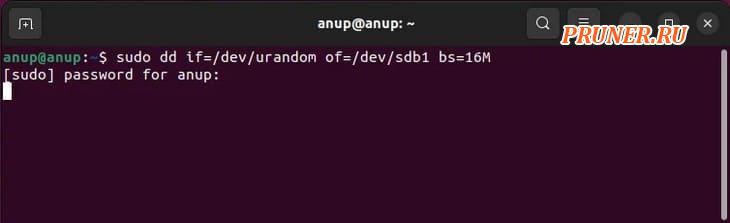
Использование «dd»
Вы можете использовать «dd» либо для заполнения нулями, либо для записи случайных данных на USB-накопитель, по сути, отформатировав его и сделав данные невосстановимыми.
Это хорошая идея, если вы планируете одолжить USB или продать его кому-то.
Использовать «dd» очень просто — базовый синтаксис следующий:
Например, если вы хотите записать случайные данные вместо нулей на USB-накопитель, подключенный к «/dev/sdb1», вы должны использовать следующую команду:
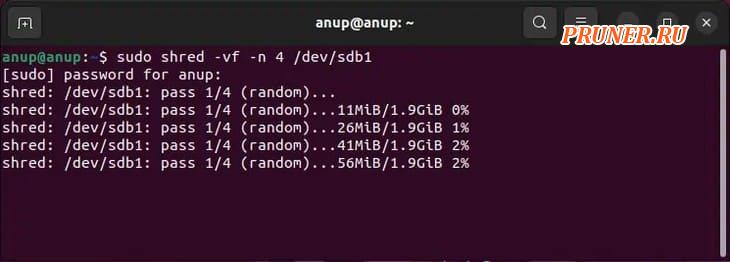
Использование уничтожения
«Shred» по сути является «dd», но более безопасным.
Его шаблоны перезаписи оптимизированы для уничтожения как можно большего количества остаточных данных, поэтому это лучший выбор, если вы пытаетесь полностью стереть USB.
Базовый синтаксис для «Shred»: shred .
В нашем примере мы будем использовать параметр «-f» для принудительной записи, «-n» для указания количества перезаписей и «-v» для отображения текущей операции.
Но полный список опций вы можете найти на справочной странице «shred».
Проблемы при форматировании USB
Часто сообщаемая проблема, связанная с USB, заключается в том, что пользователи установили Linux на USB, и теперь он не может использоваться для передачи данных.
Вернуть загрузочный USB в не загрузочное состояние очень просто — все, что вам нужно сделать, это отформатировать его.
Другой распространенной проблемой является невозможность подключения USB-накопителя после форматирования.
На этот раз это обычно происходит потому, что инструменты форматирования в Linux способны удалить все с диска, включая подписи файловой системы.
Поскольку разделов для монтирования нет, вам придется сначала их создать.
Если «sudo mount » это не позволяет вам автоматически монтировать, вы должны сначала создать точку монтирования, а затем монтировать устройство вручную как таковое:
Наконец, еще одна проблема, о которой стоит упомянуть, заключается в том, что процесс форматирования прерывается, и после этого USB не определяется.
Пользователи обычно используют «lsusb», и когда они обнаруживают, что система вообще не обнаруживает USB, они предполагают, что заблокировали устройство.
Хотя это, безусловно, возможно, мы обнаружили, что простые исправления, такие как перезагрузка ПК и переустановка USB несколько раз, на удивление эффективны для решения этой проблемы.
How To Format USB In Linux (5 Easy Ways)

Formatting a USB Drive in Linux is a straightforward process for the most part, but you may encounter a few roadblocks along the way.
For instance, users are often unsure as to what file system they should format the USB with. Generally, you should stick to ext4 for the best performance and stability. But if cross-platform compatibility is a concern, you can instead go with exFAT or FAT32.
Users have also reported facing issues with the USB not being usable after formatting. We’ve detailed how you can format the USB properly and resolve all such issues in this article.
How to Format USB in Linux
We’ll use ext4 as an example, but you can choose your preferred file system when formatting the USB. Remember to backup any important data beforehand. Also, make sure you specify the correct device to format when performing the command-line methods, as it’s easy to mess this up and format the wrong drive.
Using GParted
GParted is a GUI-based partition manager. Using GParted is generally the easiest way to format USB drives on most distros, so if you’re new to Linux, this should be your go-to option. Here are the necessary steps for this:
- First, you’ll have to install GParted. On Debian-based distros, you can do so with the following command:
sudo apt install gparted - Open GParted and enter your password to authenticate.
- Select the USB from the top right.

- Right-click the USB and select Unmount.
- Next, right-click the data partition and select Format To > ext4.

- Click on Apply all operations.
- Afterward, right-click it once more and select Mount.
- If the Mount option is greyed out, execute the following commands in the terminal:
sudo mkdir /mnt/usb
sudo mount /mnt/usb


GNOME Disks
GNOME Disks is the default partition manager for GNOME desktop environments. It’s pre-installed in most of the popular Linux distros, including Ubuntu. Here are the steps to format your USB using this utility:
- Open the Disks utility and select the USB.
- Select the partition you want to format and click on the settings cog.
- Select Format partition and rename the volume if you want.

- You can enable Erase to overwrite the existing data, and you can also select the filesystem. Afterward, press Next > Format.

- If you want to format the entire drive at once instead, click on the triple-dot button and select Format Disk > Format.

- Press the + button to create a partition in the unallocated space.
- Adjust the partition size and other values as before and create the partition.
- Now, mount the USB to make it accessible again.


Make File System (mkfs)
GParted performs the disk operations through the mkfs utility. So, you can think of this method as using GParted but via the command line, although their origins are actually the other way around. In any case, here are the steps to format your USB using mkfs:
- Use df -h to check the USB’s device path.
- Unmount the USB using sudo umount .

- Type sudo mkfs -t .
- Replace with your preferred filesystem (ext4, vfat, nfts, etc.) and execute the command.

- Afterward, mount the USB with the following commands:
sudo mkdir /mnt/usb
sudo mount /mnt/usb


Using dd
You can use dd to either zero-fill or write random data to your USB drive, essentially formatting it and making the data unrecoverable. This is a good idea if you plan to lend the USB or sell it to someone.
Using dd is very simple; the base syntax is as follows:
dd if=source of=
For instance, if you wanted to write random data instead of zeroes to a USB mounted at /dev/sdb1 , you would use the following command:
dd if=/dev/urandom of=/dev/sdb1 bs=16M

Using Shred
Shred is essentially dd but more secure. Its overwriting patterns are optimized to destroy as much residual data as possible, so this is your best bet if you’re trying to wipe the USB completely.
The base syntax for Shred is shred . In our example, we’ll use the -f option to force write, -n to specify the number of times to overwrite, and -v to display the ongoing operation. But for the full list of options, you can check the shred man page.

Problems When Formatting USB
A commonly reported issue regarding USBs is that users installed Linux onto the USB, and now it’s not usable for data transfer. Reverting a bootable USB to a non-bootable state is very simple; all you have to do is format it.
The USB not being mountable after formatting is another common problem. This time, it usually happens because the formatting tools in Linux are capable of removing everything from the drive, including the filesystem signatures. As there are no partitions to mount, you’ll have to create one first.
If sudo mount doesn’t let you auto-mount, you should create a mount point first and then mount the device manually as such:
sudo mkdir /mnt/usb
sudo mount /mnt/usb
Finally, another problem worth mentioning is that the formatting process gets interrupted, and the USB doesn’t get detected afterward. Users generally use lsusb , and when they find that the system isn’t detecting the USB at all, they assume they bricked the device.
While this is certainly a possibility, we’ve found that simple fixes like restarting the PC and reseating the USB a few times are surprisingly effective at resolving this issue.
Anup Thapa primarily covers Windows systems, networking, and computer hardware at TechNewsToday. Anup has been writing professionally for almost 5 years, and tinkering with PCs for much longer. His love for all things tech started when he got his first PC over 15 years ago. It was a Pentium IV system running Windows XP on a single 256 MB stick. He spent his formative years glued to this PC, troubleshooting any hardware or software problems he encountered by himself. Professionally, Anup has had brief forays into a variety of fields from coding and hardware installation to writing. In doing so, he’s worked with people of different backgrounds and skill levels, from average joes to industry leaders and experts. This has given him not just a versatile skill set, but also a unique perspective for writing that enables him to concisely communicate complex information and solve his reader’s problems efficiently. You can reach out to him at anup@technewstoday.com.