- hdmi-usb-dongle
- Seamlessly show captured video from a HDMI to USB dongle
- Details for hdmi-usb-dongle
- Share this snap
- Share embeddable card
- OBS Linux Basics: USB HDMI Audio Capture And Webcam Audio
- HDMI Audio
- Webcam Audio
- Devices Tested:
- Detailed Reviews:
- Winner: ClonerAlliance Flint 4KP for $140
- Notes:
- Magewell HDMI Capture with ffmpeg
hdmi-usb-dongle
![]()
Make sure snap support is enabled in your Desktop store.
Install using the command line
sudo snap install hdmi-usb-dongle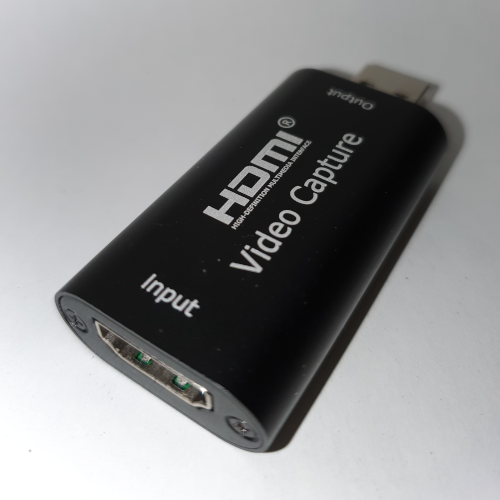
Seamlessly show captured video from a HDMI to USB dongle
This snap allows to easily show capture streams from a HDMI to USB dongle. To allow the app full access to the resources it needs, please make sure to connect the camera interface and allow scanning of the USB bus with
sudo snap connect hdmi-usb-dongle:camera sudo snap connect hdmi-usb-dongle:hardware-observe To get audio output as well, please make sure to run
sudo snap connect hdmi-usb-dongle:audio-record The app puts a configuration file in place with a bunch of commented out default values, you can find this file at ~/snap/hdmi-usb-dongle/current/config
Details for hdmi-usb-dongle
License
Last updated
Links
Share this snap
Generate an embeddable card to be shared on external websites.
Share embeddable card
Customise your embeddable card using the options below.
OBS Linux Basics: USB HDMI Audio Capture And Webcam Audio
How do I get audio from my USB capture dongle or webcam into OBS? I get this question a lot from people new to Linux. In this guide I’m going to show you how to get audio & video from your gaming PC into your OBS PC on Linux. Plus a bonus guide for connecting your webcam.
HDMI Audio
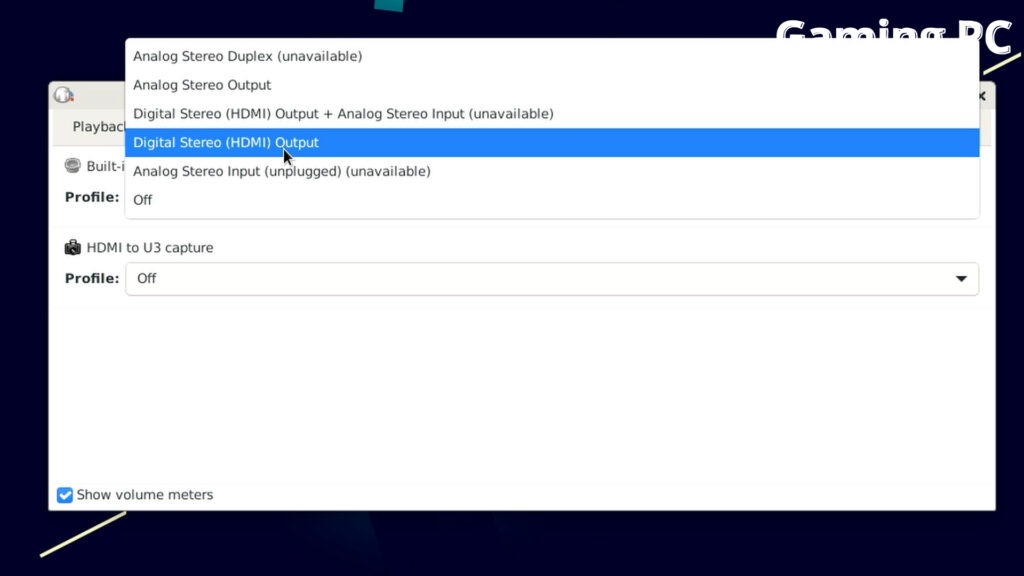
1. If you’re capturing audio from another PC set the HDMI output in pavucontrol in the configuration tab to Digital Stereo.
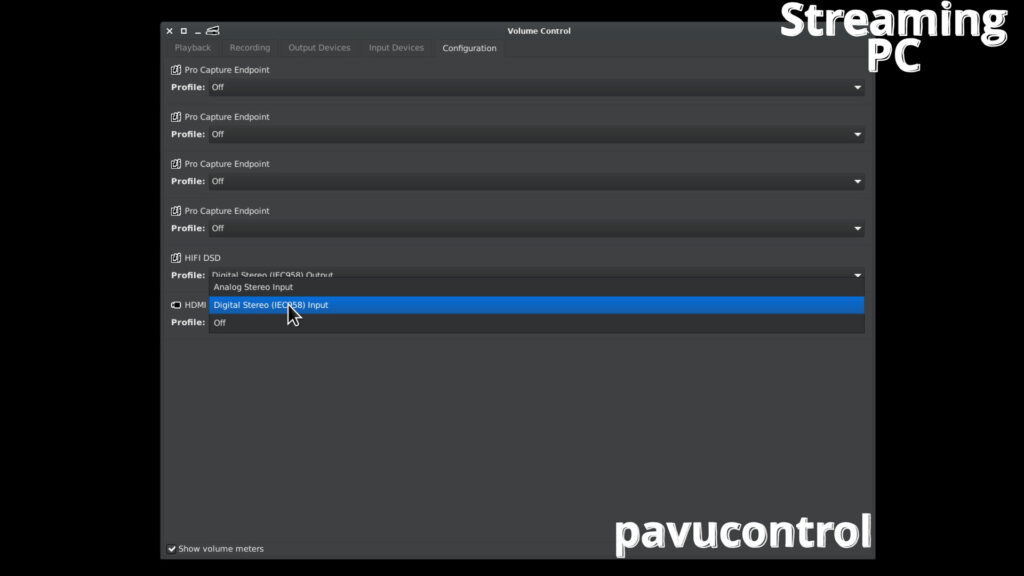
2. Select Digital Stereo Input in the configuration tab on the PC with the USB HDMI capture device.
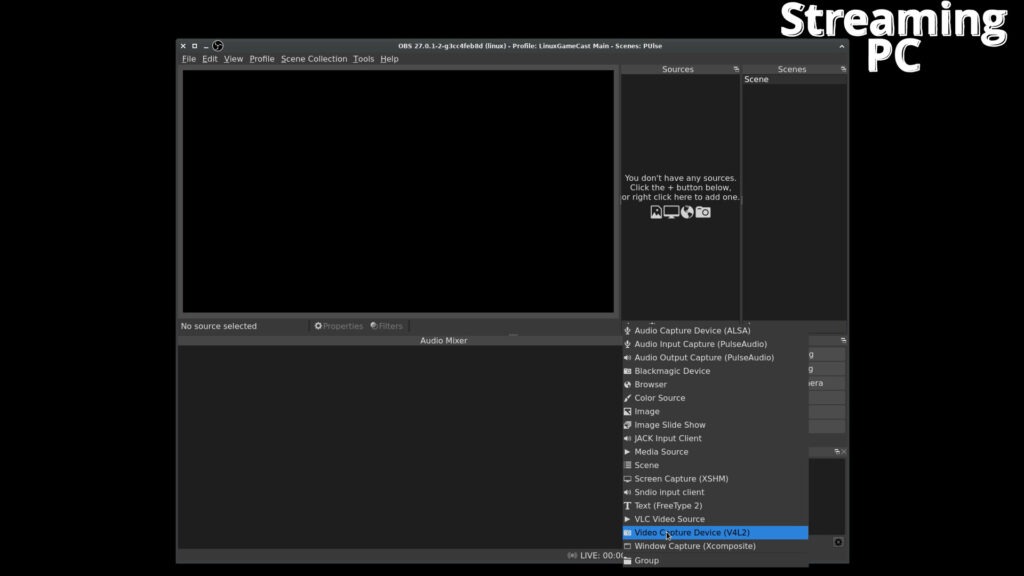
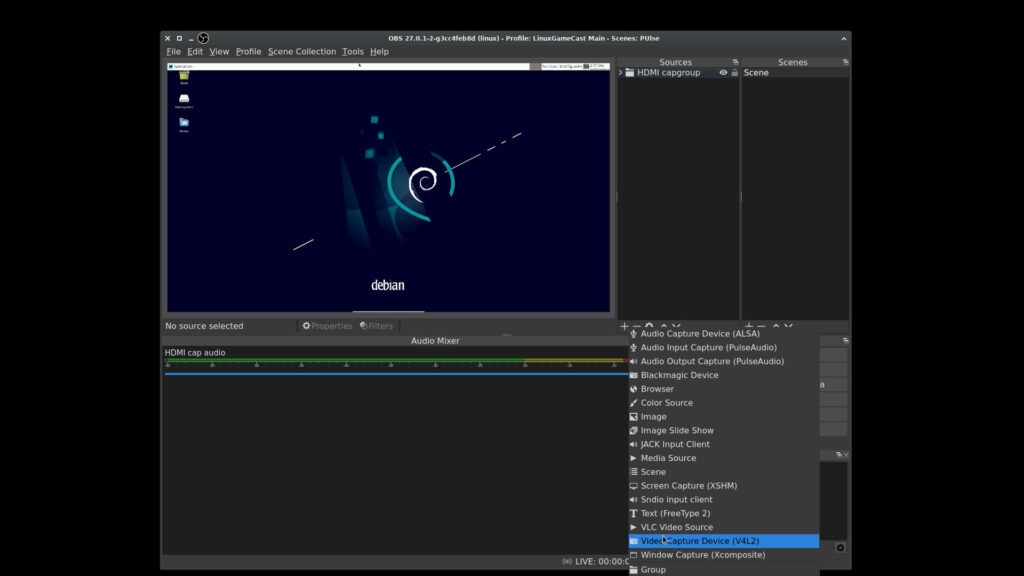
3. In OBS add a new Video Capture (V4L2) source.
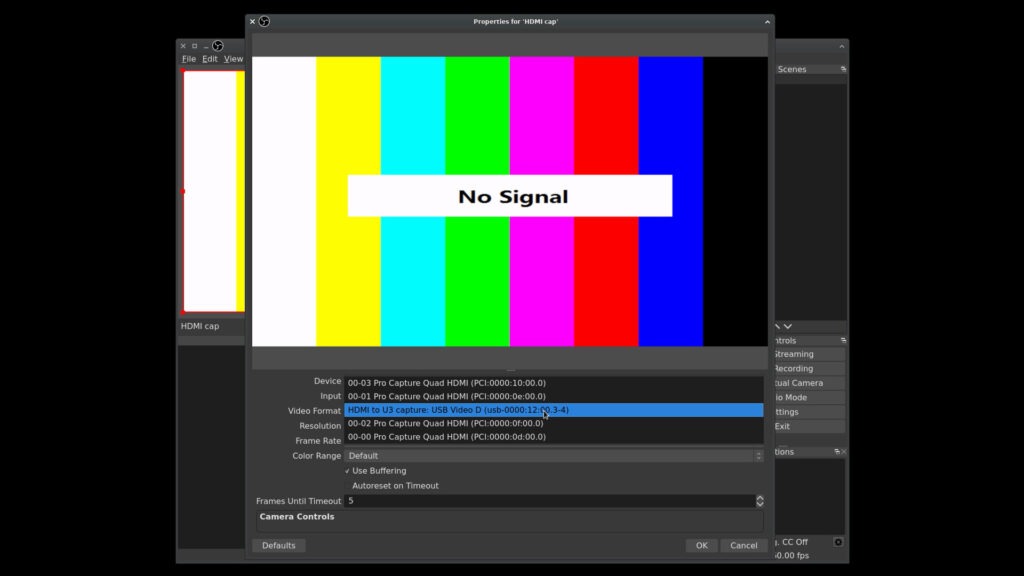
4. Select your USB HDMI capture device from the dropdown menu.
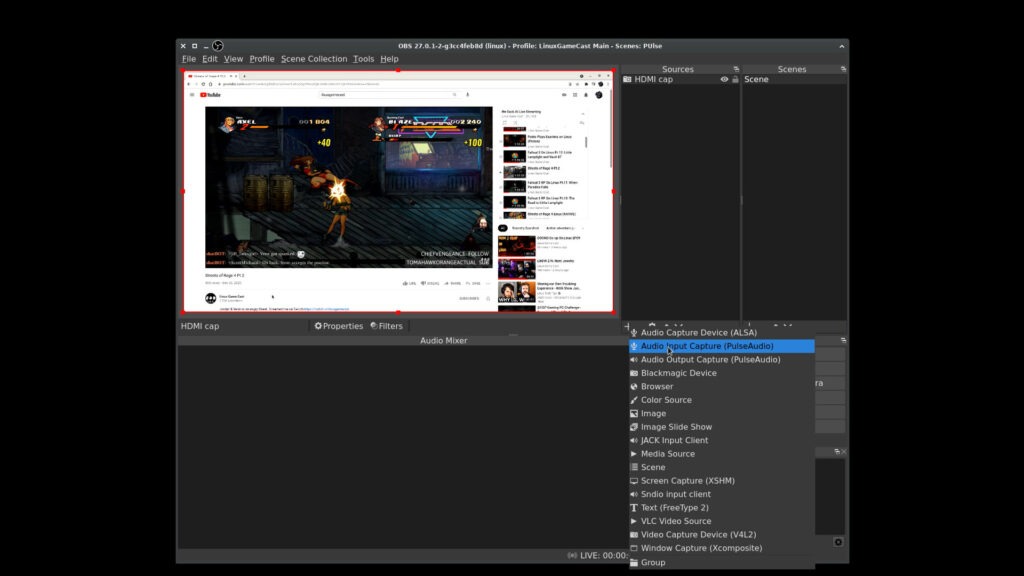
5. Add a new Audio Input Capture (PulseAudio) source.
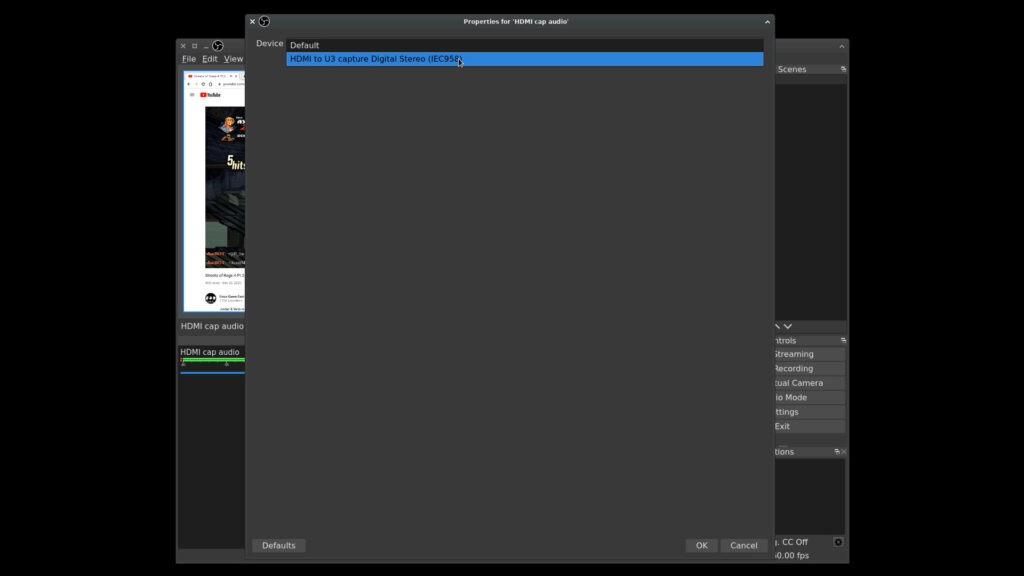
6. Select the USB HDMI capture device that was enabled earlier in pavucontrol.
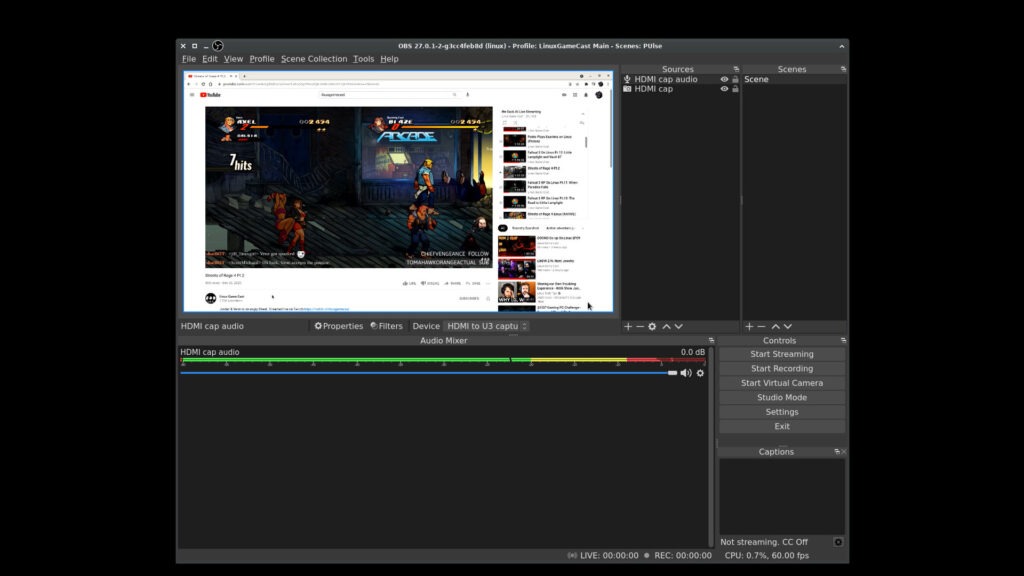
7. You should now have audio from your HDMI source.
Webcam Audio
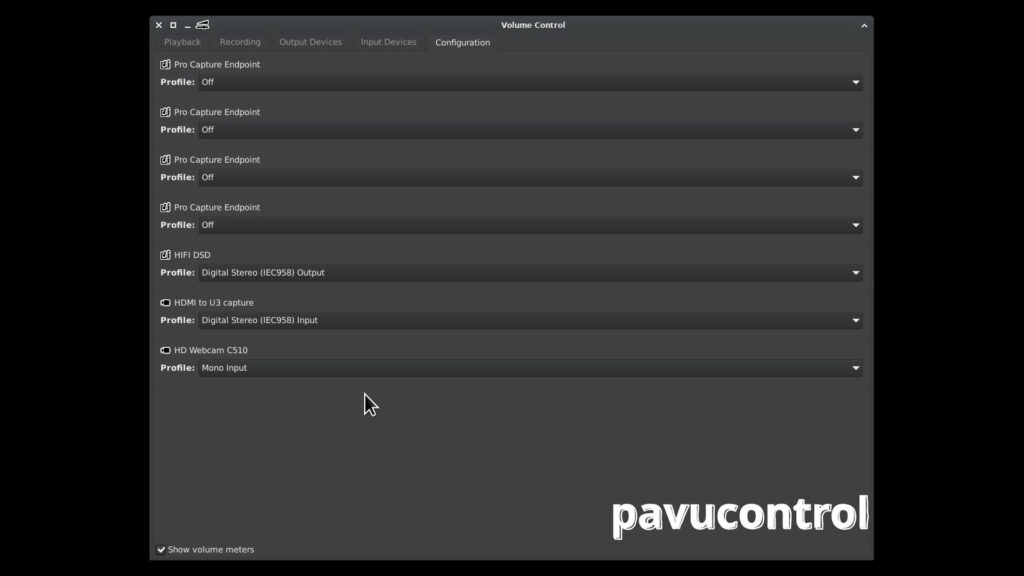
1. In pavucontrol enable mono / stereo input under the configuration tab.
2. In OBS add a new Video Capture (V4L2) source.
3. Select your USB webcam from the dropdown menu.
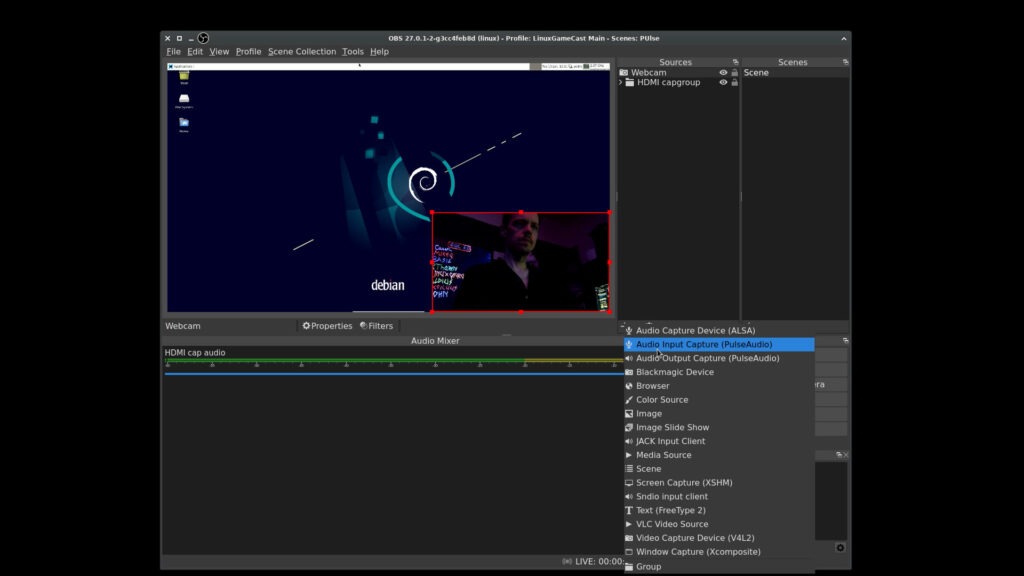
4. Add a new Audio Input Capture (PulseAudio) source.
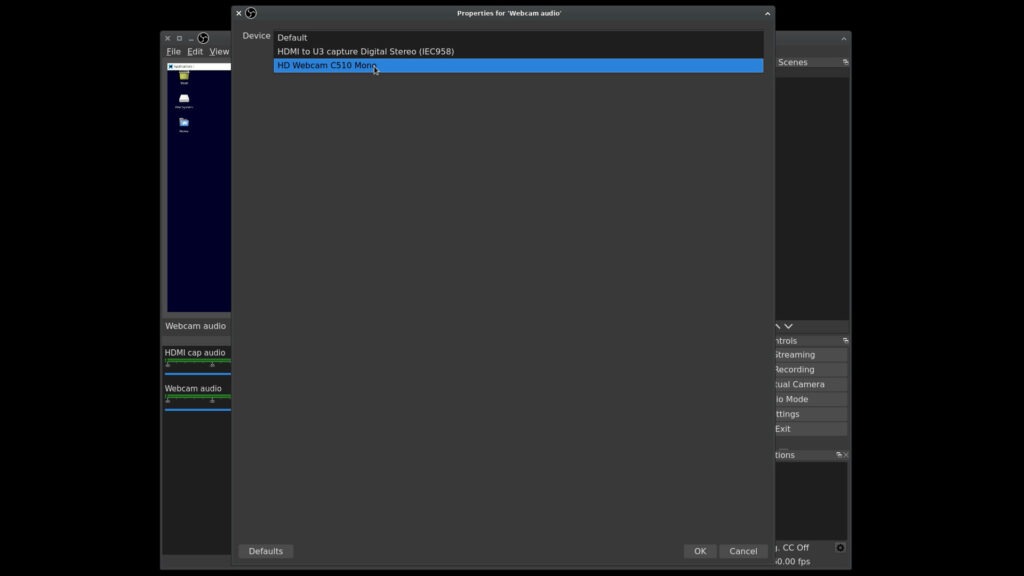
5. Select the USB webcam that was enabled earlier in pavucontrol.
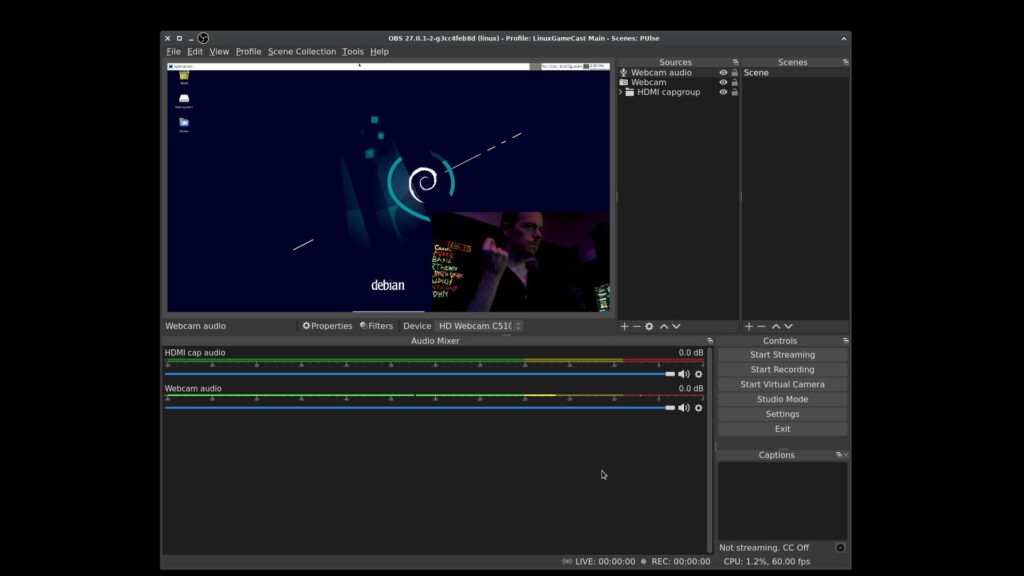
6. You should now have audio from your webcam.
Devices Tested:
MiraBox Capture Card (HSV321) with updated firmware (more info on this later) @ $99 (on sale from $179, but unsure if it goes up from $99 due to reviews and Honey saying it didn’t see any price changes in 30 days.) (Also, bypasses HDCP which is a nice bonus, but might make some companies or countries mad)
ClonerAlliance Flint 4KP @ $140 (The most expensive one here, but boasts USB Type C, mic + audio in + audio out jacks, and 4K@30fps passthrough.
Plugable Performance NIX @ $100 (When I was first looking around, I was stuck between this and the MiraBox before I decided to buy them all for this post.)
«HDMI Game Video Capture Card» @ $80
This one I just wanted to add for that one person who just wants to see how a $80 «card» functions compared to the rest that have proper Passthrough and other neat features.
I got this card back when I first got my Nintendo Switch in early 2018. And my experience with it was pretty consistent until I switched to Linux.
Things to note in no particular order:
- Crappy sound grounding (very noisy, lots of ticking and sometimes hissing)
- Default software. kinda sucks. But AFAIK, you can’t get «Instant Gameview» without it. (I could be wrong, though)
- NO LINUX SUPPORT WHATSOEVER, EVEN IF YOU TRY TO USE A VM
- Rather user friendly.
- Good video quality with minimal lag that did me fine for most of BoTW, but started using HDMI Passthrough when I got into Celeste due to the input latency. (HDMI IN — Switch. HDMI OUT — Monitor. Software on for audio, monitor switched to HDMI input for video)
I will be daisychaining the output from the cards to the Elgato to give an exact comparison of how the other card compares in terms of video fidelity.
NOTE: MOST OF THESE TESTS ARE DONE IN WINDOWS DUE TO ME USING THE ELGATO SOFTWARE. HOWEVER, RESULTS APPEARED THE SAME IN LINUX. PLS NO PITCHFORK
Detailed Reviews:
Well, this one had a bad start. First, every USB 3.0 port on my motherboard/case did not work! At all!
It was only until I plugged it into a USB Type A (Yes, A. Not C.) 3.1 port that it started outputting video consistently, and not only after reboots and only for 5 mins. Not sure if that’s an issue with the Mobo, but still.
Turns out, my mobo only supports USB 3 DATA STORAGE on it’s usb 3 ports . I grabbed a new PCIe USB 3.0 card, and it works fine.
After that, I had 0 audio from the card. Nada.
I had to contact the support to get the newest firmware to flash onto the card, which then solved the no-sound issue. You may be wondering «Why, Tony. Why didn’t you get photos of how the output was before the update?»
Because screw having no audio! If it can’t do audio on its own (even if its crappy), then I see no point in keeping the card around for video (especially since it’s not the best quality to begin with).
Additionally, I did the update in Windows 10, as the updater was an EXE and I didn’t wanna test my Wine or VM luck, as it had been quite low lately.
The audio however, is quite nice! No crackles, no sutters, decent latency.
Video though, is another story. If I had to put it into one word, it would be JPEG. It feels like every frame was run through a Windows XP machine ( https://www.youtube.com/watch?v=QEzhxP-pdos )
I think, if I had to guess what the issue is, it’s a low bit/color depth. Maybe even a low resolution? Very fine details are smeared, alpha channels don’t much exist, etc.
Also, everything is darker.
Overall: 6/10. Good audio, shite video if you actually wanna stream or record with it, unstable (freezed up a lot), strips HDCP.
If you wanna waste your money, go here.
Crap video, audio is ok, doesn’t strip HDCP, had to plug and unplug several times, etc.
Overall: 3/10. It works I guess
So what do you get for $140? The best card I tested here, plus some USB C-A dongles.
Video quality is spot on, with no color banding, and decent color representation. Runs at 60fps without noticeably extra crappy compression.
When I got the new PCIe card, the audio did start to get a little crackly, but it’s possible that’s just an issue with my case/grounding. And when it was plugged into other machines or in the Mobo’s USB ports, there was none.
It does strip HDCP, which is +1 point.
Bundled software is ok, but does offer a game mode for Windows users.
Using it in OBS is perfectly fine, however.
Overall: 9/10. Great vid, ok audio (could just be me), strips HDCP, USB-C, Line In/Mic In/Line Out 3.5mm jacks. Today’s winner.
ditto from NIX, but without passthrough but does strip HDCP
Overall: 5/10. Cheapest one here, does what it came out to do, supports YUYV.
Winner: ClonerAlliance Flint 4KP for $140
Notes:
- The lesser performing ones do work a fair bit better if you run at a lower framerate (30 instead of 60)
- Uncompressed comparisons here.
- Set resolution to 1080p with YUYV for each card in OBS. Framerate is 60fps unless stated otherwise.
- I am not sponsored, just a guy who wanted some answers and decided to share said answers.
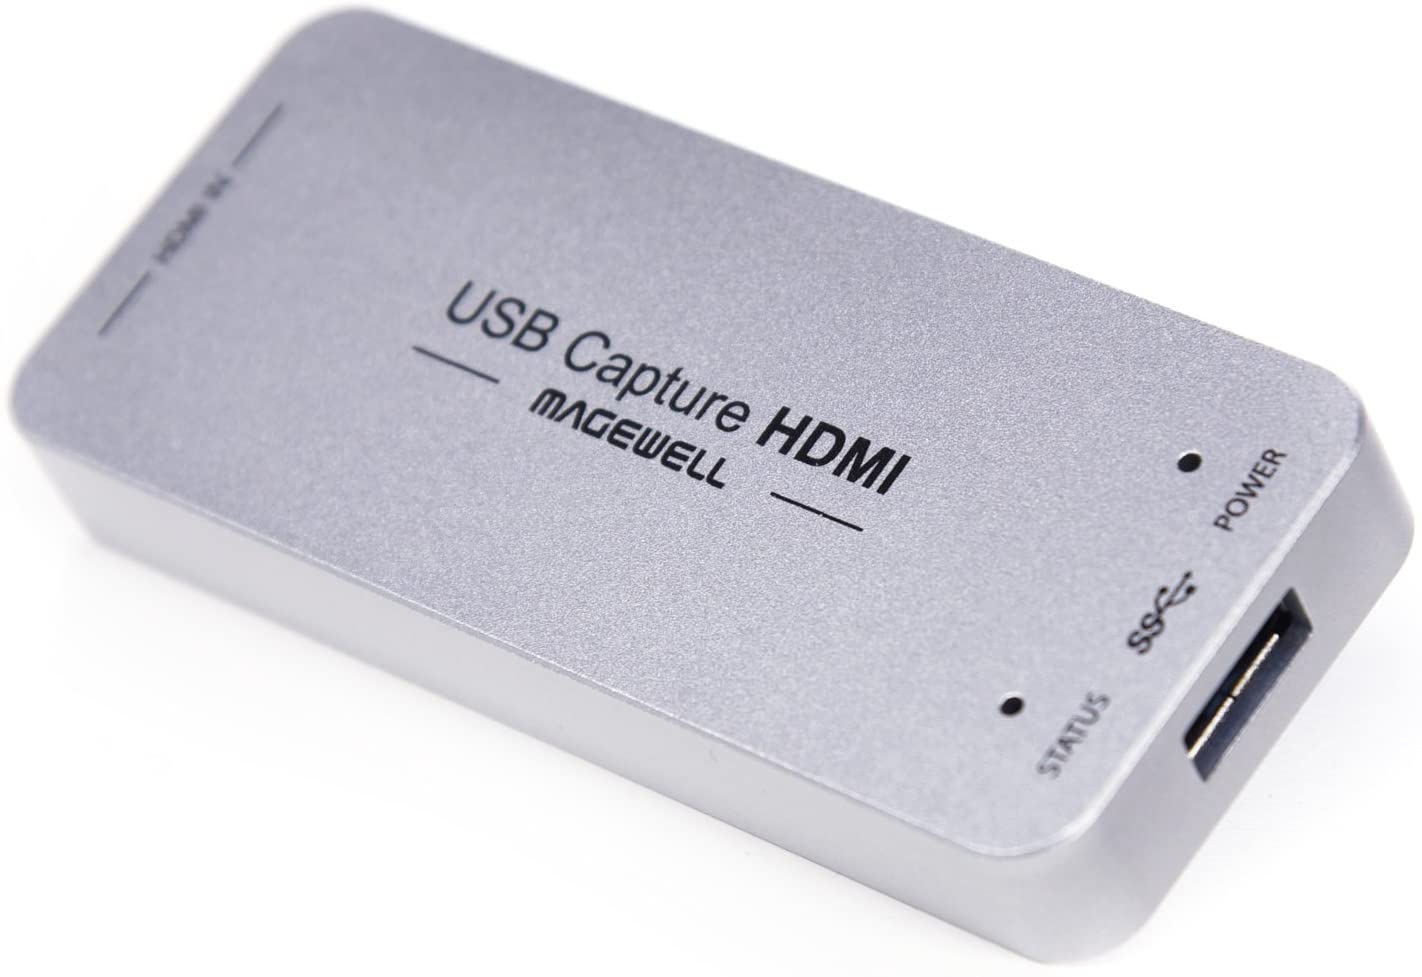
Magewell HDMI Capture with ffmpeg
Three years ago I bought a Magewell USB HDMI capture device (affiliate link). It’s a neat, reliable and well made, if expensive device. I use it to capture the output of computers, mostly to get pixel perfect bug reports, and to make some videos for YouTube. I prefer these hardware solutions over the software screencasting counterparts, as they tend to be more reliable, and don’t consume resources on the computer being recorded.
If you’re looking for a cheaper alternative (which weren’t around when I bought the above device) check out How to Tweak a £10 HDMI to USB Capture Device by Les Pounder.
One end has an HDMI socket, the other has a USB 3.0 Type-A socket. Attach the output of the machine you want to capture to the HDMI port. Connect one end of the supplied USB cable to the device, and the other end to machine doing the capturing. That’s how to “install” it. Simple.
I have the Magewell device permanently connected to my PC. It can get a little warm while powered up. Given I don’t use it all the time, I attached it to the PC via a USB 3.0 Hub (affiliate link) with individual switches for each port. I simply turn the port off when the capture card isn’t in use. Perhaps this prolongs the device lifetime, I don’t know. But it certainly doesn’t sit there wasting power getting hot anymore.
On Linux, no additional driver is needed. When attached to a USB port the Magewell device shows up under /dev/video* on Linux. There’s a few software options available to capture the stream including VLC and OBS, but I prefer to use a little script. I call it make_screencast and it lives in my /home/alan/bin folder, on the machine capturing the video. The script is below.
When I first got the Magewell device it would sometimes just disappear from the USB bus. I have no idea why, nor whether this is a problem with the device, the kernel, my USB ports, cable or hub. I never investigated that in detail, but instead added a workaround. The make_screencast script uses a utility called usbreset . The source for that is at this gist which I found via this stackexchange post. I compiled it and dropped that in /home/alan/bin too.
The script uses some bits of that stackexchange post to enumerate the correct device to reset, then uses usbreset to reset it, under sudo . I added a delay in to give the device time to settle before it starts recording. I could probably remove all of that, and test the device out without resetting. I suspect it likely doesn’t need to be reset so much now, as the device tends to be powered off most of the time, and is only powered back on to use it intermittently.
Here’s the full script in case it’s useful to anyone else. Note the USBID field is specific to this device, and relates to the output you see in lspci -n when the capture card is attached.
#!/bin/bash FFMPEGBIN="/usr/bin/ffmpeg" RATE="60" SIZE="1920x1080" USBID="2935:0006" OUTPUTDIR="$HOME/Videos" FILE="Screencast-$(date +%Y-%m-%d-%H%M%S).mkv" FILENAME="$OUTPUTDIR/$FILE" VIDEODEVICE="/dev/video4" WAITTIME="5" DEVICEID=$(lsusb | grep "$USBID") if [[ "$?" == "0" ]]; then echo "*** Found Magewell device, resetting" BUS=$(echo "$DEVICEID" | awk -F ' ' '< print $2 >') DEV=$(echo "$DEVICEID"| awk -F ' ' '< print $4 >' | tr -d ':') sudo /home/alan/bin/usbreset /dev/bus/usb/"$BUS"/"$DEV" echo "*** Waiting $WAITTIME seconds to settle" sleep "$WAITTIME" else echo "*** Can't find Magewell device, exiting ***" exit 1 fi read -p "*** Press Enter to start recording ***" "$FFMPEGBIN" \ -thread_queue_size 512 \ -r "$RATE" \ -f v4l2 \ -video_size "$SIZE" \ -i "$VIDEODEVICE" \ -crf 0 \ -c:v libx264 \ -preset ultrafast \ -threads 4 \ "$FILENAME" echo "$FILENAME" Here’s what it looks like when it runs. I have snipped out some of the chatty header of ffmpeg. Just press ‘q’ to stop the recording, at which point it prints the path to the recorded video.
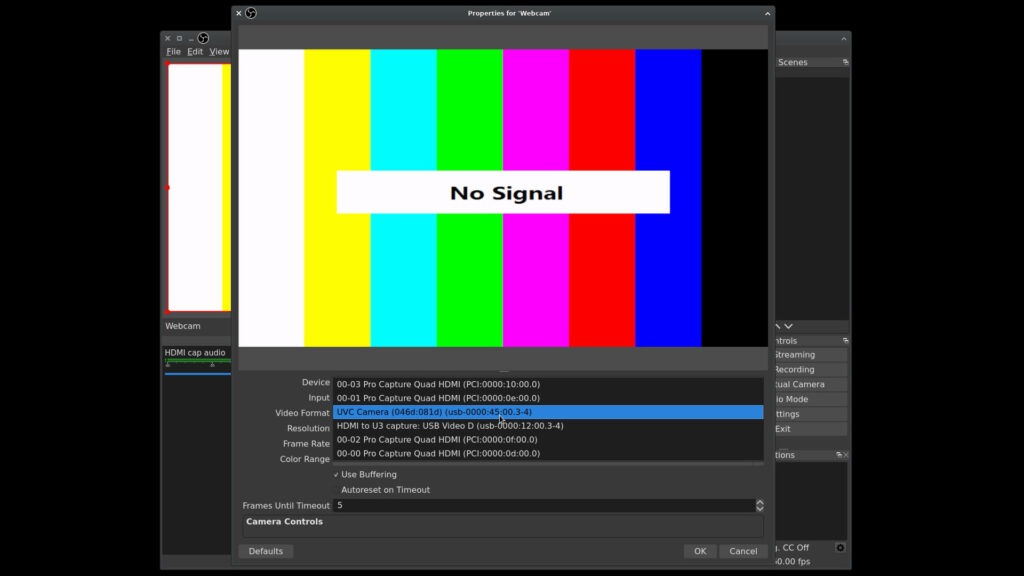
*** Found Magewell device, resetting Resetting USB device /dev/bus/usb/002/006 Reset successful *** Waiting 5 seconds to settle *** Press Enter to start recording *** ffmpeg version 4.3.1-7ubuntu1 Copyright (c) 2000-2020 the FFmpeg developers Input #0, video4linux2,v4l2, from '/dev/video4': Duration: N/A, start: 911487.880892, bitrate: 1990656 kb/s Stream #0:0: Video: rawvideo (YUY2 / 0x32595559), yuyv422, 1920x1080, 1990656 kb/s, 60 fps, 60 tbr, 1000k tbn, 1000k tbc Stream mapping: Stream #0:0 -> #0:0 (rawvideo (native) -> h264 (libx264)) Press [q] to stop, [?] for help Output #0, matroska, to '/home/alan/Videos/Screencast-2021-01-27-120421.mkv': Metadata: encoder : Lavf58.45.100 Stream #0:0: Video: h264 (libx264) (H264 / 0x34363248), yuv422p, 1920x1080, q=-1--1, 60 fps, 1k tbn, 60 tbc Metadata: encoder : Lavc58.91.100 libx264 Side data: cpb: bitrate max/min/avg: 0/0/0 buffer size: 0 vbv_delay: N/A frame= 2649 fps= 60 q=-1.0 Lsize= 23495kB time=00:00:44.13 bitrate=4361.1kbits/s speed= 1x video:23476kB audio:0kB subtitle:0kB other streams:0kB global headers:0kB muxing overhead: 0.081421% /home/alan/Videos/Screencast-2021-01-27-120421.mkv When no device is attached, you get an image like this, so you can test with no external source attached.

That’s it. You get a nice 1080p60 video which can be uploaded to video sharing sites, or used in whatever video editor you prefer.
The script could certainly be improved. For example it could detect if the device needs resetting somehow, and only do it when necessary. It might also be nice to put a little frontend together to select things like the framerate, resolution, codec etc. I haven’t done that because I almost never change any of those settings. I typically just fire it off and press ‘q’ when done.
Hope that’s helpful to someone.