- How to Use USB Redirector for Linux in USB Server Mode
- Installing USB Redirector for Linux in USB Server Mode
- Command-line Syntax
- Getting a List of USB Devices
- Sharing a USB Device
- Unsharing a USB Device
- Changing TCP Port Number Used By USB Redirector
- USB Redirector — транслирование USB-устройств в сеть
- Установка и настройка usb-redirector-linux в CentOS
- Подготовка сервера
- Настройка сервера
- Проброс USB устройства
- Настройка клиента
How to Use USB Redirector for Linux in USB Server Mode
USB Redirector for Linux can be used in USB server or USB client modes.
Installing USB Redirector for Linux in USB Server Mode
To install USB Redirector for Linux in USB server mode on your computer, you should download and extract the installation package, then execute the following command:
If you faced any problems during the installation, please read our installation troubleshooting guide.
When installation has completed, usbsrvd daemon should be running in your system. To share or unshare USB devices use usbsrv command-line utility. All further operations are executed with the help of this utility.
Command-line Syntax
The generic command-line syntax of usbsrv utility is:
where is one of the following:
- -s, -share | Share a USB device.
- -t, -unshare | Unshare a USB device.
- -auto-share on|off Enable or disable auto-sharing mode.
- -add-exclusion | Add specified device to exclusion list to deny manual and automatic sharing.
- -remove-exclusion | Remove specified device from exclusion list.
- -create-callback : Create callback connection to remote USB client.
- -close-callback : | | | all Close callback connection to remote USB client.
- -remote-auto-connect on|off | Enable or disable automatic connection of devices on the specified callback client.
- -connect-to | — Connect the specified device to the specified client. Client must be already connected to this server.
- -disconnect-from | | all Disconnect the specified device from a client.
- -l, -list-devices Show a list of all USB devices currently present on server.
- -list-clients Show a list of clients currently connected to the server.
- -i, -info Show current USB server state.
- -set-timeout Set inactivity timeout for a USB device. Timeout value is in seconds. Set to zero to disable inactivity timeout.
- -set-tcp-port Set TCP port number which is used by the server.
Parameters used in the commands are as follows:
is a device ID number as displayed by -list-devices command.
is a client ID number as displayed by -list-clients command.
is a combination of one or more of the following parameters that identify a USB device:
- -deviceid Specific device ID number as displayed by -list-devices command.
- -vid USB device vendor ID.
- -pid USB device product ID.
- -serial USB device serial number.
- -usb-port USB port number as displayed by -list-devices command.
- -device-name «» USB device name as displayed by -list-devices command. The name must be enclosed in double quotes.
is one of the following parameters that identify a client connected to the server:
- -clientid Specific client ID number as displayed by -list-clients command.
- -client : Remote client address and port number as displayed by -list-clients command.
Getting a List of USB Devices
To get a list of USB devices on your USB server, run the following command:
If successful, this command will produce the output like this:
user@cyber:~$ usbsrv -list-devices =================== LIST OF LOCAL USB DEVICES =================== 1: Flash Disk — USB Mass Storage Device Vid: 0ea0 Pid: 2168 Port: 1-4 Status: plugged 16: USB-Serial Controller C Prolific Technology Inc. Vid: 067b Pid: 2303 Port: 3-1 Status: plugged, in exclusion list 18: USB Human Interface Device — Mouse Vid: 1241 Pid: 1166 Port: 2-1 Status: in use by 192.168.1.20 19: FM1083 FORTEMEDIA — Composite USB Device Vid: 138c Pid: 0001 Port: 2-2 Status: not plugged, shared ===================== ======================= =================== user@cyber:~$
All USB devices in USB Redirector are assigned with unique ID numbers, these IDs help to conveniently share or unshare devices, manage settings, etc. The IDs are displayed by -list-devices command as shown above, they are located to the left of device name.
- plugged : USB device is plugged into the computer
- not plugged : USB device is shared, but not currently plugged into the USB port
- initializing : USB device is preparing for sharing, it will become shared in a moment
- shared : USB device is shared and available for connection by clients
- in use by : USB device is shared and connected to a remote client
- in exclusion list : USB device is in the exclusion list and can not be shared
Sharing a USB Device
Before a USB device can be redirected, it must be shared. The sharing makes a device available to remote clients.
For example, we will share the » Flash Disk — USB Mass Storage Device » that was listed by -list-devices command above. This can be done with the help of -share command:
usbsrv -share -vid 0ea0 -pid 2168 -usb-port 1-4
If successful, this command will display a message like this:
user@cyber:~$ usbsrv -share -vid 0ea0 -pid 2168 -usb-port 1-4 ====================== OPERATION SUCCESSFUL ===================== USB device has been shared ===================== ======================= =================== user@cyber:~$
Please note! If you plug this device into another USB port, the port number will change and USB Redirector will treat it as another device. This is not the case for devices with serial number, such devices will be properly identified in any USB port.
Alternatvely, it is possible to use a short form of the -share command and share the device by ID:
If successful, this command will display a message like this:
When USB device is shared, it will remain shared even after reboot. Shared devices are not accessible on the local system because they are acquired by USB Redirector to make them available for remote clients. To unshare a device use -unshare command.
Unsharing a USB Device
To unshare the » USB Human Interface Device — Mouse » listed on the screenshot above, you need to run:
usbsrv -unshare -vid 1241 -pid 1166 -usb-port 2-1
If successful, this command will display a message like this:
user@cyber:~$ usbsrv -unshare -vid 1241 -pid 1166 -usb-port 2-1 ====================== OPERATION SUCCESSFUL ===================== USB device has been unshared ===================== ======================= =================== user@cyber:~$
To unshare the same device by ID, run the following command:
If successful, this command will display a message like this:
Changing TCP Port Number Used By USB Redirector
By default USB Redirector accepts incoming connections from clients on 32032 TCP port. To change the port number you can run:
IncentivesPro is a division of SimplyCore LLC.
Copyright © 2007-2020 SimplyCore LLC. All rights reserved.
USB Redirector — транслирование USB-устройств в сеть
На клиентском компьютере необходимо с официального сайта скачать архив и распаковать его:
wget http://www.incentivespro.com/usb-redirector-linux-x86_64.tar.gz tar -zxvf usb-redirector-linux-x86_64.tar.gz
После распаковки перейти в директорию tusbd и запустить сборку модулей с указанием исходника ядра:
cd usb-redirector-linux-x86_64/files/modules/src/tusbd make KERNELDIR=/usr/src/kernels/$(uname -r)/
После сборки вернуться в директорию usb-redirector и запустить установку программы:
cd /home/user/usb-redirector-linux-x86_64/ ./installer.sh install-client
Далее нужно добавить сервер, к которому подключено USB-устройство:
usbclnt -add-server :32032 ====================== OPERATION SUCCESSFUL ===================== USB server has been added ===================== ======================= =================
После этого можно посмотреть список доступных устройств:
./usbclnt -list ================== LIST OF REMOTE USB DEVICES ================= 2: USB server at 192.168.1.1:32032 Mode: manual-connect Status: connecting ===================== ======================= =================
Также можно скачать и установить клиентскую часть для Windows на официальном сайте USB Redirector.
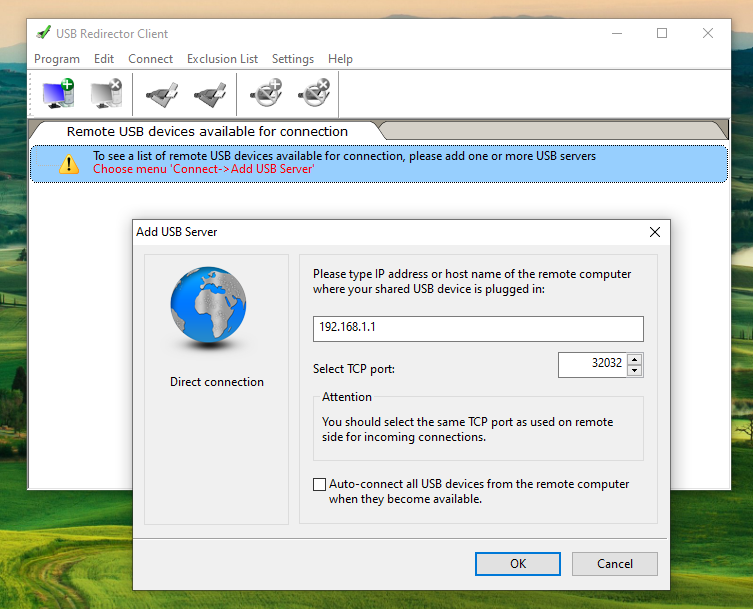
После установки необходимо запустить программу, добавить USB-сервер и прописать IP-адрес сервера Linux:
После чего можно будет выбрать «расшаренное» устройство и подключиться к нему.
Серверная часть описана в данной статье.
Дата последнего изменения: 21.12.2022
Если вы нашли ошибку, пожалуйста, выделите текст и нажмите Ctrl+Enter.
Установка и настройка usb-redirector-linux в CentOS

Опубликовано: 19.06.2018
В статье пойдет речь о настройке сервера для сетевой передачи устройства USB на другой компьютер. Подобная конструкция, как правило, необходима для проброса различных USB-ключей на виртуальные машины. Серверная часть будет настраиваться на базе Linux CentOS 7, клиентская — Windows. В качестве серверного ПО будем использовать usb-redirector-linux. Внимание — данный продукт нельзя использовать бесплатно, если раздача USB устройства идет с сервера Linux. В большей степени, инструкция предназначена для тех, кто планирует купить данных продукт.
Подготовка сервера
Для корректной установки программы, необходимо обновить систему:
После сервер необходимо перезагрузить:
Настройка сервера
usb-redirector-linux собирается из исходников. Для начала ставим пакеты, необходимые для сборки:
yum install wget gcc kernel-devel
Переходим на страницу загрузки программы и копируем ссылку на ее скачивание:

Используя ссылку, скачиваем исходник на сервер:
Распаковываем скачанный архив и переходим в каталог исходников модулей:
tar -zxvf usb-redirector-linux-x86_64.tar.gz
Собираем исходник с указанием исходника ядра:
* каталог 3.10.0-862.3.3.el7.x86_64, скорее всего, будет другим — это зависит от версии ядра.
Возвращаемся в корень каталога, который появился после распаковывания архива:
Устанавливаем usb-redirector следующей командой:
Проброс USB устройства
Переходим в каталог, куда была установлена программа:
Отображаем список подключенных USB устройств:
================= USB SERVER OPERATION SUCCESSFUL ===============
List of local USB devices:
1: USB Keyboard SIGMACHIP Composite USB Device
Vid: 1c4f Pid: 0026 Port: 2-1.4
Status: plugged
2: ET99 Token OEM USB Human Interface Device
Vid: 096e Pid: 0303 Port: 2-1.3
Status: plugged
Чтобы расшарить токен ET99, вводим:
Настройка клиента
Заходим на страницу загрузки USB Redirector и скачиваем клиентскую часть — в нашем случае для Windows:

Скачанный архив распаковываем и запускаем установщик. Отвечаем на все вопросы мастера нажатием Далее.
После окончания установки запускаем программу — нажимаем Add USB Server и прописываем IP-адрес нашего сервера:

Появится список расшаренных устройств — просто нажимаем правой кнопкой мыши на необходимый и кликаем Connect USB Device.