- USB Redirector for Linux — Share USB over Network in Linux
- USB Redirector for Linux helps to:
- How to Start
- Redirect a USB Device in 5 Steps
- Cross-platform Features and Remote Desktop Support
- More Information on How to Use USB Redirector for Linux
- System Requirements
- Sysadminium
- Менеджер лицензий hasp и проброс usb ключа по сети на ubuntu 18.04
USB Redirector for Linux — Share USB over Network in Linux
This Free product allows to share and access USB devices remotely on Linux platform. This solution is compatible with all of our other USB redirection products. It allows redirecting USB devices between Linux based computers or between Linux and Windows. And with help of the special patch, it is possible to add USB redirection support to the well-known open source remote desktop clients, rdesktop and FreeRDP, so that you can redirect USB devices into remote session on Windows computer where USB Redirector RDP Edition or USB Redirector TS Edition are installed.
USB Redirector for Linux helps to:
- Redirect USB devices to virtual machine.
- Organize USB server for users in your local or corporate network.
- Use USB devices plugged into your Linux thin-client in a Windows Remote Desktop session.
- Use USB devices plugged into remote Windows-based computer.
- Limit physical access to USB devices, but make them available for users in your network.
Not sure if this version suits your needs?
Compare USB Redirector editions

How to Start
USB Redirector for Linux can be installed in three modes:
- USB server mode. When installed in this mode, USB Redirector allows to share your USB devices for access on remote computers with Linux or Windows operating systems.
- USB client mode. When installed in this mode, USB Redirecror allows you to connect remote USB devices that were shared on remote computers with Linux or Windows operating systems.
- Combined USB server and USB client mode. You can either share your USB devices for remote access or connect USB devices from remote computers with Linux or Windows operating systems.
USB Redirector installation instructions can be found here.
Redirect a USB Device in 5 Steps
- Step 1. Download and install USB Redirector for Linux in USB server mode on a computer where USB device is physically attached, this computer will be the USB server:
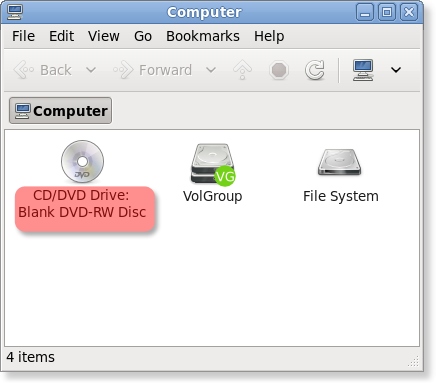
user@cyber:~$ usbsrv -list-devices =================== LIST OF LOCAL USB DEVICES =================== 8: Portable Super Multi Drive HLDS Inc — USB Mass Storage Device Vid: 152e Pid: 2571 Port: 1-4 Status: plugged ===================== ======================= =================== user@cyber:~$
root@localhost:~$ usbclnt -list-devices ================== LIST OF REMOTE USB DEVICES =================== 1: USB server at 192.168.1.105:32032 Mode: manual-connect Status: connected | `- 8: Portable Super Multi Drive HLDS Inc Vid: 152e Pid: 2571 Port: 1-4 Mode: manual-connect Status: available for connection ===================== ======================= =================== root@localhost:~$

Cross-platform Features and Remote Desktop Support
USB Redirector for Linux is compatible with USB Redirector, USB Redirector RDP Edition and USB Redirector TS Edition. It means you can freely share USB devices between Linux and Windows systems without any limitations.
It is possible to redirect USB devices over RDP connection from Linux thin-client to Windows Terminal Server (RD Sesssion Host). For this, you need to use one of the compatible RDP clients. We support the most popular open source Linux Remote Desktop clients, rdesktop and FreeRDP. We provide patches for these RDP clients which add USB over RDP redirection support.
After installing USB Redirector for Linux, you need to apply the special patch, that is shipped inside USB Redirector installation package in the rdp/rdesktop directory:
- Copy usbrdr.c and usbrdr.patch into rdesktop source code directory
- Run patch -p3 -i usbrdr.patch
- Re-compile and re-install patched rdesktop
- Start rdesktop with ‘-r usbrdr’ option:
More Information on How to Use USB Redirector for Linux
System Requirements
USB Redirector for Linux works on the following Linux distributions:
- Debian 6 and newer
- Fedora 10 and newer
- Gentoo 10.1 and newer
- openSUSE 11.1 and newer
- RedHat 6 and newer
- Ubuntu 8.10 and newer
- Other systems, which meet the following requirements:
- kernel version 2.6.27 to 5.5
- glibc 2.9 or newer, uclibc or musl libs
- udev subsystem
- r/w file system (not read-only)
- kernel source code or kernel headers are required for installation
IncentivesPro is a division of SimplyCore LLC.
Copyright © 2007-2020 SimplyCore LLC. All rights reserved.
Sysadminium
Менеджер лицензий hasp и проброс usb ключа по сети на ubuntu 18.04
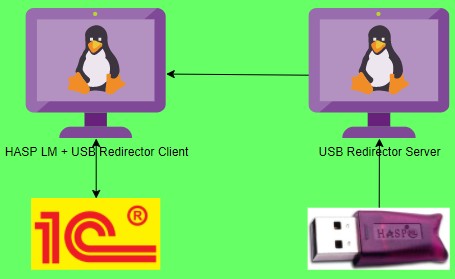
Чтобы 1С увидела ваш многопользовательский usb ключ в одной сети с вами должен находится сервер лицензирования. В этой статье настроим такой сервер, и в качестве дополнения usb ключ в него будем прокидывать по сети.
Зачем может понадобится пробрасывать usb ключ по сети? Ну допустим у вас сервер 1С или сервер лицензирования в датацентре, а ключ в датацентр вы везти не хотите. Или, например, у вас несколько виртуальных серверов лицензирования, которые могут перемещаться по разным хостам в рамках одного кластера виртуализации и нужно обеспечить перемещение ключей 1С вслед за виртуальными машинами.
Устанавливать всё это будем на Ubuntu 18.04, так как для Ubuntu 20.04 менеджера лицензий нет и скорее всего не будет.
$ sudo apt update $ sudo apt dist-upgrade $ sudo reboot
Создадим каталог, в который скачаем пакеты hasp севера, установим зависимости и сервер лицензирования:
$ mkdir hasp $ cd hasp/ $ wget http://download.etersoft.ru/pub/Etersoft/HASP/last/x86_64/Ubuntu/18.04/haspd-modules_7.90-eter2ubuntu_amd64.deb $ wget http://download.etersoft.ru/pub/Etersoft/HASP/last/x86_64/Ubuntu/18.04/haspd_7.90-eter2ubuntu_amd64.deb $ sudo apt install libc6-i386 $ sudo dpkg -i haspd_7.90-eter2ubuntu_amd64.deb $ sudo dpkg -i haspd-modules_7.90-eter2ubuntu_amd64.deb $ sudo apt install -f
Запустим сервер лицензирования:
$ sudo systemctl start haspd.service $ sudo systemctl status haspd.service ● haspd.service - LSB: Hasp keys support Loaded: loaded (/etc/init.d/haspd; generated) Active: active (running) since Thu 2021-03-25 10:14:51 UTC; 48min ago Docs: man:systemd-sysv-generator(8) Process: 990 ExecStart=/etc/init.d/haspd start (code=exited, status=0/SUCCESS) Tasks: 11 (limit: 2317) CGroup: /system.slice/haspd.service ├─1057 aksusbd ├─1068 winehasp ├─1077 hasplm -c /etc/haspd/hasplm.conf └─1088 hasplmd -s
С сервером лицензирования закончили. Теперь вернёмся в родительский каталог, создадим папку для usb-redirector и скачаем этот пакет:
$ cd .. $ mkdir usbred $ cd usbred/ $ wget https://www.incentivespro.com/usb-redirector-linux-x86_64.tar.gz
Установим зависимости для usb-redirector, а затем и сам usb-redirector:
$ sudo apt install linux-headers-`uname -r` $ apt install linux-source $ tar xf usb-redirector-linux-x86_64.tar.gz $ cd usb-redirector-linux-x86_64/ $ sudo ./installer.sh install-client $ sudo systemctl start rc.usbsrvd.service $ sudo systemctl enable rc.usbsrvd.service $ systemctl status rc.usbsrvd.service
Дальше подключимся к серверу usb-redirector и посмотрим какие ключи он раздаёт:
$ usbclnt -a :32032 $ usbclnt -l ================== LIST OF REMOTE USB DEVICES =================== 1: USB server at :32032 Mode: manual-connect Status: connected | |- 12: hasp-key-net10 | Vid: 0529 Pid: 0001 Port: 2-3.3 | Mode: manual-connect Status: available for connection
Прокинем нужный ключик или настроим автопрокидывание:
$ usbclnt -c 1-12 # ручное прокидывание $ usbclnt -auto-connect on 1-12 # автопрокидывание $ usbclnt -l ================== LIST OF REMOTE USB DEVICES =================== 1: USB server at :32032 Mode: manual-connect Status: connected | |- 12: hasp-key-net10 | Vid: 0529 Pid: 0001 Port: 2-3.3 | Mode: auto-connect Status: connected $ lsusb | grep Aladdin Bus 002 Device 002: ID 0529:0001 Aladdin Knowledge Systems HASP copy protection dongle
И последнее что можно сделать, это настроить очерёдность запуска сервисов, чтобы haspd стартовал после rc.usbsrvd. Для начала проверим на каком runlevel стартует ваш сервер по умолчанию:
Скорее всего он будет 5-ый, это уровень по умолчанию для сервера Ubuntu.
И так, настроим очерёдность:
$ cd /etc/rc5.d/ $ ls -l total 0 lrwxrwxrwx 1 root root 15 Aug 5 2019 S01acpid -> ../init.d/acpid lrwxrwxrwx 1 root root 16 Aug 5 2019 S01apport -> ../init.d/apport lrwxrwxrwx 1 root root 13 Aug 5 2019 S01atd -> ../init.d/atd lrwxrwxrwx 1 root root 26 Aug 5 2019 S01console-setup.sh -> ../init.d/console-setup.sh lrwxrwxrwx 1 root root 14 Aug 5 2019 S01cron -> ../init.d/cron lrwxrwxrwx 1 root root 14 Aug 5 2019 S01dbus -> ../init.d/dbus lrwxrwxrwx 1 root root 21 Mar 25 08:32 S01grub-common -> ../init.d/grub-common lrwxrwxrwx 1 root root 15 Mar 25 08:52 S01haspd -> ../init.d/haspd lrwxrwxrwx 1 root root 20 Aug 5 2019 S01irqbalance -> ../init.d/irqbalance lrwxrwxrwx 1 root root 22 Aug 5 2019 S01lvm2-lvmetad -> ../init.d/lvm2-lvmetad lrwxrwxrwx 1 root root 23 Aug 5 2019 S01lvm2-lvmpolld -> ../init.d/lvm2-lvmpolld lrwxrwxrwx 1 root root 15 Aug 5 2019 S01lxcfs -> ../init.d/lxcfs lrwxrwxrwx 1 root root 13 Aug 5 2019 S01lxd -> ../init.d/lxd lrwxrwxrwx 1 root root 15 Aug 5 2019 S01mdadm -> ../init.d/mdadm lrwxrwxrwx 1 root root 23 Aug 5 2019 S01open-vm-tools -> ../init.d/open-vm-tools lrwxrwxrwx 1 root root 18 Aug 5 2019 S01plymouth -> ../init.d/plymouth lrwxrwxrwx 1 root root 20 Mar 25 09:19 S01rc.usbsrvd -> ../init.d/rc.usbsrvd lrwxrwxrwx 1 root root 15 Aug 5 2019 S01rsync -> ../init.d/rsync lrwxrwxrwx 1 root root 17 Aug 5 2019 S01rsyslog -> ../init.d/rsyslog lrwxrwxrwx 1 root root 13 Mar 25 08:33 S01ssh -> ../init.d/ssh lrwxrwxrwx 1 root root 29 Aug 5 2019 S01unattended-upgrades -> ../init.d/unattended-upgrades lrwxrwxrwx 1 root root 15 Aug 5 2019 S01uuidd -> ../init.d/uuidd $ sudo mv S01haspd ./S02haspd
После этого haspd будет стартовать всегда последним! То есть после перезапуска вначале стартует наш usb клиент, который захватит нужный ключ с сервера, а затем и сервер лицензирования.
Спасибо за внимание, буду рад если кому-нибудь это пригодится!
Чтобы 1С увидела ваш многопользовательский usb ключ в одной сети с вами должен находится сервер лицензирования. В этой статье настроим такой сервер, и в качестве дополнения usb ключ в него будем прокидывать по сети.
