- CANBUS
- Host Hardware
- Terminating Resistors
- Finding the canbus_uuid for new micro-controllers
- Configuring Klipper
- USB to CAN bus bridge mode
- USBtin and Linux-CAN
- Determine serial device
- Prepare CAN utils
- Attach and startup interface
- Use the command line CAN utils
- Dump can messages
- Send sequences of CAN frames
- Use Wireshark to capture CAN frames
- Raspberry Pi — Raspbian
- Installing USB2CAN on Linux
- USB2CAN driver
- VSCP Works driver
- Starting the VSCP daemon
- Connecting VSCP Works
- Differences daemon — USB2CAN
- Resources
CANBUS
Klipper currently supports CAN on stm32, SAME5x, and rp2040 chips. In addition, the micro-controller chip must be on a board that has a CAN transceiver.
To compile for CAN, run make menuconfig and select «CAN bus» as the communication interface. Finally, compile the micro-controller code and flash it to the target board.
Host Hardware
In order to use a CAN bus, it is necessary to have a host adapter. It is recommended to use a «USB to CAN adapter». There are many different USB to CAN adapters available from different manufacturers. When choosing one, we recommend verifying that the firmware can be updated on it. (Unfortunately, we’ve found some USB adapters run defective firmware and are locked down, so verify before purchasing.) Look for adapters that can run Klipper directly (in its «USB to CAN bridge mode») or that run the candlelight firmware.
It is also necessary to configure the host operating system to use the adapter. This is typically done by creating a new file named /etc/network/interfaces.d/can0 with the following contents:
allow-hotplug can0 iface can0 can static bitrate 1000000 up ifconfig $IFACE txqueuelen 128 Terminating Resistors
A CAN bus should have two 120 ohm resistors between the CANH and CANL wires. Ideally, one resistor located at each the end of the bus.
Note that some devices have a builtin 120 ohm resistor that can not be easily removed. Some devices do not include a resistor at all. Other devices have a mechanism to select the resistor (typically by connecting a «pin jumper»). Be sure to check the schematics of all devices on the CAN bus to verify that there are two and only two 120 Ohm resistors on the bus.
To test that the resistors are correct, one can remove power to the printer and use a multi-meter to check the resistance between the CANH and CANL wires — it should report ~60 ohms on a correctly wired CAN bus.
Finding the canbus_uuid for new micro-controllers
Each micro-controller on the CAN bus is assigned a unique id based on the factory chip identifier encoded into each micro-controller. To find each micro-controller device id, make sure the hardware is powered and wired correctly, and then run:
~/klippy-env/bin/python ~/klipper/scripts/canbus_query.py can0 If uninitialized CAN devices are detected the above command will report lines like the following:
Found canbus_uuid=11aa22bb33cc, Application: Klipper Each device will have a unique identifier. In the above example, 11aa22bb33cc is the micro-controller’s «canbus_uuid».
Note that the canbus_query.py tool will only report uninitialized devices — if Klipper (or a similar tool) configures the device then it will no longer appear in the list.
Configuring Klipper
Update the Klipper mcu configuration to use the CAN bus to communicate with the device — for example:
[mcu my_can_mcu] canbus_uuid: 11aa22bb33cc USB to CAN bus bridge mode
Some micro-controllers support selecting «USB to CAN bus bridge» mode during Klipper’s «make menuconfig». This mode may allow one to use a micro-controller as both a «USB to CAN bus adapter» and as a Klipper node.
When Klipper uses this mode the micro-controller appears as a «USB CAN bus adapter» under Linux. The «Klipper bridge mcu» itself will appear as if it was on this CAN bus — it can be identified via canbus_query.py and it must be configured like other CAN bus Klipper nodes.
Some important notes when using this mode:
- It is necessary to configure the can0 (or similar) interface in Linux in order to communicate with the bus. However, Linux CAN bus speed and CAN bus bit-timing options are ignored by Klipper. Currently, the CAN bus frequency is specified during «make menuconfig» and the bus speed specified in Linux is ignored.
- Whenever the «bridge mcu» is reset, Linux will disable the corresponding can0 interface. To ensure proper handling of FIRMWARE_RESTART and RESTART commands, it is recommended to use allow-hotplug in the /etc/network/interfaces.d/can0 file. For example:
allow-hotplug can0 iface can0 can static bitrate 1000000 up ifconfig $IFACE txqueuelen 128 - The «bridge mcu» is not actually on the CAN bus. Messages to and from the bridge mcu will not be seen by other adapters that may be on the CAN bus.
- The available bandwidth to both the «bridge mcu» itself and all devices on the CAN bus is effectively limited by the CAN bus frequency. As a result, it is recommended to use a CAN bus frequency of 1000000 when using «USB to CAN bus bridge mode». Even at a CAN bus frequency of 1000000, there may not be sufficient bandwidth to run a SHAPER_CALIBRATE test if both the XY steppers and the accelerometer all communicate via a single «USB to CAN bus» interface.
- A USB to CAN bridge board will not appear as a USB serial device, it will not show up when running ls /dev/serial/by-id , and it can not be configured in Klipper’s printer.cfg file with a serial: parameter. The bridge board appears as a «USB CAN adapter» and it is configured in the printer.cfg as a CAN node.
USBtin and Linux-CAN
Load the kernel modules we need for CAN. On Ubuntu these modules are already available, so we don’t need to compile it.
$ sudo modprobe can $ sudo modprobe can-raw $ sudo modprobe slcan
Determine serial device
$ tail /var/log/kern.log kernel: [ ] usb 1-4.2.3: new full-speed USB device number 8 using ehci-pci kernel: [ ] usb 1-4.2.3: New USB device found, idVendor=04d8, idProduct=000a kernel: [ ] usb 1-4.2.3: New USB device strings: Mfr=1, Product=2, SerialNumber=0 kernel: [ ] usb 1-4.2.3: Product: USBtin kernel: [ ] cdc_acm 1-4.2.3:1.0: This device cannot do calls on its own. It is not a modem. kernel: [ ] cdc_acm 1-4.2.3:1.0: ttyACM0: USB ACM device kernel: [ ] usbcore: registered new interface driver cdc_acm kernel: [ ] cdc_acm: USB Abstract Control Model driver for USB modems and ISDN adapters
Prepare CAN utils

Get and compile the CAN utils:
$ git clone https://github.com/linux-can/can-utils.git $ cd can-utils $ make
Attach and startup interface
The parameter «s5» stands for baudrate 250k. For non-standard baudrates, please use parameter «b» to set MCP2515 register values CNF1, CNF2, CNF3 (e.g. «-bd1ad06» sets 33333 Baud).
$ sudo ./slcan_attach -f -s5 -o /dev/ttyACM0 attached tty /dev/ttyACM0 to netdevice slcan0 $ sudo ./slcand ttyACM0 slcan0 $ sudo ifconfig slcan0 up
Now, the linux-can and the CAN utils are ready and can be used.
Use the command line CAN utils
Dump can messages
Send sequences of CAN frames
$ cat test.log (0.1) slcan0 5D1#0000 (0.2) slcan0 271#0100 (0.3) slcan0 289#72027000 (0.4) slcan0 401#081100000000
$ ./canplayer -l 20 -I test.log -v -g500
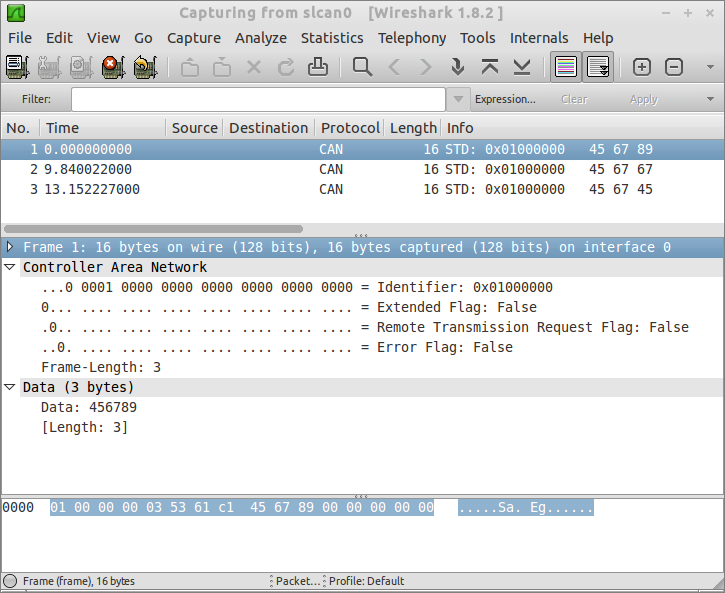
Use Wireshark to capture CAN frames
An alternative to the commandline dump tool is Wireshark, a graphical protocol analyser. Just install it on your system (e.g. «apt-get install wireshark») and choose your CAN device as capture device (eg. «slcan0»).
Raspberry Pi — Raspbian
Raspbian doesn’t have built in support for the CAN bus in the kernel. But it can be enabled. This article describes how to enable CANbus support and how to compile the kernel sources: RPi CANBus
After installing the new kernel and its modules, the steps described above can be used to activate the converter on the RPi.
Installing USB2CAN on Linux
This article describes how to use the USB2CAN interface with VSCP on Linux. While I am installing the interface on Ubuntu Linux, there is no reasons why it shouldn’t work on other distributions as well. We’ll be using VSCP’s built-in driver. The interface is subsequently tested using the VSCP Works suite.
USB2CAN driver
Ubuntu doesn’t need this driver, but if your Linux does, there is a Linux driver available on the product page on the 8Devices website. It points to a GitHub repository where you can download a zip archive.
Extract the files, enter the folder where you extracted them, and issue a ‘make’ command (as root of course). The drivers will now build.
To start the driver, the README file that came with the drivers asks to issue the following commands:
modprobe can_raw modprobe can_dev insmod usb_8dev.ko ip link set can0 up type can bitrate 1000000 sample-point 0.875 Of course we’ll need to change the bitrate to 125000 for standard VSCP or 250000 for the Hsselt and Antwerp modules.
ip link set can0 up type can bitrate 250000 sample-point 0.875 If necessary, the can0 interface can be shut down again with the command:
VSCP Works driver
I am assuming that VSCP Works has been properly configured and installed as per the instructions on vscp.org. Another article on this site, Installing VSCP Daemon in Windows, has some relevant information on how to set up the daemon.
The VSCP daemon has two drivers defined in it’s config file (/etc/vscp/vscpd.conf):
VSCPSocketCANDriver 1 /usr/local/lib/socketcandrv.so can0 00:00:00:00:00:00:00:00:00:00:00:00:00:00:00:00 VSCPSocketCANDriver 1 /usr/local/lib/vscp2drv_socketcan.so can0 00:00:00:00:00:00:00:00:00:00:00:00:00:00:00:00 Changing the driver enable line for the corresponding driver to true enables the driver. Restarting the VSCP daemon loads the driver.
I have found the Level I driver to be slow and somewhat erratic, the Level II driver does the job and is preferred. So I’ve changed driver enable to true for this driver, as you can see in the code snippet above. Don’t forget to save the config file.
Starting the VSCP daemon
Of course we’ll need to run this as root. In this example I’ll run with the -s switch so that we can see the vscpd running and can interact with it. If you want to run vscpd as a proper daemon, i.e. in the background, simply run without the -s switch.
If the driver started correctly, in the /srv/vscp/logs/vscp_log_general.txt log file you should see log entries similar to:
2014-11-01 11:24:55 - Loading level II driver: VSCPSocketCANDriver_1 Started at 2014-11-01 08:35:13 If you log on to the VSCP daemon web page (localhost:8080/vscp), the Devices — Interfaces menu should list the VSCPSocketCANDriver_1.
Another way to check if the interface loaded correctly is to log on to the daemon and do a ‘_interfaces list’ command. Use the following commands:
telnet localhost 9598 user admin pass secret interface list You should get a line that shows ‘VSCPSocketCANDriver_1 Started’.
4,3,00:00:AA:10:80:D3:16:00:FE:FF:FF:FF:00:04:00:00,VSCPSocketCANDriver_1 Started at 2014-11-05 19:46:42 Connecting VSCP Works
Now let’s try to connect a VSCP Works client to the daemon to see if we can see packets over the interface. I’ll be using a client on another machine, running Windows XP.
Let’s open a client window.
Select the interface TCP/IP: Oxygen and click edit to edit the interface settings.
Fill in the IP address of the machine which is running the VSCP daemon. The server port is best left as default (9598), and if you have changed the username and password in the vscpd.conf file on the Linux machine, you should change them here as well. The default password is secret.
If you want you can test the connection between the TCP/IP: Oxygen interface which we just defined and the VSCP daemon on the other machine by clicking the Test connection button.
Now click OK and OK again.
A VSCP client should now open, and it should show Connected as its status.
If you generate some events, you should see them in the receive window. I powered up the bus in the screenshot below, so you see nodes identifying themselves as new nodes, and then I generated some button events.
Since connecting a window directly to the USB2CAN interface blocks the interface, it means that only one window can be actively open at the same time. By connecting through the daemon, multiple windows can be open. In the screenshot below for example we’re reading a node’s configuration, while we can monitor the register read requests and responses in a client window.
Differences daemon — USB2CAN
There are some differences when connecting through the daemon instead of directly to the USB2CAN interface:
- You’ll need to connect to the TCP/IP: Oxygen interface instead of to the CANAL: USB2CAN interface (obviously)
- You’ll need to use the full GUID to address the device instead of the shorthand.
- You can have multiple open and active (connected) windows at the same time