- . David Wallis .
- Friday, 26 August 2011
- CP2102 USB to TTL bridge with Ubuntu 8.10
- USB-to-UART PL2303HX. Установка драйверов на Linux, Windows, Mac OS
- Технические параметры
- Назначение светодиодов:
- Установка драйверов USB-to-UART TTL на PL2303HX.
- Установка драйверов PL2303HX на Windows 7, 8 и 10.
- Установка драйвера PL2303HX на Mac OS.
- Getting Started with the USB to TTL converter
- Step-1 – Finding the Serial port
- Step-2 – Writing the client program
- Step-3 – The server
- Step-4 Testing
- USB to TTL (Serial) Adapters
- «Red» FTDI232 (FT232RL) USB 3.3V/5.0V TTL Serial Adapter
- «Blue» FT232RL USB 5.0V/3.3V TTL Serial Adapter
- RHX PL2303MDL (Black)
- BTE13-009
- USB Console Stub
. David Wallis .
I try to specialise in doing the out of the ordinary stuff (A Challenge!) — And generally making life as easy as possible using any of the technologies within reach without having to re-invent the wheel where possible! Technologies and products can include -> .NET, VBS, Powershell, DSC, Systems Center, NetApp, VMWare, Windows Server, Linux, Python, Microcontrollers and others!
Friday, 26 August 2011
CP2102 USB to TTL bridge with Ubuntu 8.10
Well I got the SMS working from a simple script, so it’s onto working on the input and output board, I’ve ruled out my other option as
I dont have a serial port anymore on the HP microserver, so I thought I’d look at interfacing with the Mega32 using USB.. every option was getting
over complicated and then I stumbled across the CP2102 chip on sparkfun. I was going to order one when I noticed that they were out of stock
quick search on google shopping showed play selling some for £4.18 or so including free delivery! — So I ordered two and they arrived the next day.
Seems to good to be true, anyway I Inserted the USB to TTL convertor and typed dmesg to look at the kernel messages and was presented with:
[6390234.520185] usb 4-3: new full speed USB device using ohci_hcd and address 3
[6390234.731367] USB Serial support registered for cp210x
[6390234.731450] cp210x 4-3:1.0: cp210x converter detected
[6390234.880248] usb 4-3: reset full speed USB device using ohci_hcd and address 3
[6390235.066809] usb 4-3: cp210x converter now attached to ttyUSB2
[6390235.066848] usbcore: registered new interface driver cp210x
[6390235.066854] cp210x: v0.09:Silicon Labs CP210x RS232 serial adaptor driver
Well that was easier than expected, beter than windows that wanted a driver installing..
Now to see if I can talk to my board.
All Working, shocked. now just to write a daemon that will monitor for input on the serial port and do something and also send stuff when requested, now that will take me some doing!
Ill add some pictures next week.
USB-to-UART PL2303HX. Установка драйверов на Linux, Windows, Mac OS
Большинство отладочных плат Arduino имеют встроенный USB-to-Serial преобразователь. Но как запрограммировать Arduino pro mini, Arduino pro и другие отладочные платы, которые не оснащены USB-to-Serial конверторами? Тут нам поможет USB-to-UART преобразователь на микросхеме PL2303HX.
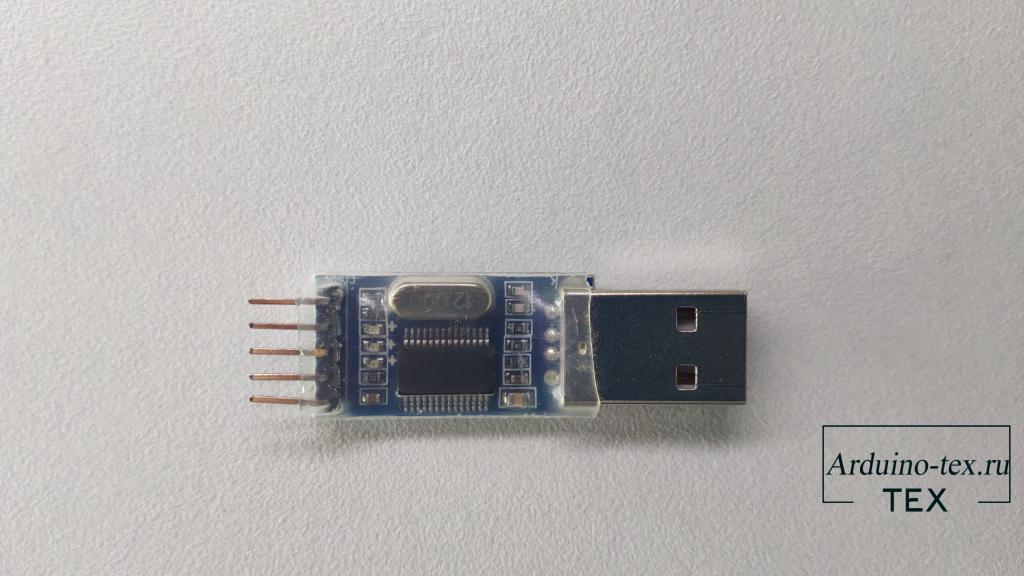
PL2303HX – это небольшой USB-Serial конвертер со встроенным приемопередатчиком RS232 (интерфейс UART). Микросхема создает на компьютере виртуальный COM — порт, через который можно прошить микроконтроллеры, а так же восстанавливать роутеры, приставки.
Технические параметры
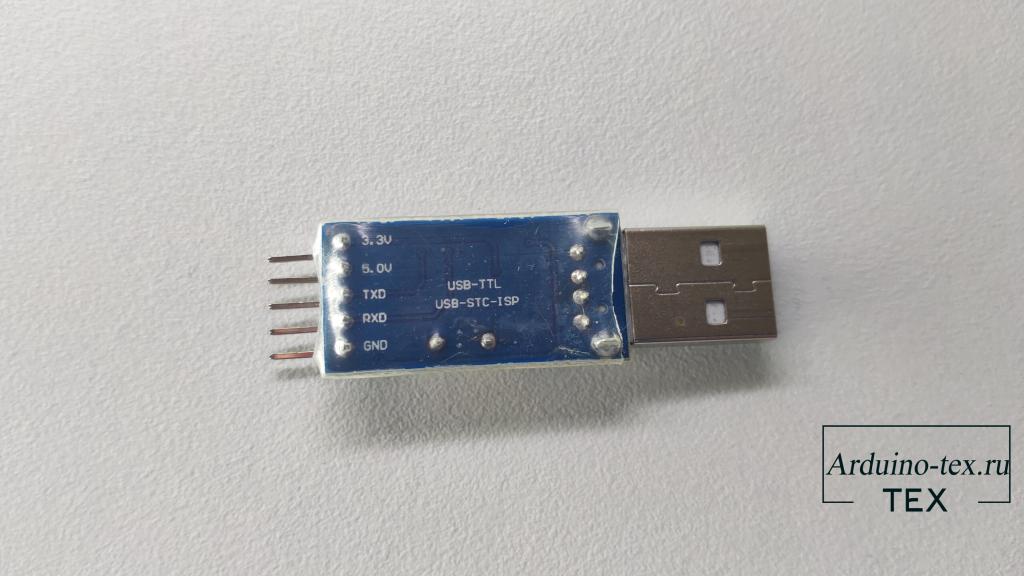
- Напряжение питания: 5В (от USB)
- Интерфейс 1: USB
- Интерфейс 2: TTL (от 0 до 5, Rx и Tx)
- Выходное напряжение, В: 3.3 и 5 (отдельные выводы)
- Размеры: 50мм x 15мм x 8мм
- Поддержка операционных систем: Linux, Mac OS, Windows XP / 7 / 8 / 8.1 / 10.
Назначение светодиодов:
- P (Power) — питание (горит постоянно).
- R (RxD) — принимаемые данные.
- T (TxD) — передаваемые данные.
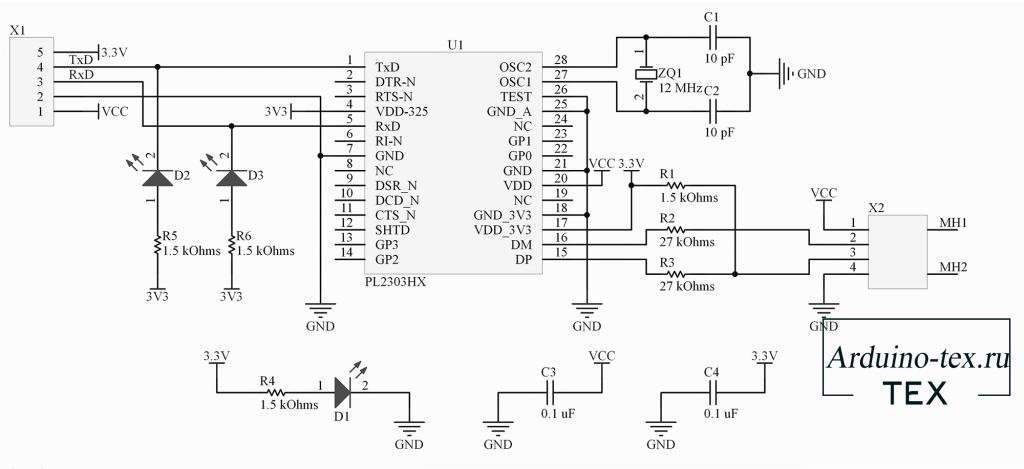
Из электрической схемы видно, что питание на вывод +5В идёт напрямую с USB порта, без защитных элементов, а питание на вывод +3.3 В. идёт с внутреннего стабилизатора PL-2303, который может выдержать ток до 150 мА.
Установка драйверов USB-to-UART TTL на PL2303HX.
При работе в операционной системе Linux Mint все работало без установки и дополнительной настройки. По моему опыту работать с Микроконтроллерами лучше в операционной системе Linux, но это мое мнение.
Установка драйверов PL2303HX на Windows 7, 8 и 10.
Фирма Prolific в октябре 2012 года, прекратила производство и поддержку микросхем UART PL2303X (Chip Rev A) и PL2303X HX (Chip Rev A), взамен начала производить микросхемы PL2303TA. Но и сейчас, можно купить преобразователь на микросхеме PL-2303HX (с поддельным чипом). При использовании ОС Windows 7 / 8 / 8.1 /10, для подключенного устройства автоматически скачивается последняя версия драйвера, в которой нет поддержки этих чипов, а в диспетчере устройств будет показан желтый знак с кодом ошибки 10.
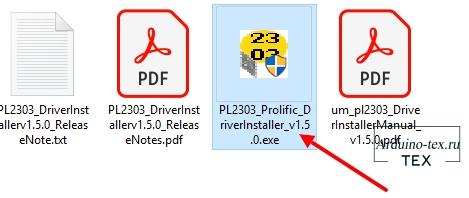
Методом проб и ошибок выяснил, чтобы преобразователь полноценно работал в Windows 7 / 8 / 8.1 /10 необходимо установить старый драйвер v. 1.5.0 (10.21.2011). Скачать драйвер можно внизу статьи в разделе «Файлы для скачивания».
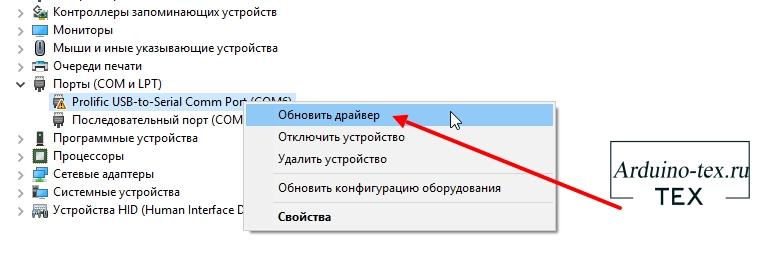
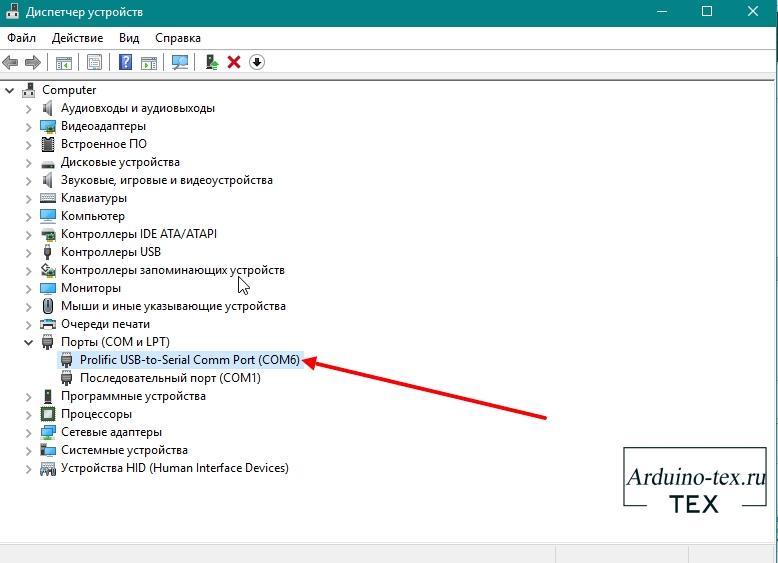
И так, приступим к установке драйвера. Для этого зайдем в «Диспетчер задач». Как видим, устройство отображается с ошибкой. И версия драйвера 17.10.2013.
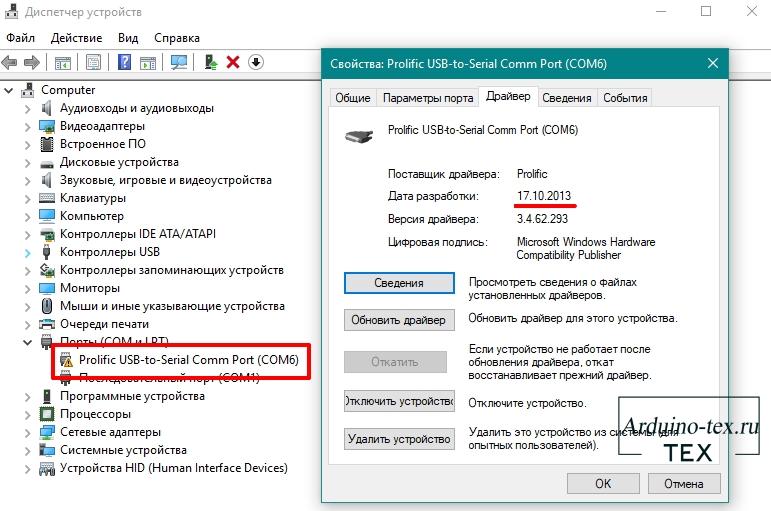
Для устранения данной ошибки достаточно установить драйвер v. 1.5.0, скачать который можно внизу статьи в разделе «Файлы для скачивания».
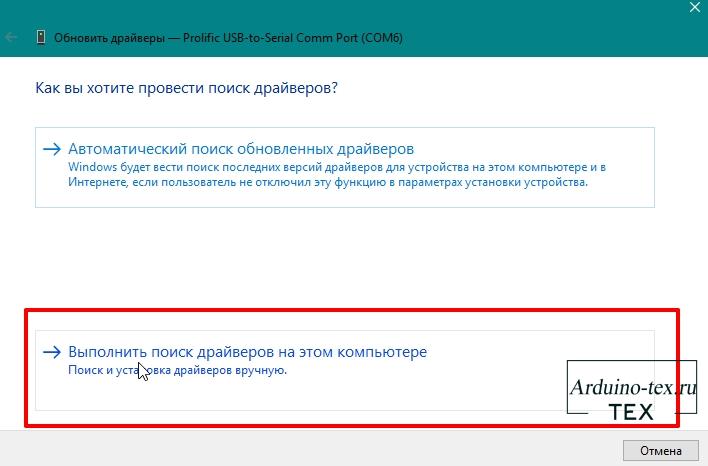
После установки нажимаем на устройство правой кнопкой мыши и выбираем пункт меню «Обновить драйвер».
Затем выбираем «Выбрать драйвер из доступных драйверов на компьютере».
Откроется список доступных драйверов.
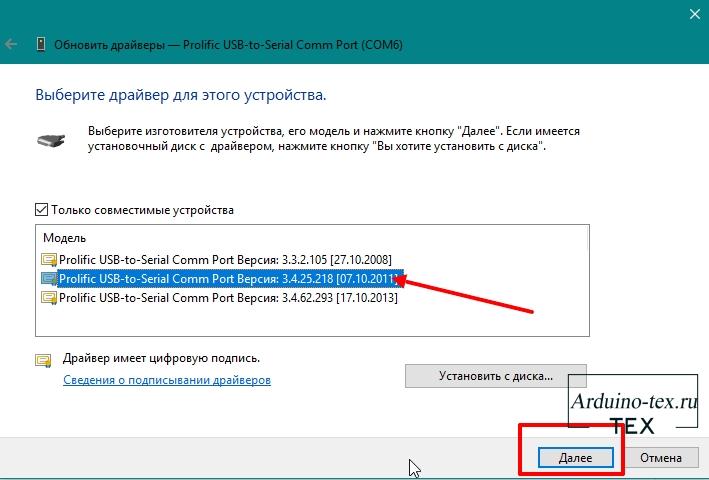
Как видно из списка, установлены драйвера более ранней версии, но положительного результата это не принесло. Поэтому выбираем из списка драйвер v. 1.5.0 (10.21.2011).
После данных манипуляций вы увидите, что ошибки в диспетчере устройств больше нет.
Можно прошивать Arduino или другое устройство.
Установка драйвера PL2303HX на Mac OS.
Mac OS не пользуюсь, поэтому рассказать, как установить не смогу. Но есть инструкция на английском языке. Драйвер и инструкцию можете скачать в разделе «Файлы для скачивания».
Понравилась статья USB-to-UART TTL на PL2303HX. Установка драйверов на Linux, Windows 8/10, Mac OS? Не забудь поделиться с друзьями в соц. сетях.
А также подписаться на наш канал на YouTube, вступить в группу Вконтакте, в группу на Facebook.
Спасибо за внимание!
Технологии начинаются с простого!
Getting Started with the USB to TTL converter
So, I purchased one of these USB to TTL converters, It seemed like a really powerful thing to work with. But I did not have the slightest clue on how to work with them. So, I played around a bit and was able to send and receive serial data using the converter. Here’s what I did:
Step-1 – Finding the Serial port
There are ways to check the active serial port on Ubuntu using the command line but probably the easiest way to check is by connecting the converter and opening up the Arduino IDE.

Now if you have nothing connected to it, the Serial Port section would be greyed out.

But once you insert your converter onto it, then you can immediately determine the serial port that converter has been connected to. In this case (see pic) it is ttyUSB1.
Step-2 – Writing the client program
Now that we have our serial ports ready, we need to write a simple program in Python that to read the data that will be sent to us.
client.py import serial ser = serial.Serial('/dev/ttyUSB1', 9600) while 1: serial_line = ser.readline() print serial_line Now our client program will print every line of serial data that is receives.
Step-3 – The server
Now that the client server is up and running, its time to set up the server. I just opened the serial port for transmission and left it at that.

The command for the transmission of serial data is write i.e
ser.write(data) data - Data to send returns the number of bytes written
Step-4 Testing
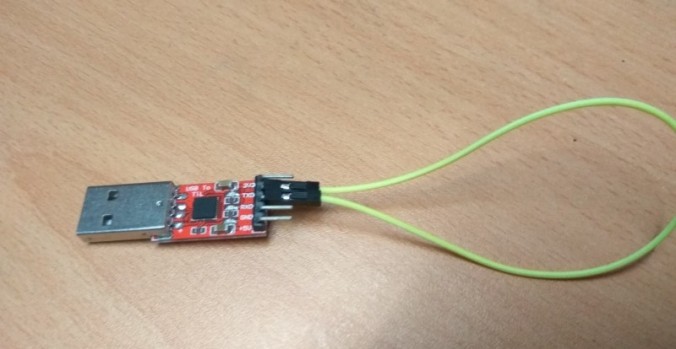
Finally, the TX and RX pins of the converter are shorted by using a jumper wire. That’s about it !
Whatever is sent through the TX port will now be received through the RX port. Everything has been setup. Now we can transmit and receive data !
Video Demo:

USB to TTL (Serial) Adapters

«Red» FTDI232 (FT232RL) USB 3.3V/5.0V TTL Serial Adapter
(Use 3.3V link with a Raspberry Pi) 6
«Blue» FT232RL USB 5.0V/3.3V TTL Serial Adapter
(Break 5V link and solder 3.3V link for use with a Raspberry Pi) 8
RHX PL2303MDL (Black)
(Rx & Tx use 3.3V logic levels) 9
BTE13-009

(NB: Uses 5V TTL levels, DO NOT connect directly to a Pi’s GPIO!)
Momentary switch A appears to operate
as a «Reset/Disconnect» switch
USB Console Stub
lsusb and lsusb -t
pi@raspiP4B4b-32GbP:~ $ lsusb Bus 002 Device 002: ID 0951:1666 Kingston Technology DataTraveler 100 G3/G4/SE9 G2 Bus 002 Device 001: ID 1d6b:0003 Linux Foundation 3.0 root hub Bus 001 Device 005: ID 04d9:1503 Holtek Semiconductor, Inc. Keyboard Bus 001 Device 004: ID 25a7:fa61 Bus 001 Device 003: ID 1a40:0101 Terminus Technology Inc. Hub Bus 001 Device 006: ID 3171:0035 Bus 001 Device 002: ID 2109:3431 VIA Labs, Inc. Hub Bus 001 Device 001: ID 1d6b:0002 Linux Foundation 2.0 root hub pi@raspiP4B4b-32GbP:~ $ lsusb -t /: Bus 02.Port 1: Dev 1, Driver=xhci_hcd/4p, 5000M |__ Port 1: Dev 2, If 0, Storage, Driver=usb-storage, 5000M /: Bus 01.Port 1: Dev 1, Driver=xhci_hcd/1p, 480M |__ Port 1: Dev 2, If 0, Driver=hub/4p, 480M |__ Port 3: Dev 6, If 0, Driver=cdc_acm, 12M |__ Port 3: Dev 6, If 1, Data, Driver=cdc_acm, 12M |__ Port 3: Dev 6, If 2, Interface Device, Driver=, 12M |__ Port 4: Dev 3, If 0, Driver=hub/4p, 480M |__ Port 3: Dev 5, If 0, Interface Device, Driver=usbhid, 1.5M |__ Port 3: Dev 5, If 1, Interface Device, Driver=usbhid, 1.5M |__ Port 1: Dev 4, If 0, Interface Device, Driver=usbhid, 12M |__ Port 1: Dev 4, If 1, Interface Device, Driver=usbhid, 12M
Extract from usb-devices
T: Bus=01 Lev=02 Prnt=02 Port=02 Cnt=01 Dev#= 6 Spd=12 MxCh= 0 D: Ver= 2.00 Cls=ef(misc ) Sub=02 Prot=01 MxPS= 8 #Cfgs= 1 P: Vendor=3171 ProdID=0035 Rev=01.10 S: Manufacturer=8086 Consultancy S: Product=USB Serial Stub S: SerialNumber=0126 C: #Ifs= 3 Cfg#= 1 Atr=80 MxPwr=100mA I: If#=0x0 Alt= 0 #EPs= 1 Cls=02(commc) Sub=02 Prot=01 Driver=cdc_acm I: If#=0x1 Alt= 0 #EPs= 2 Cls=0a(data ) Sub=00 Prot=00 Driver=cdc_acm I: If#=0x2 Alt= 0 #EPs= 0 Cls=03(HID ) Sub=00 Prot=00 Driver=(none)
pi@raspiP4B4b-32GbP:~ $ cat .gtktermrc [default] port = /dev/ttyS0 speed = 9600 bits = 8 stopbits = 1 parity = none flow = none wait_delay = 0 wait_char = 255 rs485_rts_time_before_tx = 30 rs485_rts_time_after_tx = 30 echo = False crlfauto = False font = "Monospace 12" term_block_cursor = True term_rows = 80 term_columns = 25 term_scrollback = 200 term_visual_bell = True term_foreground_red = 0.660000 term_foreground_blue = 0.660000 term_foreground_green = 0.660000 term_foreground_alpha = 1.000000 term_background_red = 0.000000 term_background_blue = 0.000000 term_background_green = 0.000000 term_background_alpha = 1.000000 [piconsole] port = /dev/ttyACM0 speed = 115200 bits = 8 stopbits = 1 parity = none flow = none wait_delay = 0 wait_char = 255 rs485_rts_time_before_tx = 30 rs485_rts_time_after_tx = 30 echo = False crlfauto = False font = "Monospace 12" term_block_cursor = True term_rows = 80 term_columns = 25 term_scrollback = 200 term_visual_bell = True term_foreground_red = 0.660000 term_foreground_blue = 0.660000 term_foreground_green = 0.660000 term_foreground_alpha = 1.000000 term_background_red = 0.000000 term_background_blue = 0.000000 term_background_green = 0.000000 term_background_alpha = 1.000000