- Saved searches
- Use saved searches to filter your results more quickly
- k0rnh0li0/cp210x-arch
- Name already in use
- Sign In Required
- Launching GitHub Desktop
- Launching GitHub Desktop
- Launching Xcode
- Launching Visual Studio Code
- Latest commit
- Git stats
- Files
- README.md
- About
- USB-to-UART PL2303HX. Установка драйверов на Linux, Windows, Mac OS
- Технические параметры
- Назначение светодиодов:
- Установка драйверов USB-to-UART TTL на PL2303HX.
- Установка драйверов PL2303HX на Windows 7, 8 и 10.
- Установка драйвера PL2303HX на Mac OS.
- Saved searches
- Use saved searches to filter your results more quickly
- WCHSoftGroup/ch343ser_linux
- Name already in use
- Sign In Required
- Launching GitHub Desktop
- Launching GitHub Desktop
- Launching Xcode
- Launching Visual Studio Code
- Latest commit
- Git stats
- Files
- README.md
- Saved searches
- Use saved searches to filter your results more quickly
- WCHSoftGroup/ch341ser_linux
- Name already in use
- Sign In Required
- Launching GitHub Desktop
- Launching GitHub Desktop
- Launching Xcode
- Launching Visual Studio Code
- Latest commit
- Git stats
- Files
- README.md
Saved searches
Use saved searches to filter your results more quickly
You signed in with another tab or window. Reload to refresh your session. You signed out in another tab or window. Reload to refresh your session. You switched accounts on another tab or window. Reload to refresh your session.
CP210x USB to UART driver modified for building on Arch Linux
k0rnh0li0/cp210x-arch
This commit does not belong to any branch on this repository, and may belong to a fork outside of the repository.
Name already in use
A tag already exists with the provided branch name. Many Git commands accept both tag and branch names, so creating this branch may cause unexpected behavior. Are you sure you want to create this branch?
Sign In Required
Please sign in to use Codespaces.
Launching GitHub Desktop
If nothing happens, download GitHub Desktop and try again.
Launching GitHub Desktop
If nothing happens, download GitHub Desktop and try again.
Launching Xcode
If nothing happens, download Xcode and try again.
Launching Visual Studio Code
Your codespace will open once ready.
There was a problem preparing your codespace, please try again.
Latest commit
Git stats
Files
Failed to load latest commit information.
README.md
This repo contains the CP210x USB to UART driver source as downloaded from SiLabs, modified for building on Arch Linux.
# Install packages as necessary $ sudo pacman -S base-devel linux-headers # Build driver $ make # Install driver $ sudo cp cp210x.ko /lib/modules/$(uname -r)/kernel/drivers/usb/serial $ sudo insmod cp210x.ko - Updated Makefile to reference /usr/lib/src as the kernel source directory
- Updated cp210x.c, changing the return type of cp210x_port_remove from int to void.
As of Linux commit c5d1448, struct usb_serial_driver in expects the callback for the remove event to have a void return type.
About
CP210x USB to UART driver modified for building on Arch Linux
USB-to-UART PL2303HX. Установка драйверов на Linux, Windows, Mac OS
Большинство отладочных плат Arduino имеют встроенный USB-to-Serial преобразователь. Но как запрограммировать Arduino pro mini, Arduino pro и другие отладочные платы, которые не оснащены USB-to-Serial конверторами? Тут нам поможет USB-to-UART преобразователь на микросхеме PL2303HX.
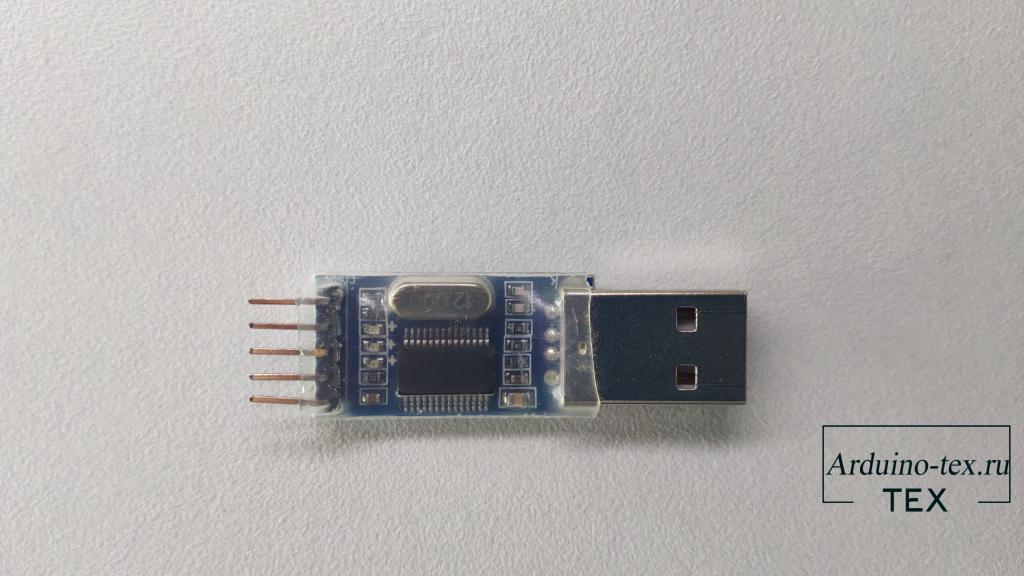
PL2303HX – это небольшой USB-Serial конвертер со встроенным приемопередатчиком RS232 (интерфейс UART). Микросхема создает на компьютере виртуальный COM — порт, через который можно прошить микроконтроллеры, а так же восстанавливать роутеры, приставки.
Технические параметры
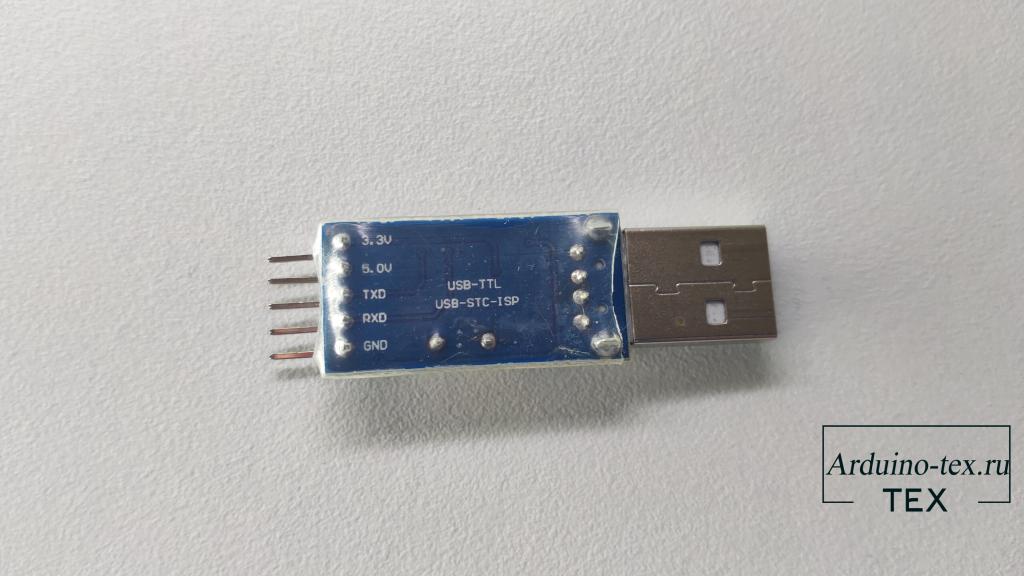
- Напряжение питания: 5В (от USB)
- Интерфейс 1: USB
- Интерфейс 2: TTL (от 0 до 5, Rx и Tx)
- Выходное напряжение, В: 3.3 и 5 (отдельные выводы)
- Размеры: 50мм x 15мм x 8мм
- Поддержка операционных систем: Linux, Mac OS, Windows XP / 7 / 8 / 8.1 / 10.
Назначение светодиодов:
- P (Power) — питание (горит постоянно).
- R (RxD) — принимаемые данные.
- T (TxD) — передаваемые данные.
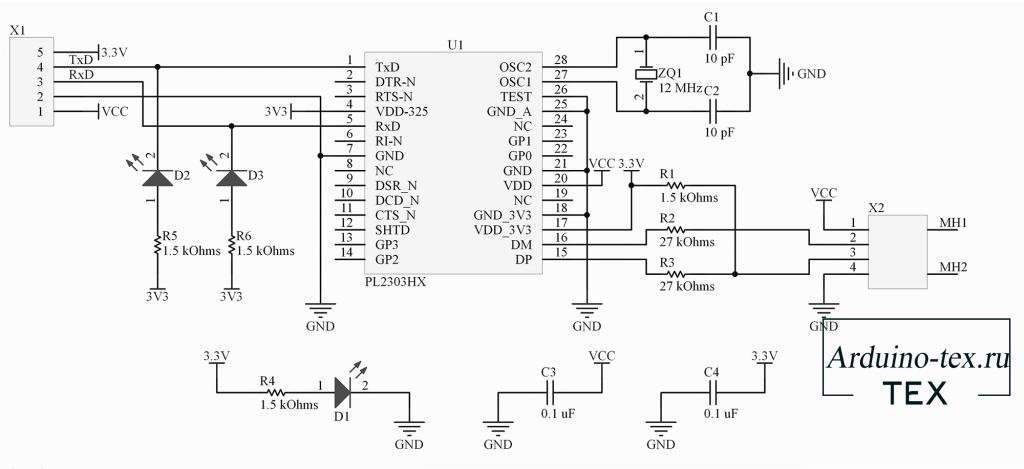
Из электрической схемы видно, что питание на вывод +5В идёт напрямую с USB порта, без защитных элементов, а питание на вывод +3.3 В. идёт с внутреннего стабилизатора PL-2303, который может выдержать ток до 150 мА.
Установка драйверов USB-to-UART TTL на PL2303HX.
При работе в операционной системе Linux Mint все работало без установки и дополнительной настройки. По моему опыту работать с Микроконтроллерами лучше в операционной системе Linux, но это мое мнение.
Установка драйверов PL2303HX на Windows 7, 8 и 10.
Фирма Prolific в октябре 2012 года, прекратила производство и поддержку микросхем UART PL2303X (Chip Rev A) и PL2303X HX (Chip Rev A), взамен начала производить микросхемы PL2303TA. Но и сейчас, можно купить преобразователь на микросхеме PL-2303HX (с поддельным чипом). При использовании ОС Windows 7 / 8 / 8.1 /10, для подключенного устройства автоматически скачивается последняя версия драйвера, в которой нет поддержки этих чипов, а в диспетчере устройств будет показан желтый знак с кодом ошибки 10.
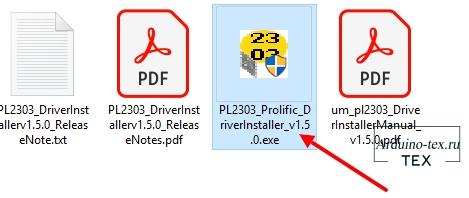
Методом проб и ошибок выяснил, чтобы преобразователь полноценно работал в Windows 7 / 8 / 8.1 /10 необходимо установить старый драйвер v. 1.5.0 (10.21.2011). Скачать драйвер можно внизу статьи в разделе «Файлы для скачивания».
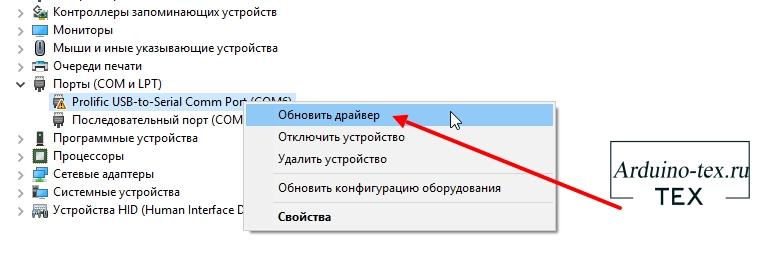
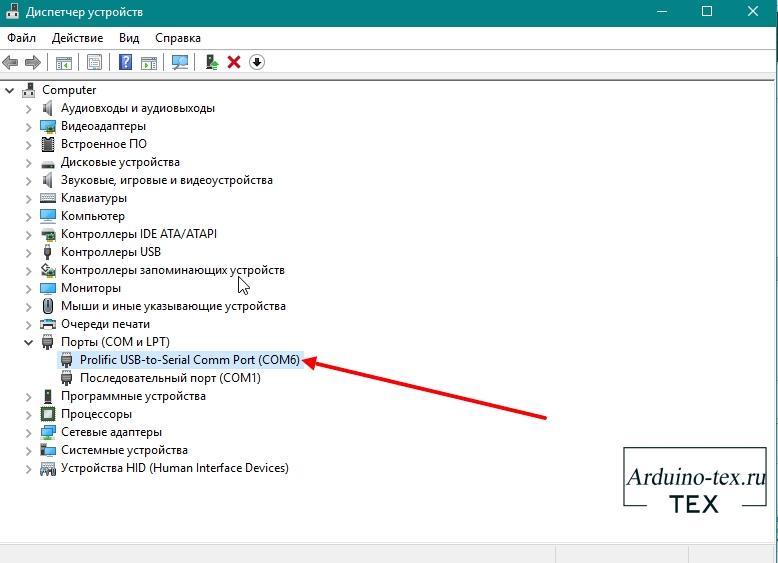
И так, приступим к установке драйвера. Для этого зайдем в «Диспетчер задач». Как видим, устройство отображается с ошибкой. И версия драйвера 17.10.2013.
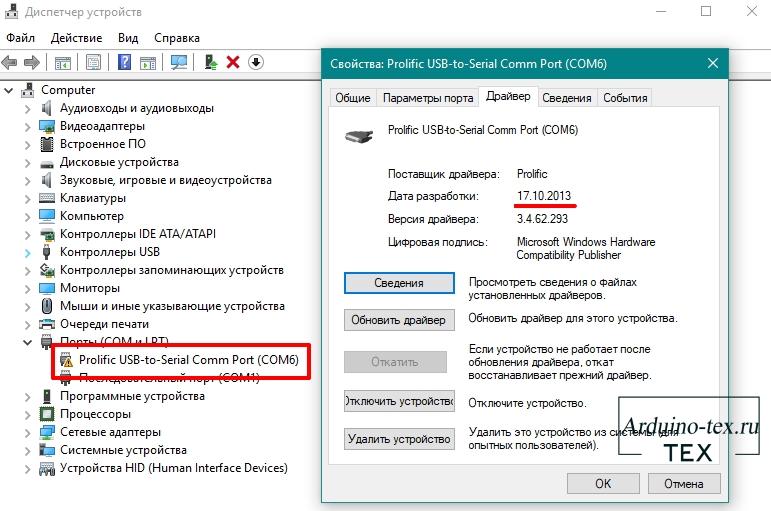
Для устранения данной ошибки достаточно установить драйвер v. 1.5.0, скачать который можно внизу статьи в разделе «Файлы для скачивания».
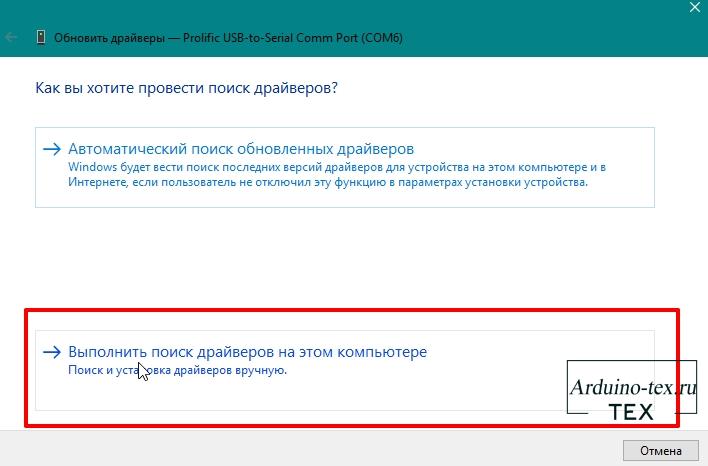
После установки нажимаем на устройство правой кнопкой мыши и выбираем пункт меню «Обновить драйвер».
Затем выбираем «Выбрать драйвер из доступных драйверов на компьютере».
Откроется список доступных драйверов.
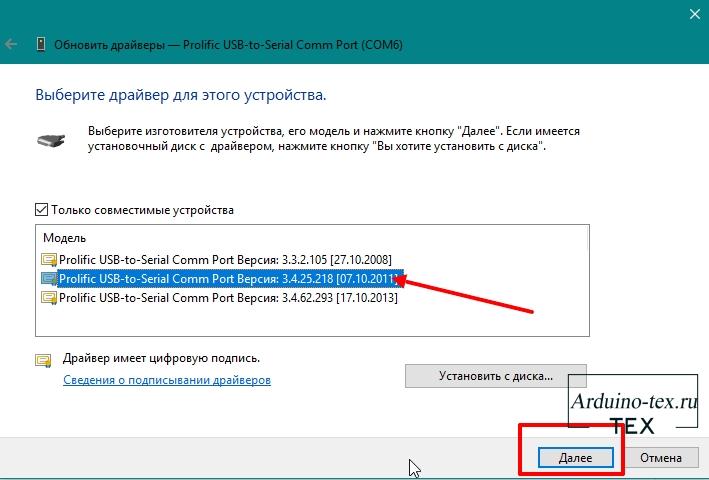
Как видно из списка, установлены драйвера более ранней версии, но положительного результата это не принесло. Поэтому выбираем из списка драйвер v. 1.5.0 (10.21.2011).
После данных манипуляций вы увидите, что ошибки в диспетчере устройств больше нет.
Можно прошивать Arduino или другое устройство.
Установка драйвера PL2303HX на Mac OS.
Mac OS не пользуюсь, поэтому рассказать, как установить не смогу. Но есть инструкция на английском языке. Драйвер и инструкцию можете скачать в разделе «Файлы для скачивания».
Понравилась статья USB-to-UART TTL на PL2303HX. Установка драйверов на Linux, Windows 8/10, Mac OS? Не забудь поделиться с друзьями в соц. сетях.
А также подписаться на наш канал на YouTube, вступить в группу Вконтакте, в группу на Facebook.
Спасибо за внимание!
Технологии начинаются с простого!
Saved searches
Use saved searches to filter your results more quickly
You signed in with another tab or window. Reload to refresh your session. You signed out in another tab or window. Reload to refresh your session. You switched accounts on another tab or window. Reload to refresh your session.
USB driver for USB to serial chip ch342, ch343, ch344, ch9101, ch9102, ch9103, etc
WCHSoftGroup/ch343ser_linux
This commit does not belong to any branch on this repository, and may belong to a fork outside of the repository.
Name already in use
A tag already exists with the provided branch name. Many Git commands accept both tag and branch names, so creating this branch may cause unexpected behavior. Are you sure you want to create this branch?
Sign In Required
Please sign in to use Codespaces.
Launching GitHub Desktop
If nothing happens, download GitHub Desktop and try again.
Launching GitHub Desktop
If nothing happens, download GitHub Desktop and try again.
Launching Xcode
If nothing happens, download Xcode and try again.
Launching Visual Studio Code
Your codespace will open once ready.
There was a problem preparing your codespace, please try again.
Latest commit
Git stats
Files
Failed to load latest commit information.
README.md
ch343 linux serial driver
USB to UART(s) chip ch342/ch343/ch344/ch347/ch9101/ch9102/ch9103 are fully compliant to the Communications Device Class (CDC) standard, they will work with a standard CDC-ACM driver (CDC — Abstract Control Model). Linux operating systems supply a default CDC-ACM driver that can be used with these USB UART devices. In Linux, this driver file name is cdc-acm.
The CDC-ACM driver has limited capabilities to control specific devices. This generic driver does not have any knowledge about specific device protocols. Because of this, device manufacturers can create an alternate, or custom driver that is capable of accessing the device specific function sets, such as hardware flow control or GPIO functions.
If you use this VCP driver, please check that the CDC-ACM driver was not installed for the USB UART devices mentioned above. You can use command «ls /dev/ttyACM*» to confirm that, to remove the CDC-ACM driver, use command «rmmod cdc-acm».
This directory contains 2 parts, ch343 driver and gpio testing utility. This driver and application support USB to single serial port chip ch343/ch347/ch9101/ch9102, USB to dual serial ports chip ch342/ch347/ch9103, USB to quad serial ports chip ch344, etc.
- Open «Terminal»
- Switch to «driver» directory
- Compile the driver using «make», you will see the module «ch343.ko» if successful
- Type «sudo make load» or «sudo insmod ch343.ko» to load the driver dynamically
- Type «sudo make unload» or «sudo rmmod ch343.ko» to unload the driver
- Type «sudo make install» to make the driver work permanently
- Type «sudo make uninstall» to remove the driver
- You can refer to the link below to acquire uart application, you can use gcc or Cross-compile with cross-gcc https://github.com/WCHSoftGroup/tty_uart
Before the driver works, you should make sure that the usb device has been plugged in and is working properly, you can use shell command «lsusb» or «dmesg» to confirm that, USB VID of these devices are [1A86], you can view all IDs from the id table which defined in «ch343.c».
If the device works well, the driver will created tty devices named «ttyCH343USBx» in /dev directory. Operating the device in the /dev directory under Linux requires root permission by default, if users want to access the device in a non root mode, they can create udev rule file related to the device.
Any question, you can send feedback to mail: tech@wch.cn
Saved searches
Use saved searches to filter your results more quickly
You signed in with another tab or window. Reload to refresh your session. You signed out in another tab or window. Reload to refresh your session. You switched accounts on another tab or window. Reload to refresh your session.
USB to serial driver for USB to serial chip ch340, ch341, etc.
WCHSoftGroup/ch341ser_linux
This commit does not belong to any branch on this repository, and may belong to a fork outside of the repository.
Name already in use
A tag already exists with the provided branch name. Many Git commands accept both tag and branch names, so creating this branch may cause unexpected behavior. Are you sure you want to create this branch?
Sign In Required
Please sign in to use Codespaces.
Launching GitHub Desktop
If nothing happens, download GitHub Desktop and try again.
Launching GitHub Desktop
If nothing happens, download GitHub Desktop and try again.
Launching Xcode
If nothing happens, download Xcode and try again.
Launching Visual Studio Code
Your codespace will open once ready.
There was a problem preparing your codespace, please try again.
Latest commit
Git stats
Files
Failed to load latest commit information.
README.md
ch341 linux serial driver
USB serial driver for USB to UART chip ch340, ch341, etc. In fact Linux mainline kernels have built-in ch341 serial driver since kernel version 2.6.24. The location is: drivers/usb/serial/ch341.c, it’s a pity that the built-in driver cannot be kept up to date. We suggest our customers use this driver.
- Open «Terminal»
- Switch to «driver» directory
- Compile the driver using «make», you will see the module «ch341.ko» if successful
- Type «sudo make load» or «sudo insmod ch341.ko» to load the driver dynamically
- Type «sudo make unload» or «sudo rmmod ch341.ko» to unload the driver
- Type «sudo make install» to make the driver work permanently
- Type «sudo make uninstall» to remove the driver
- You can refer to the link below to acquire uart application, you can use gcc or Cross-compile with cross-gcc https://github.com/WCHSoftGroup/tty_uart
Before the driver works, you should make sure that the usb device has been plugged in and is working properly, you can use shell command «lsusb» or «dmesg» to confirm that, USB VID of these devices are [1A86], you can view all IDs from the id table which defined in «ch341.c».
If the device works well, the driver will created tty devices named «ttyCH341USBx» in /dev directory.
Any question, you can send feedback to mail: tech@wch.cn