- How to use Time Machine function on TP-Link routers (case 2)
- How to use Time Machine function on TP-Link routers(case 1)
- Backup disks you can use with Time Machine
- Network-attached storage (NAS) device that supports Time Machine over SMB
- Mac shared as a Time Machine backup destination
- macOS Ventura or later
- Earlier versions of macOS
- External drive connected to an AirPort Extreme Base Station (802.11ac) or AirPort Time Capsule
- How to use Time Machine function on TP-Link routers(case 1)
- How to use Time Machine function on TP-Link routers (case 2)
- Рекомендуемая продукция
How to use Time Machine function on TP-Link routers (case 2)
![]()
Updated 06-27-2022 03:19:53 AM 70563
Archer C5400 , Archer AX55 , Archer AX4200 , Archer C5200 , Archer AX75 , Archer AX4400 , Archer AX53 , Archer AX73 , Archer AX96 , Archer A10 , Archer AX4800 , Archer AXE75 , Archer AXE95 , Archer AX10000 , Archer C8( V4 ) , Archer C3150 , Archer AX50 , Archer AX72 , Archer C9( V5 ) , Archer GX90 , Archer AX90 , Archer AX6000 , Archer C5400X( V1 ) , Archer C2300 , Archer AX23 , Archer AX3000 Pro , Archer AX20 , Archer AX21 , Archer C4000( V2 V3 ) , Archer A20 , Archer AX1800 , Archer AXE300 , Archer AX11000 , Archer AX3200 , Archer AX3000
User’s Application Scenario
Use the USB drive connected to my TP-Link router as the backup disk of my MacBook.
If the web interface of your TP-Link router looks different from the example below, please refer to How to use Time Machine function on TP-Link routers (case 1)?
Follow the steps below, here takes Archer C4000 as demonstration:
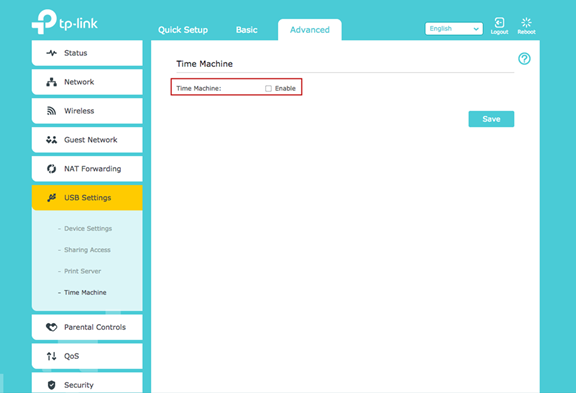
2. Go to Advanced > USB Sharing > Time Machine.
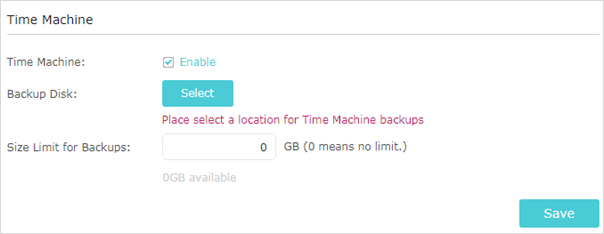
3. Tick the Enable checkbox.
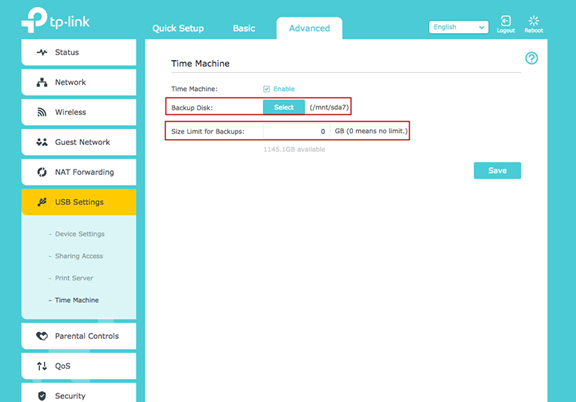
4. Click Select to set a location for Time Machine backups.
5. Click the Size Limit for Backups.
Note: 0 means no limit for the space.
6. Click Save to save the settings.
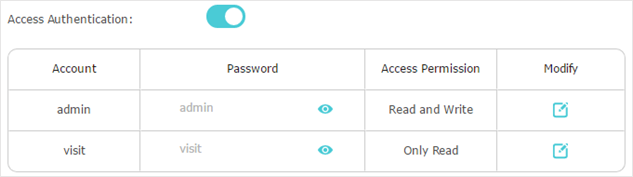
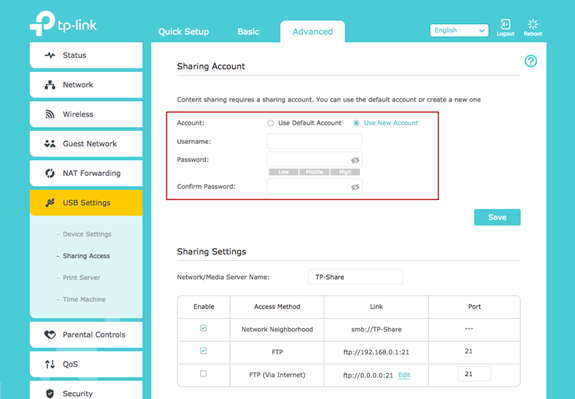
7. For data security, you can set up authentication for your USB device.
1). Go to Advanced > USB Sharing > USB Storage Device and locate the Sharing Contents and Security section.
2). Toggle on Access Authentication.
3). Click to modify the access account. The username and password are both admin for default administrator account, and are both visit for default visitor account.
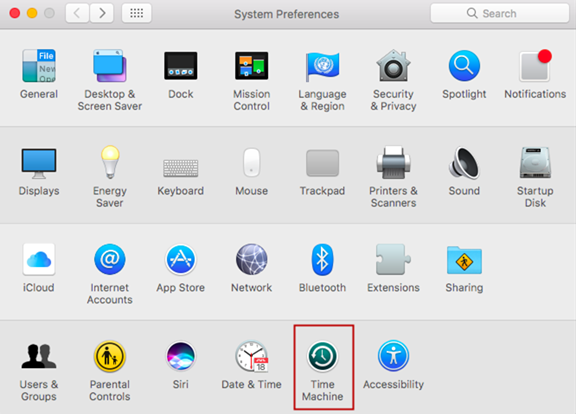
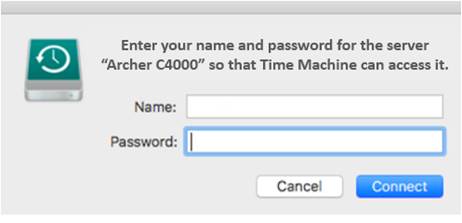
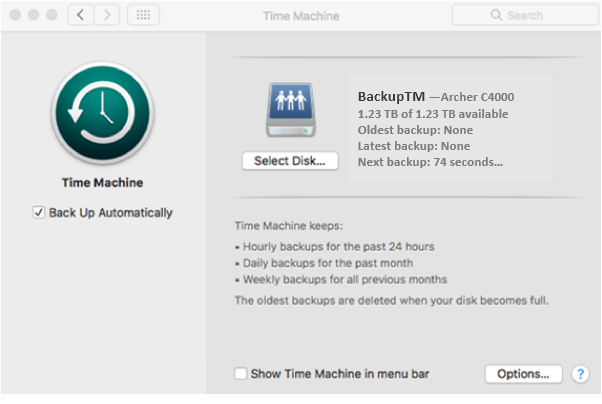
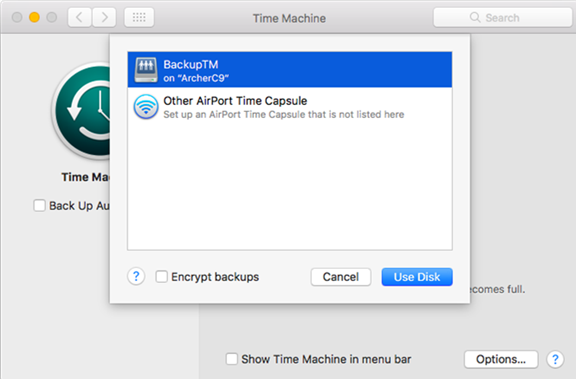
8. Make sure your MacBook is connected to the router. Open System Preferences and click on Time Machine on your MacBook.
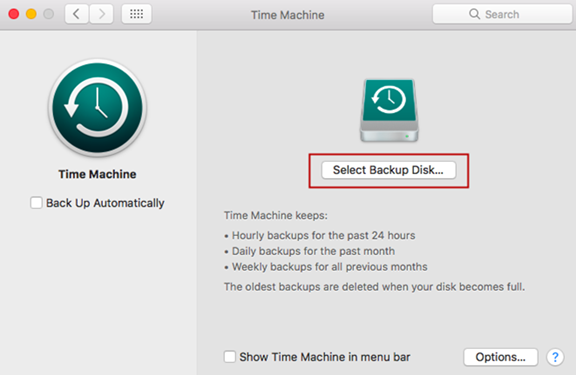
9. Select BackupTM on Archer C4000 as Backup Disk.
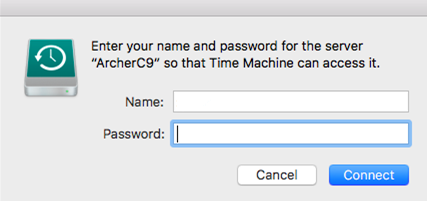
10. Enter the Sharing Account of the router and then Connect.
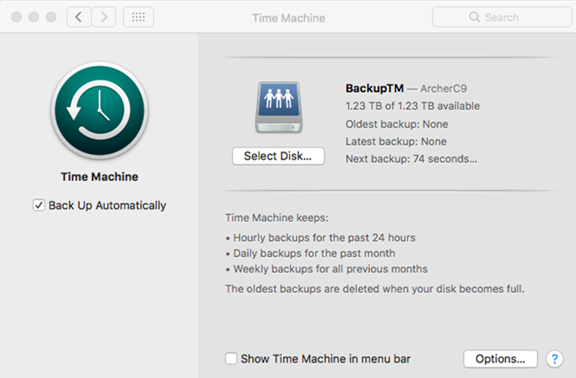
11. Succeed! You can back up your data to the external disk now.
Get to know more details of each function and configuration please go to Download Center to download the manual of your product.
Is this faq useful?
Your feedback helps improve this site.
What’s your concern with this article?
- Dissatisfied with product
- Too Complicated
- Confusing Title
- Does not apply to me
- Too Vague
- Other
We’d love to get your feedback, please let us know how we can improve this content.
We appreciate your feedback.
Click here to contact TP-Link technical support.
How to use Time Machine function on TP-Link routers(case 1)
![]()
Дата последнего обновления: 06-27-2022 09:11:18 AM 98691
With Time Machine function, you can select the USB drive connecting to TP-Link router as the backup disk of your MacBook.
Settings on router
Go to Advanced – USB Settings – Time Machine and then enable the function.
Select a backup disk and set up the size limit for backup and then save it.
Go to Advanced – USB Settings – Sharing Access, set up your Sharing Account and then save it.
Settings on MacBook
Make sure your MacBook is connected to the router. Open System Preferences and click on Time Machine on your MacBook.

Select BackupTM on Archer C9 as Backup Disk.

Enter the Sharing Account of the router and then Connect.
Succeed! You can back up your data to the external disk now.
Get to know more details of each function and configuration please go to Download Center to download the manual of your product.
Был ли этот FAQ полезен?
Ваш отзыв поможет нам улучшить работу сайта.
Что вам не понравилось в этой статье?
- Недоволен продуктом
- Слишком сложно
- Неверный заголовок
- Не относится к моей проблеме
- Слишком туманное объяснение
- Другое
Как мы можем это улучшить?
Спасибо за обращение
Нажмите здесь, чтобы связаться с технической поддержкой TP-Link.
Подписаться на рассылку Мы с ответственностью относимся к вашим персональным данным. Полный текст положения об обработке персональных данных доступен здесь. С нашими условиями использования и программой улучшения пользовательского опыта можно ознакомиться здесь.
Backup disks you can use with Time Machine
Time Machine can back up to an external drive connected to a USB, Thunderbolt, or FireWire port on your Mac. If the disk isn’t using the correct format, Time Machine will prompt you to erase it.
Network-attached storage (NAS) device that supports Time Machine over SMB
Many third-party NAS devices support Time Machine over SMB. For details, check the documentation for your NAS device.
Mac shared as a Time Machine backup destination
To use another Mac on your network as a Time Machine backup destination, complete these steps on the other Mac.
macOS Ventura or later
- On the Mac to be used as a Time Machine backup destination, choose Apple menu > System Settings.
- Click General in the sidebar, then click Sharing on the right.
- Turn on File Sharing. You may be asked to enter your administrator password.
- Click the info button
 next to File Sharing.
 - Click the add button (+) under the Shared Folders list, then choose a folder to use for Time Machine backups.
- Control-click the folder that you added, then choose Advanced Options from the shortcuts menu that appears.

- Select “Share as a Time Machine backup destination,” then click OK.
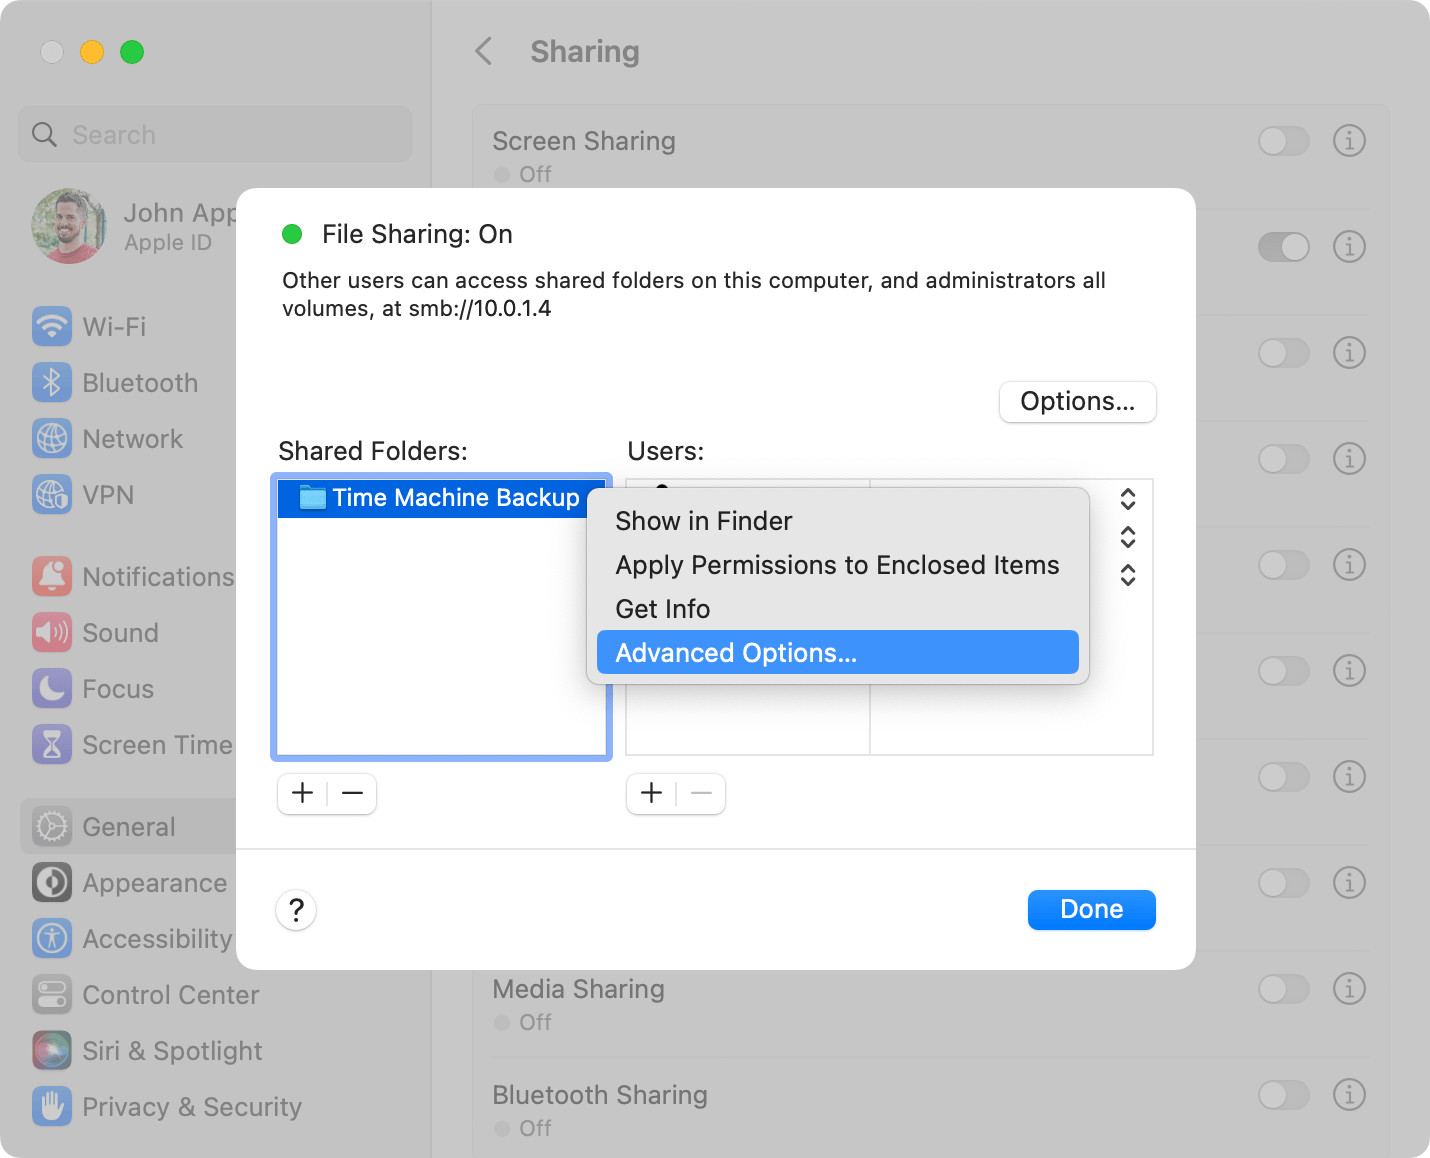
When setting up Time Machine on your other Mac computers, you should now be able to select the shared folder as a backup disk.
Earlier versions of macOS
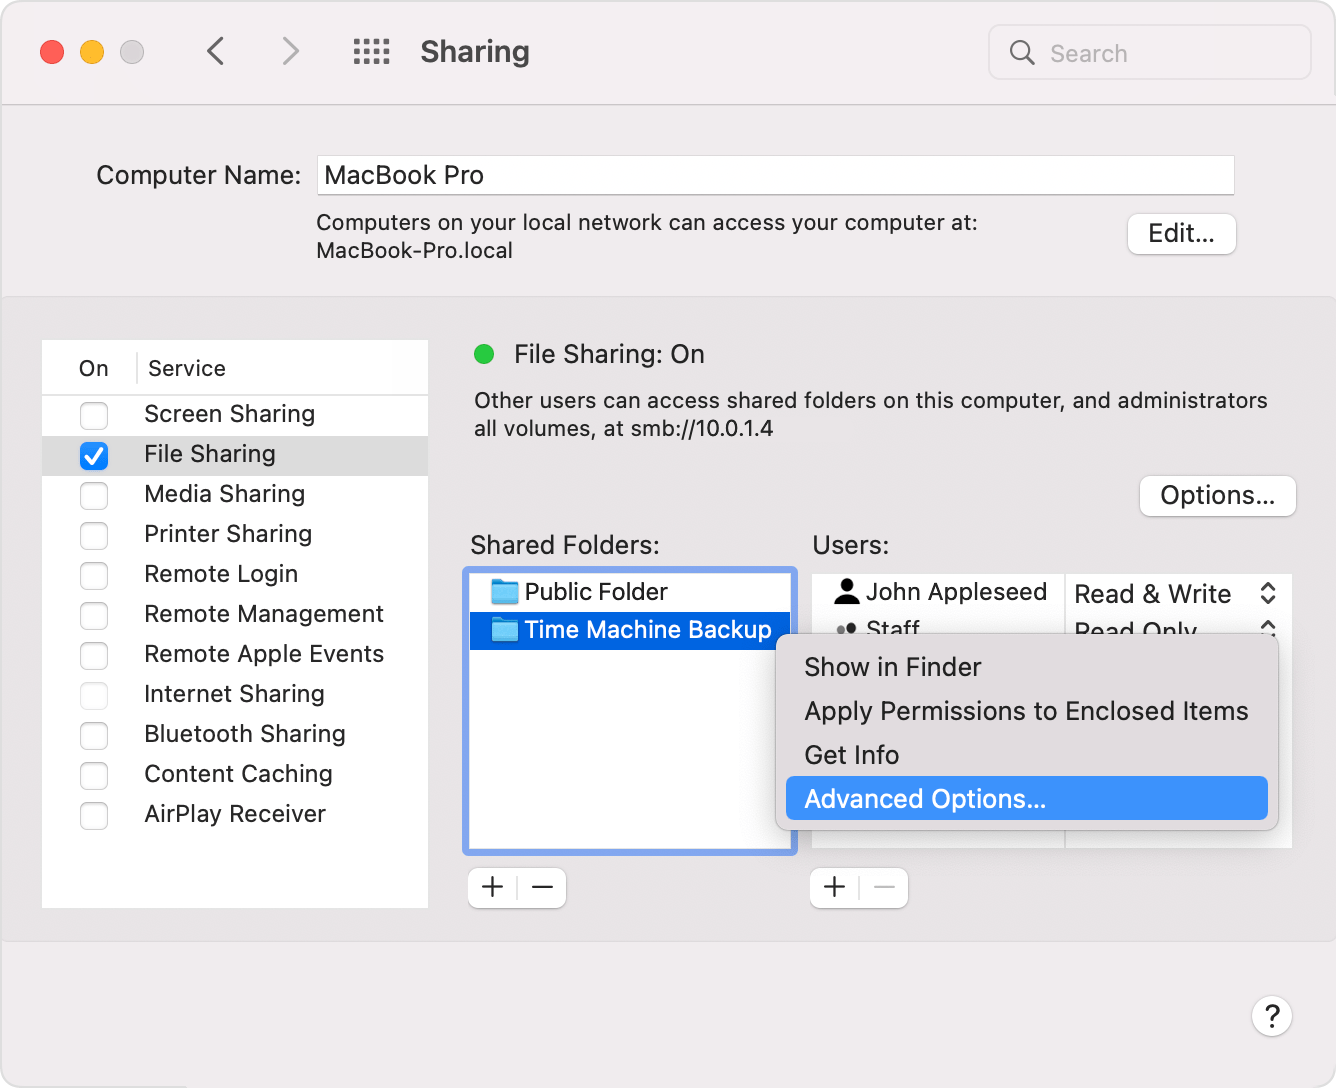
- On the Mac to be used as a Time Machine backup destination, choose Apple menu > System Preferences.
- Click Sharing.
- From the list of services on the left, select File Sharing.
- Click the add button (+) under the Shared Folders list on the right, then choose a folder to use for Time Machine backups.
- Control-click the folder that you added, then choose Advanced Options from the shortcuts menu that appears.
- Select “Share as a Time Machine backup destination,” then click OK.
When setting up Time Machine on your other Mac computers, you should now be able to select the shared folder as a backup disk.
External drive connected to an AirPort Extreme Base Station (802.11ac) or AirPort Time Capsule
Time Machine can back up to an external USB drive connected to an AirPort Extreme Base Station (802.11ac model) or AirPort Time Capsule.
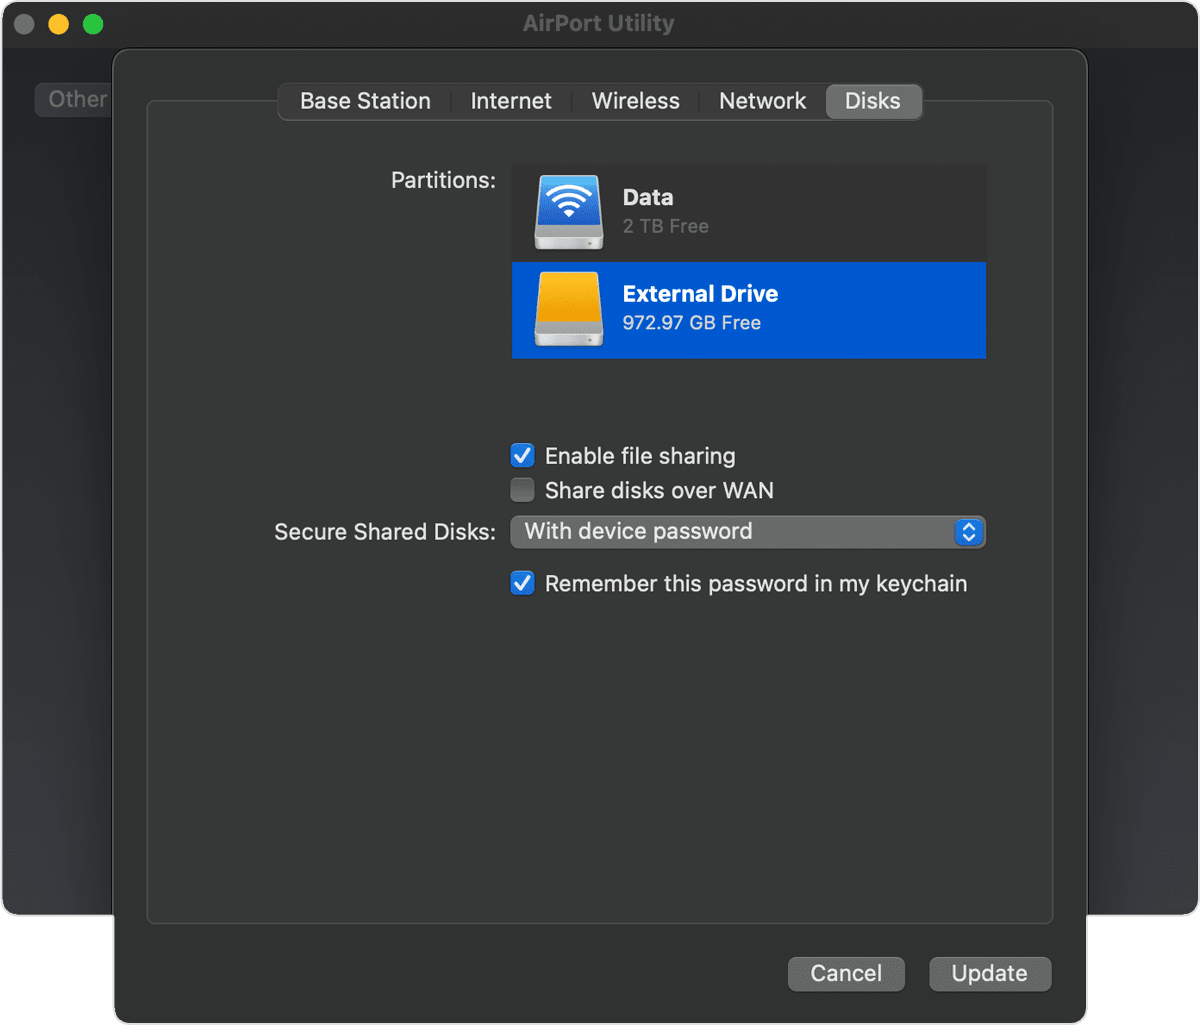
- Connect the drive directly to your Mac, then use Disk Utility to erase it.
- Connect the drive to a USB port on your AirPort base station, then turn it on.
- Open AirPort Utility, then select your base station and click Edit to view its settings.
- Click the Disks tab in the settings window.
- Select your backup disk from the list of partitions, then select “Enable file sharing”:
- If more than one user on your network will back up to this disk with Time Machine, you can use the Secure Shared Disks pop-up menu to make sure that they can view only their own backups, not yours. Choose “With accounts” from the menu, then click the add button (+) to add users.
- Click Update to restart your base station and apply the settings.
How to use Time Machine function on TP-Link routers(case 1)
![]()
Updated 06-27-2022 09:11:18 AM 98692
With Time Machine function, you can select the USB drive connecting to TP-Link router as the backup disk of your MacBook.
Settings on router
Go to Advanced – USB Settings – Time Machine and then enable the function.
Select a backup disk and set up the size limit for backup and then save it.
Go to Advanced – USB Settings – Sharing Access, set up your Sharing Account and then save it.
Settings on MacBook
Make sure your MacBook is connected to the router. Open System Preferences and click on Time Machine on your MacBook.
Select BackupTM on Archer C9 as Backup Disk.
Enter the Sharing Account of the router and then Connect.
Succeed! You can back up your data to the external disk now.
Get to know more details of each function and configuration please go to Download Center to download the manual of your product.
Is this faq useful?
Your feedback helps improve this site.
What’s your concern with this article?
- Dissatisfied with product
- Too Complicated
- Confusing Title
- Does not apply to me
- Too Vague
- Other
We’d love to get your feedback, please let us know how we can improve this content.
We appreciate your feedback.
Click here to contact TP-Link technical support.
Subscription TP-Link takes your privacy seriously. For further details on TP-Link’s privacy practices, see TP-Link’s Privacy Policy.
How to use Time Machine function on TP-Link routers (case 2)
![]()
Дата последнего обновления: 06-27-2022 03:19:53 AM 70564
Archer C5400 , Archer AX55 , Archer AX4200 , Archer C5200 , Archer AX75 , Archer AX4400 , Archer AX53 , Archer AX73 , Archer AX96 , Archer A10 , Archer AX4800 , Archer AXE75 , Archer AXE95 , Archer AX10000 , Archer C8( V4 ) , Archer C3150 , Archer AX50 , Archer AX72 , Archer C9( V5 ) , Archer GX90 , Archer AX90 , Archer AX6000 , Archer C5400X( V1 ) , Archer C2300 , Archer AX23 , Archer AX3000 Pro , Archer AX20 , Archer AX21 , Archer C4000( V2 V3 ) , Archer A20 , Archer AX1800 , Archer AXE300 , Archer AX11000 , Archer AX3200 , Archer AX3000
User’s Application Scenario
Use the USB drive connected to my TP-Link router as the backup disk of my MacBook.
If the web interface of your TP-Link router looks different from the example below, please refer to How to use Time Machine function on TP-Link routers (case 1)?
Follow the steps below, here takes Archer C4000 as demonstration:
2. Go to Advanced > USB Sharing > Time Machine.
3. Tick the Enable checkbox.
4. Click Select to set a location for Time Machine backups.
5. Click the Size Limit for Backups.
Note: 0 means no limit for the space.
6. Click Save to save the settings.
7. For data security, you can set up authentication for your USB device.
1). Go to Advanced > USB Sharing > USB Storage Device and locate the Sharing Contents and Security section.
2). Toggle on Access Authentication.
3). Click to modify the access account. The username and password are both admin for default administrator account, and are both visit for default visitor account.
8. Make sure your MacBook is connected to the router. Open System Preferences and click on Time Machine on your MacBook.
9. Select BackupTM on Archer C4000 as Backup Disk.
10. Enter the Sharing Account of the router and then Connect.
11. Succeed! You can back up your data to the external disk now.
Get to know more details of each function and configuration please go to Download Center to download the manual of your product.
Был ли этот FAQ полезен?
Ваш отзыв поможет нам улучшить работу сайта.
Что вам не понравилось в этой статье?
- Недоволен продуктом
- Слишком сложно
- Неверный заголовок
- Не относится к моей проблеме
- Слишком туманное объяснение
- Другое
Как мы можем это улучшить?
Спасибо за обращение
Нажмите здесь, чтобы связаться с технической поддержкой TP-Link.
Рекомендуемая продукция


Подписаться на рассылку Мы с ответственностью относимся к вашим персональным данным. Полный текст положения об обработке персональных данных доступен здесь. С нашими условиями использования и программой улучшения пользовательского опыта можно ознакомиться здесь.