- Use your Linux server as a proxy (SSH Tunnel + SOCKS Proxy Forwarding)
- 1. Start a socks proxy server
- 2. Configure Google Chrome
- 3. Configure Firefox and other apps
- References
- 3 Comments
- How to set up proxy using http_proxy & https_proxy environment variable in Linux?
- What is Proxy Server?
- Check current proxy configuration status (https_proxy/https_proxy)
- Set up proxy server using http_proxy environment variable
- Set up proxy without username and password
- Set up proxy with username and password
- Set up proxy with domain, username and password
- Special character (@) handling
- Set up proxy permanently using /etc/environment
- Set up proxy permanently using /etc/profile.d
- 4 thoughts on “How to set up proxy using http_proxy & https_proxy environment variable in Linux?”
- How to Configure Proxy Settings on Ubuntu 20.04
- Setting Up Proxy with Ubuntu Desktop GUI
- Setting up Proxy With Ubuntu Desktop Terminal
- Setting Up Temporary Proxy for a Single User
- Setting Up Permanent Proxy for a Single User
- Setting Up Permanent Proxy for All Users
- Setting Up Proxy for APT
Use your Linux server as a proxy (SSH Tunnel + SOCKS Proxy Forwarding)
I often come across websites that block me because my isp is on some blacklist somewhere. The only option then is to access the website through some kind of proxy server, which are quite hard to find.
The best solution for me was to use my own linux servers as proxy servers. Its quite easy to convert your linux server into a socks proxy server and it works very nice.
1. Start a socks proxy server
Run the following ssh command on your local command to connect to your server and also open a socks proxy on a local port.
The port number used here is 9999, but could be anything of your choice. Just make sure that nothing else is running on the same port.
According to the ssh man page, the -D option is used for —
Specifies a local "dynamic" application-level port forwarding. This works by allocating a socket to listen to port on the local side, optionally bound to the specified bind_address. Whenever a connection is made to this port, the connection is forwarded over the secure channel, and the application protocol is then used to determine where to connect to from the remote machine. Currently the SOCKS4 and SOCKS5 protocols are supported, and ssh will act as a SOCKS server. Only root can forward privileged ports. Dynamic port forwardings can also be specified in the configuration file.
The ssh command will proceed as usual and login to your server, keep the ssh session open as long as you want to use the proxy.
Now configure your browser to use the proxy server, and it should work seamlessly.
2. Configure Google Chrome
Install the extension called Proxy SwitchySharp. It can be found at the following link.
Open the options and create a new Proxy Profile.
1. Profile Name — anything
2. Manual Configuration
3. SOCKS Host — localhost, PORT 9999, Socks V5
4. Save
Now click the Switchy Sharp icon on the Chrome toolbar and click the profile name and the proxy would be selected.
There are many other plugins that you can try. Or you can even configure the proxy settings directly into the Chrome settings to make the changes permanent.
3. Configure Firefox and other apps
Firefox can be configured the same way like Google Chrome, using a plugin. Just find the right proxy plugin that allows you to create profiles and switch them at a single click.
Next configure any other applications that you need to use with the socks proxy.
References
A Tech Enthusiast, Blogger, Linux Fan and a Software Developer. Writes about Computer hardware, Linux and Open Source software and coding in Python, Php and Javascript. He can be reached at [email protected] .
3 Comments
- proxy list txt 2016December 29, 2016 at 3:03 pm An anonymous proxy also does not show a true IP address, but does modify
the request fields, creating it straightforward to detect via log
evaluation that the user is making use of a proxy.
- GNU-FTW May 10, 2016 at 7:07 pm What I forgot to add is, if the server is only listening on the loopback address you wont be able to connect to it from another computer.
How to set up proxy using http_proxy & https_proxy environment variable in Linux?
In this article I will share the steps to set up proxy server using https_proxy and https_proxy environment variable.

What is Proxy Server?
A proxy server is a dedicated computer or a software system running on a computer that acts as an intermediary between an endpoint device, such as a computer, and another server from which a user or client is requesting a service. The proxy server may exist in the same machine as a firewall server or it may be on a separate server, which forwards requests through the firewall.
Check current proxy configuration status (https_proxy/https_proxy)
This variable will show if there is a proxy server configured on the system:
# echo $http_proxy # echo $https_proxy
If these variables are empty it would mean that there are no proxy servers configured on the system level.
Set up proxy server using http_proxy environment variable
The http_proxy and https_proxy environment variable is used to specify proxy settings to client programs such as curl and wget .
Set up proxy without username and password
Execute the below command with valid SERVER_IP and PORT on the terminal. This will enable proxy configuration for the current session but these values will not be persistent across reboot.
# export http_proxy=http://SERVER:PORT/
Set up proxy with username and password
You can modify the earlier command to add the username and password value assuming a valid authentication is required to enable the proxy server configuration. But again this command will also enable proxy server for the current session only and will not be persistent across reboots.
# export http_proxy=http://USERNAME:PASSWORD@SERVER:PORT/
Set up proxy with domain, username and password
Assuming you are also required to add domain detail while setting up proxy configuration on your system then use the below command
# export http_proxy=http://DOMAIN\\USERNAME:PASSWORD@SERVER:PORT/
Special character (@) handling
With more complex and robust handling of special characters in username or password follow How to setup http or https proxy with special characters in username and password
When the username or password uses the @ symbol, add a backslash (\) before the @ — for example:
export http_proxy=http://DOMAIN\\USERN\@ME:PASSWORD@SERVER:PORT
export http_proxy=http://DOMAIN\\USERNAME:P\@SSWORD@SERVER:PORT
Set up proxy permanently using /etc/environment
Now as I have highlighted above the above commands will work only for the current active session but will not be available across reboots. So to make these changes persistent define the environment variables in /etc/environment file:
# echo "http_proxy=http://proxy.example.com:3128/" >> /etc/environment
Set up proxy permanently using /etc/profile.d
For bash and sh users, add the export line given above into a new file called /etc/profile.d/http_proxy.sh file:
# echo "export http_proxy=http://proxy.example.com:3128/" > /etc/profile.d/http_proxy.sh
For csh and tcsh users, use the following command to set the http_proxy variable in a new file called /etc/profile.d/http_proxy.csh file:
# echo "setenv http_proxy http://proxy.example.com:3128/" > /etc/profile.d/http_proxy.csh
The extension of these files determines which shell will read them. The commands are not interchangeable.
Replace http_proxy with https_proxy in the export argument to enable proxy over SSL/TLS. This information will be provided by the Network Team who have provided the proxy server related details.
Lastly I hope the steps from the article to setup proxy using http_proxy and https_proxy environment variable in Linux was helpful. So, let me know your suggestions and feedback using the comment section.
Didn’t find what you were looking for? Perform a quick search across GoLinuxCloud
If my articles on GoLinuxCloud has helped you, kindly consider buying me a coffee as a token of appreciation.

For any other feedbacks or questions you can either use the comments section or contact me form.
Thank You for your support!!
4 thoughts on “How to set up proxy using http_proxy & https_proxy environment variable in Linux?”
Your example “Set up proxy permanently using /etc/environment” should use a double redirect (>>) to APPEND instead of a single redirect (>) to OVERWRITE the environment file. If someone were to copy/paste your example, they would overwrite any other existing environment settings in their /etc/environment file! # echo “http_proxy=http://proxy.example.com:3128/” >> /etc/environment Reply
I would like to set up a proxy in debian10 via environment file.
The username, password, however, includes a comma (,)
How does that affect the phrasing? Reply
How to Configure Proxy Settings on Ubuntu 20.04
Using a proxy server as an internet access intermediary is a common business scenario. However, personal users can also benefit from increased network security, privacy, and speed provided by proxies.
In this tutorial, you will learn how to set up your Ubuntu 20.04 system to work with a proxy server.

- Ubuntu 18.04 or later
- Access to terminal with sudo privileges
- Proxy info (web or IP address, username, and password)
Note: If you wish to set up one of your machines to act as a proxy, refer to How to Set Up & Install Squid Proxy Server on Ubuntu.
Setting Up Proxy with Ubuntu Desktop GUI
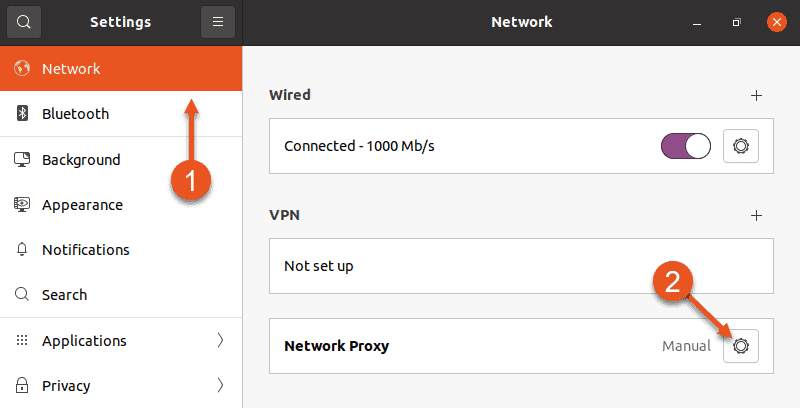
1. To access proxy settings using the Ubuntu GUI, open Ubuntu’s main Settings.
2. Select the Network setting in the menu on the left side of the window.
3. Then, click the cog in the Network Proxy section.
4. A Network Proxy dialogue appears. Choose Manual and enter your proxy info into the fields below.
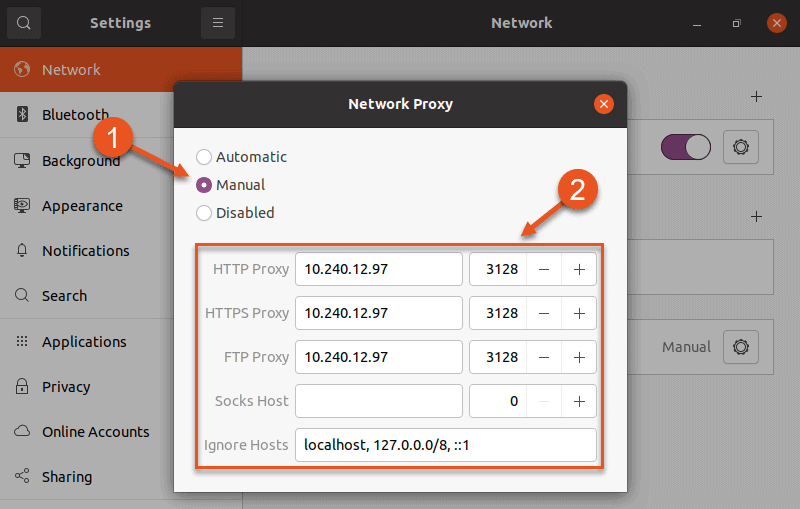
5. Exit the dialogue and Ubuntu will automatically apply the proxy settings.
Setting up Proxy With Ubuntu Desktop Terminal
Use the command line interface for more granular control of proxy settings. This allows you to:
- Make temporary or permanent changes to the configuration.
- Set up proxy for a single user or for all users.
Setting Up Temporary Proxy for a Single User
A temporary proxy connection resets after a system reboot. To establish such a connection for the current user, use the export command.
The syntax for establishing a temporary proxy connection is:
export HTTP_PROXY=[username]:[password]@[proxy-web-or-IP-address]:[port-number] export HTTPS_PROXY=[username]:[password]@[proxy-web-or-IP-address]:[port-number] export FTP_PROXY=[username]:[password]@ [proxy-web-or-IP-address]:[port-number] . export NO_PROXY=localhost,127.0.0.1. 1Provide the proxy address (web or IP), followed by the port number. If the proxy server requires authentication, add your proxy username and password as the initial values.
This is what the set of commands should look like in terminal:

The purpose of the NO_PROXY line is to tell the system that local traffic should ignore the proxy.
Setting Up Permanent Proxy for a Single User
As stated above, proxy settings configured through a terminal window reset after you reboot your system. To make permanent changes for a single user, edit the .bashrc file.
1. Open the file with a text editor of your choice:
2. Now add the following lines at the bottom of the .bashrc file:
export HTTP_PROXY="[username]:[password]@[proxy-web-or-IP-address]:[port-number]" export HTTPS_PROXY="[username]:[password]@[proxy-web-or-IP-address]:[port-number]" export FTP_PROXY="[username]:[password]@ [proxy-web-or-IP-address]:[port-number]" . export NO_PROXY="localhost,127.0.0.1. 1"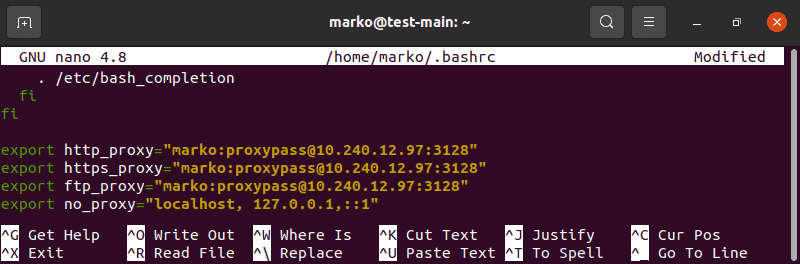
4. Then, run the following command in to apply the new settings to the current session:
Setting Up Permanent Proxy for All Users
To permanently set up proxy access for all users, you have to edit the /etc/environment file.
1. First, open the file in a text editor:
2. Next, update the file with the same information you added to the .bashrc file in the previous scenario:
export HTTP_PROXY="[username]:[password]@[proxy-web-or-IP-address]:[port-number]" export HTTPS_PROXY="[username]:[password]@[proxy-web-or-IP-address]:[port-number]" export FTP_PROXY="[username]:[password]@ [proxy-web-or-IP-address]:[port-number]" . export NO_PROXY="localhost,127.0.0.1. 1"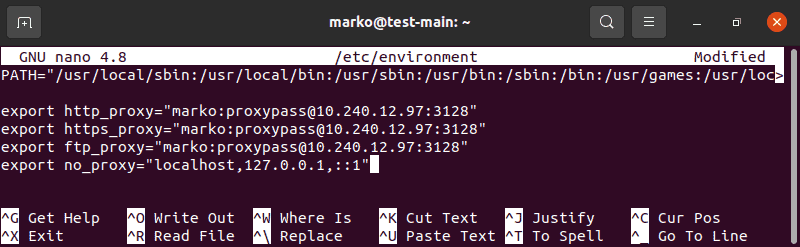
3. Save the file and exit. The changes will be applied the next time you log in.
Setting Up Proxy for APT
On some systems, the apt command-line utility needs a separate proxy configuration, because it does not use system environment variables.
1. To define proxy settings for apt, create or edit (if it already exists) a file named apt.conf in /etc/apt directory:
2. Add the following lines to the file:
Acquire::http::Proxy "http://[username]:[password]@ [proxy-web-or-IP-address]:[port-number]"; Acquire::https::Proxy "http://[username]:[password]@ [proxy-web-or-IP-address]:[port-number]";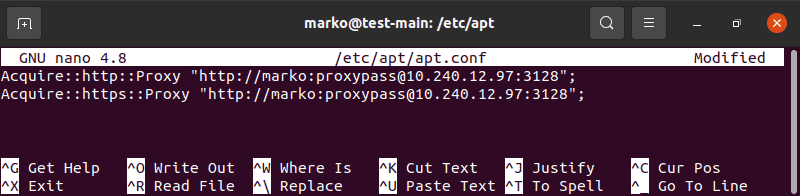
3. Save the file and exit. The configuration will be applied after a reboot.
This tutorial provided instructions on how to set up proxy settings on Ubuntu 20.04. You should now know how to make temporary and permanent changes to your system’s proxy configuration, for a single user or for the entire system.