- LFCA: Learn User Account Management – Part 5
- User Account Management in Linux
- Root User
- Regular User
- Service Account
- User Management Files
- The /etc/passwd File
- The /etc/group File
- The /etc/gshadow File
- The /etc/shadow File
- How to Add Users in a Linux System
- How to Delete Users in a Linux System
- Управление учетными записями в Linux. Часть 1. Хранение учетных данных
- Где хранятся учетки
- Быстрый перебор
- И еще немного… соли
- Заключение
LFCA: Learn User Account Management – Part 5
As a Linux system administrator, you will be tasked with ensuring the smooth flow of all IT operations in your organization. Given that some IT operations are intertwined, a systems administrator usually wears many hats including being a database or network administrator.
This article is Part 5 of the LFCA series, here in this part, you will acquaint yourself with the general system administration commands to create and manage users in a Linux system.
User Account Management in Linux
One of the primary responsibilities of a Linux systems administrator is to create and manage users in a Linux system. Each user account has 2 unique identifiers: the username and the User ID (UID).
Essentially, there are 3 main categories of users in Linux:
Root User
The root user is the most powerful user in a Linux system and is usually created during the installation process. The root user has absolute power in the Linux system or any other UNIX-like OS. The user can access all the commands, files, and directories and modify the system to their preference.
The root user can update the system, install and uninstall packages, add or remove other users, grant or revoke permissions, and perform any other system administration task without any restrictions.
The root user can just about do anything on the system. The assumption by Linux and UNIX-like systems is that you know full well what you are doing with the system. That said, the root user can easily break the system. All it takes is for you to execute a fatal command, and the system will be up in smoke.
For this reason, running commands as the root user is highly discouraged. Instead, good practice demands that you should configure a sudo user. That is grant sudo privileges to a regular user to perform certain administrative tasks and restrict some tasks only to the root user.
Regular User
A regular user is a normal login user that can be created by a systems administrator. Usually, there is a provision to create one during the installation process. However, you can still create as many regular users as needed post-installation.
A regular user can only perform tasks and access files and directories for which they are authorized. If need be, a regular user can be granted elevated privileges to perform administrative-level tasks. Regular users can also be deleted or disabled when the need arises.
Service Account
This is a non-login account that is created when a software package is installed. Such accounts are used by services to execute processes in the system. They are not designed or intended to carry out any routine or administrative tasks in the system.
User Management Files
Information about users in a Linux system is stored in the following files:
Let’s understand each file and what it does:
The /etc/passwd File
The /etc/passwd file contains quite a bit of information about users which is contained in various fields. To view the contents of the file, simply use the cat command as shown.
Here’s a snippet of the output.
tecmint:x:1002:1002:tecmint. /home/tecmint:/bin/bash
Let’s focus on the first line and flesh out the various fields. Starting from the far left, we have the following:
- The username: This is the name of the user, in this case, tecmint.
- The Password: The second column represents the encrypted password of the user. The password is not printed in plain text, instead, a placeholder with an x sign is used.
- The UID: This is the User ID. It’s a unique identifier for every user.
- The GID: This is the Group ID.
- A brief description or summary of the user.
- This is the path to the user’s home directory. For tecmint user, we have /home/tecmint.
- This is the Login shell. For regular login users, this is usually represented as /bin/bash. For service accounts such as SSH or MySQL, this is usually represented as /bin/false.
The /etc/group File
This file contains information about the user groups. When a user is created, the shell automatically creates a group that corresponds to the username of the user. This is known as the primary group. The user is added to the primary group upon creation.
For example, if you create a user called bob, the system automatically creates a group called bob and adds the user bob to the group.
$ cat /etc/group tecmint:x:1002:
The /etc/group file has 3 columns. From the far left, we have:
- Group name. Each group name must be unique.
- Group password. Usually represented by an x placeholder.
- Group ID (GID)
- Group members. These are members that belong to the group. This field is left blank if the user is the only member in the group.
NOTE: A user can be a member of multiple groups. Likewise, a group can have multiple members.
To confirm the groups that a user belongs to, run the command:
For example, to check the groups that the user tecmint belongs to, run the command:
The output confirms that the user belongs to two groups: tecmint and sudo.
tecmint : tecmint sudo
The /etc/gshadow File
This file contains encrypted or ‘shadowed‘ passwords for group accounts and, for security reasons, cannot be accessed by regular users. It’s only readable by the root user and users with sudo privileges.
$ sudo cat /etc/gshadow tecmint.
From the far left, the file contains the following fields:
The /etc/shadow File
The /etc/shadow file stores the users actual passwords in a hashed or encrypted format. Again, the fields are colon-separated and take the format shown.
$ sudo cat /etc/shadow tecmint:$6$iavr8PAxxnWmfh6J$iJeiuHeo5drKWcXQ.BFGUrukn4JWW7j4cwjX7uhH1:18557:0:99999:7.
The file has 9 fields. Starting from the far left we have:
- The username: This is your login name.
- The user’s password. This is presented in a hashed or encrypted format.
- The last password change. This is the date since the password was changed and is calculated since the epoch date. Epoch is the 1st January 1970.
- The minimum password age. This is the minimum number of days that must elapse before a password can be set.
- The maximum password age. This is the maximum number of days after which a password must be changed.
- The warning period. As the name suggests, this is the number of days shortly before a password expires that a user is notified of the impending password expiry.
- The inactivity period. The number of days after a password expires that a user account is disabled without the user changing the password.
- The expiration date. The date when the user account expired.
- Reserved field. – This is left blank.
How to Add Users in a Linux System
For Debian and Ubuntu distributions, the adduser utility is used for adding users.
The syntax is quite simple and straightforward.
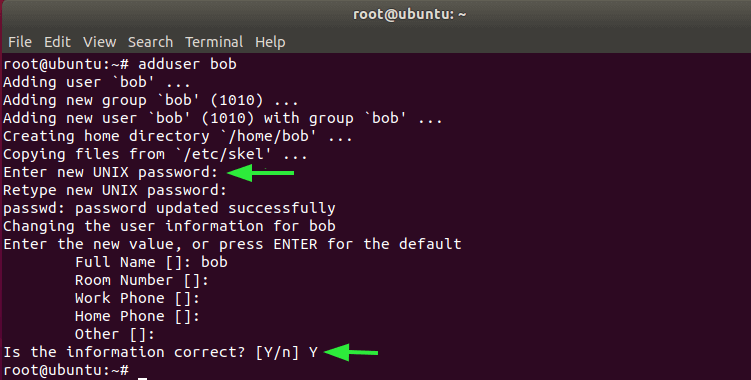
For example, to add a user called bob, run the command
From the output, a user called ‘bob‘ is created and is added to a newly created group called ‘bob‘. Additionally, the system also creates a home directory and copies configuration files into it.
Thereafter, you will be prompted for the new user’s password and then confirm it. The shell will also prompt you for the user’s full name and other optional information such as Room no and Work phone. This information is not really necessary, so it’s safe to skip it. Finally, press ‘Y’ to confirm that the information provided is correct.
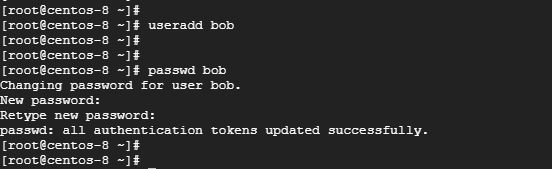
For RHEL & CentOS-based systems, use the useradd command.
Next, set the password for the user using the passwd command as follows.
How to Delete Users in a Linux System
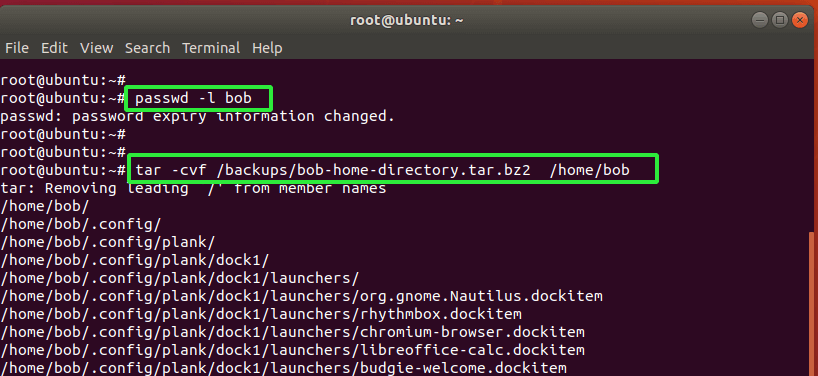
To delete a user from the system, it’s advisable to first lock the user from logging into the system as shown.
If you wish, you can backup the user’s files using the tar command.
# tar -cvf /backups/bob-home-directory.tar.bz2 /home/bob
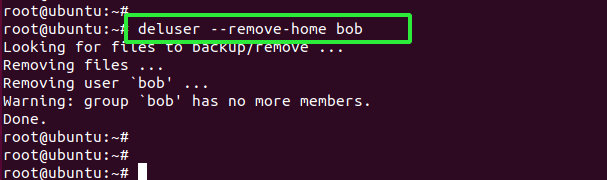
Finally, to delete the user together with the home directory use the deluser command as follows:
Additionally, you can use the userdel command as shown.
The two commands completely remove the user alongside their home directories.
Conclusion
That was an overview of user management commands that will prove useful especially when managing user accounts in your office environment. Give them a try from time to time to sharpen your system administration skills.
Управление учетными записями в Linux. Часть 1. Хранение учетных данных
Файлы в операционках семейства Linux можно назвать основой всего. Для Linux все есть файл. Другими словами, файлы это не только объекты для хранения информации, но и устройства, тоннели, сокеты и многое другое. При этом, нам необходимы разграничивать доступ к тем или иным файлам в зависимости от прав пользователя, обращающегося к файлу.
У каждого файла в Linux системах есть владелец (user). И как мы уже говорили, у каждого пользователя есть уникальный идентификатор – user ID. Еще есть группы, то есть объединения пользователей по тому или иному признаку. Каждый пользователь должен состоять минимум в одной группе, но есть возможность добавить пользователя во множество групп. Так же, как и у пользователя, группа имеет уникальный идентификатор группы называемый GID – group ID.
Где хранятся учетки
Информацию об учетных записях ОС Linux хранит в файле /etc /passwd .
Он содержит следующее:

Где:
User ID — логин;
Password – наличие пароля;
UID — идентификатор пользователя;
GID — идентификатор группы по умолчанию;
User Info – вспомогательная информация о пользователе (полное имя, контакты и т.д.)
Home Dir — начальный (он же домашний) каталог;
Shell — регистрационная оболочка, или shell.
Когда-то, на заре становления Линукс, в файле /etc/passwd хранились также хэши паролей от учетных записей пользователей. Но тогда эти данные становились легкой добычей злоумышленников, так как любой пользователь мог прочитать этот файл и скопировать хэши для последующей расшифровки.
В качестве проверки можно под учеткой обычного пользователя (не root) ввести cat /etc/passwd и вы получите содержимое файла.

Для хранения хэшей паролей в современных Линукс используется файл /etc/shadow .

И вот к содержимому этого файла обычные пользователи уже доступа не имеют. Таким образом, обеспечивается защита хэшей от пользовательского доступа.

Файл /etc/shadow имеет следующую структуру:

loginID – имя пользователя;
password – пароль в зашифрованном виде;
lastchg – количество дней c 1.01.1970, когда пароль был изменен в последний раз;
min – минимальное число дней между сменами пароля;
max – максимальное число дней, в течении которых пароль будет валиден;
warn – количество дней за которые пользователь будет предупрежден об истечении пароля;
inactive – количество дней, в течении которых пользователь может быть неактивен перед блокировкой;
expire – дата, когда истекает срок пользовательской учетной записи.
Отсутствие доступа к /etc/shadow для обычных пользователей конечно усложняет жизнь потенциальным взломщикам, но не исключает полностью возможность получить доступ к хэшам. При наличии физического доступа злоумышленник может загрузиться с флешки и подмонтировав раздел скопировать нужный файл к себе. Аналогично в случае использования виртуализации можно скопировать выключенную виртуалку к себе и затем, также загрузиться со сменного носителя.
В случае, если хакер получил права обычного пользователя, например www, он может попытаться повысить привилегии для того, чтобы прочитать файл. Также, если пользователь может загружать любые docker-контейнеры, то при определенных условиях он может получить права на чтение /etc/shadow. Об этом мы подробно поговорим в третьей статье.
Быстрый перебор
Не углубляясь в тему взлома (все-таки эта статья больше про администрирование Linux) кратко опишем дальнейшие действия злоумышленника после получения доступа к хэшам паролей.
Перебор паролей даже на достаточно мощной машине процесс довольно продолжительный. И для того, чтобы его максимально ускорить существуют наборы сгенерированных заранее хэшей паролей, например все комбинации из цифр длиной до 10 символов, маленьких латинских букв до 10 символов и т.д. Более сложные комбинации тоже можно получить готовыми, но это уже будет стоить денег. Тем не менее взломщик может сэкономить много времени используя готовые хэши.
И еще немного… соли
Для решения проблемы использования готовых хэшей разработчики ОС Linux стали использовать соль (salt), то есть набор из нескольких дополнительных байт, который добавлялись к паролю перед хэшированием.
Обычно формат пароля, хранимого в /etc/shadow представляет собой:
$id $salt $hashed, где $id — алгоритм, которым шифруется пароль ($1 is MD5, $2a is Blowfish, $2y is Blowfish, $5 is SHA-256, $6 is SHA-512).

Таким образом, использование соли для шифрования паролей осложняет перебор, так как не позволяет использовать готовые таблицы.
Заключение
В этой статье мы рассмотрели механизмы работы с учетными записями в ОС семейства Linux, в частности механизм обеспечения безопасности при хранении хэшей паролей. В следующей статье мы начнем говорить о настройках доступа и тех ошибках могут допустить администраторы при выполнении этих настроек.
Вместо заключения хочу пригласить вас на бесплатные демоуроки по Linux от OTUS. Зарегистрироваться на уроки можно по ссылкам ниже: