- A complete guide to Manage Users and Groups on Linux!
- User Management
- What is a Linux user?
- Types of Linux users
- Understanding Properties of Linux User Accounts
- Create a Linux user
- Assign Password to a Linux user
- Delete a Linux user
- Modifying an Existing user’s properties
- Group Management
- Create a Linux group
- Add users to a Linux group
- Change Name of a Linux group
- Change GID of a Linux group
- Remove a User from a Linux group
- Delete or Remove a Linux group
- Creating advanced user
- How users and groups database is maintained
- What is purpose of having Group Password
- Did you find this article valuable?
A complete guide to Manage Users and Groups on Linux!
User and Group management is one of the core element of any operating system and being a multi user operating system it becomes more critical on Linux.
In this tutorial I will demonstrate how one can add/remove/modify users and groups on Linux operating system using cli.
User Management
What is a Linux user?
Linux user is an account or an entity which provides interactive access to the system and allows to create or modify files and to perform several other operations.
Types of Linux users
There are two types of users which exists on a typical Linux operating system.
System users ->
A system user account aka privileged account is created by the operating system during its installation and that is used for operating system defined purposes. They have user id’s predefined (100-999).
This range can be verified in the file /etc/login.defs .
cat /etc/login.defs | grep -i SYS_UID_MIN cat /etc/login.defs | grep -i SYS_UID_MAX cat /etc/login.defs | grep -i SYS_GID_MIN cat /etc/login.defs | grep -i SYS_GID_MAX Regular users ->
The regular user accounts has ids begin from 1000 onwards.
cat /etc/login.defs | grep -i UID_MIN | grep -v -E '^\#' cat /etc/login.defs | grep -i UID_MAX | grep -v -E '^\#' cat /etc/login.defs | grep -i GID_MIN | grep -v -E '^\#' cat /etc/login.defs | grep -i GID_MAX | grep -v -E '^\#' To make the IDs assigned to new users by default start at any range of your choice for e.g. 5,000, change the UID_MIN and GID_MIN directives in the /etc/login.defs file:
Understanding Properties of Linux User Accounts
When you create a local user account, the user’s login information and all other details are stored in the /etc/passwd file.
Let us go through each and every details of an entry about a Linux user.
I have created a sample user for the purpose of understanding this.
root@lco-linux-master:~# cat /etc/passwd | grep -i sample sample:x:1003:1004:Sample User,123,123456789,805463638,Sample user:/home/sample:/bin/bash The syntax is ->
The above entry has 7 columns and each belongs to the following information.
To view valid login shell please run the following command:
root@lco-linux-master:~# cat /etc/shells Now since you have a fair understanding of a Linux user and its properties we can start performing the User Administration tasks.
Create a Linux user
There are three different ways to create a user in Linux.
Method 1: Using useradd command ->
Following are the commonly used options along with useradd command while creating users.
-b , —base-dir -> The default base directory for the system if -d HOME_DIR is not specified.
-c , —comment -> a short description of the login
-d , —home-dir -> The new user will be created using HOME_DIR as the value for the user’s login directory.
-f , —inactive -> The number of days after a password expires until the account is permanently disabled.
-k , —skel -> The skeleton directory, which contains files and directories to be copied in the user’s home directory, when the home directory is created by useradd.
-m , —create-home -> Create the user’s home directory if it does not exist. The files and directories contained in the skeleton directory (which can be defined with the -k option) will be copied to the home directory.
-M , —no-create-home -> Do no create the user’s home directory, even if the system wide setting from /etc/login.defs (CREATE_HOME) is set to yes.
-s , —shell -> The name of the user’s login shell. The default is to leave this field blank, which causes the system to select the default login shell specified by the SHELL variable in /etc/default/useradd, or an empty string by default.
-u , —uid -> The numerical value of the user’s ID.
-g , —gid -> The group name or number of the user’s initial login group.
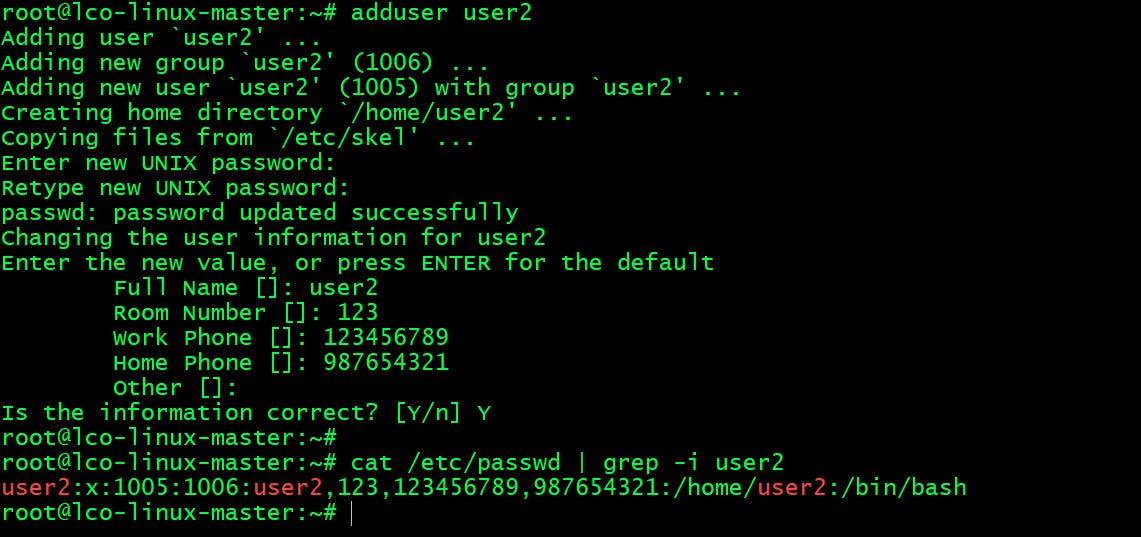
Method 2: Using adduser command ->
adduser is a Perl script which uses useradd (which is native to Linux) binary in back-end. It’s more interactive and user friendly than it’s back-end useradd .
Method 3: By directly modifying /etc/passwd file ->
Not a recommended way but one can create a Linux user by directly modifying /etc/passwd file and making an entry for new user. In such cases you need to create the group , home directory etc. individually for that user.
Assign Password to a Linux user
Using passwd command we can assign passwords to Linux user.
Delete a Linux user
Using userdel command you can delete a user from Linux operating system.
-f , —force -> This option forces the removal of the user account, even if the user is still logged in.
-r , —remove -> Files in the user’s home directory will be removed along with the home directory itself and the user’s mail spool.
Modifying an Existing user’s properties
usermod command is used to modify an existing user’s properties.
Update the comment part ->
usermod -c "This is Sample user" sample Change User Home Directory ->
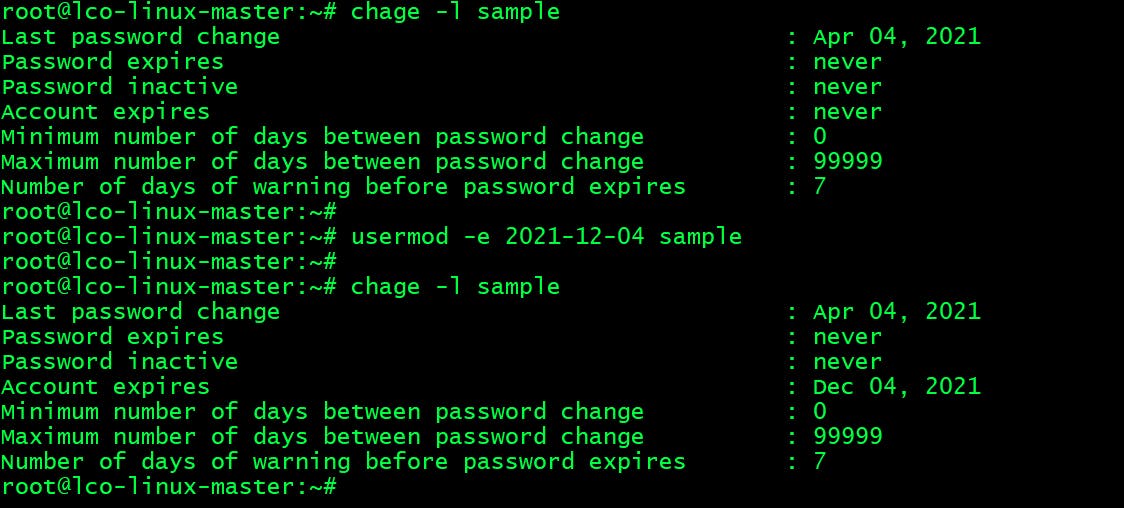
Setting User Account Expiry Date ->
usermod -e 2021-12-04 sample chage -l sample Previously it was set to Never Expire , we have changed it to expire on December 4th 2021 .
chage command is to change and view user password expiry information.
Lock and unlock the user account ->
Use ‘-L‘ (lock) option with usermod command to lock the user account and to unlock use -U option.
Once locked user can’t login by using the password and you will see a ! added before the encrypted password in /etc/shadow file, means password is disabled.
usermod -L sample usermod -U sample I have seen many websites on internet mentioning passwd -l command to disable a user. But that’s not true at all. This option disables a password by changing it to a value which matches no possible encrypted value. The user may still be able to login using another authentication token (e.g. an SSH key). To disable the account, administrators should use usermod command.
Group Management
There are two types of groups in Linux. The primary group and secondary group. On Linux when you create a user the primary group that the user belongs to also gets created with the same name as the user.
A user must be a member of a primary group and there can be only one primary group for each member. Secondary groups are always optional. If you have a requirement create it and add the users to it. A user can be mart of one or more secondary groups.
Here the sample user is part of it’s own primary group named sample with GID 1004 .
Create a Linux group
Use groupadd command to create a Linux group.
Add users to a Linux group
We can add users to become part of any other groups.
usermod -G secondgroup sample usermod -G secondgroup user1 You can clearly see above sample and user1 becoming part of secondgroup .
Another way to check groups information of a Linux user using id and groups command.
id sample id user1 groups sample groups user1 Change Name of a Linux group
Run following command to change name of a Linux group.
groupmod -n secondarygroup secondgroup The syntax is -> groupmod -n newname oldname
Change GID of a Linux group
Run following command to change name of a Linux group.
groupmod -g 1007 secondarygroup The syntax is -> groupmod -g newgid groupname
Remove a User from a Linux group
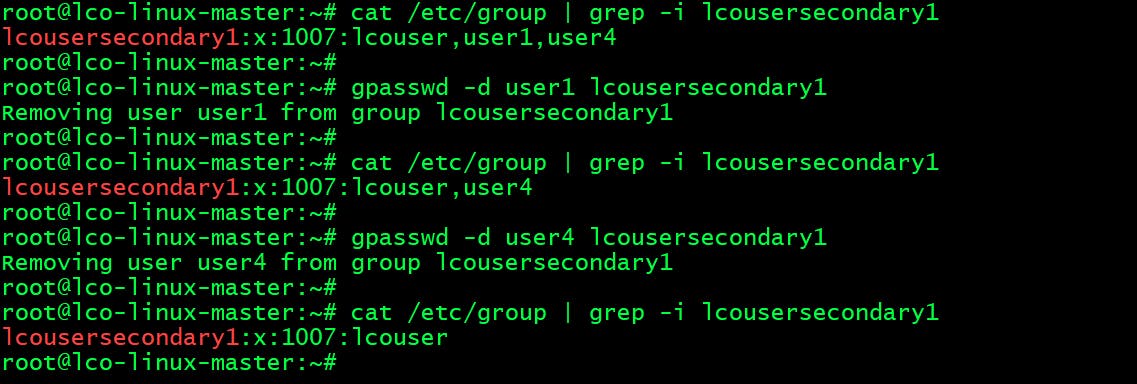
Run the following commands to remove a user from a Linux group.
gpasswd -d user1 lcousersecondary1 gpasswd -d user4 lcousersecondary1 One can also remove a user from a group by directly editing the /etc/group file and removing the username from the list.
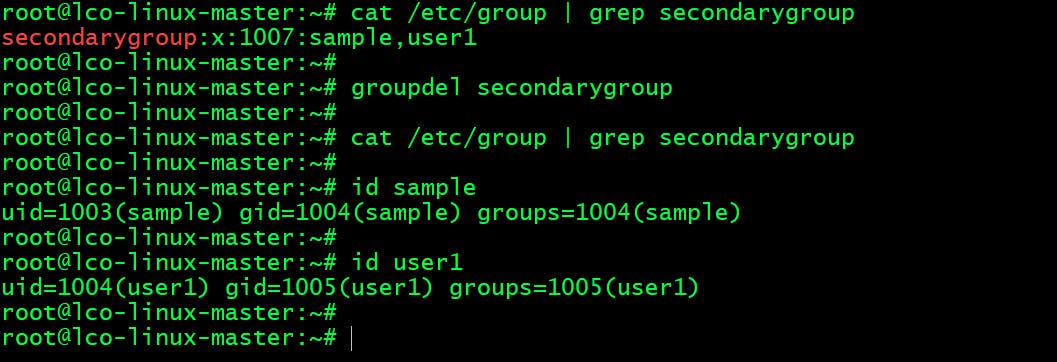
Delete or Remove a Linux group
Run following command to delete a Linux group.
Now as we have learnt how users and groups can be created on Linux Operating System its time for us to learn how to create advance Linux users.
Creating advanced user
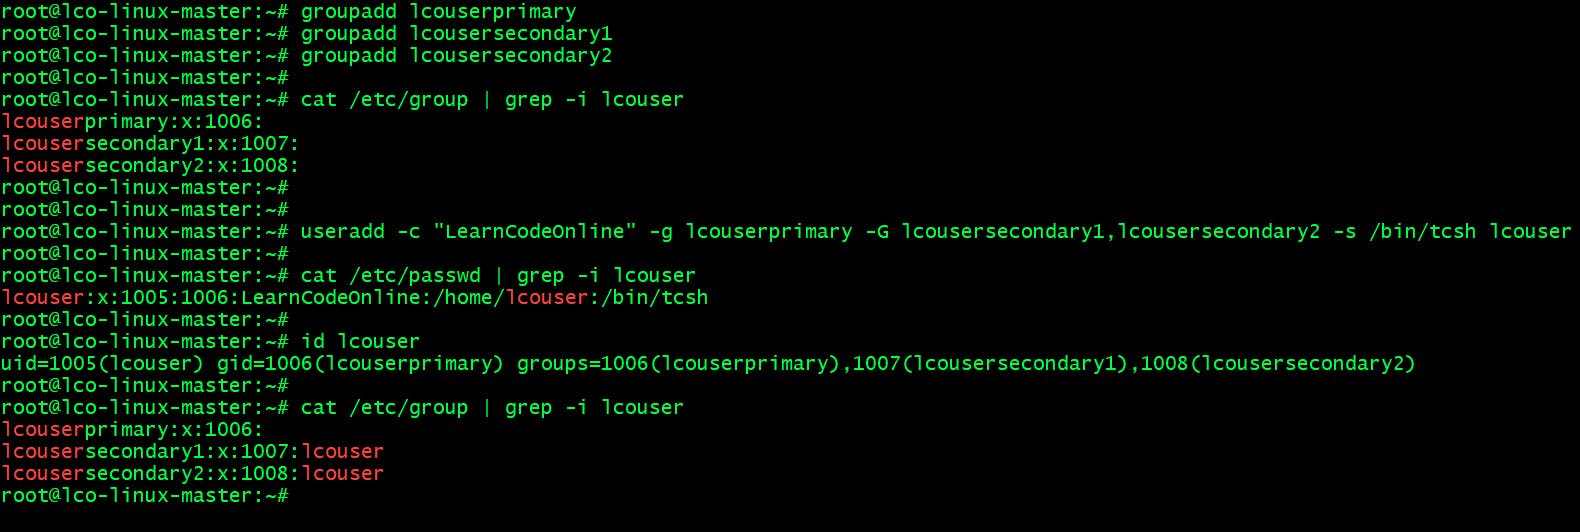
Here we will use multiple useradd command options to create the user.
Our requirement is as follows:
Full name is LearnCodeOnline Login or username is lcouser Primary group is lcouserprimary Secondary groups are lcousersecondary1 and lcousersecondary2 Default shell is /bin/tcsh
Run the following commands to achieve this.
groupadd lcouserprimary groupadd lcousersecondary1 groupadd lcousersecondary2 useradd -c "LearnCodeOnline" -g lcouserprimary -G lcousersecondary1,lcousersecondary2 -s /bin/tcsh lcouser How users and groups database is maintained
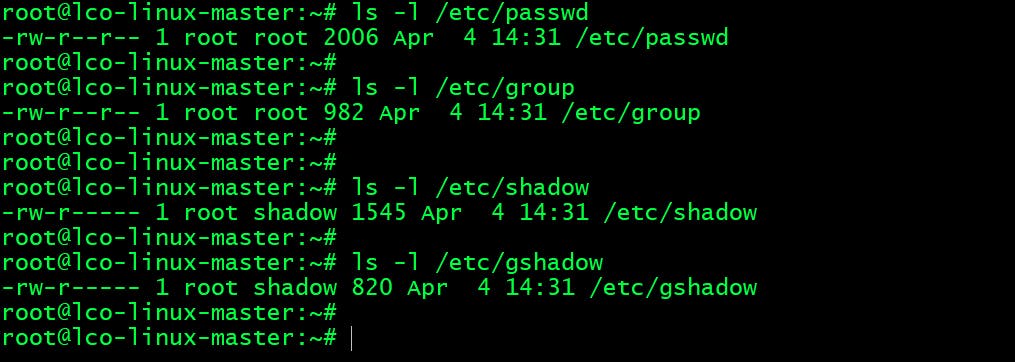
On Linux Operating system there are primarily four files placed under /etc directory which manages records about users and groups .
/etc/passwd -> The file containing basic information about users.
/etc/shadow -> The file containing encrypted passwords.
/etc/group -> The file containing basic information about groups and which users belong to them.
/etc/gshadow -> The containing encrypted group passwords.
These files gets updated by all the commands we have learnt through this tutorial.
The password ( /etc/passwd ) and group ( /etc/group ) files doesn’t contain password information for security reasons and they are world readable, but the other two files are not.
What is purpose of having Group Password
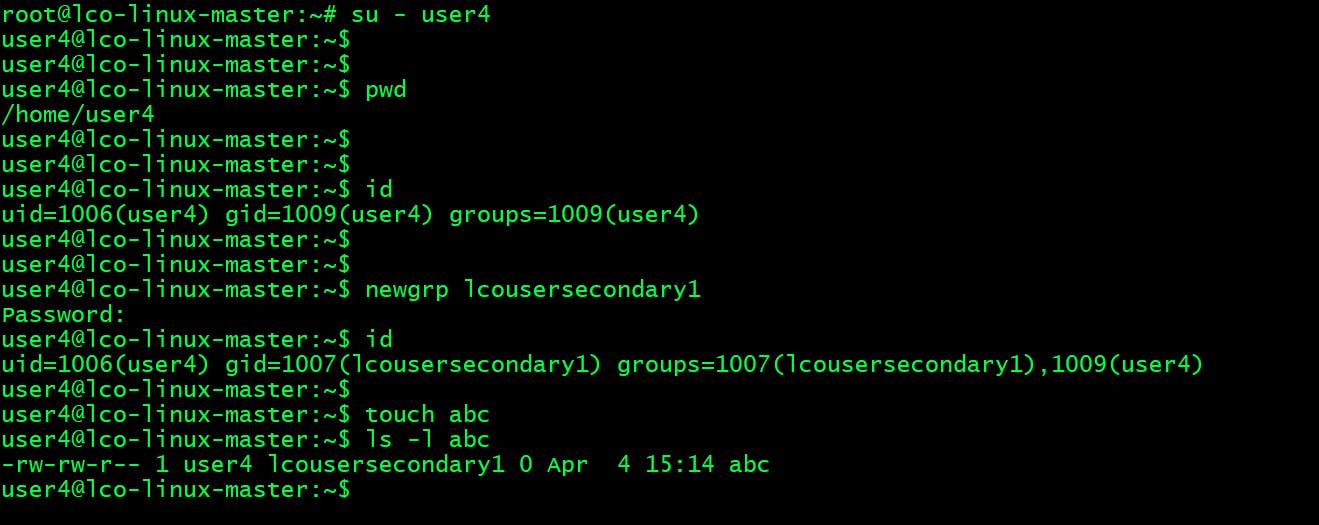
It’s a very common question one can ask you in interviews. If we protect a group by setting password to it the non-members can join the group by typing the password for that group using the newgrp command.
If the value of this field is set to ! then no user is allowed to access the group using the newgrp command only the user with admin access can make changes. A value of !! indicates that a password has never been set before. If the value is null, only group members will be allowed to log into the group. This file is not of much importance though.
Here we have set password on group lcousersecondary1 by using gpasswd command. The new user user4 now have to provide the same password in order to make itself part of that group.
That’s all for this comprehensive guide covering all aspects of User and Group Management on Linux.
Hope you like the article. Stay Tuned for more.
Did you find this article valuable?
Support Learn Code Online by becoming a sponsor. Any amount is appreciated!


