- screen command in Linux with Examples
- 4 Ways to Show all Drives (Mounted and Unmounted) on Linux
- Display all Drives on Linux
- Method # 1: Using the “fdisk” Command
- Method # 2: Using the “blkid” Command:
- Method # 3: Using the “lsblk” Command:
- Method # 4: Using the “parted” Command:
- Conclusion
- Search
- About This Site
- Latest Tutorials
- How can I specify a display?
- 12 Answers 12
screen command in Linux with Examples
screen command in Linux provides the ability to launch and use multiple shell sessions from a single ssh session. When a process is started with ‘screen’, the process can be detached from session & then can reattach the session at a later time. When the session is detached, the process that was originally started from the screen is still running and managed by the screen itself. The process can then re-attach the session at a later time, and the terminals are still there, the way it was left. Syntax:
- -a: It force all capabilities into each window’s termcap.
- -A -[r|R]: It adapt all windows to the new display width & height.
- -c file: It read configuration file instead of ‘.screenrc’.
- -d (-r): It detach the elsewhere running screen (and reattach here).
- -dmS name: It start as daemon: Screen session in detached mode.
- -D (-r): It detach and logout remote (and reattach here).
- -D -RR: It do whatever is needed to get a screen session.
- -e xy: It change the command characters.
- -f: It make the flow control on, -fn = off, -fa = auto.
- -h lines: It set the size of the scrollback history buffer.
- -i: It interrupt output sooner when flow control is on.
- -l: It make the login mode on (update /var/run/utmp), -ln = off.
- -ls [match]: It display all the attached screens.
- -L: It turn on output logging.
- -m: It ignore $STY variable, do create a new screen session.
- -O: It choose optimal output rather than exact vt100 emulation.
- -p window: It preselect the named window if it exists.
- -q: It quiet startup. Exits with non-zero return code if unsuccessful.
- -Q: It commands will send the response to the stdout of the querying process.
- -r [session]: It reattach to a detached screen process.
- -R: It reattach if possible, otherwise start a new session.
- -S sockname: It name this session .sockname instead of …
- -t title: It set title. (window’s name).
- -T term: It use term as $TERM for windows, rather than “screen”.
- -U: It tell screen to use UTF-8 encoding.
- -v: It print “Screen version 4.06.02 (GNU) 23-Oct-17”.
- -x: It attach to a not detached screen. (Multi display mode).
- -X: It execute as a screen command in the specified session.
Shortcut keys Options:
- Ctrl-a + c: It create a new windows.
- Ctrl-a + w: It display the list of all the windows currently opened.
- Ctrl-a + A: It rename the current windows. The name will appear when you will list the list of windows opened with Ctrl-a + w.
- Ctrl-a + n: It go to the next windows.
- Ctrl-a + p: It go to the previous windows.
- Ctrl-a + Ctrl-a: It back to the last windows used.
- Ctrl-a + k: It close the current windows (kill).
- Ctrl-a + S: It split the current windows horizontally. To switch between the windows, do Ctrl-a + Tab.
- Ctrl-a + |: It split the current windows vertically.
- Ctrl-a + X: Close active Split window
- Ctrl-a + Q: Close all Split windows
- Ctrl-a + d: It detach a screen session without stopping it.
- Ctrl-a + r: It reattach a detached screen session.
- Ctrl-a + [: It start the copy mode.
- Ctrl-a + ]: It paste the copied text.
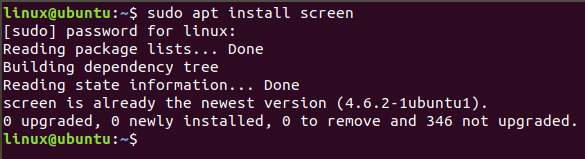
- Installation of screen command: To install the screen command simply go to the terminal and type the following command:
- screen: It will start a new window within the screen.

- -S: It will start a new window within the screen and also gives a name to the window. It creates a session which is identified by that name. The name can be used to reattach screen at a later stage.

- -ls: It is used to display the currently opened screens including those running in the background. It will list all the attached as well as detached screen sessions.

- -d: It is used to detach a screen session so that it can be reattached in future. It can also be done with the help of shortcut key Ctrl-a + d

- Here 1643 is the screen id we want to detach.
- -r: It is used to reattach a screen session which was detached in past.

4 Ways to Show all Drives (Mounted and Unmounted) on Linux

The drives on any system can either be mounted or unmounted. The mounted drives are the ones that are ready to be accessed at any time whereas the data residing on the unmounted drives can only be accessed after these drives are mounted. In the proceeding section of this article, we want to share with you the different methods of displaying all available drives on Linux.
Display all Drives on Linux
To display all of your drives on a Linux system, you can perform any of the following four methods:
Method # 1: Using the “fdisk” Command
The “fdisk” command can be used to display the drives in Linux in the manner shown below:
![]()
The output produced by this command is shown in the following image:

Method # 2: Using the “blkid” Command:
The “blkid” command can be used to display available drives in Linux in the manner shown below:
![]()
The output produced by this command is shown in the following image:

Method # 3: Using the “lsblk” Command:
The “lsblk” command can be used to display the system drives in Linux in the manner shown below:
![]()
The output produced by this command is shown in the following image:

Method # 4: Using the “parted” Command:
The “parted” command can be used to display the disk partitions in Linux in the manner shown below:
![]()
The output produced by this command is shown in the following image:

Conclusion
By picking out any of the four methods shared in this article, you can conveniently find out all the mounted and unmounted drives on your Ubuntu system. Once you have this information, you can always mount a drive out of these whenever you wish to access its contents.
Search
About This Site
Vitux.com aims to become a Linux compendium with lots of unique and up to date tutorials.
Latest Tutorials
How can I specify a display?
I would like to open many displays, still showing the stdout of each program. Initial Question: How can I specify the display to get a many-displayed program? Pablo Santa Cruz gives me the following code as a solution. I do not understand it.
$ export DISPLAY=yourmachine.yourdomain.com:0.0 $ firefox & 12 Answers 12
The way that X works is the same as the way any network program works. You have a server of some description (in this case, the X display server) which runs on a specific machine, and you have X clients (like firefox) that try to connect to that server to get their information displayed.
Often (on «home» machines), the client and server run on the same box and there’s only one server, but X is powerful enough that this doesn’t need to happen. It was built with the server/client separation built in from the start.
This allows you to do such wondrous things such as log on to your box (in text mode) halfway around the planet, tell it that the display server is the box you’re currently on and, voila, the windows suddenly start appearing locally.
In order for a client to interact with a user, it needs to know how to find the server. There are a number of ways to do this. Many clients allow the -display or —display option to specify it:
xeyes -display paxbox1.paxco.com:0.0 Many will use the DISPLAY environment variable if a display isn’t specifically given. You can set this variable like any other:
DISPLAY=paxbox1.paxco.com:0.0; export DISPLAY # in .profile export DISPLAY=paxbox1.paxco.com:0.0 # in your shell DISPLAY=paxbox1.paxco.com:0.0 firefox & # for that command (shell permitting) The first part of the DISPLAY variable is just the address of the display server machine. It follows the same rule as any other IP address; it can be a resolvable DNS name (including localhost ) or a specific IP address (such as 192.168.10.55).
The second part is X-specific. It gives the X «display» (X server) number and screen number to use. The first (display number) generally refers to a group of devices containing one or more screens but with a single keyboard and mouse (i.e., one input stream). The screen number generally gives the specific screen within that group.
+----------------------------------------+ |paxbox1.paxco.com| | +-----------------+ | | | | +----------+----+ +----------+----+ | | |Display :0| | |Display :1| | | | +----------+ | +----------+ | | | | | | | | | | +-----------+ | | | | | | |Screen :0.0| | | | | | | +-----------+ | | | | | | +-----------+ | | | | | | |Screen :0.1| | | | | | | +-----------+ | | | | | | +-----------+ | | +-----------+ | | | | |Screen :0.2| | | |Screen :1.0| | | | | +-----------+ | | +-----------+ | | | | +-----------+ | | +-----------+ | | | | |Screen :0.3| | | |Screen :1.1| | | | | +-----------+ | | +-----------+ | | | | +-----------+ | | +-----------+ | | | | | Keyboard | | | | Keyboard | | | | | +-----------+ | | +-----------+ | | | | +-----------+ | | +-----------+ | | | | | Mouse | | | | Mouse | | | | | +-----------+ | | +-----------+ | | | +---------------+ +---------------+ | | | +----------------------------------------+ Here you have a single machine ( paxbox1.paxco.com ) with two display servers. The first has four screens and the second has two. The possibilities are then:
DISPLAY=paxbox1.paxco.com:0.0 DISPLAY=paxbox1.paxco.com:0.1 DISPLAY=paxbox1.paxco.com:0.2 DISPLAY=paxbox1.paxco.com:0.3 DISPLAY=paxbox1.paxco.com:1.0 DISPLAY=paxbox1.paxco.com:1.1 depending on where you want your actual windows to appear and which input devices you want to use.