locate command in Linux with Examples
locate command in Linux is used to find the files by name. There is two most widely used file searching utilities accessible to users are called find and locate. The locate utility works better and faster than find command counterpart because instead of searching the file system when a file search is initiated, it would look through a database. This database contains bits and parts of files and their corresponding paths on your system. By default, locate command does not check whether the files found in the database still exist and it never reports files created after the most recent update of the relevant database. Syntax:
Exit Status: This command will exit with status 0 if any specified match found. If no match founds or a fatal error encountered, then it will exit with status 1. Options:
- -b, –basename : Match only the base name against the specified patterns, which is the opposite of –wholename.
- -c, –count : Instead of writing file names on standard output, write the number of matching entries only.
- -d, –database DBPATH : Replace the default database with DBPATH. DBPATH is a : (colon) separated list of database file names. If more than one –database option is specified, the resulting path is a concatenation of the separate paths. An empty database file name is replaced by the default database. A database file name – refers to the standard input. Note that a database can be read from the standard input only once.
- -e, –existing : Print only entries that refer to files existing at the time locate is run.
- -L, –follow : When checking whether files exist (if the –existing option is specified), follow trailing symbolic links. This causes bro ken symbolic links to be omitted from the output. This option is the default behavior. The opposite can be specified using –nofollow.
- -h, –help : Write a summary of the available options to standard output and exit successfully.
- -i, –ignore-case : Ignore case distinctions when matching patterns.
- -l, –limit, -n LIMIT : Exit successfully after finding LIMIT entries. If the –count option is specified, the resulting count is also limited to LIMIT.
- -m, –mmap : Ignored, but included for compatibility with BSD and GNU locate.
- -P, –nofollow, -H : When checking whether files exist (if the –existing option is specified), do not follow trailing symbolic links. This causes broken symbolic links to be reported like other files. This option is the opposite of –follow.
- -0, –null : Separate the entries on output using the ASCII NULL character instead of writing each entry on a separate line. This option is designed for interoperability with the –null option of GNU xargs.
- -S, –statistics : Write statistics about each read database to standard output instead of searching for files and exit successfully.
- -q, –quiet : Write no messages about errors encountered while reading and processing databases.
- -r, –regexp REGEXP : Search for a basic regexp REGEXP. No PATTERNs are allowed if this option is used, but this option can be specified multiple times.
- –regex : Interpret all PATTERNs as extended regexps.
- -s, –stdio : Ignored, for compatibility with BSD and GNU locate.
- -V, –version : Write information about the version and license of locate on standard output and exit successfully.
- -w, –wholename : Match only the whole path name against the specified patterns. This option is the default behavior. The opposite can be specified using –basename.
Example 1: Search a file with specific name.

It will search for sample.txt in particular directory. Output: Example 2: Limit Search Queries to a Specific Number.

It will show 20 results for the searching of file ending with .html. Output: Example 3. Display The Number of Matching Entries.
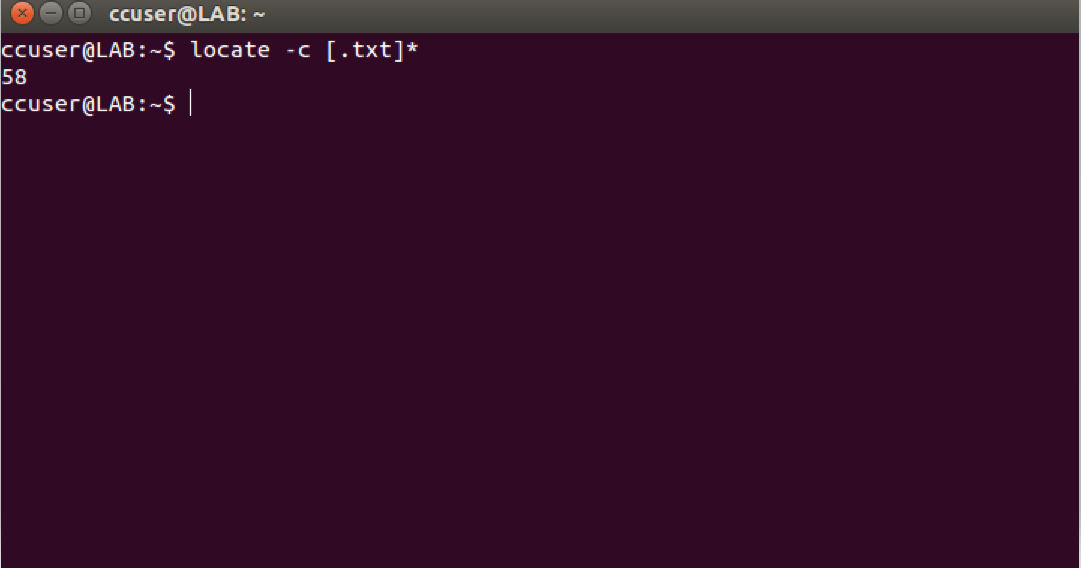
It will count files ending with .txt. Output: Example 4: Ignore Case Sensitive Locate Outputs. This command is configured to process queries in a case sensitive manner. It means SAMPLE.TXT will show a different result than sample.txt.

Output: Example 5: Separate Output Entries Without New Line.

Default separator for locate command is the newline (\\n) character. But if someone want to use a different separator like the ASCII NULL, the he/she can do so using the -0 command line option. Output:
Quickly Search for Files in Linux With Locate Command
The locate command allows you to preform a super quick search for files. In this tutorial, you’ll learn how locate command works and how to use it.
As the name suggests, the locate command in Linux is used for locating (searching) a file. It has the following syntax:
While it is real simple to use the locate command, it comes with lots of ifs and buts. For starter, if it doesn’t find a file, it doesn’t necessarily mean that the file does not exist on the system.
Don’t be confused just now. I’ll explain how the locate command works and how you can use it for finding files.
Using locate command in Linux
The locate command works on an index i.e., a database of file locations. When you use the command, it refers to this index instead of searching the entire filesystem. This is the reason why locate is super quick at finding files in Linux.
Some Linux distributions automatically index the entire filesystem on a regular basis. You can also manually build this index (I’ll show it to you later in this article).
Using locate command is dead simple. You just have to specify the file name:
The result will show all the places where the file you specified was found.
[email protected]:~$ locate desktop.iso /home/abhishek/desktop.isoThe best part is that you don’t need to be in the certain directory to find the file. Remember, locate command doesn’t search the filesystem but the index. This is why you don’t need to specify a path or directory while looking for files.
You can also perform a case-insensitive search by using the -i option:
[email protected]:~$ locate -i desktop.iso /home/abhishek/desktop.iso /home/abhishek/Downloads/Desktop.isoKeep in mind that the result may show all the files that have the search term in their name.
[email protected]:~$ locate -i desktop /home/abhishek/eoan-desktop-amd64.iso /home/abhishek/Bionic-Desktop-amd64.iso /home/abhishek/desktop.iso /home/abhishek/Downloads/Desktop.isoYou may also use regex with locate:
locate -r regex_expressionUsing updatedb to create your own index for locate command
This is just for informational purposes and I don’t think you would need to use it.
You can manually rebuild the database for the entire system like this:
If you want to create an index of the present directory (and its subdirectories), you can use the updatedb command like this:
updatedb -l0 -U my_directory -o index_fileOnce you have created this index file, you can ask locate command to explicitly use this index:
locate -d index_file file_nameIs locate better than the find command?
If you want to search for files in a directory structure that doesn’t change much, locate command is a good option. It is super quick as well.
But the find command gives you a lot of options, especially for performing complex search options.
Both commands have their usage. In my opinion, if you are feeling lazy and want a quick result, use locate. If the result is not of your liking, switch to the find command.
Команда locate в Linux
Команда locate Linux используется для поиска файлов, расположенных на машине пользователя или на сервере. Фактически она выполняет ту же работу, что и команда find, однако, ведёт поиск в собственной базе данных. Find же шаг за шагом проходит через всю иерархию директорий.
Обновление базы данных locate происходит автоматически, как правило, раз в сутки. Настроить желаемый интервал между сканированиями системы можно с помощью планировщика задач Cron.
Синтаксис и опции locate
В эмуляторе терминала команда locate записывается в таком формате:
locate опции шаблон_для_поиска
- -A (—all) — выводит только файлы, соответствующие всем заданным шаблонам.
- -b (—basename) — выводит файл, если его название соответствует шаблону.
- -c (—count) — вместо адресов выводит количество найденных файлов.
- -d (—database) — меняет базу данных для поиска, установленную по умолчанию, на пользовательскую.
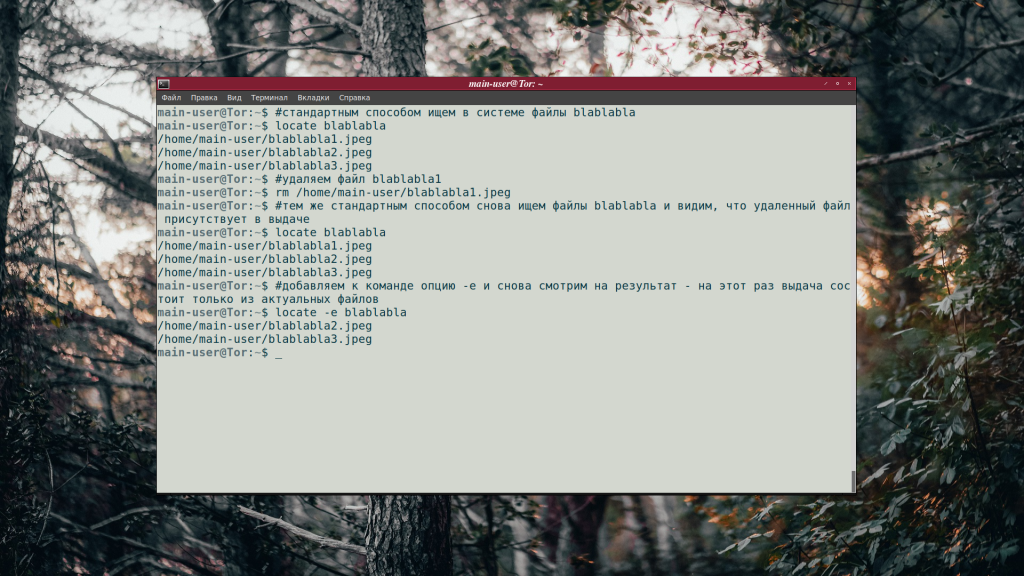
- -e (—existing) — поиск файлов, существующих на момент запуска команды.
- -L (—follow) — при применении —existing заставляет команду использовать символические ссылки вместо жёстких. Опция —follow включена по умолчанию.
- -h (—help) — выводит справку.
- -i (—ignore-case) — делает команду нечувствительной к регистру.
- -p (—ignore-spaces) — заставляет команду игнорировать пробелы и знаки пунктуации.
- -t (—transliterate) — игнорирует диакритические знаки.
- -l, -n (—limit) — ограничивает количество файлов в выводе команды.
- -P (—nofollow) — заставляет команду использовать жёсткие ссылки вместо символических.
- -0 (—null) — включает использование NUL в качестве разделителя строк.
- -S (—statistics) — выводит статистику по каждой базе данных вместо поиска файлов.
- -q (—quiet) — запрещает команде выводить сообщения об ошибках до завершения поиска.
- -r (—regexp) — поиск с использованием регулярных выражений.
- -V (—version) — показывает версию установленной в системе утилиты locate.
- -w (—wholename) — выводит файл, если в его названии либо адресе есть символы, соответствующие шаблону.
Примеры использования locate
Если нужно найти файлы, соответствующие сразу нескольким шаблонам, используется опция -A. Шаблоны разделяются пробелом:
Опция -w включена по умолчанию, поэтому locate проверяет на соответствие шаблону не только имена файлов, но и названия папок, в которых эти файлы расположены. Например, если Документ1.ods находится по адресу Компьютер/БухалтерияДоки/ВсеДокументы/, он будет выведен командой при использовании шаблонов «Док», «Бух» и «Все». Для того, чтобы в результатах отображались только файлы с именами, в которых присутствует шаблон, применяется опция -b.
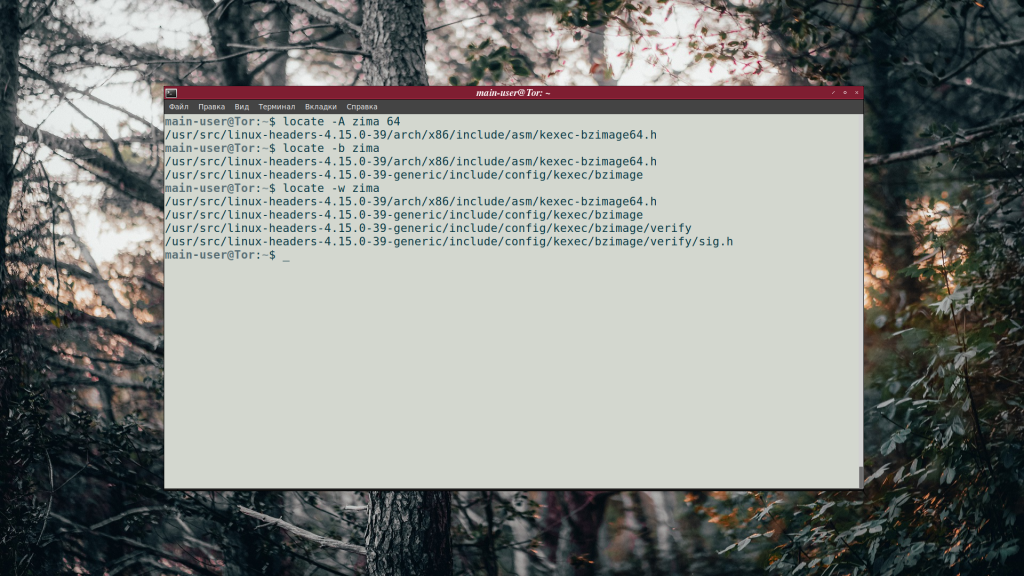
На скриншоте видно, как команда обрабатывает запросы с каждой из упомянутых опций.
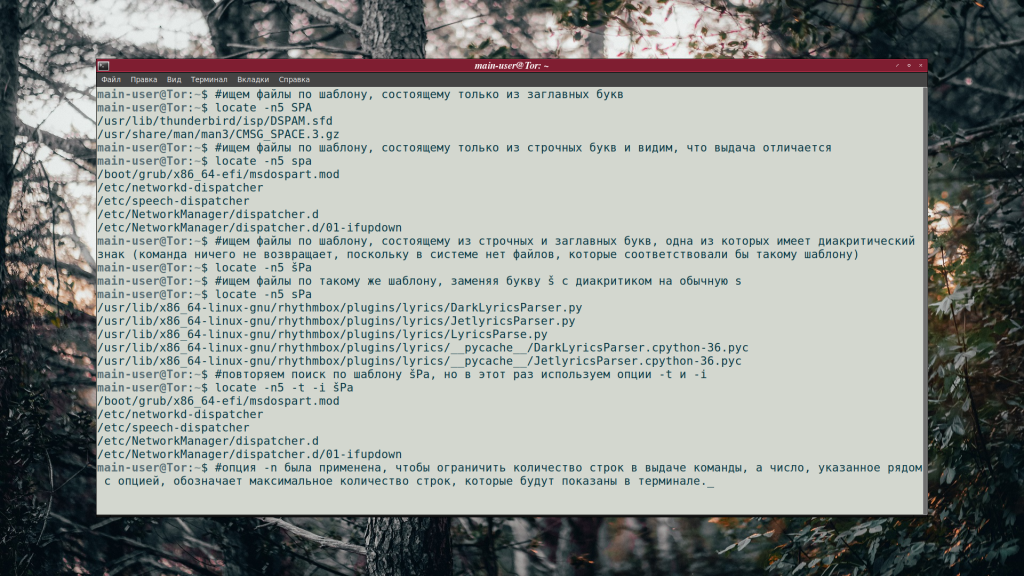
Команда locate чувствительна к регистру. Если, к примеру, шаблон имеет вид «GrEEn», файлы с именами green и GREEN в процессе поиска будут игнорироваться. Для того, чтобы найти все документы, независимо от наличия строчных и заглавных букв в их названиях, используется опция -i.
Порой в названиях файлов встречаются буквы с диакритическими знаками (умлаутами, акутами, тремами и прочими). Эти документы не будут найдены, если в команде используется шаблон, состоящий из обычных букв. И наоборот, если в шаблоне есть буквы с диакритическими знаками, команда проигнорирует файлы, в названиях которых отсутствуют аналогичные символы. «Стереть» разницу между буквами с диакритическими знаками и без них можно при помощи опции -t.
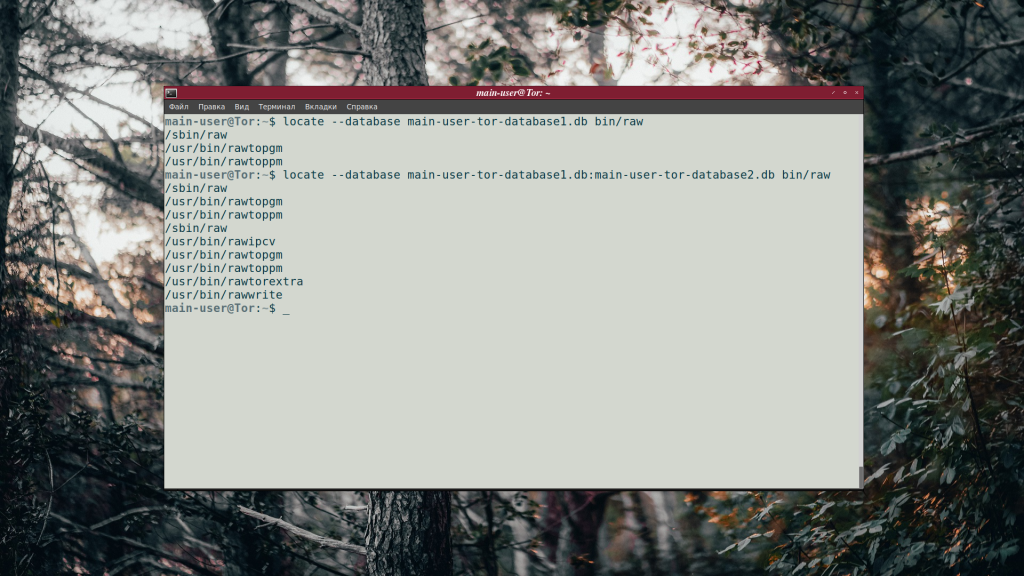
По умолчанию команда locate осуществляет поиск в собственной базе данных mlocate.db, однако, умеет работать и с пользовательскими БД. Для этого предусмотрена следующая опция: —database.
locate —database main-user-tor-database1.db bin/raw
Можно одновременно осуществлять поиск в нескольких базах данных, при этом названия файлов этих баз нужно разделять двоеточием:
locate —database main-user-tor-database1.db:main-user-tor-database2.db bin/raw
Результаты будут выведены отдельно для каждой базы данных, в той же очерёдности, с которой базы данных были перечислены в запросе.
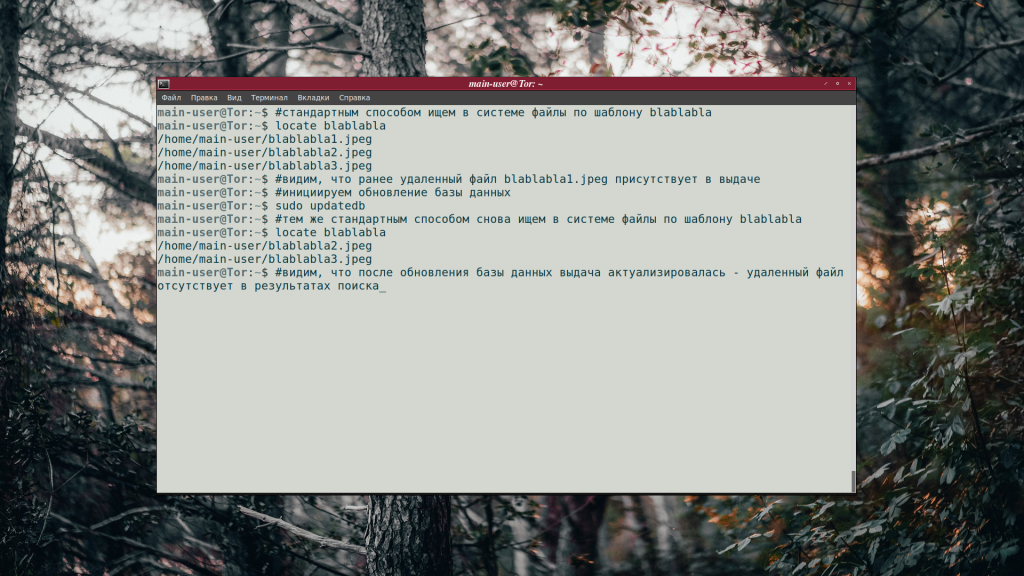
Файлы, добавленные в систему до обновления стандартной базы данных, не обнаруживаются командой locate. Также в результатах могут появляться уже несуществующие (удалённые) документы. Для того, чтобы актуализировать выдачу, используется опция -e.
Глядя на скриншот, легко сравнить результаты поиска с опцией -е и без неё.
Кроме того, можно обновить базу данных вручную, выполнив в терминале команду:
Выводы
Команда locate linux позволяет быстро и легко найти файлы, затерявшиеся в недрах системы. Если какие-то аспекты её работы остались для вас непонятными, задавайте вопросы в комментариях.
Обнаружили ошибку в тексте? Сообщите мне об этом. Выделите текст с ошибкой и нажмите Ctrl+Enter.