- How to install Mac keyboard and trackpad drivers
- 2 Answers 2
- Preparation
- Installation
- Making the modules load at boot time — optional
- Configuring the Touchbar module
- Fixing suspend
- Possible Issues
- How to Install Mac Drivers on Ubuntu 14.04 Trusty LTS Linux
- How to Install Mac Drivers on Ubuntu 16.04 Xenial LTS Linux
- How to run Mac Apps on Linux
- Using the Darling Emulator
- How to run Mac Apps on Linux using a Virtual Machine
- Method 1: Use Macos-virtualbox
- Method 2: Download from the internet
- Method 3: Download from a borrowed Mac
- Conclusion
- Receive techie stuffs
- Featured posts
- Disclaimer
How to install Mac keyboard and trackpad drivers
I have recently installed Ubuntu on my Mac book Pro 2016, and noticed that the built in keyboard, and the track-pad are frozen. I have looked up how to install the drivers but I don’t understand a how to use GitHub and got lost really quick. What is the fastest way I can get these drivers installed and working? I am using an external keyboard and mouse for now but would not like to in the long run.
After spending many hours on the exact same issue, I finally ran across this link: wiki.t2linux.org/guides/dkms/#installing-modules I am using a Macbook 15,1 (15″ 2018 MBP) and Ubuntu 20.04.
2 Answers 2
Note that two of the steps (about loading the modules either at boot or immediately) are optional (and have been marked as such), and should not be necessary for Ubuntu.
Preparation
First install the dkms module
Next check that your kernel isn’t outdated (or your distribution uses different module versions from those used later) by running:
dkms status or ls -l /usr/src If the version of apple-bce is 0.1 then uninstall the old modules (to avoid incompatibility issues):
sudo dkms uninstall -m apple-bce -v 0.1 sudo dkms uninstall -m apple-ibridge -v 0.1 sudo rm -r /usr/src/apple-bce-0.1 sudo rm -r /usr/src/apple-ibridge-0.1 sudo rm -r /var/lib/dkms/apple-bce sudo rm -r /var/lib/dkms/apple-ibridge Installation
- Install the BCE (Buffer Copy Engine) module for Keyboard and Audio
- If you are on Arch, then use Aunali1’s apple-bce-dkms-git package
- Otherwise, run
sudo git clone https://github.com/t2linux/apple-bce-drv /usr/src/apple-bce-r183.c884d9c PACKAGE_NAME="apple-bce" PACKAGE_VERSION="r183.c884d9c" MAKE[0]="make KVERSION=$kernelver" CLEAN="make clean" BUILT_MODULE_NAME[0]="apple-bce" DEST_MODULE_LOCATION[0]="/kernel/drivers/misc" AUTOINSTALL="yes" - Run sudo git clone https://github.com/t2linux/apple-ib-drv /usr/src/apple-ibridge-0.1
- Run sudo dkms install -m apple-ibridge -v 0.1 . If on a live ISO, use sudo dkms install -m apple-ibridge -v 0.1 -k x.x.x-mbp instead and change x.x.x-mbp to the kernel that you have installed, as by default dkms will try to build the module for the kernel that the live ISO is using, which will most likely be older.
sudo modprobe apple_bce sudo modprobe apple_ib_tb sudo modprobe apple_ib_als The touchbar and the keyboard should now work.
For audio some additional configuration is required, see Audio config files.
Making the modules load at boot time — optional
In Ubuntu, these should already be set:
echo "apple-bce apple-ib_tb apple-ib-als brcmfmac" >> /etc/modules-load.d/t2.conf If you don’t want (for example) the touch bar modules, you can omit them from this command. brcmfmac is needed to use the internal Wi-Fi chip, refer to the Wi-Fi guide for details on how to set that up.
Configuring the Touchbar module
The Touchbar module offers some modes to set. In /etc/modprobe.d/apple-tb.conf , set fnmode (options apple-ib-tb fnmode=x) to one of the following options:
- 0: Only show F1-F12
- 1: Show media and brightness controls, use the fn key to switch to F1-12
- 2: Show F1-F12, use the fn key to switch to media and brightness controls
- 3: Only show media and brightness controls
- 4: Only show the escape key
Fixing suspend
#!/bin/sh if [ "$" = "pre" ]; then modprobe -r apple_ib_tb hid_apple elif [ "$" = "post" ]; then modprobe hid_apple apple_ib_tb fi sudo chmod 755 /lib/systemd/system-sleep/rmmod_tb.sh sudo chown root:root /lib/systemd/system-sleep/rmmod_tb.sh This unloads the Touchbar modules as they can cause issues for suspend.
Possible Issues
The apple_ib_als module can cause issues, if you find your computer hanging at shutdown, or having BCE errors at boot, try blacklisting it by running
sudo sh -c "echo blacklist apple-ib-als" >> /etc/modprobe.d/blacklist.conf or removing it from /etc/modules-load.d/t2.conf .
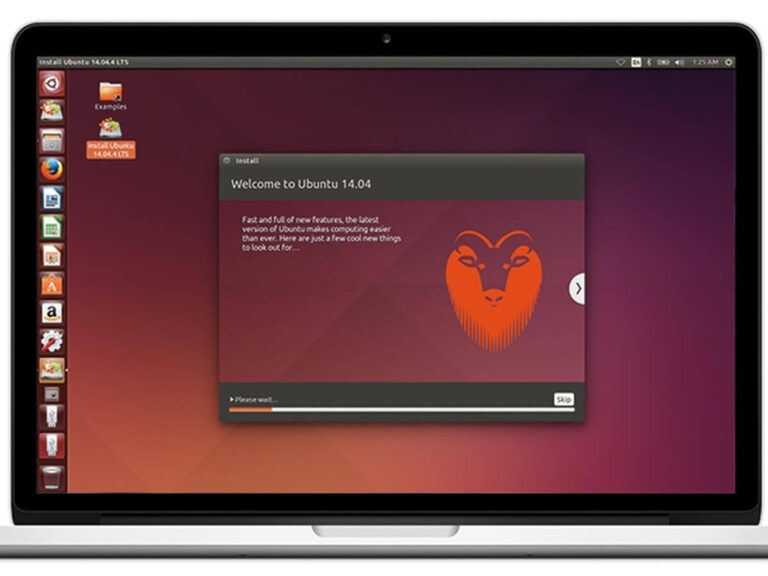
How to Install Mac Drivers on Ubuntu 14.04 Trusty LTS Linux
You are Welcome! The Tutorial shows you Step-by-Step How to Install the Mac Wi-fi and NVIDIA Graphics Drivers for Mac on Ubuntu 14.04 Trusty Tahr LTS i386/amd64 Linux.
From this Release Ubuntu has Very Nicely Evolved in the Ability on Getting-Installed Easier and Automatically the NVIDIA Graphics Driver and other Proprietary Drivers!


- Press Cmd to Start Searching on Dashboard
Find and Run ‘Additional Drivers‘
Select the Proprietary Drivers for Installed Devices. 
Apply 
If there is More than One Choice Select the ‘Tested’ or ‘Recommended’…
How to Install Mac Drivers on Ubuntu 16.04 Xenial LTS Linux
You are Welcome! The Tutorial shows you Step-by-Step How to Install the Mac Wi-fi and NVIDIA Graphics Drivers for Mac on Ubuntu 16.04 Xenial Xerus LTS 32/64-bit.
From this Release Ubuntu has Very Nicely Evolved in the Ability on Getting-Installed Easier and Automatically the NVIDIA Graphics Driver and other Proprietary Drivers!
- Press Cmd to Start Searching on Dashboard
Find and Run ‘Additional Drivers‘
Select the Proprietary Drivers for Installed Devices.
Apply
If there is More than One Choice Select the ‘Tested’ or ‘Recommended’…
How to run Mac Apps on Linux
Looking for a way to install and run your Mac apps on your Linux box? There are two possibilities here. Read on to discover them.
One downside of moving to Linux is that you miss some programs from your previous operating system. You sometimes wish they would run on your *nix box.
This is not much of a problem for Windows apps anymore, but what about Mac apps? Can you run them on Linux, and how easy is that?
The answer is: Yes, you can. There are two methods of running Mac apps in Linux and they are:
A. By using the Darling emulator
B. By using a virtual machine
Using the Darling Emulator
The Darling emulator aims to make using Mac apps on Linux as easy as Wine made using Windows apps. Darling is currently in the early stages of development though, so there is still a long way to go.
Its major limitation is that you can only use it to run command-line programs at the moment. So, if you are planning on running a GUI (Graphic User Interface) app, then you must either wait for when and if, Darling supports GUI apps or use option 2 of this guide, which is guaranteed to work.
There are two parts of the Darling package and you need to download and install both to make it work. One is the emulator itself, while the other is the kernel module.
Following is a step by step guide for installing Darling on Ubuntu 18.04. It uses the gdebi command, which automatically satisfies and installs all the package dependencies for you.
Step 1: Download both the darling and darling-dkms files from https://github.com/darlinghq/darling/releases
Step 2: Hit Ctrl + T to open a terminal
Step 3: cd to your downloads directory and enter the following command to install the kernel module. Answer yes to its prompt by typing ‘y’
sudo gdebi darling-dkms_0.1.20200331.testing_amd64.deb
Step 4: Then install darling using the following command:
sudo gdebi darling_0.1.20200331.testing_amd64.deb
Step 5: Once the installation is complete, you can now start the emulator with the following command:
You can then check to confirm that it is not a Bash shell by typing the uname command, to which it should print ‘Darwin’ and not ‘Linux’.
How to run Mac Apps on Linux using a Virtual Machine
You can also run Mac apps on a virtual machine such as Virtualbox, Vmware, or KVM. The caveat, however, is that you need to install the Mac operating system first, before installing the app on it. Apple also frowns on installing its Mac operating system on hardware that is not Apple Mac.
This means that you cannot download Mac OS without having a Mac computer. And although you could decide to download it from the internet, you cannot be sure of the integrity of the file you are downloading. Some people make a living from uploading malware-infected software and you could fall victim.
On the other hand, Macos-virtualbox is a promising Bash script, which downloads the files directly from Apple servers and creates a virtual machine for you. This guarantees you are using only genuine Apple software.
Another route is to borrow a Mac from a friend and use it to download an updated Mac version, which you can then turn into an ISO installation file.
Here is how to go about all 3 methods:
Method 1: Use Macos-virtualbox
Head over to GitHub and download the package. Also try and read the documentation to get a better understanding of how it works.
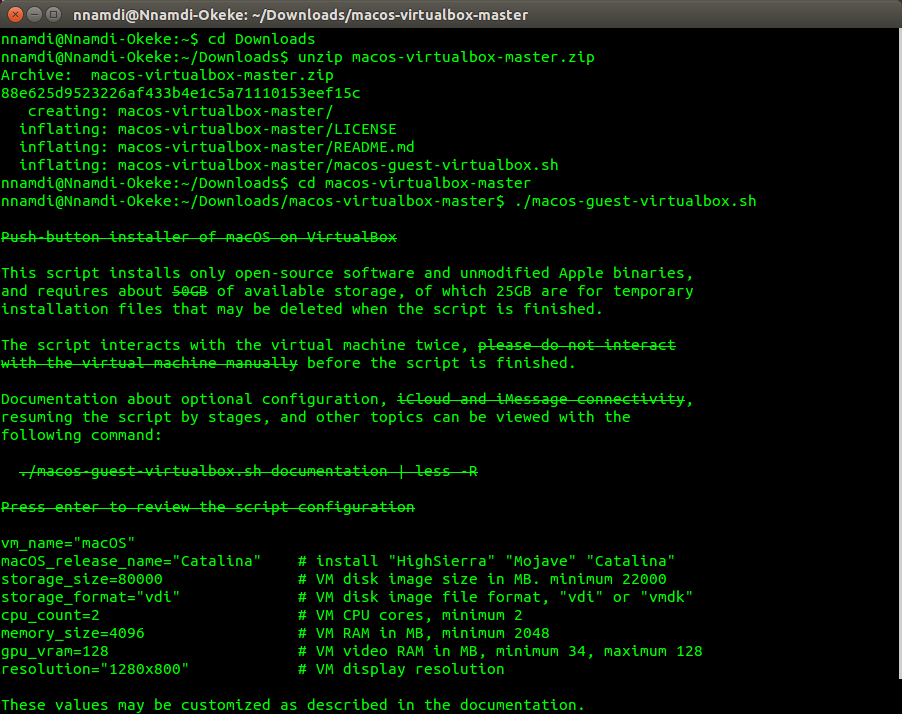
Open a terminal, then unzip and run the script using the following commands:
It will take you through the entire process of downloading the software and creating the virtual machine. All you need is to sit patiently and hit the “Enter” button when prompted.
But if for some reason it does not work, then you can try out these other methods.
Method 2: Download from the internet
Step 1: You will have to find your own file from the web because Apple frowns on the distribution of Mac OS on devices other than the Mac computer. The next steps assume that you downloaded a virtual machine (vmdk) file.
Step 2: Install VirtualBox or any other virtualization software of choice. For VirtualBox, use the command below to install the package with all its extra additions at a go:
sudo apt install virtualbox virtualbox-dkms virtualbox-ext-pack virtualbox-guest-additions-iso virtualbox-guest-utils virtualbox-qt
Step 3: Start VirtualBox and create a new virtual machine, using the vmdk file you downloaded.
Step 4: Give it about 4G of RAM or more, 128 MB of graphics, and 2 CPU cores. Avoid spaces in your virtual machine name. You can give it something like “MyMacOS”.
Step 5: This is important. Quit VirtualBox first. Then download this shell script
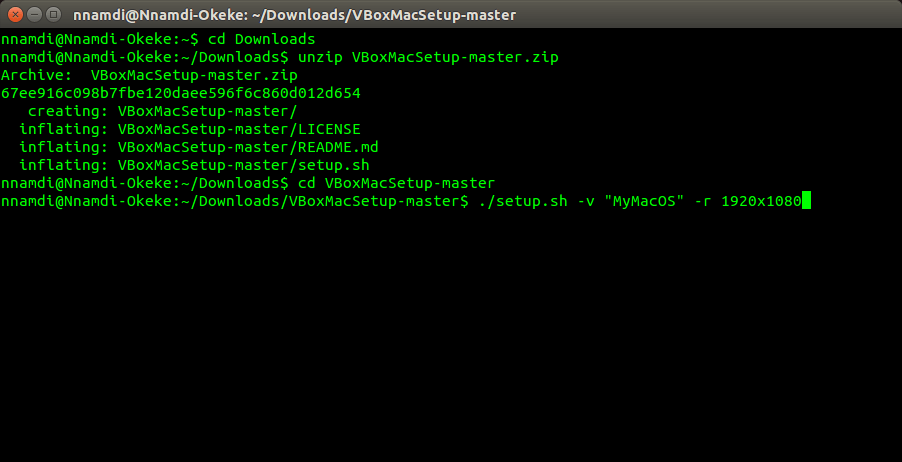
Step 6: cd (Change Directory) to the directory you downloaded the script into and execute it, like this:
./setup.sh -v “MyMacOS” -r 1920×1080
Where MyMacOS is the name you gave your virtual machine and 1920×1080 is your full-screen resolution or the resolution you want to give the virtual machine.
Step 7: Launch VirtualBox again and start your new Mac OS virtual machine.
Method 3: Download from a borrowed Mac
If you have access to a real Mac computer that’s older than the Mac High Sierra, then you can use the steps below to also create a Mac virtual machine on your Linux box:
Step 1: Gain physical access to a Mac computer. It could be yours or you can borrow it from a friend. Just make sure it has internet access and you are good to go.
Step 2: Head for the Mac Store and search for High Sierra. Click Download.
Step 3: When it finishes and tries to start the installation, hit Ctrl + Q to exit.
Step 4: Open a terminal from Applications > Utilities and enter the following commands:
hdiutil create -o /tmp/HighSierra.cdr -size 7316m -layout SPUD -fs HFS+J
hdiutil attach /tmp/HighSierra.cdr.dmg -noverify -nobrowse -mountpoint /Volumes/install_build
asr restore -source /Applications/Install\ macOS\ High\ Sierra.app/Contents/SharedSupport/BaseSystem.dmg -target /Volumes/install_build -noprompt -noverify -erase
hdiutil detach /Volumes/OS\ X\ Base\ System
hdiutil convert /tmp/HighSierra.cdr.dmg -format UDTO -o /tmp/HighSierra.iso
mv /tmp/HighSierra.iso.cdr ~/Desktop/HighSierra.iso
That’s it. You now have a bootable ISO file on the desktop that you can install on your Virtual machine. Copy it into a thumb drive and move over to your Linux box to begin the installation.
Conclusion
You have seen the different methods out there to run Mac apps on Linux, despite Apple’s efforts to the contrary.
The Darling Emulator is best for little shell programs. Else, if you need to run a more serious GUI program use a Virtual machine.
Nnamdi Okeke is a computer enthusiast who loves to read a wide range of books. He has a preference for Linux over Windows/Mac and has been using
Ubuntu since its early days. You can catch him on twitter via bongotrax
Receive techie stuffs
Tech trends, startup trends, reviews, online income, web tools and marketing once or twice monthly
Featured posts
Disclaimer
Some of the links here are affiliates. If you purchase through them, you might get exclusive discount. It does not inflate the price but rather offers you discount. Buying through affiliate links here helps us to continue to develop and add more helpful content to this site.