Как установить PHP на Linux
Настроить рабочее окружение для разработки на PHP в Linux возможно несколькими способами. Рассмотрим один из наиболее быстрых: настройка связки PHP и nginx.
Запустите приложение «Терминал». Ярлык на запуск доступен в менеджере приложений. Сначала обновим локальный индекс пакетов APT.
Настройка веб-сервера
Для работы с PHP нам потребуется веб-сервер. В репозиториях доступно несколько популярных веб-серверов, мы отдадим предпочтение nginx. Он хорошо работает и легко настраивается.
sudo apt-get install nginx Затем запустим nginx. Запомните эту команду. Она пригодится для добавления новых виртуальных хостов.
nginx установлен и теперь нам требуется выполнить базовое конфигурирование. Наша цель — создать новый виртуальный хост, который будет доступен по адресу yourproject.local , где вместо yourproject может быть название вашего проекта.
Например: doingsdone.local , yeticave.local .
Обратите внимание, имена доменов не могут содержать пробелы. Определитесь с именем домена (далее «имя хоста для проекта»). Мы будем ориентироваться на проект yeticave.local , поэтому именно так будем называть конфигурационный файл. Перейдите в директорию sites-available . В этой директории nginx хранит конфигурационные файлы всех виртуальных хостов.
cd /etc/nginx/sites-available Чтобы увидеть список всех доступных виртуальных хостов, выведите содержимое каталога:

Название конфигурационного файла должно совпадать с именем хоста. Поскольку мы планируем сделать конфигурационный файл для хоста yeticave.local , нам потребуется создать файл yeticave.local . Сделаем это:
Файл готов, теперь откроем его в консольном редакторе nano (установлен по умолчанию в большинстве современных дистрибутивов) и опишем минимальную конфигурацию.
Скопируйте в открытый файл yeticave.local ниже приведённый конфигурационный файл. Информацию обо всех непонятных строках вы сможете почерпнуть из официальной документации к nginx.
server < # Наш проект будет доступен на 80 порту listen 80; # Имя виртуального хоста server_name yeticave.local; # Корневая директория проекта. root /home/administrator/www/yeticave.local; # Имя индексного файла. index index.php; # Настройки отдачи файлов location ~* \.(jpg|jpeg|gif|css|png|js|ico|html)$ < access_log off; expires max; log_not_found off; >location / < try_files $uri $uri/ /index.php?$query_string; >location ~* \.php$ < try_files $uri = 404; fastcgi_split_path_info ^(.+\.php)(/.+)$; fastcgi_pass unix:/var/run/php/php8.1-fpm.sock; fastcgi_index index.php; fastcgi_param SCRIPT_FILENAME $document_root$fastcgi_script_name; include fastcgi_params; >location ~ /\.ht < deny all; >> Обратите внимание на номер версии PHP. На момент написания статьи в репозиториях Ubuntu доступна версия 8.1. Если вы пользуетесь более старой версией ОС, то не забудьте обновить номер версии на свой.
Важно: в нашем конфиге файлы находятся в домашней директории пользователя Administrator . Ваше имя пользователя наверняка отличается, поэтому обратите на это внимание при написании пути.

Для сохранения изменений в файле нажмите комбинацию клавиш ctrl+o. Затем закройте редактор nano сочетанием клавиш ctrl+x.
Протестируем созданный конфигурационный файл на наличие ошибок:

Мы создали конфигурационный файл. Теперь активируем только что созданный виртуальный хост. Для этого перейдём в директорию sites-enabled и создадим в ней символическую ссылку на наш конфигурационный файл.
cd /etc/nginx/sites-enabled/ sudo ln -s /etc/nginx/sites-available/yeticave.local Если на текущем шаге попытаться открыть браузер и ввести в адресной строке http://yeticave.local , то ничего, кроме ошибки «Сервер не найден», мы не увидим. Исправим проблему добавлением новой записи в hosts :
В самом начале файла добавьте строку:
Обратите внимание, мы пишем только доменное имя без указания протокола (http). Сохраняем изменения ctrl+o и закрываем редактор nano сочетанием клавиш ctrl+ x.
Установка PHP
Последним компонентом в настройке рабочего окружения станет PHP.
Для начала давайте добавим новый репозиторий, который понадобится для установки свежей версии PHP. Этот репозиторий является официальным источником PHP-пакетов для Debian и Ubuntu:
sudo add-apt-repository ppa:ondrej/php В окне терминала введите команду для установки php-fpm из репозитория.
sudo apt install php-fpm php-cli php-common php-json php-mysql php-phpdbg php-mbstring php-imap php-dev php-curl php-xdebug Важно: обязательно обратите внимание на версию PHP. В зависимости от дистрибутива она может отличаться. Если номер версии отличается от той, что мы указали в конфигурационном файле yeticave.local , то необходимо её исправить.
Настройка xdebug
Вводим команду редактирования файла:
sudo nano /etc/php/8.1/mods-available/xdebug.ini Добавляем в файл конфигурацию для xdebug:
xdebug.remote_enable=1 xdebug.remote_handler=dbgp xdebug.remote_mode=req xdebug.remote_host=localhost xdebug.remote_port=9000 xdebug.var_display_max_depth = -1 xdebug.var_display_max_children = -1 xdebug.var_display_max_data = -1 xdebug.idekey = "PHPSTORM": Сохраняем изменения ctrl+o и закрываем редактор nano ctrl+x.
Внесём изменения в конфигурационный файл php, чтобы он выводил все ошибки в браузер, а не только в лог-файл.
sudo nano /etc/php/8.1/fpm/php.ini Найдём, раскомментируем (уберём знак «;» или исправим значение) и установим значения для строк:
display_errors = On display_startup_errors = On error_reporting = E_ALL & ~E_DEPRECATED & ~E_STRICT Сохраняем изменения ctrl+o, закрываем редактор ctrl+x.
Запускаем php-fpm . Выполняем команды:
sudo service php8.1-fpm stop sudo service php8.1-fpm start Размещаем файлы проекта в директорию проекта. Директорию проекта вы указали в секции root , конфигурационного файла yeticave.local . Выставляем права:
sudo chmod -R 755 /home/administrator/www/yeticave.local Открываем браузер и пробуем обратиться к http://yeticave.local.
«Доктайп» — журнал о фронтенде. Читайте, слушайте и учитесь с нами.
How to Use and Execute PHP Codes in Linux Command Line – Part 1
PHP is an open source server side scripting Language which originally stood for ‘Personal Home Page‘ now stands for ‘PHP: Hypertext Preprocessor‘, which is a recursive acronym. It is a cross platform scripting language which is highly influenced by C, C++ and Java.
A PHP Syntax is very similar to Syntax in C, Java and Perl Programming Language with a few PHP-specific feature. PHP is used by some 260 Million websites, as of now. The current stable release is PHP Version 5.6.10.
PHP is HTML embedded script which facilitates developers to write dynamically generated pages quickly. PHP is primarily used on Server-side (and JavaScript on Client Side) to generate dynamic web pages over HTTP, however you will be surprised to know that you can execute a PHP in a Linux Terminal without the need of a web browser.
This article aims at throwing light on the command-line aspect of PHP scripting Language.
1. After PHP and Apache2 installation, we need to install PHP command Line Interpreter.
# apt-get install php5-cli [Debian and alike System) # yum install php-cli [CentOS and alike System)
Next thing, we do is to test a php (if installed correctly or not) commonly as by creating a file infophp.php at location ‘/var/www/html‘ (Apache2 working directory in most of the distros), with the content , simply by running the below command.
# echo '' > /var/www/html/infophp.php
and then point your browser to http://127.0.0.1/infophp.php which opens this file in web browser.

Same results can be obtained from the Linux terminal without the need of any browser. Run the PHP file located at ‘/var/www/html/infophp.php‘ in Linux Command Line as:
# php -f /var/www/html/infophp.php
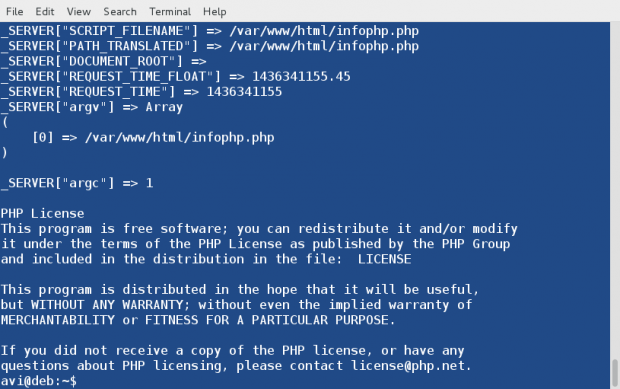
Since the output is too big we can pipeline the above output with ‘less‘ command to get one screen output at a time, simply as:
# php -f /var/www/html/infophp.php | less
Here Option ‘-f‘ parse and execute the file that follows the command.
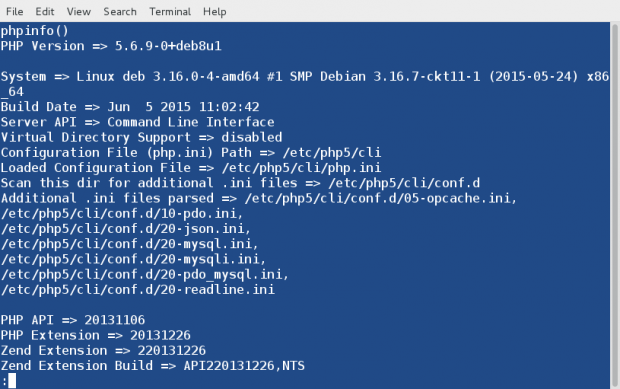
2. We can use phpinfo() which is a very valuable debugging tool directly on the Linux command-line without the need of calling it from a file, simply as:
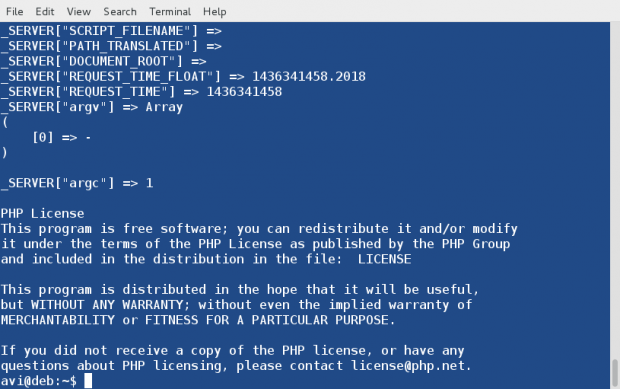
Here the option ‘-r‘ run the PHP Code in the Linux Terminal directly without tags < and >.
3. Run PHP in Interactive mode and do some mathematics. Here option ‘-a‘ is for running PHP in Interactive Mode.
# php -a Interactive shell php > echo 2+3; 5 php > echo 9-6; 3 php > echo 5*4; 20 php > echo 12/3; 4 php > echo 12/5; 2.4 php > echo 2+3-1; 4 php > echo 2+3-1*3; 2 php > exit
Press ‘exit‘ or ‘ctrl+c‘ to close PHP interactive mode.

4. You can run a PHP script simply as, if it is a shell script. First Create a PHP sample script in your current working directory.
# echo -e '#!/usr/bin/php\n' > phpscript.php
Notice we used #!/usr/bin/php in the first line of this PHP script as we use to do in shell script (/bin/bash). The first line #!/usr/bin/php tells the Linux Command-Line to parse this script file to PHP Interpreter.
Second make it executable as:
5. You will be surprised to know you can create simple functions all by yourself using the interactive shell. Here is the step-by step instruction.
Start PHP interactive mode.
Create a function and name it addition. Also declare two variables $a and $b.
php > function addition ($a, $b)
Use curly braces to define rules in between them for this function.
Define Rule(s). Here the rule say to add the two variables.
All rules defined. Enclose rules by closing curly braces.
Test function and add digits 4 and 3 simply as :
php > var_dump (addition(4,3));
Sample Output
You may run the below code to execute the function, as many times as you want with different values. Replace a and b with values of yours.
php > var_dump (addition(a,b));
php > var_dump (addition(9,3.3));
Sample Output
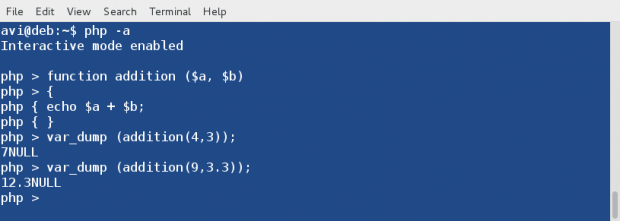
You may run this function till you quit interactive mode (Ctrl+z). Also you would have noticed that in the above output the data type returned is NULL. This can be fixed by asking php interactive shell to return in place of echo.
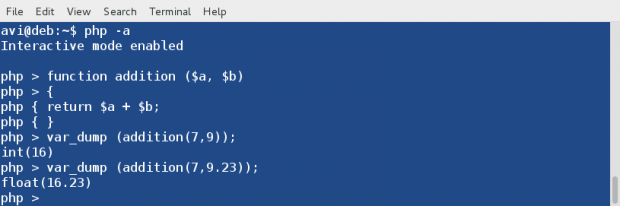
Simply replace the ‘echo‘ statement in the above function with ‘return‘
and rest of the things and principles remain same.
Here is an Example, which returns appropriate data-type in the output.
Always Remember, user defined functions are not saved in history from shell session to shell session, hence once you exit the interactive shell, it is lost.
Hope you liked this session. Keep Connected for more such posts. Stay Tuned and Healthy. Provide us with your valuable feedback in the comments. Like ans share us and help us get spread.
Installation on Unix systems
This section will guide you through the general configuration and installation of PHP on Unix systems. Be sure to investigate any sections specific to your platform or web server before you begin the process.
As our manual outlines in the General Installation Considerations section, we are mainly dealing with web centric setups of PHP in this section, although we will cover setting up PHP for command line usage as well.
There are several ways to install PHP for the Unix platform, either with a compile and configure process, or through various pre-packaged methods. This documentation is mainly focused around the process of compiling and configuring PHP. Many Unix like systems have some sort of package installation system. This can assist in setting up a standard configuration, but if you need to have a different set of features (such as a secure server, or a different database driver), you may need to build PHP and/or your web server. If you are unfamiliar with building and compiling your own software, it is worth checking to see whether somebody has already built a packaged version of PHP with the features you need.
- Basic Unix skills (being able to operate «make» and a C compiler)
- An ANSI C compiler
- A web server
- Any module specific components (such as GD , PDF libs, etc.)
- autoconf: 2.59+ (for PHP >= 7.0.0), 2.64+ (for PHP >= 7.2.0)
- automake: 1.4+
- libtool: 1.4.x+ (except 1.4.2)
- re2c: 0.13.4+
- bison:
- PHP 7.0 — 7.3: 2.4 or later (including Bison 3.x)
- PHP 7.4: > 3.0
The initial PHP setup and configuration process is controlled by the use of the command line options of the configure script. You could get a list of all available options along with short explanations running ./configure —help. Our manual documents the different options separately. You will find the core options in the appendix, while the different extension specific options are described on the reference pages.
When PHP is configured, you are ready to build the module and/or executables. The command make should take care of this. If it fails and you can’t figure out why, see the Problems section.
Note:
Some Unix systems (such as OpenBSD and SELinux) may disallow mapping pages both writable and executable for security reasons, what is called PaX MPROTECT or W^X violation protection. This kind of memory mapping is, however, necessary for PCRE’s JIT support, so either PHP has to be built without PCRE’s JIT support, or the binary has to be whitelisted by any means provided by the system.
Note: Cross-compiling for ARM with the Android toolchain is currently not supported.