- Использование HTTP proxy и SOCKS в Linux
- curl: передача данных через proxy
- wget: закачка файлов через proxy
- ssh: доступ к серверам
- Соксификатор dante
- DNS запросы через proxy
- How to Configure Proxy Settings on Ubuntu 20.04
- Setting Up Proxy with Ubuntu Desktop GUI
- Setting up Proxy With Ubuntu Desktop Terminal
- Setting Up Temporary Proxy for a Single User
- Setting Up Permanent Proxy for a Single User
- Setting Up Permanent Proxy for All Users
- Setting Up Proxy for APT
Использование HTTP proxy и SOCKS в Linux
В Linux существует много полезных консольных команд, которые при необходимости хотелось бы запустить через proxy. Некоторые приложения имеют встроенную поддержку proxy, а некоторые нет. Далее описано как пользоваться востребованными утилитами через proxy, даже теми, которые этой поддержки не имеют.
curl: передача данных через proxy
curl имеет полноценную поддержку как HTTP proxy так и SOCKS.
Для тестирования возможно использовать proxy сервера из бесплатных списков (socks — sockslist.net, и HTTP proxy — proxyhttp.net). Проверка IP адреса будет производиться с помощью ресурса check-host.net
# Проверить HTTP proxy curl --proxy 11.22.33.44:5555 check-host.net/ip # Тоже самое, но если для HTTP proxy требуется авторизация curl --proxy 11.22.33.44:5555 -U username:password check-host.net/ip # Проверить socks4 curl --socks4 11.22.33.44:5555 check-host.net/ip # Проверить socks5 curl --socks5 11.22.33.44:5555 check-host.net/ip # Тоже самое, только преобразование имен идет также через SOCKS # (подробнее о преобразовании имен можно прочитать ниже в подразделе "DNS запросы через proxy") curl --socks5-hostname 11.22.33.44:5555 check-host.net/ip Часть параметров curl можно записать в файл ~/.curlrc:
socks5 = 11.22.33.44:5555 proxy-user = username:password user-agent = "Mozilla/5.0 (X11; Linux i686; rv:7.0.1) Gecko/20100101 Firefox/7.0.1" С помощью time и curl также можно замерить время отклика сервера:
# Без proxy: time curl check-host.net/ip # С proxy: time curl --socks5 11.22.33.44:5555 check-host.net/ip # Или любого сайта: time curl habrahabr.ru Результат будет выглядеть так:
real 0m0.307s user 0m0.000s sys 0m0.004s wget: закачка файлов через proxy
wget имеет встроенную поддержку proxy. Недостаток лишь в том, что только поддержку HTTP proxy. Для использования совместно с SOCKS рекомендуется использовать соксификатор dante.
# Скачать файл через proxy: http_proxy="http://33.22.44.44:8080" wget http://www.google.com/favicon.ico Тоже самое, но для HTTPS https_proxy="http://33.22.44.44:8080" wget https://www.google.com/favicon.ico # Использовать proxy с авторизацией http_proxy="http://33.22.44.44:8080" wget --proxy-user=user --proxy-password=password http://www.google.com/favicon.ico Чтобы все время не указывать —proxy-user и —proxy-password можно их прописать в файл ~/.wgetrc:
proxy-user = username proxy-password = password user-agent = Mozilla/5.0 (X11; Linux i686; rv:7.0.1) Gecko/20100101 Firefox/7.0.1 ssh: доступ к серверам
Для доступа к серверам через ssh и proxy также лучше использовать соксификатор dante.
Соксификатор dante
apt-get install dante-client # пример для Debian-based систем # Если требуется зайти по ssh на сервер SOCKS_PASSWORD="" SOCKS_SERVER="11.22.33.44:1080" socksify ssh myserver # Тоже самое, только если для подключения к соксу требуется авторизация SOCKS_USERNAME="user" SOCKS_PASSWORD="password" SOCKS_SERVER="11.22.33.44:1080" socksify ssh myserver # Пример с использованием IRC клиента - irssi SOCKS_PASSWORD="" SOCKS_SERVER="11.22.33.44:1080" socksify irssi # Тоже самое, только с использованием HTTP proxy с поддержкой метода CONNECT HTTP_CONNECT_PROXY="http://11.22.33.44:8080" socksify irssi С помощью socksify можно направить через proxy почти любое приложение, не только консольное.
Чтобы все время не вводить данные о proxy можно создать файл /etc/socks.conf
Пример для SOCKS:
Пример для HTTP proxy с авторизацией:
А также экспортировать переменные SOCKS_USERNAME и SOCKS_PASSWORD, если для SOCKS или HTTP proxy требуется авторизация:
export SOCKS_USERNAME="username" export SOCKS_PASSWORD="password" DNS запросы через proxy
Часто требуется чтобы и преобразование имен происходило через proxy. Если использовать dante, то запрос на преобразование имен идет и через proxy, и через именной сервер указанный в /etc/resolv.conf . Понять почему же идет два одинаковых запроса вместо одного не удалось. Поэтому можно предложить два варианта:
1) Закомментировать именные сервера в файле /etc/resolv.conf, чтобы преобразование имен шло только через proxy. Это отразится на всей системе.
2) Изменить /etc/resolv.conf и выставить именные сервера необходимой страны, или просто отличные от серверов провайдера. Например установить сервера Google:
nameserver 8.8.8.8 nameserver 8.8.4.4 Чтобы данные не были перезаписаны именными серверами провайдера (при переподключении), можно запретить обновление списка именных серверов сетевому менеджеру (NetworkManager/wicd) или DHCP-клиенту (спасибо ergil за корректировку).
Или воспользоваться «грубым» методом — запрещением изменения файла /etc/resolv.conf:
sudo chattr +i /etc/resolv.conf Если есть какие-то дополнения, пожалуйста, напишите, это будет полезно узнать и применить.
How to Configure Proxy Settings on Ubuntu 20.04
Using a proxy server as an internet access intermediary is a common business scenario. However, personal users can also benefit from increased network security, privacy, and speed provided by proxies.
In this tutorial, you will learn how to set up your Ubuntu 20.04 system to work with a proxy server.

- Ubuntu 18.04 or later
- Access to terminal with sudo privileges
- Proxy info (web or IP address, username, and password)
Note: If you wish to set up one of your machines to act as a proxy, refer to How to Set Up & Install Squid Proxy Server on Ubuntu.
Setting Up Proxy with Ubuntu Desktop GUI
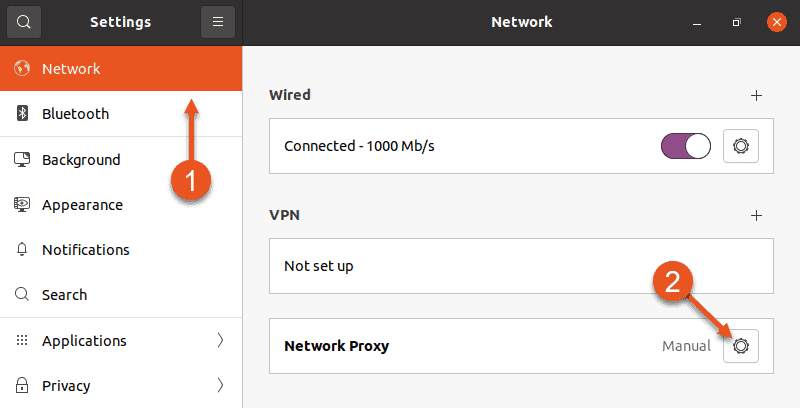
1. To access proxy settings using the Ubuntu GUI, open Ubuntu’s main Settings.
2. Select the Network setting in the menu on the left side of the window.
3. Then, click the cog in the Network Proxy section.
4. A Network Proxy dialogue appears. Choose Manual and enter your proxy info into the fields below.
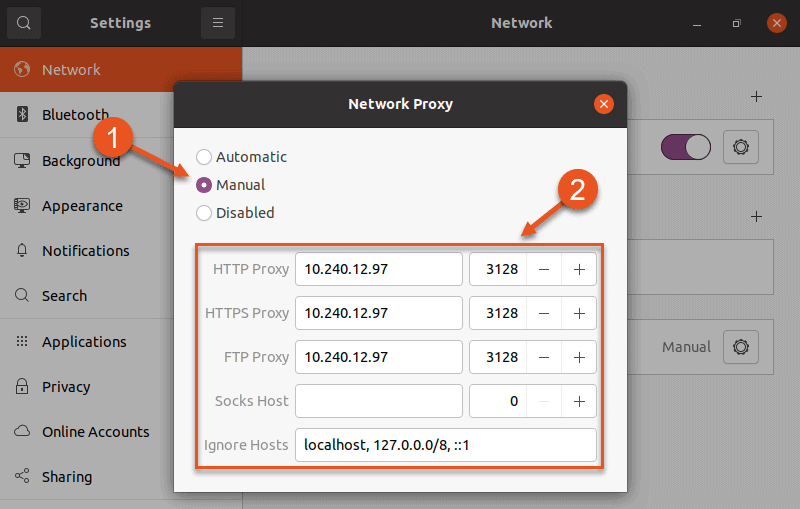
5. Exit the dialogue and Ubuntu will automatically apply the proxy settings.
Setting up Proxy With Ubuntu Desktop Terminal
Use the command line interface for more granular control of proxy settings. This allows you to:
- Make temporary or permanent changes to the configuration.
- Set up proxy for a single user or for all users.
Setting Up Temporary Proxy for a Single User
A temporary proxy connection resets after a system reboot. To establish such a connection for the current user, use the export command.
The syntax for establishing a temporary proxy connection is:
export HTTP_PROXY=[username]:[password]@[proxy-web-or-IP-address]:[port-number] export HTTPS_PROXY=[username]:[password]@[proxy-web-or-IP-address]:[port-number] export FTP_PROXY=[username]:[password]@ [proxy-web-or-IP-address]:[port-number] . export NO_PROXY=localhost,127.0.0.1. 1Provide the proxy address (web or IP), followed by the port number. If the proxy server requires authentication, add your proxy username and password as the initial values.
This is what the set of commands should look like in terminal:

The purpose of the NO_PROXY line is to tell the system that local traffic should ignore the proxy.
Setting Up Permanent Proxy for a Single User
As stated above, proxy settings configured through a terminal window reset after you reboot your system. To make permanent changes for a single user, edit the .bashrc file.
1. Open the file with a text editor of your choice:
2. Now add the following lines at the bottom of the .bashrc file:
export HTTP_PROXY="[username]:[password]@[proxy-web-or-IP-address]:[port-number]" export HTTPS_PROXY="[username]:[password]@[proxy-web-or-IP-address]:[port-number]" export FTP_PROXY="[username]:[password]@ [proxy-web-or-IP-address]:[port-number]" . export NO_PROXY="localhost,127.0.0.1. 1"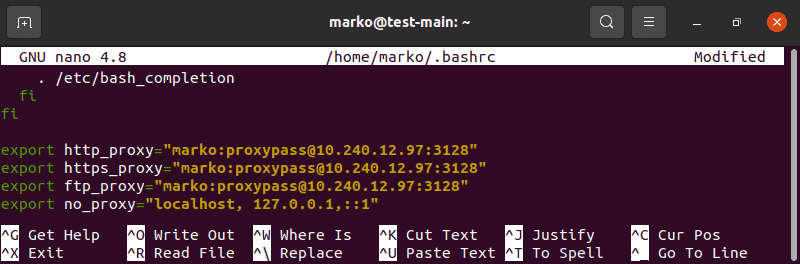
4. Then, run the following command in to apply the new settings to the current session:
Setting Up Permanent Proxy for All Users
To permanently set up proxy access for all users, you have to edit the /etc/environment file.
1. First, open the file in a text editor:
2. Next, update the file with the same information you added to the .bashrc file in the previous scenario:
export HTTP_PROXY="[username]:[password]@[proxy-web-or-IP-address]:[port-number]" export HTTPS_PROXY="[username]:[password]@[proxy-web-or-IP-address]:[port-number]" export FTP_PROXY="[username]:[password]@ [proxy-web-or-IP-address]:[port-number]" . export NO_PROXY="localhost,127.0.0.1. 1"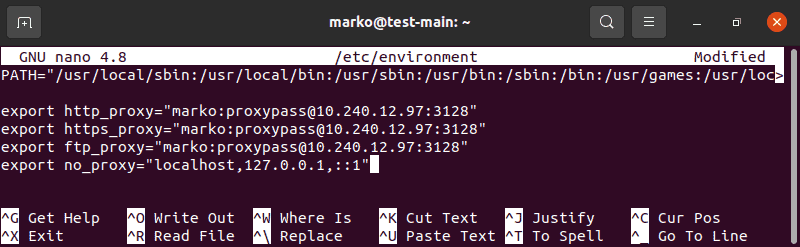
3. Save the file and exit. The changes will be applied the next time you log in.
Setting Up Proxy for APT
On some systems, the apt command-line utility needs a separate proxy configuration, because it does not use system environment variables.
1. To define proxy settings for apt, create or edit (if it already exists) a file named apt.conf in /etc/apt directory:
2. Add the following lines to the file:
Acquire::http::Proxy "http://[username]:[password]@ [proxy-web-or-IP-address]:[port-number]"; Acquire::https::Proxy "http://[username]:[password]@ [proxy-web-or-IP-address]:[port-number]";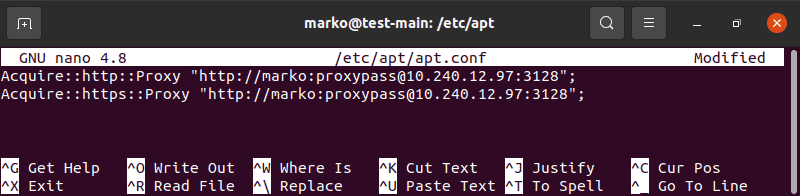
3. Save the file and exit. The configuration will be applied after a reboot.
This tutorial provided instructions on how to set up proxy settings on Ubuntu 20.04. You should now know how to make temporary and permanent changes to your system’s proxy configuration, for a single user or for the entire system.