- Saved searches
- Use saved searches to filter your results more quickly
- daneelsan/Dual_boot_Windows_Archlinux
- Name already in use
- Sign In Required
- Launching GitHub Desktop
- Launching GitHub Desktop
- Launching Xcode
- Launching Visual Studio Code
- Latest commit
- Git stats
- Files
- README.md
- Dual boot ArchLinux и Windows 8 на UEFI без GRUB c помощью rEFInd
Saved searches
Use saved searches to filter your results more quickly
You signed in with another tab or window. Reload to refresh your session. You signed out in another tab or window. Reload to refresh your session. You switched accounts on another tab or window. Reload to refresh your session.
Simple instructions to install Arch Linux alongside Windows.
daneelsan/Dual_boot_Windows_Archlinux
This commit does not belong to any branch on this repository, and may belong to a fork outside of the repository.
Name already in use
A tag already exists with the provided branch name. Many Git commands accept both tag and branch names, so creating this branch may cause unexpected behavior. Are you sure you want to create this branch?
Sign In Required
Please sign in to use Codespaces.
Launching GitHub Desktop
If nothing happens, download GitHub Desktop and try again.
Launching GitHub Desktop
If nothing happens, download GitHub Desktop and try again.
Launching Xcode
If nothing happens, download Xcode and try again.
Launching Visual Studio Code
Your codespace will open once ready.
There was a problem preparing your codespace, please try again.
Latest commit
Git stats
Files
Failed to load latest commit information.
README.md
Dual boot with Windows (BIOS/MBR) — Archlinux
Simple instructions to install Arch Linux alongside Windows (Legacy-BIOS/MBR). Last update: 16/06/18.
- Boot into Windows
- Press Win key and ‘R’ to start the Run dialog
- In the Run dialog type «msinfo32» and press Enter
- In the System Information windows, select System Summary on the left and check the value of BIOS mode item on the right
- If the value is UEFI, Windows boots in UEFI/GPT mode. If the value is Legacy, Windows boots in BIOS/MBR mode.
- Open Power options .
- “Choose what the power buttons do”.
- «Change settings that are currently unavailable.”
- Under “Shutdown settings” make sure “Turn on fast startup” is disabled.
- Enter BIOS (F1, F2 or F10 during boot sequence).
- Give a USB device boot sequence priority over the hard drive
Pick network, enter password. Verify it’s working by using [ping](https://en.wikipedia.org/wiki/Ping_(networking_utility):
Disk /dev/sda: 931.5 GiB, 1000204886016 bytes, 1953525168 sectors Units: sectors of 1 * 512 = 512 bytes Sector size (logical/physical): 512 bytes / 4096 bytes I/O size (minimum/optimal): 4096 bytes / 4096 bytes Disklabel type: dos Disk identifier: 0xd275cc93 Device Boot Start End Sectors Size Id Type /dev/sda1 * 2048 1026047 1024000 500M 7 HPFS/NTFS/exFAT /dev/sda2 1026048 437999615 436973568 208.4G 7 HPFS/NTFS/exFAT /dev/sda3 437999616 1401948159 963948544 459.7G 7 HPFS/NTFS/exFAT /dev/sda4 1401948160 1953525167 551577008 263G 5 Unallocated With this we will enter fdisk ‘s command prompt. We will install Linux in 2 partitions ( root and home ). To do so, we will make the Type of the unallocated partition Extended (source):
Select Extended partition type. For the fist and last sector enter the default. Create the root partition ( n command). Partition type: Primary. First sector: default. Last sector: +XXXG (i.e. +63G). Create the home partition. Partition type: Primary. First sector: default. Last sector: default. To finalize, enter w to write the changes. After fdisk -l , the output should look something like this:
Device Boot Start End Sectors Size Id Type /dev/sda1 * 2048 1026047 1024000 500M 7 HPFS/NTFS/exFAT /dev/sda2 1026048 437999615 436973568 208.4G 7 HPFS/NTFS/exFAT /dev/sda3 437999616 1401948159 963948544 459.7G 7 HPFS/NTFS/exFAT /dev/sda4 1401948160 1953525167 551577008 263G 5 Extended /dev/sda5 1401950208 1534070783 132120576 63G 83 Linux /dev/sda6 1534072832 1953525167 419452336 200G 83 Linux Install the base packages
The fstab file can be used to define how disk partitions, various other block devices, or remote filesystems should be mounted into the filesystem.
``` $ genfstab -U /mnt >> /mnt/etc/fstab ``` Look at it: ``` $ cat /mnt/etc/fstab ``` $ pacman -S grub-bios linux-headers linux-lts linux-lts-headers $ pacman -S dialog network-manager-applet networkmanager networkmanager-openvpn wireless_tools wpa_supplicant wpa_actiond # grub-install --target=i386-pc --recheck /dev/sdX if [ "$" == "pc" ]; then menuentry "Microsoft Windows Vista/7/8/8.1/10 BIOS/MBR" < insmod part_msdos insmod ntfs insmod search_fs_uuid insmod ntldr search --fs-uuid --set=root --hint-bios=hd0,msdos1 --hint-efi=hd0,msdos1 --hint-baremetal=ahci0,msdos1 XXXXXXXXXXXXXXXX ntldr /bootmgr >fi $ cp /usr/share/locale/en\@quot/LC_MESSAGES/grub.mo /boot/grub/locale/en.mo $ grub-mkconfig -o /boot/grub/grub.cfg $ echo '/swapfile none swap sw 0 0' | tee -a /etc/fstab $ systemctl status NetworkManager $ systemctl XXXXX NetworkManager $ nmcli dev wifi connect password
00:00.0 Host bridge: Intel Corporation Xeon E3-1200 v3/4th Gen Core Processor DRAM Controller (rev 06) 00:01.0 PCI bridge: Intel Corporation Xeon E3-1200 v3/4th Gen Core Processor PCI Express x16 Controller (rev 06) 00:02.0 VGA compatible controller: Intel Corporation 4th Gen Core Processor Integrated Graphics Controller (rev 06) 00:03.0 Audio device: Intel Corporation Xeon E3-1200 v3/4th Gen Core Processor HD Audio Controller (rev 06) 00:14.0 USB controller: Intel Corporation 8 Series/C220 Series Chipset Family USB xHCI (rev 04) 00:16.0 Communication controller: Intel Corporation 8 Series/C220 Series Chipset Family MEI Controller #1 (rev 04) 00:1a.0 USB controller: Intel Corporation 8 Series/C220 Series Chipset Family USB EHCI #2 (rev 04) 00:1b.0 Audio device: Intel Corporation 8 Series/C220 Series Chipset High Definition Audio Controller (rev 04) 00:1c.0 PCI bridge: Intel Corporation 8 Series/C220 Series Chipset Family PCI Express Root Port #1 (rev d4) 00:1c.2 PCI bridge: Intel Corporation 8 Series/C220 Series Chipset Family PCI Express Root Port #3 (rev d4) 00:1c.3 PCI bridge: Intel Corporation 8 Series/C220 Series Chipset Family PCI Express Root Port #4 (rev d4) 00:1d.0 USB controller: Intel Corporation 8 Series/C220 Series Chipset Family USB EHCI #1 (rev 04) 00:1f.0 ISA bridge: Intel Corporation HM86 Express LPC Controller (rev 04) 00:1f.2 SATA controller: Intel Corporation 8 Series/C220 Series Chipset Family 6-port SATA Controller 1 [AHCI mode] (rev 04) 00:1f.3 SMBus: Intel Corporation 8 Series/C220 Series Chipset Family SMBus Controller (rev 04) 01:00.0 3D controller: NVIDIA Corporation GK208M [GeForce GT 740M] (rev a1) 03:00.0 Network controller: Qualcomm Atheros QCA9565 / AR9565 Wireless Network Adapter (rev 01) 04:00.0 Ethernet controller: Qualcomm Atheros QCA8171 Gigabit Ethernet (rev 10) Check which video driver ( Inter , NVIDIA , VirtualBox , etc.) you have under VGA compatible controller or 3D controller . If you have both, I recommend installing the Intel driver. Intel:
$ pacman -S xf86-video-intel libgl mesa $ pacman -S nvidia nvidia-lts nvidia-libgl mesa $ pacman -S virtualbox-guest-utils virtualbox-guest-modules- arch mesa Dual boot ArchLinux и Windows 8 на UEFI без GRUB c помощью rEFInd
Инструкция для новичков, о том, как сделать красивый dualboot windows и archlinux (и других ОС) через efi без grub и лишних заморочек.
Фото для привлечения внимания:
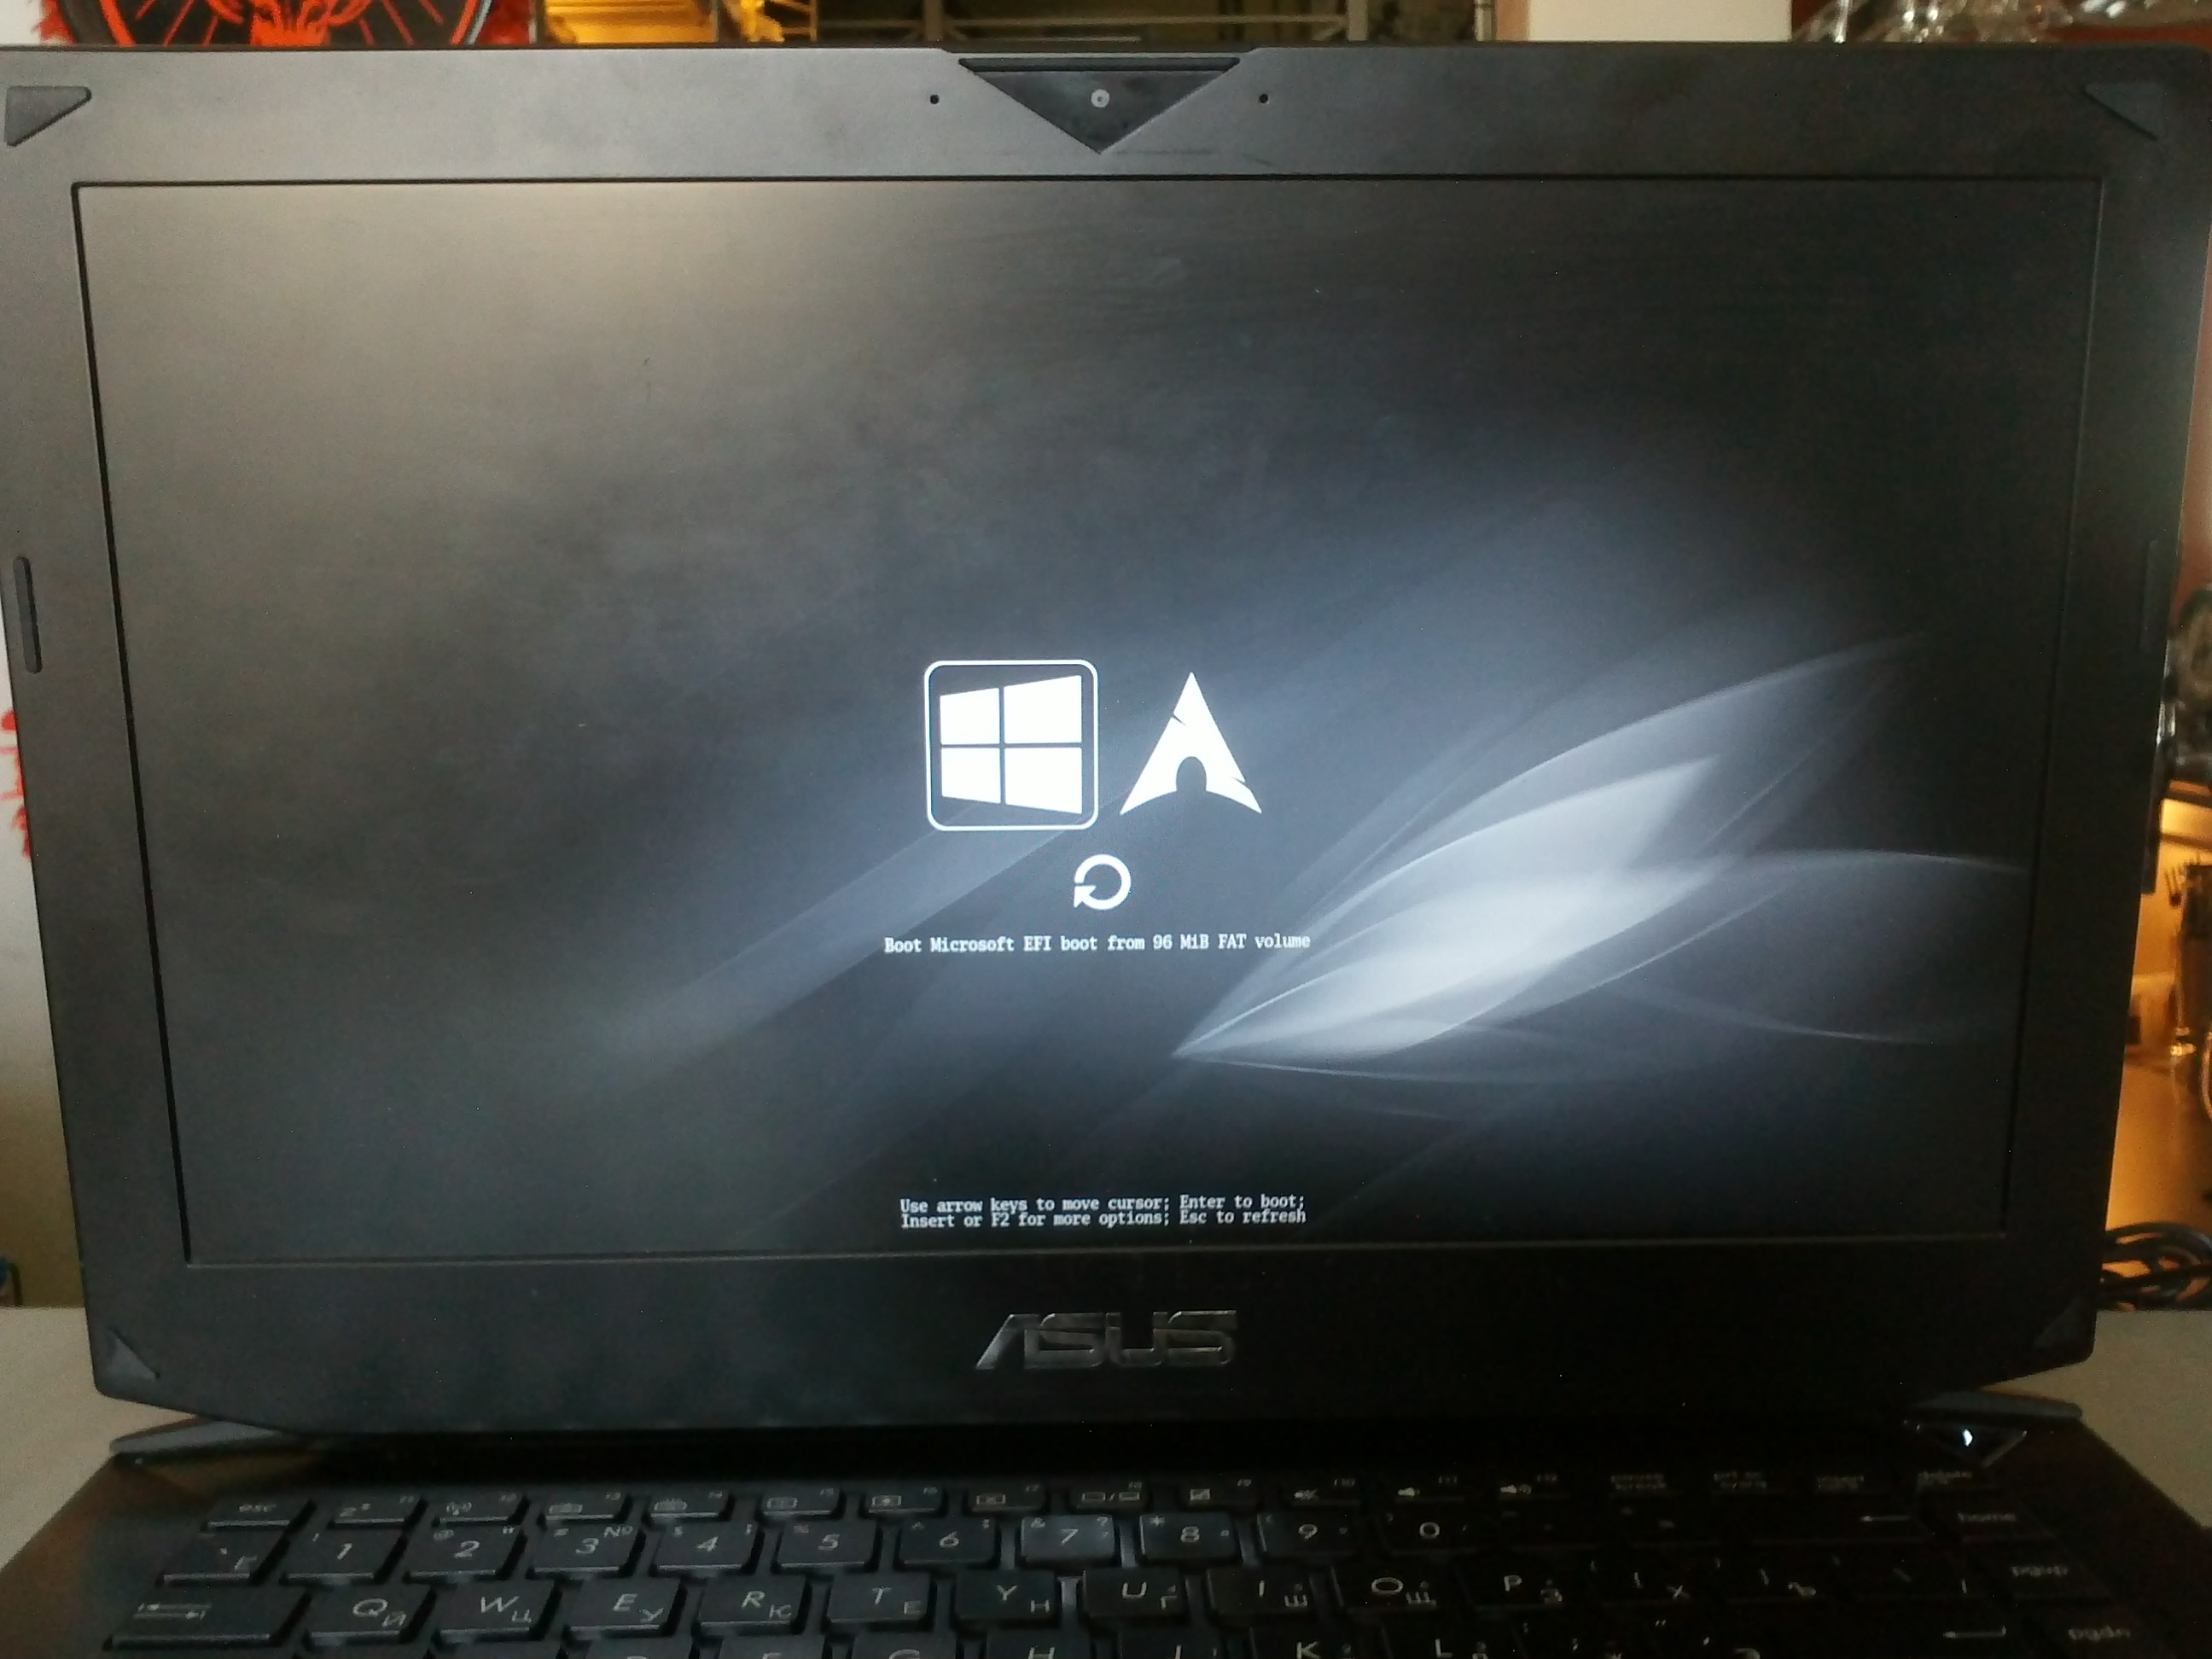
Можете посмотерть в google как это ещё может выглядеть.
Сразу оговорюсь.
Предполагается, что вы уже поставили windows и archlinux, понимаете как размечать диски и что куда монтировать и осталось вам только разобраться с загрузчиком. Если нет, то рекомендую посмотреть для начала вот это видео.
Я пробовал различные варианты, как описано тут, тут и тут и прочие выкрутасы с efibootmgr. Пытался добавлять опции прямо в «BIOSе» — ничего хорошего у меня не получилось, то рут раздел не находит то ещё что-то. Да и сам подход к переключению систем (жать Esc при включении ПК для выбора системы) меня не очень радовал.
Провозившись весь выходной, нашёл для себя простое и элегантное решение — пакет refind-efi (ArchWiki).
Если коротко, — достаточно установить этот пакет (pacman -S refind-efi) и выполнить refind-install, — всё.
В /boot/efi/EFI/ будет создан каталог refind и в опции загрузки добавлен новый пунк «rEFInd boot manager ».
Предупреждение
Добавлю к этой статье предупреждение: запись в NVRAM из ОС — достаточно опасная операция, которая может приводить к «кирпичу» на некоторых моделях ноутбуков с BIOSами на платформе Phoenix SCT. У автора BIOS на платформе AMI Aptio, с ним таких проблем нет.
Именно поэтому я настоятельно не рекомендую использовать на ноутбуках как саму efibootmgr, так и все, что ее вызывает, и устанавливать любые загрузчики вручную, либо заменяя имеющийся загрузчик по умолчанию (fs0:/EFI/BOOT/bootx64.efi), либо прописывая новый загрузчик из UEFI Shell командой bсfg boot add 0 fs0:/path/to/bootloader.efi «My Fancy Bootloader» — это намного безопаснее.
Всё что вы делаете, вы делаете на свой страх и риск!
Теперь подробнее об установке и конфигурировании
NAME MAJ:MIN RM SIZE RO TYPE MOUNTPOINT sda 8:0 0 119.2G 0 disk ├─sda1 8:1 0 300M 0 part ├─sda2 8:2 0 100M 0 part /boot/efi ├─sda3 8:3 0 128M 0 part ├─sda4 8:4 0 59.1G 0 part ├─sda5 8:5 0 9G 0 part / └─sda6 8:6 0 50G 0 part /home Device Start End Size Type /dev/sda1 2048 616447 300M Windows recovery environment /dev/sda2 616448 821247 100M EFI System /dev/sda3 821248 1083391 128M Microsoft reserved /dev/sda4 1083392 125036543 59.1G Microsoft basic data /dev/sda5 125036544 143910911 9G Linux filesystem /dev/sda6 143910912 248768511 50G Linux filesystem Раздел с типом «EFI System» созданный инсталятором windows, монтируем в /boot/efi/ ( /mnt/boot/efi/ ведь мы загрузились с liveiso верно?)
mkdir -p /mnt/boot/efi mount /dev/sdaX /mnt/boot/efi где X это номер вашего EFI раздела ( например mount /dev/sda2 /mnt/boot/efi ).
Далее перейдя в уже установленный arch ( arch-chroot /mnt/ ) устанавливаем сам refind:
Если вдруг такой пакет не найден, поищите в yaourt:
yaourt refind 1 extra/refind-efi 0.7.9-1 [installed] Rod Smith's fork of rEFIt UEFI Boot Manager - built with Tianocore UDK libs После перезагрузки можно поставить в «биосе» в настройках приоритета загрузки «rEFInd boot manager » на первое место.
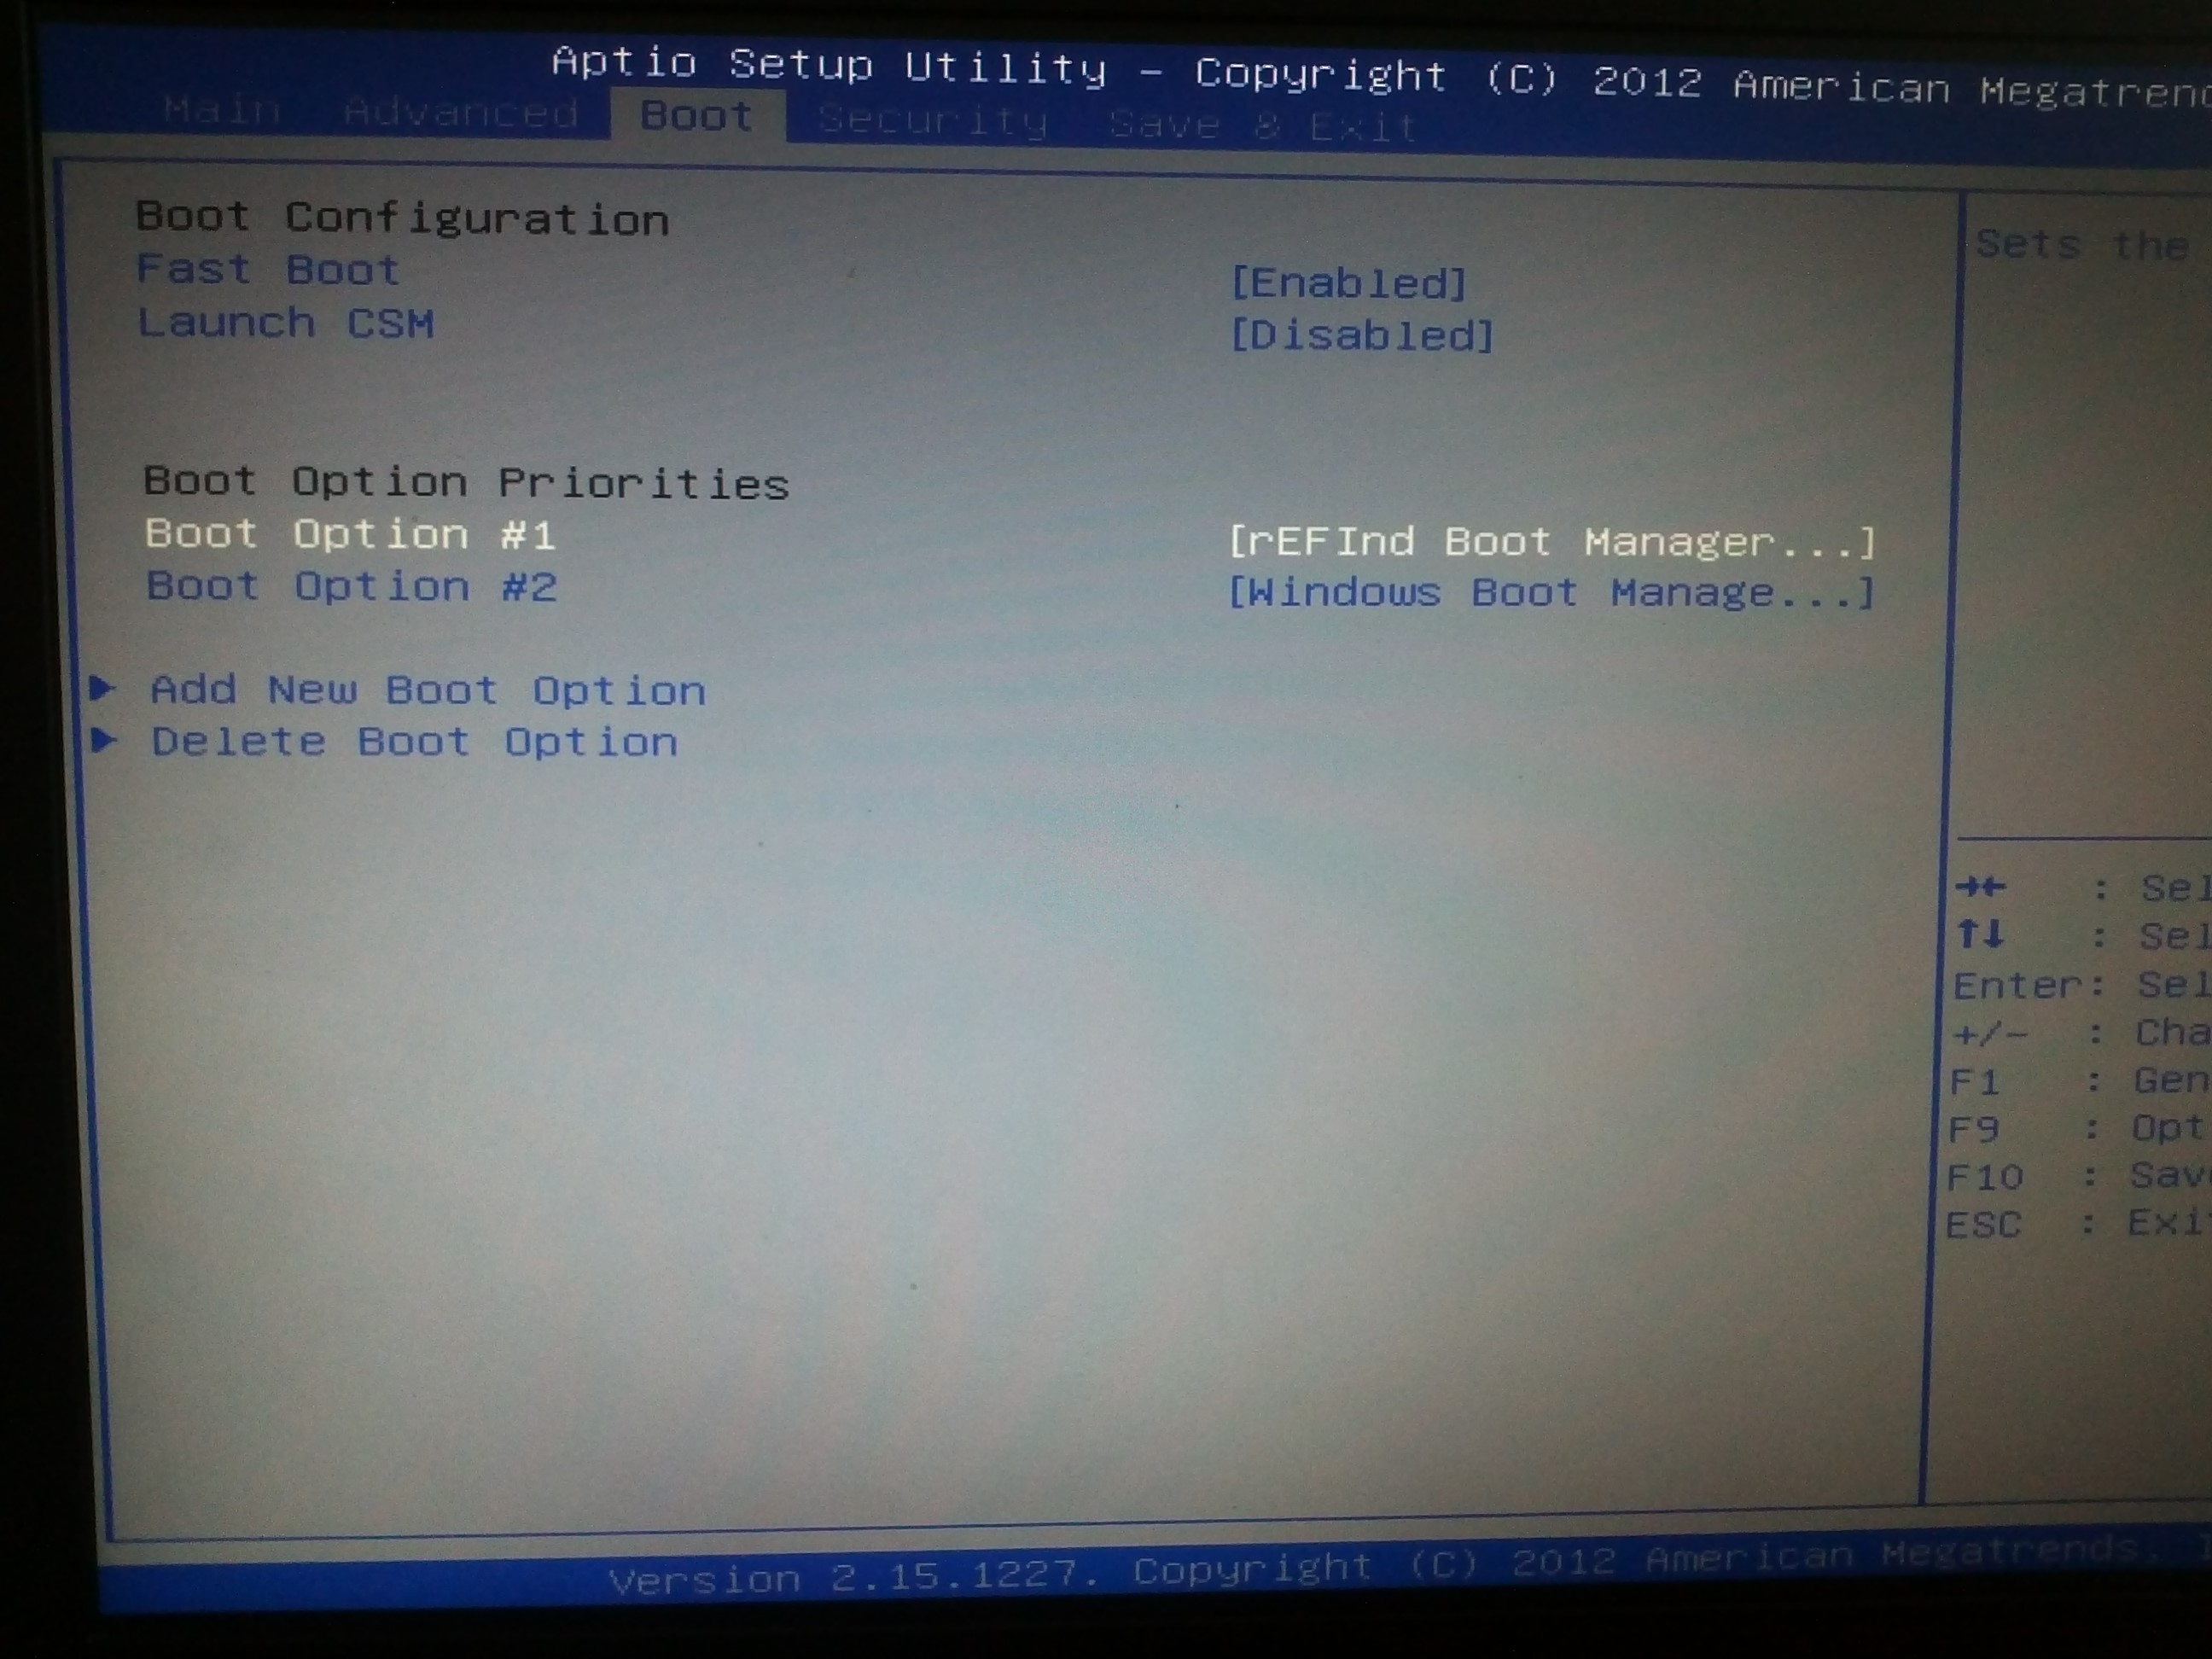
И не забудьте отключить «Secure Boot».
В каталоге /boot/efi/EFI создана дирректория refind. В ней есть refind.conf в котором можно установить время отображения списка ОС и настроить внешний вид.
Refind сам находит установленные ОС и определяет параметры их загрузки. Так же мне очень понравилось что если вставлена загрузочная флешка или диск они тоже появляются в списке.
Мне понравилась тема Next-Theme (вы можете подобрать что-то на свой вкус), положил её в /boot/efi/EFI/refind/next-theme и прописал в конфиге:
icons_dir next-theme/icons banner next-theme/background_1200.pngКонфиг хорошо документирован и вопросов вызывать не должен.
Буду благодарен за замечания и дополнения.