- Saved searches
- Use saved searches to filter your results more quickly
- CyberCommunity03/Burp-Suite-Installation
- Name already in use
- Sign In Required
- Launching GitHub Desktop
- Launching GitHub Desktop
- Launching Xcode
- Launching Visual Studio Code
- Latest commit
- Git stats
- Files
- README.md
- Как настроить Burp Suite в Кали Линукс.
- Для чего это делается?
- Как настроить Burp Suite в Кали Линукс: настраиваем браузер.
- Как настроить Burp в Кали: настраиваем Burp.
- How to Configure Burp Suite on kali linux
- What is Burp Suite?
- Tutorial configure Burp Suite on kali linux
- How to install Burp Suite on kali linux
- Introducing Burp Suite plugins
- Conclusion
- Packages and Binaries:
Saved searches
Use saved searches to filter your results more quickly
You signed in with another tab or window. Reload to refresh your session. You signed out in another tab or window. Reload to refresh your session. You switched accounts on another tab or window. Reload to refresh your session.
CyberCommunity03/Burp-Suite-Installation
This commit does not belong to any branch on this repository, and may belong to a fork outside of the repository.
Name already in use
A tag already exists with the provided branch name. Many Git commands accept both tag and branch names, so creating this branch may cause unexpected behavior. Are you sure you want to create this branch?
Sign In Required
Please sign in to use Codespaces.
Launching GitHub Desktop
If nothing happens, download GitHub Desktop and try again.
Launching GitHub Desktop
If nothing happens, download GitHub Desktop and try again.
Launching Xcode
If nothing happens, download Xcode and try again.
Launching Visual Studio Code
Your codespace will open once ready.
There was a problem preparing your codespace, please try again.
Latest commit
Git stats
Files
Failed to load latest commit information.
README.md
Burp Suite Professional Installation steps for Windows
—> Open Powershell and execute below command to set Script Execution Policy. Set-ExecutionPolicy -ExecutionPolicy bypass -Scope process —> Now Execute Windows_Setup.ps1 file in Powershell to Complete Installation. ./Windows_Setup.ps1 —> For Start Menu Entry, copy Burp-Suite-Pro.vbs file to C:\ProgramData\Microsoft\Windows\Start Menu\Programs\
Burp Suite Professional Installation steps for Linux
—> Execute Kali_Linux_Setup.sh file as root user
Burp Suite Pro Activation Steps
- Modify License String like «license to cybercommunity03»
- Copy License key from keygen.jar and paste in Burp Suite Pro and click Next.
- Select Manual Activation Option on your bottom Right in Burp Suite Pro.
- Copy License Request from BurpSuite_Pro and paste in Keygenerator.
- Copy license response from Keygenerator and paste in Burp Suite Pro, then next and Done.
Executing Burp Suite Profession after Activation
—> Windows :-: You can start Burp Suite Professional from Start Menu.
—> Kali Linux :-: You can start Burp Suite Professional by writing burp in terminal.
Как настроить Burp Suite в Кали Линукс.
В статье рассмотрим вопрос о том как правильно настроить Burp Suite в Кали Линукс с целью подготовиться к анализу трафика и веб-приложений. В конце обзора избавимся от ошибки отсутствия необходимых сертификатов для анализа защищённого соединения через ваш браузер.
Всем привет, в продолжении статьи об установке DVWA в Кали дополним браузер корректными настройками программы Burp Suite дабы тот работал, не отвлекая тестера на ошибки. В статье я буду настраивать имеющийся по умолчанию в Кали Firefox, однако сразу посоветую поставить вторым браузером хотя бы Chromium, чтобы иметь фоном обычное соединение с сетью, пока Burp и Firefox взаимонастраиваются.
Для чего это делается?
Раз вы здесь, значит на этот вопрос ответ знаете. Платформа Burp Suite с огромным количеством встроенных инструментов позволяет знающему человеку правильно оценивать информацию, извлекаемую из цепочки «браузер-сервер» с единственной в итоге целью: обнаружить дыру в безопасности.
Burp Suite в Кали прошита; единственно, что может понадобиться, это обновить бесплатную версию. Диалоговое окно перебросит вас на сайт «разрабов», откуда можно будет скачать последний вариант Burp-а. У меня так и произошло. Я скачал последнюю версию:


Перед установкой удалю предыдущую версию:
В Загрузках же переименую файл в тот, что будет с именем покороче (просто для удобства):

Открою в папке терминал и сделаю скачанный файл исполнительным:
и даём сразу команду на установку:
Осталось следовать советам менеджера установки:

Затем найдём новый Burp через поисковик Кали и добавим в избранное.

Как настроить Burp Suite в Кали Линукс: настраиваем браузер.
Откроем Firefox. Проходим в Настройки ( Preferences )-Дополнительно ( Advanced )-Сеть ( Network ). Нам нужна кнопка Настройки ( Settings ). Делаем как у меня (проверяйте, где поля заполнены, а где — пусты):

Окно браузера сверните, но не закрывайте: нам ещё с сертификатами разбираться. Об этом в финишном абзаце.
Как настроить Burp в Кали: настраиваем Burp.
Запускаем: Next — Start Burp. Проверьте настройки во вкладках Proxy — Options. Смотрим, как у меня:

Заканчиваем с браузером: настраиваем защищённые соединения.
Чтобы не было проблем с беспрепятственным соединением, укажем дополнительные сертификаты безопасности. Разверните браузер и наберите в адресной строке адрес любого сайта. Firefox немедленно сообщит о том, что вы входите в зону сетевого риска: это нормальная реакция на любой прокси. Добавим сертификат. Жмём по кнопке Add Exception…

После того, как сертификат получен, укажем его браузеру. В настройках Advanced нажмём Certicates — View certificates:

Идём дальше до вкладки Details и выделим пункт

Сохраняем (хотя бы на Рабочий стол):

Во вкладке Authorities браузера спустимся до кнопки Import… и найдём сохранённый сертификат:


укажите на сохранённый сертификат безопасности


Сертификат теперь в списке. В случае чего, вы сможете повторить эту процедуру, исследую глобальное или локальное сетевое пространство.
Осталось немного: мы не нуждаемся в предупреждениях о посещении потенциально опасных ресурсов. Снимем галочку в настройках Security :

Burp Suite и Firefox готовы к работе.
How to Configure Burp Suite on kali linux

Learn how to configure Burp Suite on kali linux step by step. Burp suite is a software application for checking the security of a web application, which includes tools that provide you with a modern and functional software. This software is offered by Portswigger company and has been published in two versions, professional and free. In this article, we are going to teach you how to configure Burp Suite on kali linux. You can visit the packages available in Eldernode if you need to buy Linux VPS server.
What is Burp Suite?
Burp Suite gives the user complete control and allows them to combine different and advanced techniques to work faster, more efficiently and more enjoyable. This software is very simple, convenient and configurable and has many powerful features to help those who test the software. Its professional version includes multiple tools and an automatic scanner. At the same time, the free version is complete and includes all the basic tools.
Tutorial configure Burp Suite on kali linux
Before we configure Burp Suite, we will first introduce you to the tabs of this software, which include the following:
– Target: With this tool, you are able to collect all the resources of the web application for identification.
– Proxy: Using this tool, all web application traffic can be analyzed and edited.
– Spider: This tool allows you to browse the Internet according to certain algorithms and patterns.
– Scanner: A comprehensive security scanner under the web application that is only available in the professional version.
-Intruder: With this tool, all web application requests are automated. By repeating a request many times (fuzzing) which actually means sending surprise requests to the program, this process can find security vulnerabilities.
– Repeater: A powerful tool used to re-edit and send web requests.
– Sequencer: A tool used to check tokens and cookies.
– Decoder: Allows you to encrypt or decrypt data.
– Comparer: This tool is used to find changes on the web page.
How to install Burp Suite on kali linux
The first method is that you can access the Burp Suite by going to the following path:
Applications >> Kali Linux >> Top 10 Security Tools >> burpsuite.
The second method is that by going to the Java interpreter from the bash terminal you can run Burp Suite:
[email protected]:~# java -jar /usr/bin/burpsuite.jarAfter downloading Burp Suite, make sure the proxy listener is enabled. The following example uses the TCP 8080 port.
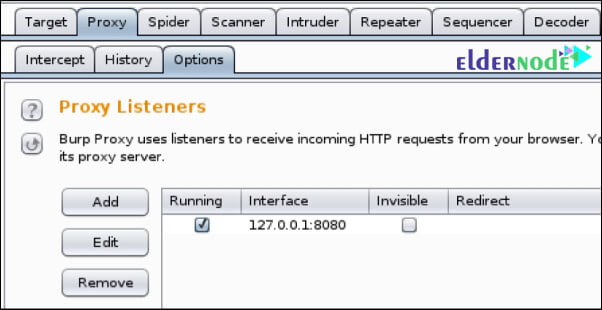
In this section you will see a list of all proxy listeners. You can add it in the absence of a proxy listener. To use the IceWeasel web browser on Kali Linux, configure the listener to listen to a dedicated port at 127.0.0.1. Also make sure the Running box is active.
Now you need to change the browser configuration to route traffic through the proxy. To do this, open the IceWeasel by clicking on the weasel globe icon at the top of the page. Then follow the path below to open the following page:
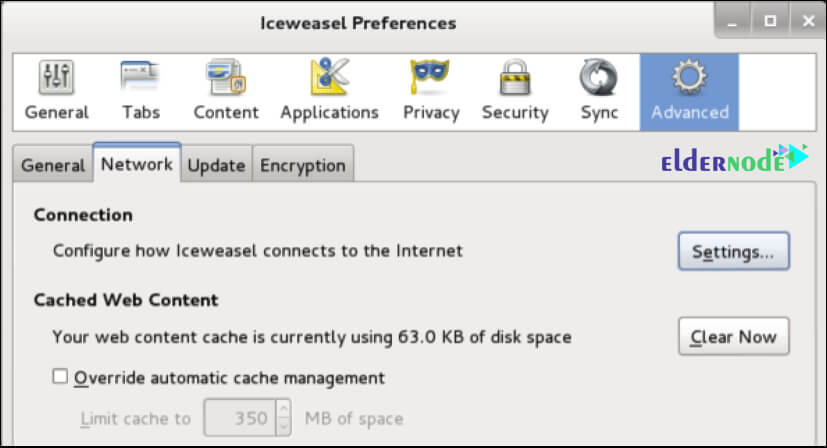
In the preferences menu, click on the Advanced options and then select the Network tab.
Then, click on the Settings. This will take you to the connection settings configuration page:
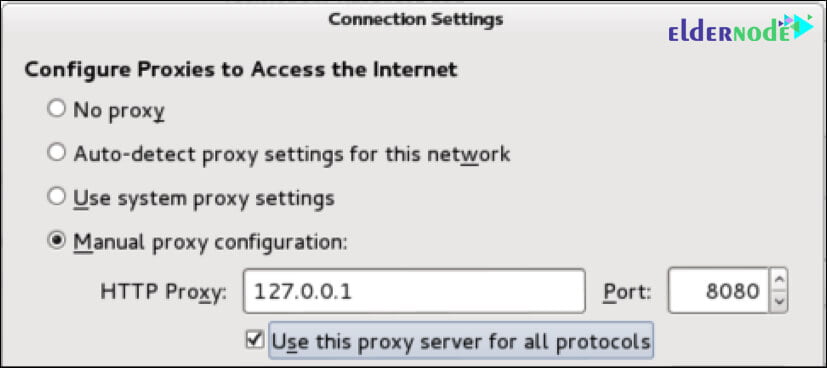
Change the proxy radio button to manual configuration. In this example, the HTTP proxy address is set to 127.0.0.1 and the port value is set to TCP 8080. Search a website through the IceWeasel browser to make sure the configuration is correct.
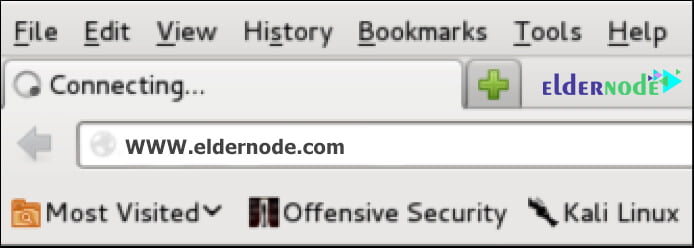
You will notice that the browser tries to connect, but nothing is provided in the browser, because the request sent from the browser is intercepted by a proxy. To use the browser, you can change the proxy settings to the Use system proxy settings option and use the manual proxy settings only when using Burp.
Introducing Burp Suite plugins
This plugin is for searching the admin pages of a website. Using this plugin, you can easily find the website admin panel in burpsuite. Among the features of this plugin, you can test more than 1000 pages and its high speed.
This plugin is for searching backup files inside the server, which is used as a plugin in burpsuite. It also has the ability to read directories and search for backups using default names.
This plugin is excellent and useful and translates foreign texts using Google when testing penetration. Due to the use of Google service, you can translate all common languages.
This plugin is for breaking AES encryption when traffic passes through the network and is very useful for testing the penetration of encrypted data. It also has the ability to connect to a proxy and scan.
To search for WordPress plugins using burpsuite which has the ability to search more than 35,000 WordPress plugins.
Conclusion
Burp Suite is a very popular tool among hackers that is used to test network intrusion, especially web applications. This tool is available by default on a variety of security operating systems such as Kali Linux. In this article, we tried to teach you How to configure Burp Suite on kali linux after introducing Burp Suite.
Click on a star to rate it!
Average rating 1 / 5. Vote count: 1
No votes so far! Be the first to rate this post.
Packages and Binaries:
Burp Suite is an integrated platform for performing security testing of web applications. Its various tools work seamlessly together to support the entire testing process, from initial mapping and analysis of an application’s attack surface, through to finding and exploiting security vulnerabilities.
Burp gives you full control, letting you combine advanced manual techniques with state-of-the-art automation, to make your work faster, more effective, and more fun.
Installed size: 225.93 MB
How to install: sudo apt install burpsuite
burpsuite
[email protected]:~# burpsuite --help Usage: --help Print this message --version Print version details --disable-extensions Prevent loading of extensions on startup --diagnostics Print diagnostic information --use-defaults Start with default settings --collaborator-server Run in Collaborator server mode --collaborator-config Specify Collaborator server configuration file; defaults to collaborator.config --data-dir Specify data directory --project-file Open the specified project file; this will be created as a new project if the file does not exist --developer-extension-class-name Fully qualified name of locally-developed extension class; extension will be loaded from the classpath --config-file Load the specified project configuration file(s); this option may be repeated to load multiple files --user-config-file Load the specified user configuration file(s); this option may be repeated to load multiple files --auto-repair Automatically repair a corrupted project file specified by the --project-file option --unpause-spider-and-scanner Do not pause the Spider and Scanner when opening an existing project --disable-auto-update Suppress auto update behavior