- Setting up HackRF One
- Firmware and CPLD
- Ready to go
- Installing drivers and support for the SDRplay RSP1A, HackRF One and RTL-SDR on a Raspberry Pi
- Install Ubuntu:
- Install software:
- 13.12.2021 Формирование навигационного сигнала GPS CA с помощью gps-sdr-sim и HackRF
- Формирование навигационного сигнала GPS L1 C/A c помощью GPS-SDR-SIM и HackRF One
- Введение
- Последовательность действий для формирования сигнала
Setting up HackRF One
and just in case the front-panel is not pushing enough power into the device, PLUG THE SHIT INTO A MOTHERBOARD USB PLUG.
then look at currently installed FW version
which hackrf_info hackrf_info
note: it is preferable to have all version at the same level: FW, CPLD and binaries.
Firmware and CPLD
apt install gcc-arm-none-eabi python3-pip #apt install libnewlib-arm-none-eabi libstdc++-arm-none-eabi-newlib gcc-arm-none-eabi binutils-arm-none-eabi cd hackrf/ git submodule init git submodule update cd firmware/libopencm3 pip -V # python 3.8 pip install pyyaml ls -lF /usr/bin/python # python3 make cd ../hackrf_usb/ mkdir build/ cd build/ cmake ../ make hackrf_spiflash -w hackrf_usb.bin
now restart the device by clicking on the first button on the left.
cd ../../cpld/ hackrf_cpldjtag -x sgpio_if/default.xsvf
check for write success, un-plug power from the device, wait a second and replug.
Ready to go
play with GQRX and tune the gain settings
gqrx input rate 20000000 center freq 950 Mhz
RF "amp", 0 or 14 dB IF "lna", 0 to 40 dB in 8 dB steps BB "vga", 0 to 62 dB in 2 dB steps
we need no heavy gains and want to get only the strongest channels. eventually start with 0/16/18 and gradually level-up IF and BB gains to obtain the best SNR. theorically, there’s no need to enable the pre-amplifier there unless you’re in a desert with no BTS. good results are obtained here with 0/32/18 .
RF 0 or 14 dB IF 0 to 47 dB in 1 dB steps
Installing drivers and support for the SDRplay RSP1A, HackRF One and RTL-SDR on a Raspberry Pi
There seems to be little Linux support for SDRplay devices outside of the convenient images from SDRplay with preinstalled software. That software was limited and out of date as of this writing. I have spent quite a bit of time getting an up to date system on which to install the latest Linux SDR software. I have added support for the HackRF One. This procedure uses Ubuntu, whose packages are much more up-to-date. I hope this helps you. These procedures may work for other SDR hardware except for the drivers and device specific items.
I suggest turning off power saving features as they will halt your SDR reception. There are several places where this should be done in Ubuntu. There are details ner the end of this section.
I basically included prerequisites that were not found on my system. However, there may be a few packages listed that are already installed. This is OK.
Note: I have included support for the SDRplay RSP1A, HackRF One and RTL-SDR. You will only need to install support for the device(s) that you have.
Install Ubuntu:
- Download the latest 32 bit server version of Ubuntu with long term support here: https://ubuntu.com/download/raspberry-pi
This procedure is developed for version ubuntu-20.04.2-preinstalled-server-armhf+raspi. This procedure may not be appropriate for the next major version. - Follow the tutorial titled «How to install Ubuntu Server on your Raspberry Pi» starting with
https://ubuntu.com/tutorials/how-to-install-ubuntu-on-your-raspberry-pi#1-overview Some of these instructions are also in the tutorial. - Install the image on a 32 GB or larger SD card. Use your favorite image program. I used Balena Etcher on Windows. For more help extracting and flashing the image, look on the image help page.
- If you need to use WiFi, follow the directions titled «Getting setup with Wi-Fi» before booting the SD card image .
sudo apt update sudo apt upgrade
sudo apt install lubuntu-desktop
- It will offer a choice of Desktop. Select gdm3. When the installation finishes, type sudo reboot .
- When the desktop boots to the login prompt, press enter. From the gear icon at the lower right corner of the screen, choose lubuntu.
The Gnome Display Manager is the default Display Manager for Gnome Desktop, but I found that CPU usage idled at around 50%
Install software:
- cmake
- To install the version in the packager: sudo apt-get install cmake
- You may want to install the latest version of cmake, but the package version will work. Instructions are here. It is a long procedure.
sudo apt install pyqt5-dev python3-sip python3-pyqt5.sip python3-pyqt5 python3-venv python3-pip sudo apt install man git g++ build-essential ntfs-3g apt-utils libudev-dev at-spi2-core sudo apt install qt5-qmake qtbase5-dev qtmultimedia5-dev libqt5multimediawidgets5 libqt5multimedia5-plugins qtgstreamer-plugins-qt5 qtcreator libqt5svg5-dev libqt5serialport5-dev qttools5-dev libqwt-qt5-6 libqwt-qt5-dev sudo apt install libqt5websockets5-dev libqt5charts5-dev qml-module-qtlocation qml-module-qtpositioning qml-module-qtquick-dialogs qml-module-qtquick-controls qml-module-qtquick-controls2 qtdeclarative5-dev qtpositioning5-dev qtlocation5-dev libqt5texttospeech5-dev libqt5opengl5 libqt5opengl5-dev
sudo apt install libusb-1.0-0 libusb-1.0-0-dev libfftw3-3 libfftw3-dev # Create a new file: sudo featherpad /etc/udev/rules.d/66-mirics.rules
SUBSYSTEM=="usb",ENV=="usb_device",ATTRS=="1df7",ATTRS=="2500",MODE:="0666"
sudo service udev restart
cd ~/Downloads # or wherever you downloaded the file chmod 755 SDRplay_RSP_API-ARM32-3.07.2.run sudo ./SDRplay_RSP_API-ARM32-3.07.2.run sudo ldconfig
sudo systemctl stop sdrplay sudo systemctl start sdrplay
sudo apt install libusb-1.0-0-dev usbutils libfftw3-3 libfftw3-dev
cd ~/ git clone https://github.com/greatscottgadgets/hackrf cd hackrf/host mkdir build cd build cmake .. make -j 4 sudo make install sudo ldconfig
If you see «Firmware Version: 2022.09.1 (API:1.06)», then it is up to date and you do not need to do the firmware update shown below.
Note: the latest release is 2023.01.1. A firmware update will be required. I will update this page after I test it.# Transfer rate test: hackrf_transfer -r /dev/null -s 20000000 # Connect an antenna and test sending data: hackrf_transfer -t /dev/zero
Download hackrf-2022.09.1.zip
Extract only the firmware-bin directory into the ~/hackrf directorycd ~/hackrf/firmware-bin # To update the firmware on a working HackRF One, use the hackrf_spiflash program: hackrf_spiflash -w hackrf_one_usb.bin # Press the reset button on the HackRF. hackrf_info # The new firmware version should now displayed.
sudo mousepad /etc/modprobe.d/blacklist-dvb.conf
sudo apt-get install rtl-sdr librtlsdr-dev
sudo apt install g++ libcodec2-dev libvolk2-bin libvolk2-dev libvolk2.2 sudo apt install libboost-all-dev libgmp-dev swig python3-requests python3-ruamel.yaml python3-setuptools python3-numpy python3-mako python3-sphinx python3-lxml doxygen libsdl1.2-dev libgsl-dev libzmq3-dev cppzmq-dev python3-yaml python3-click python3-click-plugins python3-zmq python3-scipy python-docutils liborc-0.4-0 liborc-0.4-dev python3-gi-cairo python3-waitress liblog4cpp5-dev liblog4cpp5v5 sudo apt install osspd osspd-pulseaudio sudo osspd-alsa libcppunit-dev
sudo apt install libuhd3.15.0 libuhd-dev # Show version gnuradio-config-info -v featherpad ~/.profile #add this export command to the end of the file or to any existing PYTHONPATH line. Save changes to make the variables permanent. export PYTHONPATH=/usr/local/lib/python3/dist-packages:$PYTHONPATH
sudo featherpad /etc/ld.so.conf.d/gnuradio.conf # insert the line: /usr/local/lib # Save the file sudo ldconfig
cd ~/ git clone https://github.com/pothosware/SoapySDR.git cd SoapySDR mkdir build cd build cmake .. make -j4 sudo make install sudo ldconfig
cd ~/ git clone https://github.com/pothosware/SoapySDRPlay.git cd SoapySDRPlay mkdir build cd build cmake .. make -j4 sudo make install sudo ldconfig # Type these commands. If your SDR is listed, the hardest work is done! SoapySDRUtil --info SoapySDRUtil --probe="driver=sdrplay"
cd ~/ git clone https://github.com/pothosware/SoapyHackRF.git cd SoapyHackRF mkdir build cd build cmake .. make -j4 sudo make install sudo ldconfig # Type this command. Check that your SDR is listed and the details are correct. SoapySDRUtil --probe="driver=hackrf"
cd ~/ git clone https://github.com/pothosware/SoapyRTLSDR.git cd SoapyRTLSDR mkdir build cd build cmake .. make -j4 sudo make install sudo ldconfig # Type this command. Check that your SDR is listed and the details are correct. SoapySDRUtil --probe="driver=rtlsdr"
cd ~/ git clone https://github.com/fventuri/gr-osmosdr.git cd gr-osmosdr/ mkdir build cd build cmake .. -DENABLE_NONFREE=TRUE
Under Gnuradio enabled components in the terminal text, check that SDRplay RSP (NONFREE), SoapySDR and HackRF support are listed.
make -j4 sudo make install sudo ldconfig
cd ~/ git clone https://github.com/fventuri/gr-sdrplay3.git cd gr-sdrplay3 mkdir build cd build cmake .. make -j4 sudo make install sudo ldconfig
sudo featherpad /usr/share/pulseaudio/alsa-mixer/profile-sets/default.conf
- Comment out each line in the [Mapping analog-mono] section with a «;» at the beginning of the line.
- Save the file and reboot.
sudo featherpad /etc/profile
sudo pkill -9 -f "/usr/share/gdm/greeter/autostart"
13.12.2021 Формирование навигационного сигнала GPS CA с помощью gps-sdr-sim и HackRF
Формирование навигационного сигнала GPS L1 C/A c помощью GPS-SDR-SIM и HackRF One
GPS-SDR-SIM — программа, позволяющая выводить двоичный файл сигналов в соответствии с указанным файлом спутниковой информации, информацией о координатах, частоте дискретизации и другими параметрами.
HackRF One — программно-определяемое радио, способное передавать / принимать радиосигналы на частотах от 1МГц до 6 ГГц. Использует технологию, позволяющую с помощью программного обеспечения устанавливать / изменять рабочие радиочастотные параметры.
Введение
Данная статья является инструкцией по формированию навигационного сигналы GPS L1 C/A для неподвижного потребителя. Для имитации GPS сигнала будет использоваться программа GPS-SDR-SIM, которая позволяет формировать выборку навигационного сигнала (НС) в соответствии с указанным файлом спутниковой информации. Полученный файл будет импортироваться в радиочастотное устройство для трансляции НС в эфир.
В качестве приемопередатчика будет выступать программно-определяемое радио (англ. SDR — software defined radio) HackRF One. Основные характеристики устройства: диапазон частот от 1 МГц до 6 ГГц, полоса пропускания 20 МГц, 8-разрядный АЦП/ЦАП.
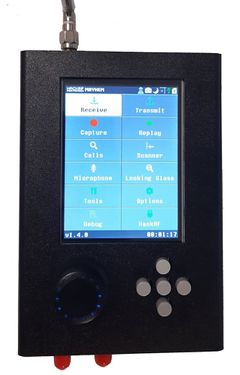
Рассматривается конфигурация HackRF One c расширяющей платой Portapack H2, которая позволяет работать HackRF One автономно, т.е. без подключения к компьютеру.
В сборе HackRf One + Portapack H2 + металлический корпус, SDR выглядит следующим образом:

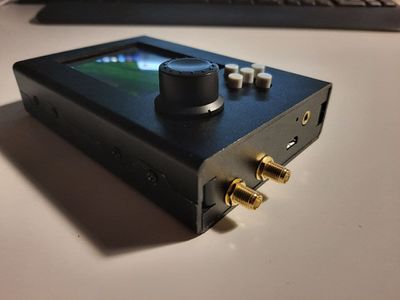
На изображении ниже можно увидеть два SMA разъема CLKIN (ближний) и CLKOUT – вход и выход для синхронизации. На этой же стороне присутствует разъем micro-USB для подключения платы к компьютеру.

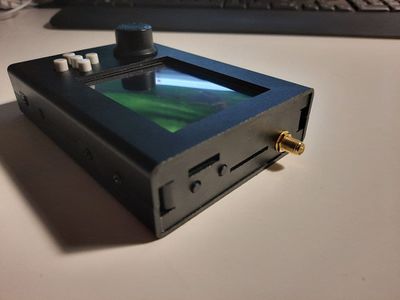
С противоположной стороны плата имеет антенный разъем SMA и две кнопки: Reset – для перезагрузки HackRF по питанию и DFU – для восстановления заводской прошивки. Над кнопками разъем для карты памяти.
Последовательность действий для формирования сигнала
Шаг 2. Установка драйверов и пакетов на ПК (ОС: Linux)
sudo apt update; sudo apt upgrade
sudo apt install hackrf libhackrf-dev libhackrf0 gnuradio gnuradio-dev gr-osmosdr gqrx-sdr

hackrf_info version: unknown libhackrf version: unknown (0.5) Found HackRF Index: 0 Serial number: 0000000000000000048866dc348258c3 Board ID Number: 2 (HackRF One) Firmware Version: local-57ed3eb (API:1.04) Part ID Number: 0xa000cb3c 0x00614368
Шаг 4. Загрузить и скомпилировать код GPS-SDR-SIM
cd gps-sdr-sim && gcc gpssim.c -lm -O3 -o gps-sdr-sim
Шаг 5. Формированию выборки сигнала GPS
- Открыть консоль внутри скомпилированной программы.
- Консольная команда для формирования 8-разрядного бинарный файла сигнала по эфемеридному файлу brdc3540.14n:
./gps-sdr-sim -e brdc3540.14n -l 31.603202,120.466576,100 -b 8 -d 300
brdc3540.14 — файл эфемерид 32-х спутников GPS;
-e — файл является общим форматом ГНСС-данных RINEX;
-l 31.603202,120.466576,100 — координаты позиции приемника;
-b 8 — разрядность чисел в выходном файле;
-d 300 — длительность в секундах (1с = 5Мбайт).
Шаг 6. Формирование радиосигнала
На предыдущем шаге по эфемеридному файлу был создан 8-разрядный бинарный файл «gpssim.bin».
Убедитесь, что антенна подключена к антенному порту HackRF
hackrf_transfer -t gpssim.bin -f 1575.42e6 -s 2.6e6 -a 1 -x 30 -b 5e6
hackrf_transfer – команда, с помощью которой можно отправлять и получать сигналы, используя HackRF;
-t – пересылать данные из файла ;
-f – несущая сигнала 1575.42 МГц;
-s – частота дискретизации 2.6 МГц;
-b – 5e6 полоса пропускания ФНЧ.
Шаг 7. Оценка параметров сигнала смартфоном
- Установить приложение GPS Test.
- Включить геолакацию.
- Включить на телефоне режим полета