- Updating drivers during installation
- Overview
- Types of driver update
- Preparing a driver update
- Prerequisites
- Procedure
- Performing an automatic driver update
- Prerequisites
- Procedure
- Performing an assisted driver update
- Prerequisite
- Procedure
- Performing a manual driver update
- Prerequisite
- Procedure
- Additional resources
- Disabling a driver
- Prerequisites
- Procedure
- Как установить драйверы NVIDIA в CentOS 7 Linux
- Требования к программному обеспечению и используемые условные обозначения
- Пошаговая инструкция по установке официальных драйверов NVIDIA на CentOS 7 Linux
- Ubuntu — Страница 6 — VITUX
- Как установить файлы (пакеты) RPM в CentOS Linux
- Как установить R на CentOS 7
Updating drivers during installation
This section describes how to complete a driver update during the CentOS installation process.
This is an optional step of the installation process. CentOS Project recommends that you do not perform a driver update unless it is necessary.
Overview
CentOS supports drivers for many hardware devices but some newly-released drivers may not be supported. A driver update should only be performed if an unsupported driver prevents the installation from completing. Updating drivers during installation is typically only required to support a particular configuration. For example, installing drivers for a storage adapter card that provides access to your system’s storage devices.
Driver update disks may disable conflicting kernel drivers. In rare cases, unloading a kernel module may cause installation errors.
Types of driver update
Your hardware vendor or a trusted third party provides the driver update as an ISO image file. Once you receive the ISO image file, choose the type of driver update.
The recommended driver update method; a storage device (including a CD, DVD, or USB flash drive) labeled OEMDRV is physically connected to the system. If the OEMDRV storage device is present when the installation starts, it is treated as a driver update disk, and the installation program automatically loads its drivers.
The installation program prompts you to locate a driver update. You can use any local storage device with a label other than OEMDRV . The inst.dd boot option is specified when starting the installation. If you use this option without any parameters, the installation program displays all of the storage devices connected to the system, and prompts you to select a device that contains a driver update.
Manually specify a path to a driver update image or an RPM package. You can use any local storage device with a label other than OEMDRV , or a network location accessible from the installation system. The inst.dd=location boot option is specified when starting the installation, where location is the path to a driver update disk or ISO image. When you specify this option, the installation program attempts to load any driver updates found at the specified location. With manual driver updates, you can specify local storage devices, or a network location (HTTP, HTTPS or FTP server).
- You can use both inst.dd=location and inst.dd simultaneously, where location is the path to a driver update disk or ISO image. In this scenario, the installation program attempts to load any available driver updates from the location and also prompts you to select a device that contains the driver update.
- Initialize the network using the ip= option when loading a driver update from a network location.
On UEFI systems with the Secure Boot technology enabled, all drivers must be signed with a valid certificate. CentOS drivers are signed by one of CentOS Project’s private keys and authenticated by its corresponding public key in the kernel. If you load additional, separate drivers, verify that they are signed.
Preparing a driver update
This procedure describes how to prepare a driver update on a CD and DVD.
Prerequisites
- You received the driver update ISO image from your hardware vendor, or a trusted third-party vendor.
- You burned the driver update ISO image to a CD or DVD.
If only a single ISO image file ending in .iso is available on the CD or DVD, the burn process has not been successful. See your system’s burning software documentation for instructions on how to burn ISO images to a CD or DVD.
Procedure
- Insert the driver update CD or DVD into your system’s CD/DVD drive, and browse it using the system’s file manager tool.
- Verify that a single file rhdd3 is available. rhdd3 is a signature file that contains the driver description and a directory named rpms , which contains the RPM packages with the actual drivers for various architectures.
Performing an automatic driver update
This procedure describes how to perform an automatic driver update during installation.
Prerequisites
- You have placed the driver update image on a standard disk partition with an OEMDRV label or burnt the OEMDRV driver update image to a CD or DVD. Advanced storage, such as RAID or LVM volumes, may not be accessible during the driver update process.
- You have connected a block device with an OEMDRV volume label to your system, or inserted the prepared CD or DVD into your system’s CD/DVD drive before starting the installation process.
Procedure
- Once you have completed the prerequisite steps, the drivers are automatically loaded when the installation program starts, and installed on the system during the installation process.
Performing an assisted driver update
This procedure describes how to perform an assisted driver update during installation.
Prerequisite
You have connected a block device without an OEMDRV volume label to your system and copied the driver disk image to this device, or you have prepared a driver update CD or DVD and inserted it into your system’s CD/DVD drive before starting the installation process.
If you burned an ISO image file to a CD or DVD but it does not have the OEMDRV volume label, you can use the inst.dd option with no arguments. The installation program provides an option to scan and select drivers from the CD or DVD. In this scenario, the installation program does not prompt you to select a driver update ISO image. Another scenario is to use the CD or DVD with the inst.dd=location boot option; this allows the installation program to automatically scan the CD or DVD for driver updates. For more information, see
Procedure
- From the boot menu window, press the Tab key on your keyboard to display the boot command line.
- Append the inst.dd boot option to the command line and press Enter to execute the boot process.
- From the menu, select a local disk partition or a CD or DVD device. The installation program scans for ISO files, or driver update RPM packages.
- Optional: Select the driver update ISO file.
This step is not required if the selected device or partition contains driver update RPM packages rather than an ISO image file, for example, an optical drive containing a driver update CD or DVD.
- Use the number keys on your keyboard to toggle the driver selection.
- Press c to install the selected driver. The selected driver is loaded and the installation process starts.
Performing a manual driver update
This procedure describes how to perform a manual driver update during installation.
Prerequisite
Place the driver update ISO image file on a USB flash drive or a web server, and connect it to your computer.
Procedure
- From the boot menu window, press the Tab key on your keyboard to display the boot command line.
- Append the inst.dd=location boot option to the command line, where location is a path to the driver update. Typically, the image file is located on a web server, for example, http://server.example.com/dd.iso, or on a USB flash drive, for example, /dev/sdb1 . It is also possible to specify an RPM package containing the driver update, for example http://server.example.com/dd.rpm.
- Press Enter to execute the boot process. The drivers available at the specified location are automatically loaded and the installation process starts.
Additional resources
- For more information about the inst.dd boot option, see the upstream inst.dd boot option content.
- For more information about all boot options, see the upstream Boot Options content.
Disabling a driver
This procedure describes how to disable a malfunctioning driver.
Prerequisites
Procedure
- From the boot menu, press the Tab key on your keyboard to display the boot command line.
- Append the modprobe.blacklist=driver_name boot option to the command line.
- Replace driver_name with the name of the driver or drivers you want to disable, for example:
Drivers disabled using the modprobe.blacklist= boot option remain disabled on the installed system and appear in the /etc/modprobe.d/anaconda-blacklist.conf file.
All CentOS Documentation content available under CC-BY-SA 3.0.
This page was built using a modified version of the Antora default UI. The source code for this UI is licensed under the terms of the MPL-2.0 license.
Как установить драйверы NVIDIA в CentOS 7 Linux
CentOS 7 поддерживает видеокарты Nvidia с открытым исходным кодом. модерн Водитель. В случае если модерн драйвер не является достаточным решением, пользователи могут установить официальный драйвер Nvidia в качестве проприетарной альтернативы. Это пошаговое руководство проведет вас через весь процесс установки драйвера Nvidia.
Чтобы установить драйвер Nvidia в других дистрибутивах Linux, следуйте нашим Драйвер Nvidia для Linux гид.
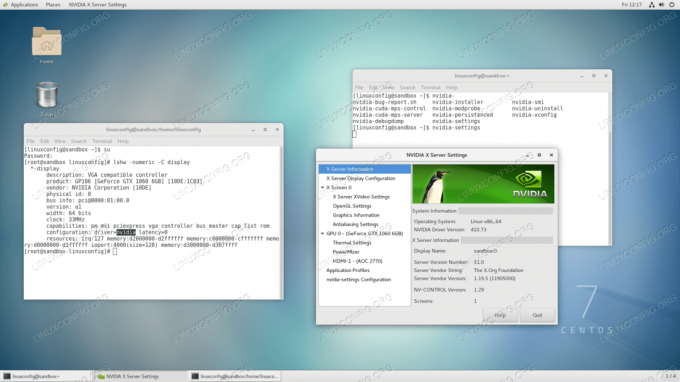
Установлены драйверы Nvidia на рабочий стол CentOS 7 Linux GNOME.
Требования к программному обеспечению и используемые условные обозначения
Требования к программному обеспечению и условные обозначения командной строки Linux| Критерии | Требования |
|---|---|
| Операционная система | CentOS 7.5 или выше |
| Программного обеспечения | Существующая установка рабочего стола, такая как GNOME, KDE и т. Д. |
| Другой | Привилегированный доступ к вашей системе Linux с правами root или через судо команда. |
| Условные обозначения | # — требует данных команды linux для выполнения с привилегиями root либо непосредственно как пользователь root, либо с использованием |
Пошаговая инструкция по установке официальных драйверов NVIDIA на CentOS 7 Linux
Установка драйверов Nvidia состоит из нескольких этапов. Во-первых, мы определяем номер модели доступной карты Nvidia VGA, подготавливаем систему, устанавливая все необходимые компоненты пакета, и загружаем официальный драйвер Nvidia.
Следующим шагом будет отключение значения по умолчанию. модерн драйвер и установите проприетарный драйвер Nvidia. Давайте начнем:
- Откройте терминал и определите модель вашей видеокарты Nvidia, выполнив:
# lshw -numeric -C display * -display описание: VGA-совместимый контроллер продукт: GP106 [GeForce GTX 1060 6 ГБ] [10DE: 1C03] поставщик: NVIDIA Corporation [10DE] физический идентификатор: 0 информация о шине: pci @ 0000: 01: 00.0 версия: a1 ширина: 64-битные часы: возможности 33 МГц: pm msi pciexpress vga_controller bus_master cap_list конфигурация ROM: driver =модерн задержка = 0 ресурсы: irq: 126 память: d2000000-d2ffffff память: c0000000-cfffffff память: d0000000-d1ffffff ioport: 4000 (размер = 128) память: d3000000-d307ffff.
$ ls NVIDIA-Linux-x86_64- * NVIDIA-Linux-x86_64-410.73.run.
# yum groupinstall "Инструменты разработки" # yum install kernel-devel epel-release. # yum install dkms.
GRUB_TIMEOUT = 5 GRUB_DISTRIBUTOR = "$ (sed 's, release. * $,, g' / etc / system-release)" GRUB_DEFAULT = сохранено GRUB_DISABLE_SUBMENU = true GRUB_TERMINAL_OUTPUT = "консоль" GRUB_CMDLINE_LINUX = "crashkernel = auto rhgb quiet nouveau.modeset = 0" GRUB_DISABLE_RECOVERY = "true" Над строка 6 гарантирует, что модерн драйвер будет отключен при следующей загрузке системы CentOS 7 Linux. Когда все будет готово, выполните следующую команду, чтобы применить новое изменение конфигурации GRUB:
BIOS: $ sudo grub2-mkconfig -o /boot/grub2/grub.cfg. EFI: $ sudo grub2-mkconfig -o /boot/efi/EFI/centos/grub.cfg.
# systemctl изолировать multi-user.target.

Теперь вы можете при желании запустить тест видеокарты Nvidia, следуя нашим инструкциям. Проверьте свою видеокарту в Linux гид.
Подпишитесь на новостную рассылку Linux Career Newsletter, чтобы получать последние новости, вакансии, советы по карьере и рекомендуемые руководства по настройке.
LinuxConfig ищет технических писателей, специализирующихся на технологиях GNU / Linux и FLOSS. В ваших статьях будут представлены различные руководства по настройке GNU / Linux и технологии FLOSS, используемые в сочетании с операционной системой GNU / Linux.
Ожидается, что при написании статей вы сможете идти в ногу с технологическим прогрессом в вышеупомянутой технической области. Вы будете работать самостоятельно и сможете выпускать как минимум 2 технических статьи в месяц.
Ubuntu — Страница 6 — VITUX
Как администраторам Linux, нам нужно снова и снова просматривать таблицу разделов нашего жесткого диска. Это помогает нам реорганизовать старые диски, освобождая место для дальнейшего разбиения на разделы, а также при необходимости освобождая мест.
Как установить файлы (пакеты) RPM в CentOS Linux
Менеджер пакетов RPM (RPM) — это мощная система управления пакетами, используемая Red Hat Linux и ее производными, такими как CentOS и Fedora. RPM также относится к об / мин команда и .rpm формат файла.Репозитории CentOS содержат тысячи пакетов rp.
Как установить R на CentOS 7
R — это быстрорастущий язык программирования с открытым исходным кодом и бесплатная среда, специализирующаяся на статистических вычислениях и графическом представлении. Он поддерживается фондом R Foundation for Statistical Computing и в основном и.