- Установка среды разработки Eclipse в Astra Linux Special Edition
- Предварительные требования
- Подготовка к установке
- Для установки с Axiom JDK Pro
- Для установки с ГосJava
- Установка
- Установка на изолированном компьютере
- Для установки с Axiom JDK Pro
- Для установки с ГосJava
- How to Install Eclipse IDE on Linux
- Prerequisites
- Installing Eclipse on Linux
- How to Install Eclipse IDE from the Snap Store (Terminal)
- How to Install Eclipse IDE using the Eclipse Installer
- Starting Eclipse
- From the Terminal
- From the Application Finder
- From the Desktop Shortcut
- Conclusion
- Установка eclipse astra linux
- Установка ALT Linux
- Установка и настройка IntelliJ IDEA
- Установка и настройка Eclipse
- Установка и настройка Visual Studio Code
- Заключение
Установка среды разработки Eclipse в Astra Linux Special Edition
Не забывайте удалять сторонние репозитории после завершения их использования.
Среда разработки Eclipse DogTag использует Java, и без Java работать не может. По требованиям безопасности Java исключена из состава Astra Linux Special Edition. При выполнении описанной ниже процедуры можно использовать следующие версии Java:
- Версия Axiom JDK Pro разработанная компанией БЕЛЛСОФТ и распространяемая на коммерческой основе и доступна по запросу: info@axiomjdk.ru .
- Версия ГосJava из репозитория наших партнеров Лаборатория 50 ;
Предварительные требования
Для установки пакета eclipse в Astra Linux Special Edition требуется:
- Наличие настроенных и доступных сетевых репозиториев пакетов Astra Linux Special Edition, содержащих все необходимые пакеты
или наличие полного комплекта установочного дисков или ISO-образов Astra Linux Special Edition:- Основного установочного диска;
- Диска со средствами разработки;
- Последнего диска с обновлением безопасности;
- Последнего диска с обновлением средств разработки;
Подготовка к установке
Для установки с Axiom JDK Pro
Скачать и установить пакет Axiom JDK Pro:
Для установки с ГосJava
2.1. Для подключения репозитория ГосJava, необходимо добавить запись в конфигурационный файл /etc/apt/sources.list:
deb http://packages.lab50.net/gosjava/se16/ gosjava main
2.2. Добавить цифровой ключ подписи в APT, выполнив команду:
2.3. Обновить состояние репозиториев и установить ГосJava, выполнив команду:
Установка
Установка на изолированном компьютере
Для установки с Axiom JDK Pro
Скачать пакет Axiom JDK Pro:
Для установки с ГосJava
При необходимости выполнить установку на изолированном компьютере, не имеющем доступа в Интернет, можно отдельно скачать из репозитория Лаборатория 50 на компьютере, имеющем доступ в Интернет, все пакеты , необходимые для установки. Для этого:
- Очистить каталог /var/cache/apt/archives от имеющихся там файлов .deb:
файлы будут распакованы в текущий каталог.
После установки среду разработки Eclipse можно запустить из графического меню:
How to Install Eclipse IDE on Linux
Ransomware recovery test drive: This technical workshop is designed to take you behind the scenes and shows you how to adopt strategies to automate recovery, ensuring you’re ready to become a recovery hero. REQUEST YOUR LAB
Eclipse is a popular Integrated Development Environment (IDE) that offers a ton of features. But installing Eclipse can be quite the challenge – especially on Linux.
This guide aims to simplify that task by providing clear and concise instructions on how to install Eclipse IDE in Ubuntu.
By the end of this guide, you should have a working installation of Eclipse that you can use to develop your applications.
Prerequisites
This hands-on tutorial requires you to have the following items so that you may follow along with the examples seamlessly.
- Your Linux computer must have Java installed. This tutorial will be using OpenJDK 11.0.15.
- You must have access to the root account or an account with sudo privileges. This guide uses a root account to execute commands.
Installing Eclipse on Linux
The Eclipse package is not available in the Ubuntu package repository as of this writing, which means you cannot install Eclipse via apt or the Software Manager. Don’t worry; there are several ways to install the Eclipse IDE.
How to Install Eclipse IDE from the Snap Store (Terminal)
Eclipse is available in the Snap Store, so you can install it with the snap command. If you’re unfamiliar with Snap, it’s a package manager for Linux that allows you to install and update applications with a single command.
Snaps are convenient to install and update. They are safe to run and isolated from the rest of your system, so they don’t put your system at risk.
While Snap is an excellent app source, the Eclipse version available in the Snap store might not be the latest one.
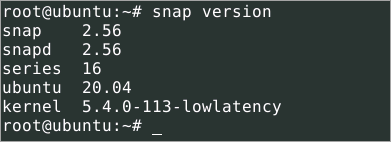
1. First, open a terminal window on your computer and run the below command to confirm that Snap is installed.
If Snap is available on your system, you will see the version information in the result.

2. If Snap is not installed, run the below command to install.

3. Create a symbolic link between /var/lib/snapd/snap and /snap. Doing so gives Snap apps access to your home directory after the installation.
ln -s /var/lib/snapd/snap /snap4. Now, update the Snap package list by running the below command.

5. Run the following command to install the latest stable version of Eclipse. This command downloads the latest stable version of Eclipse from the Snap store and installs it on your system.
snap install --classic eclipseThe output below shows that you have successfully installed Eclipse IDE from the Snap store. The version number may be different depending on when you installed it. In this example, the Eclipse version from Snap is 2019-12 at the time of writing.


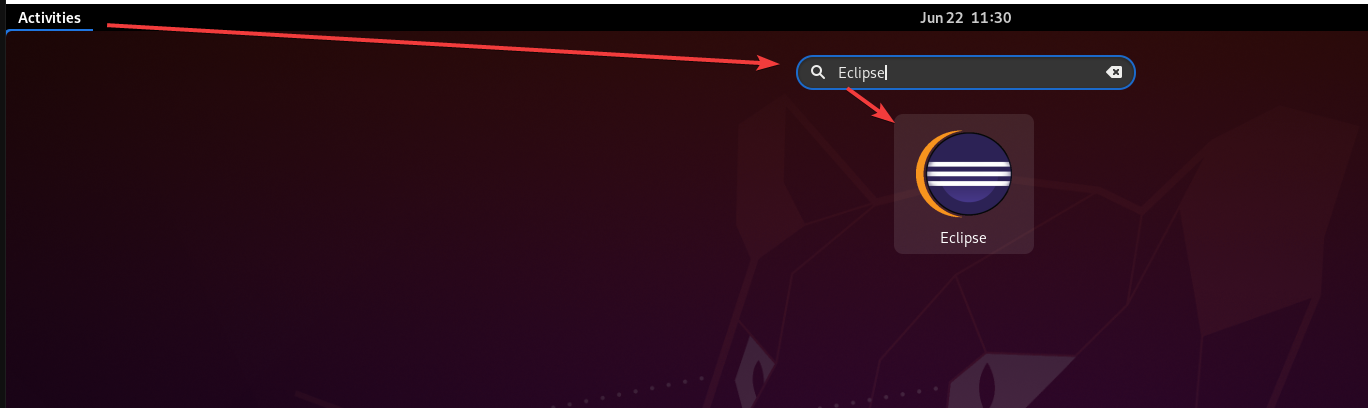
6. At this point, you have successfully installed Eclipse IDE from the Snap store. To launch Eclipse, click on the Activities tab in the top left corner of your screen and search for Eclipse.

How to Install Eclipse IDE using the Eclipse Installer
If you want the latest and greatest, install the official package from the Eclipse website. The version available on the official Eclipse website is always the latest one.
Compared with the Snap installation method, installing the official package requires more steps. But don’t worry. This section will walk you through the installation process step by step.
To install Eclipse from the official Eclipse website, follow these steps.
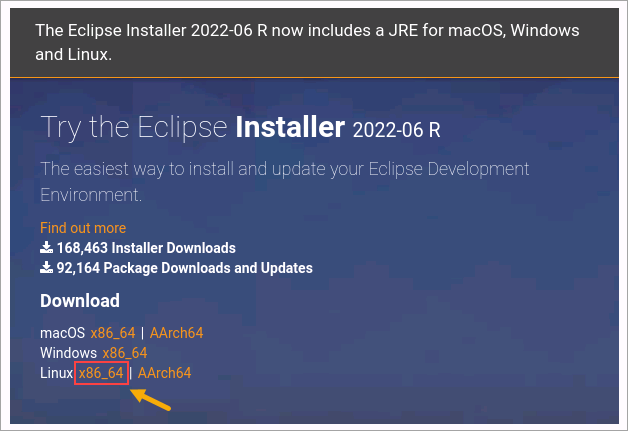
1. Open the Eclipse download website using your web browser.
2. Click the appropriate download link for Linux, as shown below. By default, the browser will download the file to your Downloads folder (~/Downloads).

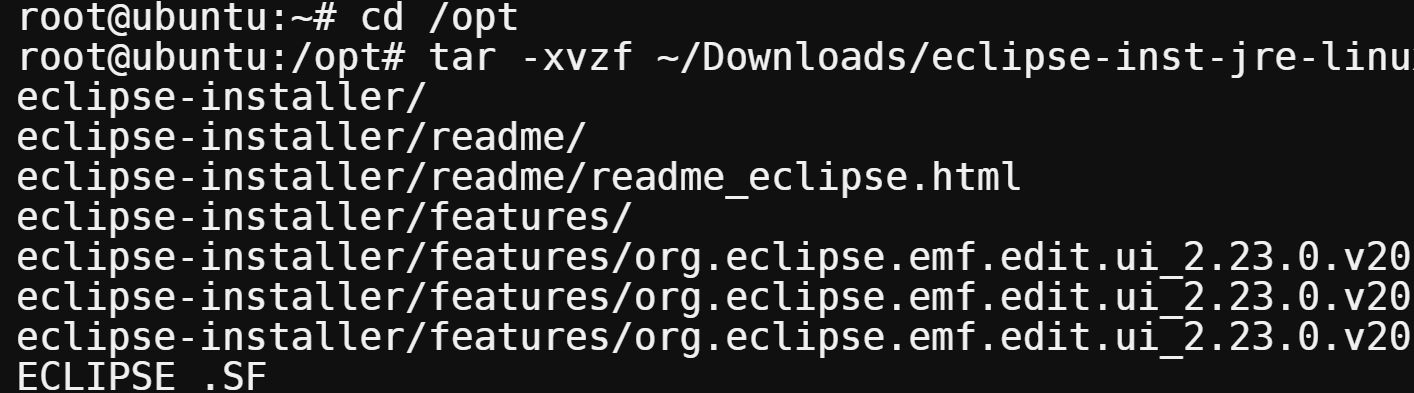
3. Extract the downloaded archive file using the commands below. These commands extract the contents of the package to the /opt directory.
You can choose any location you want to extract the file. But /opt is a common directory for optional software packages, so it’s a good choice.
The -xvzf options tell tar to (x) extract the (f) file through (z) gzip and display the progress (v).
cd /opt tar -xvzf ~/Downloads/eclipse-inst-jre-linux64.tar.gz
4. The installer extracts to the eclipse-installer subdirectory. To confirm the sub directory exists, run the below command.

5. Change the working directory to the eclipse-installer subdirectory.
6. Now that you are in the eclipse-installer directory, run the ./eclipse-inst file to launch the installer.
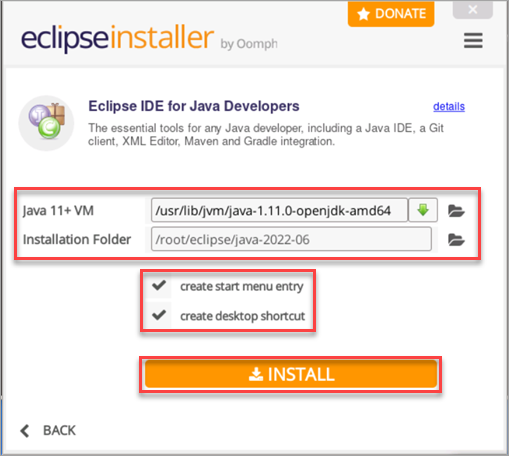
7. On the Eclipse installer window, click the Eclipse IDE type you wish to install. This example installs the Eclipse IDE for Java Developers.

8. Select your Java version and the installation directory on the next screen. The default Java version and installation directory are acceptable in most cases.
Tick the two checkboxes to launch Eclipse using the start menu and the desktop icon. Click the Install button to start the installation process.

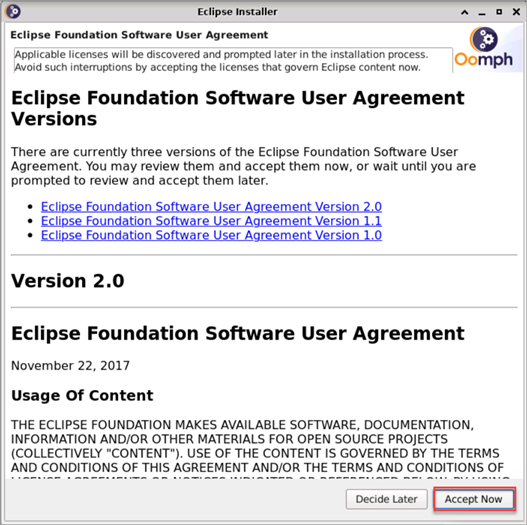
9. Next, click Accept Now on the Eclipse Foundation Software User Agreement page.

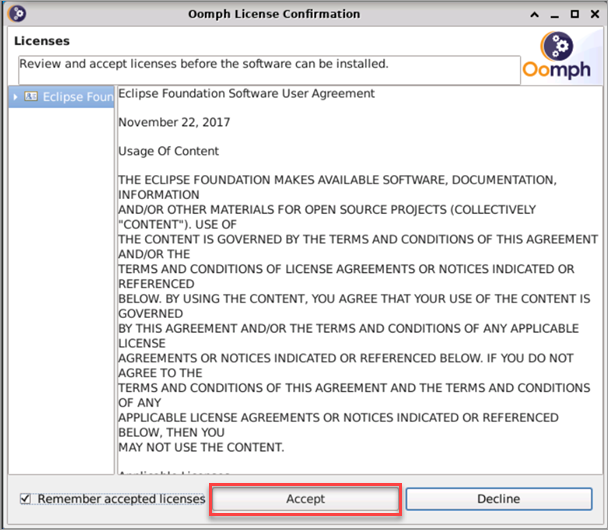
10. Review the Licenses and click Accept to proceed.

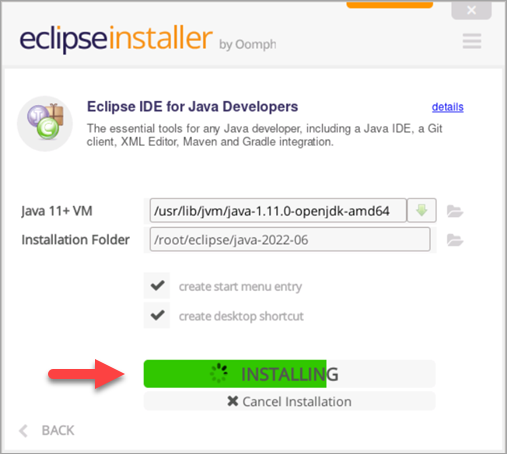
The status changes to Installing.

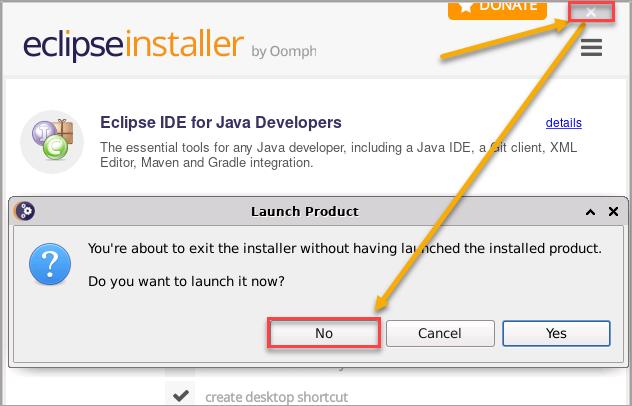
11. After the installation, click the exit button and No to exit the installer.

Starting Eclipse
You’ve completed learning how to install Eclipse IDE. Depending on which installation method you used, there are a few ways to start the Eclipse IDE.
From the Terminal
If you installed Eclipse through the Snap Store, one way to start the Eclipse IDE is by running the below command in the terminal.
Note: This method does not apply if you installed Eclipse IDE using the Eclipse installer.

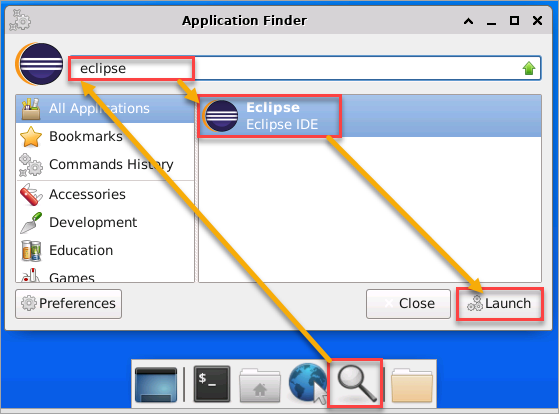
From the Application Finder
Most Linux desktop environments have a search or application finder that allows you to search for an application and launch it.
For example, in Ubuntu GNOME, click the Activities menu and type “eclipse” to search for the Eclipse IDE.
Another example on the XFCE desktop, click the Application Finder icon on the dock. Type “eclipse” in this search bar to find the Eclipse IDE app and click Launch.

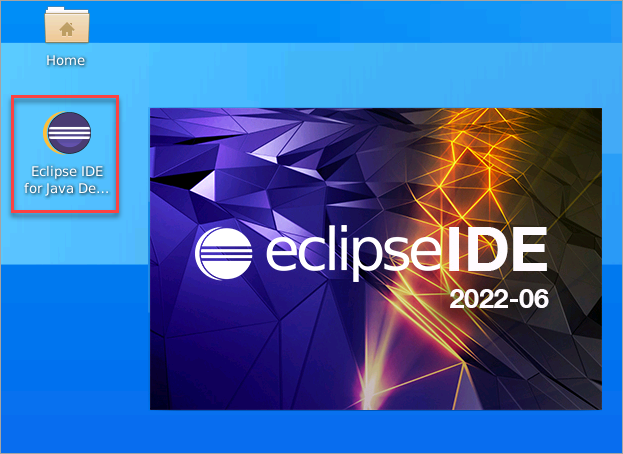
From the Desktop Shortcut
If you installed Eclipse IDE using the Eclipse installer, the installer automatically creates a desktop shortcut for you. All you need to do is double-click the icon to launch the Eclipse IDE.

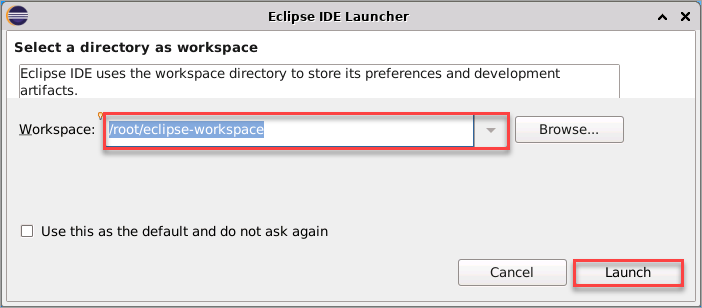
The Eclipse IDE Launcher asks you to specify the workspace directory. Choose the default location or browse to a different one as you wish. This workspace will store all your project files, including the preferences. Once you’ve selected the workspace location, click the Launch button.

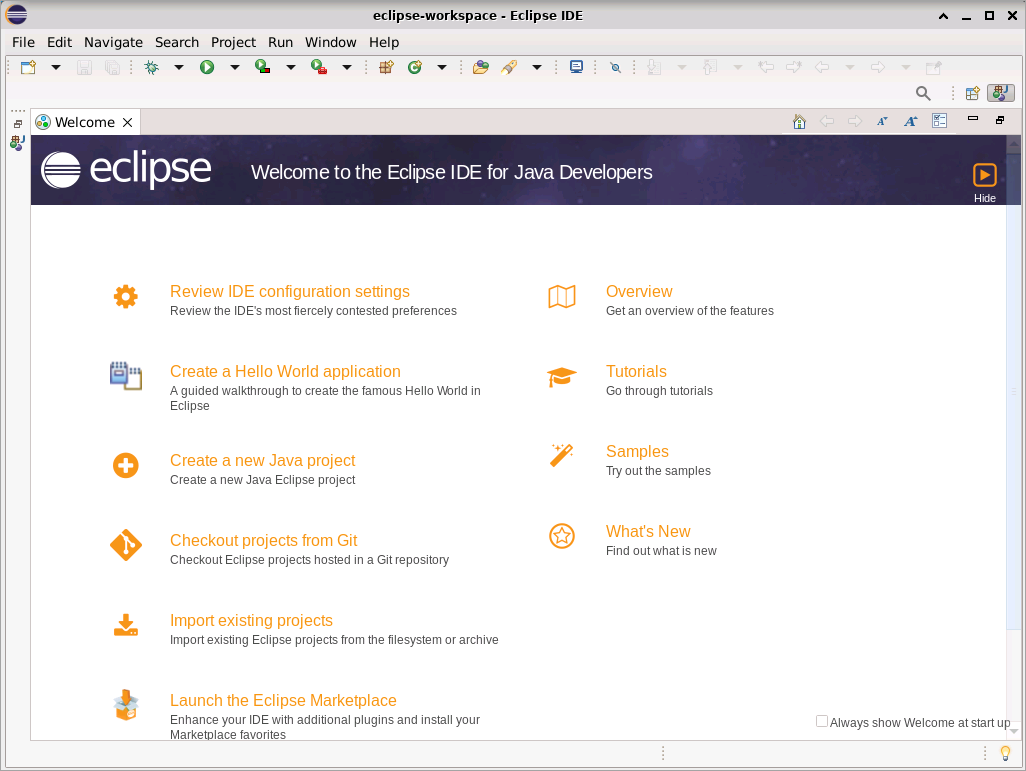
Eclipse will now launch with your selected workspace. You will see the welcome screen when Eclipse launches successfully, as shown below. You can now start using Eclipse.

Conclusion
A popular IDE for Java development, Eclipse comes packed with features to help make your life as a developer easier. In this guide, you have learned the different methods to install Eclipse on Linux and how to launch it.
Are you looking to extend the Eclipse IDE features? The Google App market is a great place to start looking for plugins to add to your Eclipse installation. With over 1000 plugins available, you will find something that will help your development workflow.
Have you used Eclipse before? What are some of your favorite features? Let us know in the comments below!
Hate ads? Want to support the writer? Get many of our tutorials packaged as an ATA Guidebook.
Установка eclipse astra linux

Источник: spectr.spb.ru Программирование на ALT Linux становится все более привлекательным благодаря доступности мощных инструментов разработки, таких как IntelliJ IDEA, Eclipse и Visual Studio Code. Эта статья охватывает процесс установки ALT Linux, а также установку и настройка этих сред разработки.
Установка ALT Linux
Если вы еще не установили ALT Linux, вы можете скачать его с официального сайта с помощью следующей команды:
wget http://ftp.altlinux.org/pub/distributions/ALTLinux/p8/images/regular-cd/altlinux-8.0.2-x86_64.isoСледуйте инструкциям установки, и вы будете готовы к использованию системы и настройке сред разработки.
Установка и настройка IntelliJ IDEA
IntelliJ IDEA – это среда разработки, предоставляющая поддержку для Java, Groovy и других языков. Вы можете установить IntelliJ IDEA, используя команду:
sudo apt-get install intellij-idea-communityПосле установки вы можете запустить IntelliJ IDEA из терминала, введя idea. Внутри среды вы можете настроить настройки проекта, подключиться к репозиторию Git и многое другое.
Установка и настройка Eclipse
Eclipse – еще одна мощная среда разработки, предназначенная в основном для Java, но также поддерживает C/C++, PHP и другие языки. Установка Eclipse выполняется следующей командой:
sudo apt-get install eclipseПосле установки вы можете запустить Eclipse из терминала, введя eclipse. Настройка Eclipse включает настройку среды выполнения Java, настройку проектов и др.
Установка и настройка Visual Studio Code
Visual Studio Code – это современная среда разработки от Microsoft, поддерживающая множество языков и платформ. Установить Visual Studio Code можно командой:
После установки вы можете запустить Visual Studio Code, введя code в терминале. Visual Studio Code имеет множество настраиваемых параметров и поддерживает множество плагинов для улучшения процесса разработки.
Заключение
ALT Linux предлагает широкий спектр возможностей для разработчиков программного обеспечения, включая доступ к мощным средам разработки, таким как IntelliJ IDEA, Eclipse и Visual Studio Code. Легкость установки, гибкость настройки и простота использования делают эти среды разработки идеальными инструментами для разработки на ALT Linux.