Install Zorin OS
A step-by-step guide to help you install Zorin OS alongside your current operating system or instead of it.
What you need
- A computer capable of running Zorin OS. View System Requirements ›
- A USB flash drive with enough capacity for your Zorin OS edition:
- Core and Lite: 4 GB
- Pro/Pro Lite and Education/Education Lite: 8 GB
Download your Zorin OS .iso file
If you haven’t already downloaded your copy of Zorin OS, you will need to get it from our website to proceed.
Please keep the downloaded .iso file on your computer when following the next steps.
Back up your data
We recommend that you copy the important files on your computer to an external drive or cloud storage service. Installing a new operating system may overwrite your data.
Create a bootable USB Install Drive
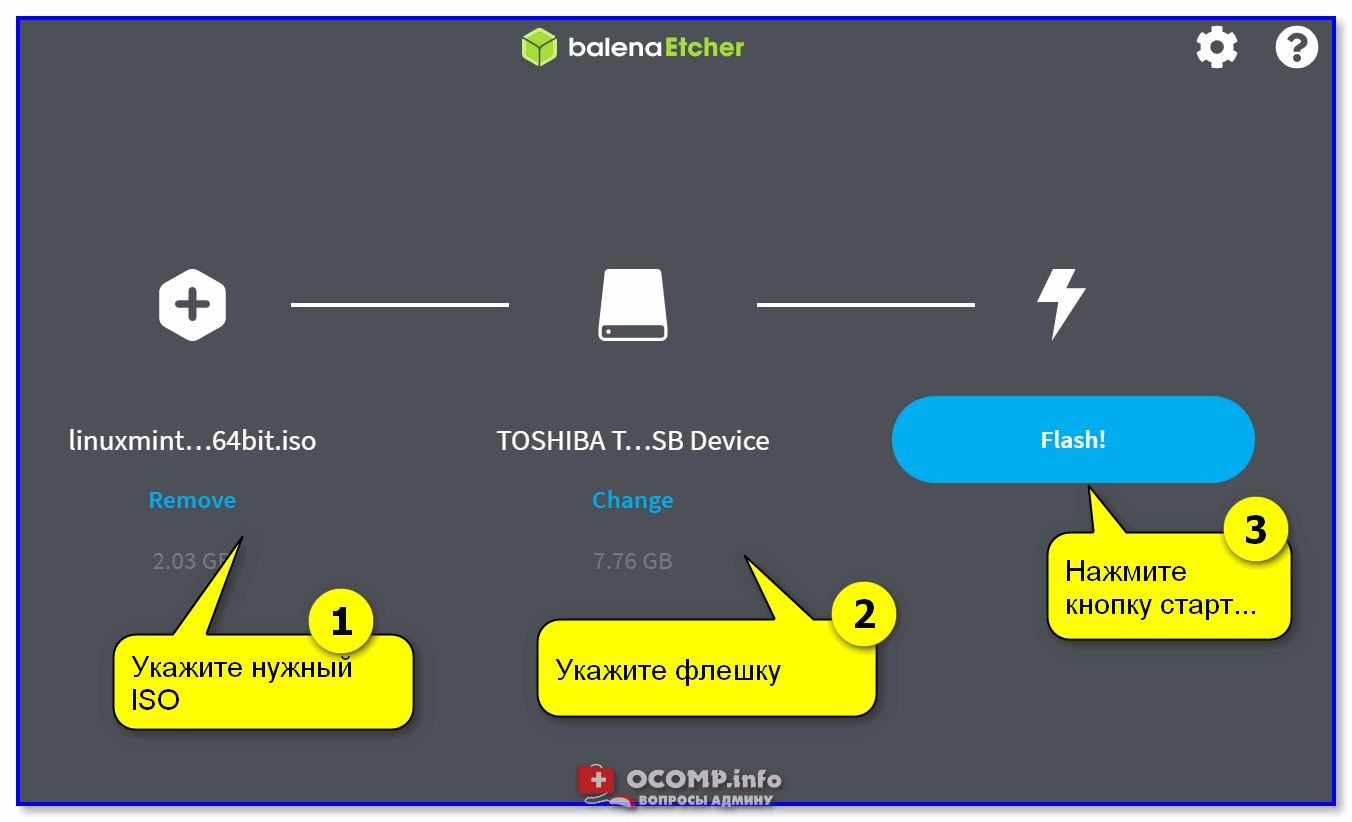
You will need to write the Zorin OS .iso file to your USB flash drive using an app called balenaEtcher. The computer that you use to do this can be different from the computer you plan to install Zorin OS onto.
All contents on the USB flash drive will be erased. We recommend that you use an empty USB flash drive or back up the contents of your USB flash drive now.
- Plug the USB flash drive into your computer.
- Double-click on the balenaEtcher download file to run the app.
- On Linux. If the balenaEtcher app doesn’t open after double-clicking on it, you may need to mark its downloaded “.AppImage” file as executable. To do so, right-click on the file in the file browser and open its Properties. Navigate to the Permissions section to enable the “Allow executing file as program” option.
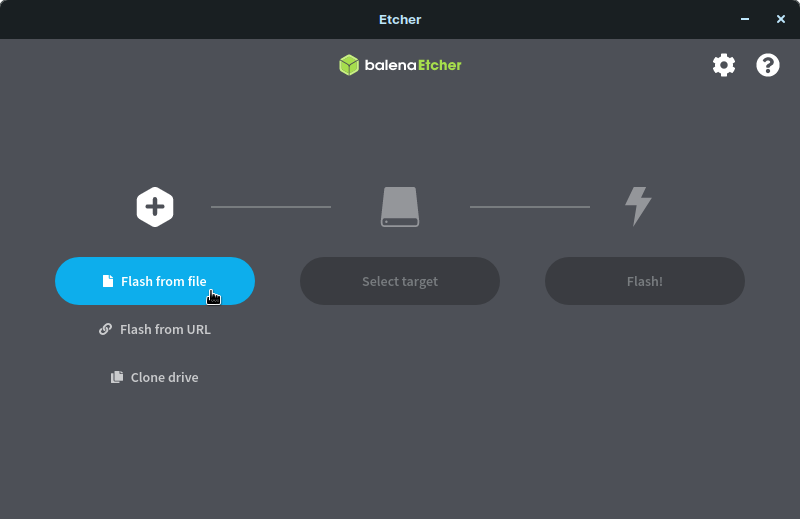
- Press “Flash from file” and select the downloaded Zorin OS .iso file on your computer. The file should be in your “Downloads” folder.
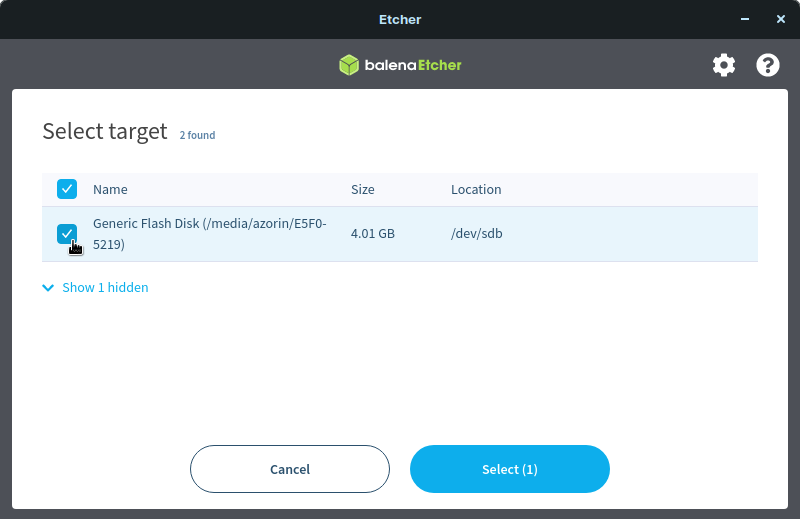
- Press “Select target” and choose the correct USB flash drive in the list.
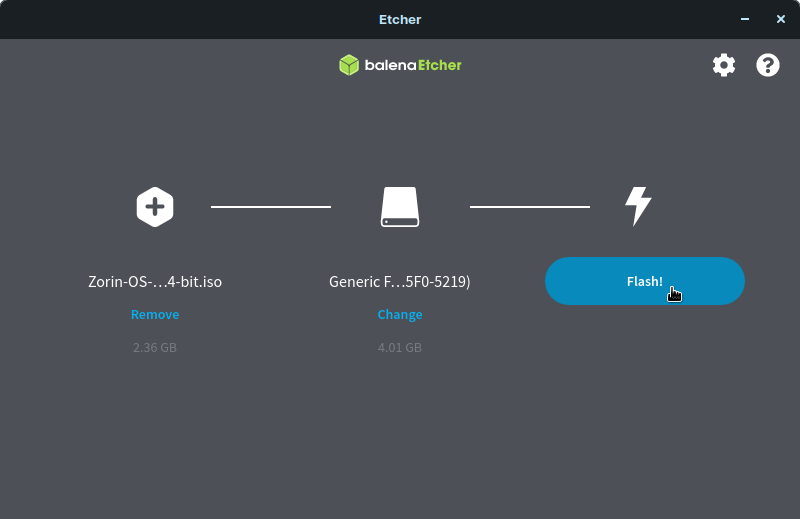
- Press “Flash!” to begin writing Zorin OS to the USB flash drive.
- After a few minutes, the USB flash drive will be ready for booting into Zorin OS.
Boot from the USB Install Drive
To install Zorin OS, you must boot your computer from the USB Install Drive.
- Switch off the computer you want to install Zorin OS onto. Make sure it’s completely powered off, and not in sleep or hibernate mode.
- Plug the Zorin OS USB Install Drive into the computer.
- Switch on the computer. Immediately at start-up, repeatedly press the designated key to open the Boot Device Menu.
- On a PC. This key should be indicated on the screen at start-up or in your computer’s manual. If you’re unsure which key to press, it is usually either Esc , Delete , F2 , F12 , or another function key.
- On a Mac. Press and hold the ⌥ Option key at start-up. If you’re using a wireless keyboard, you may need to plug in a USB keyboard instead to be able to select the boot device.
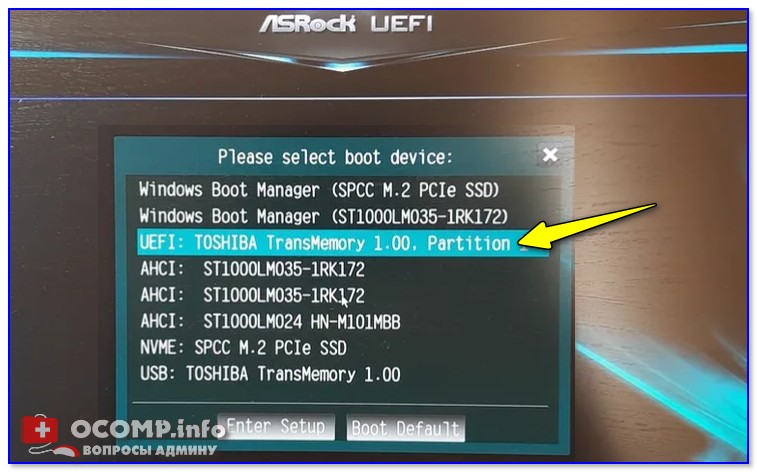
- At the Boot Device Menu, use the arrow keys to highlight the option which mentions “USB”, “EFI”, or the flash drive manufacturer’s name. Press Enter to boot from the Install Drive.
- On a Mac. Sometimes the Install Drive might be incorrectly identified as “Windows”, which is normal.
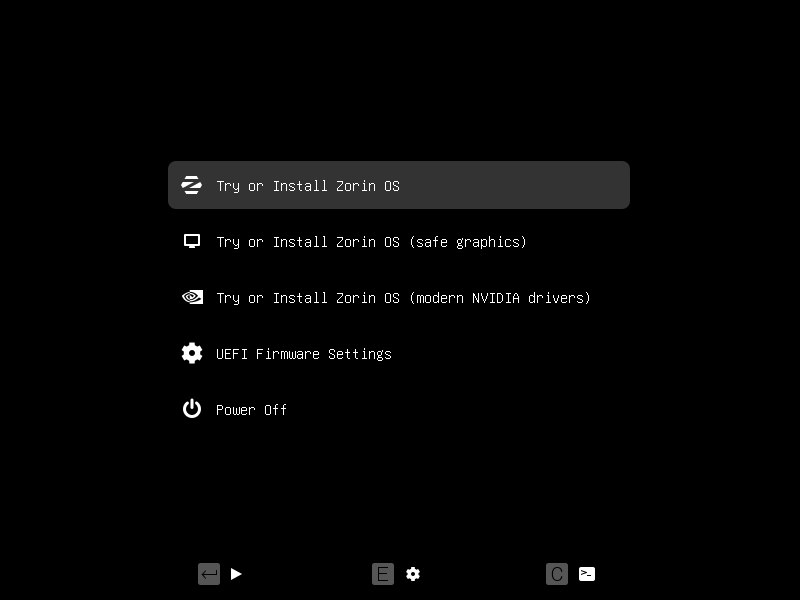
- Select the “Try or Install Zorin OS” option in the Zorin OS boot selection menu using the Enter key.
- If your computer has a modern NVIDIA graphics card (produced after 2013). You can select the “Try or Install Zorin OS (modern NVIDIA drivers)” option using the ↓ ↑ keys. Press Enter to boot and install with the official NVIDIA proprietary graphics drivers.
- While booting, Zorin OS will check the USB Install Drive to ensure there aren’t any defects. We recommend that you do not skip this check the first time you use the USB Install Drive. It helps prevent issues while installing Zorin OS to your computer.
Install your new copy of Zorin OS
Complete the installation of your new copy of Zorin OS to your computer.
- Follow the on-screen instructions to start the installation.
By selecting the Try Zorin OS option, you can test drive Zorin OS before installing it to your computer. Please note that the system will run slower from a USB flash drive than when it’s installed on the computer.
- If you want to keep your current operating system installed alongside Zorin OS (dual-boot). Select the “Install Zorin OS alongside [your current operating system]” option and press “Continue” to choose how much space to allocate to Zorin OS. If this option didn’t appear for you, see the “Manual partitioning” instructions below.
- If you want to have only Zorin OS installed on your computer. Select the “Erase disk and install Zorin OS” option and press “Install Now”. Use this option to enable advanced features like disk encryption and LVM.
- Manual partitioning. If your computer has a non-standard storage drive configuration (such as multiple internal hard drives/SSDs), select the “Something else” option and press “Continue”. You can learn how to use this option in this article ›
That’s it! We hope you’ll enjoy using Zorin OS 😃️
Типовая установка Zorin OS на диск, на котором уже есть Windows (без удаления данных)
Доброго дня!
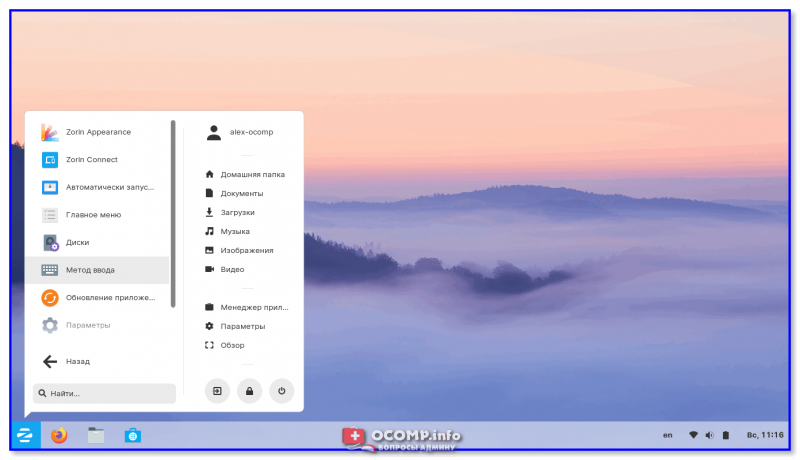
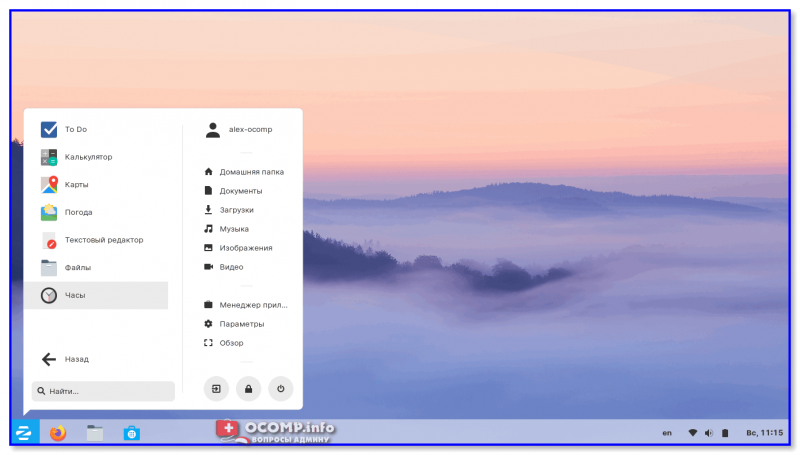
В последние несколько лет интерес к Zorin OS начал несколько расти — ведь эта система очень похожа на Windows 7! ( примечание : ну а т.к. поддержка Windows 7 прекратилась, то интерес вырос в двое. Тем паче, что Windows 10 работает далеко не всегда так «гладко». ).
К тому же Zorin OS позволяет достаточно легко познакомиться с «миром» Linux (причем, первое время в ней можно работать вообще без терминала, пользуясь предустановленным ПО и магазином приложений. Удобно?! 👌).
Собственно, в этой небольшой заметке решил на простом примере показать установку этой ОС без удаления информации на диске (т.е. ОС можно поставить как вторую, рядом с текущей Windows).
Zorin OS — внешний вид напоминает Windows 7!
Пошаговая установка Zorin OS
👉 ШАГ 1: освобождение свободного места
В этой заметке я буду исходить из того, что у вас есть диск, на который установлена ОС. И вы не хотите ее пока удалять, а попробовать установить Zorin OS рядом с ней. Если никакие данные на диске вам не нужны (и вы готовы его отформатировать) — можете переходить сразу к шагу 2.
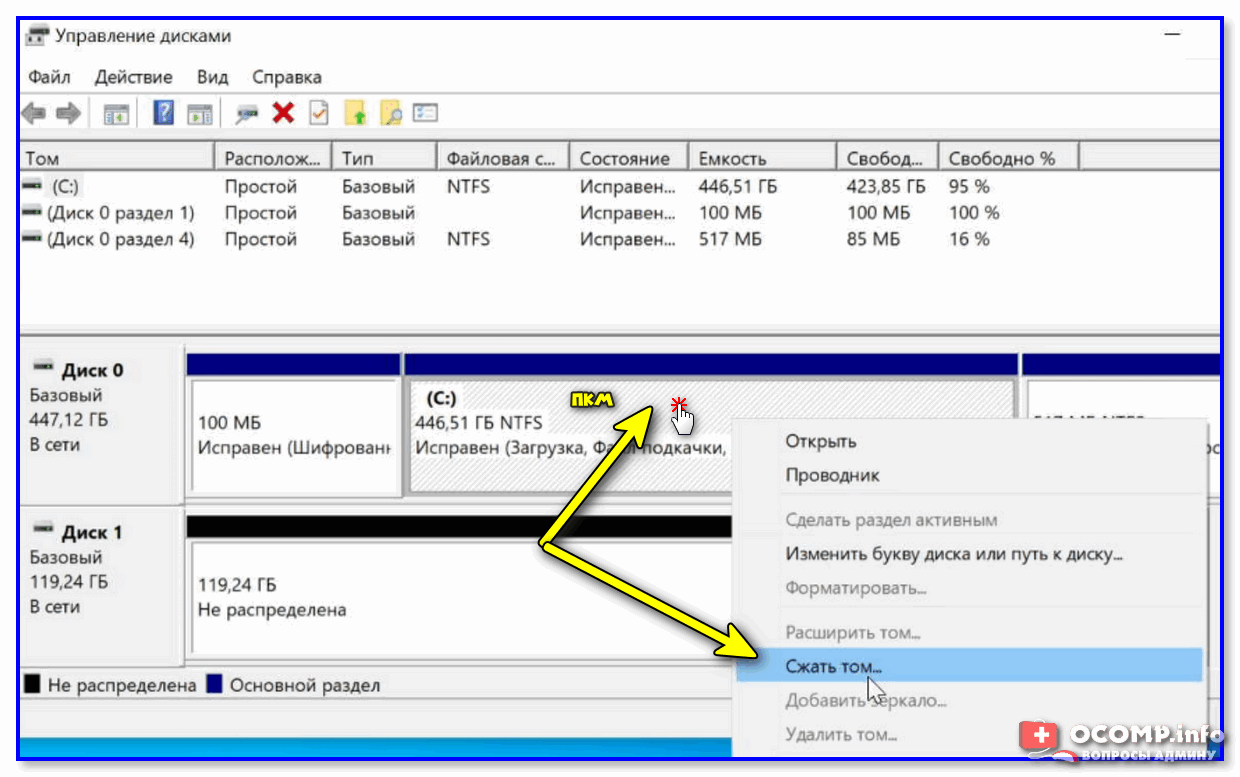
И так, после загрузки текущей установленной Windows — необходимо открыть управление дисками. Далее необходимо кликнуть правой кнопкой мыши по разделу, на котором есть свободное место (не менее 30 ГБ) — в появившемся меню выбрать «Сжать том» (эта операция создаст еще один раздел на диске. Причем, никаких данных на сжимаемом разделе удалено не будет!) .
Сжимаем системный раздел с Windows
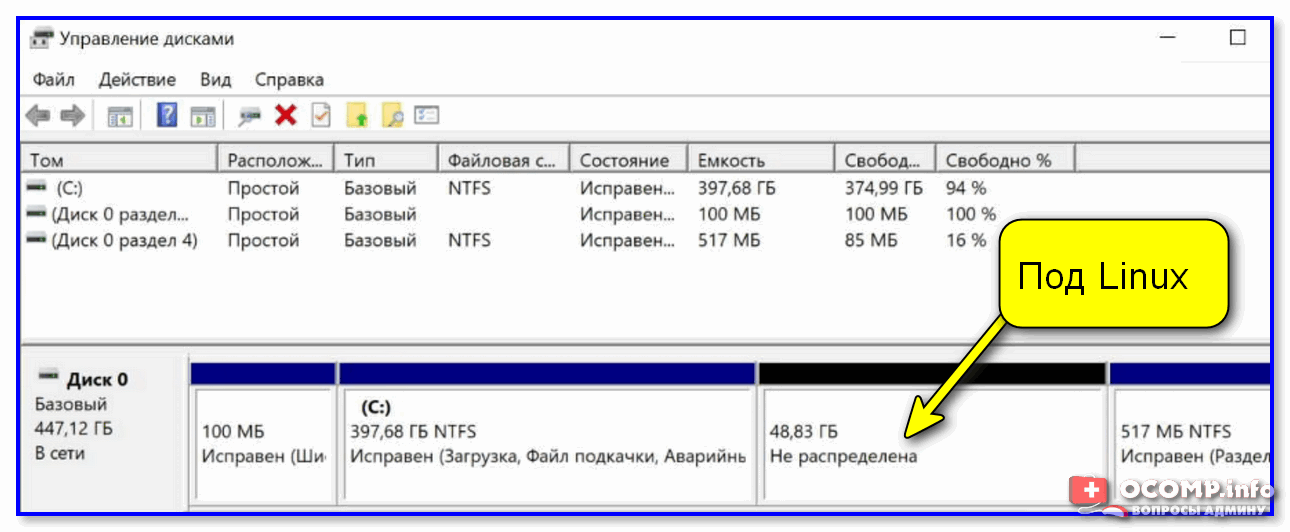
В результате на диске появится не распределенное место (в моем случае 48,83 ГБ). Именно на это «свободное место» мы и установим Zorin OS. 👌
Раздел под Linux создан (не распределен!) // Управление дисками
👉 ШАГ 2: создание загрузочной флешки
Есть несколько версий Zorin OS — для обычной домашней работы (для начала) я бы порекомендовал воспользоваться базовой версией. После загрузки ISO-образа с этой ОС — его необходимо будет записать на USB-флешку. О том, как это лучше сделать — рассказано в одной моей предыдущей заметке. 👇
👉 В помощь!
Как создать загрузочную флешку с Linux (при работе в Windows). Cкрины настроек из бесплатных программ
Etcher — всего три действия!
👉 ШАГ 3: загрузка с подготовленной флешки
В общем-то, эта «операция» стандартна:
- подключаете подготовленную флешку (из шага 2) к USB-порту;
- включаете ПК;
- входите в BOOT Menu;
- выбираете флешку и загружаетесь с нее.
Если флешка была правильно подготовлена и все прошло корректно — должна произойти загрузка ОС (рабочий стол очень похож на классический — как в Windows 👇).
👉 ШАГ 4: запуск установки + разметка диска
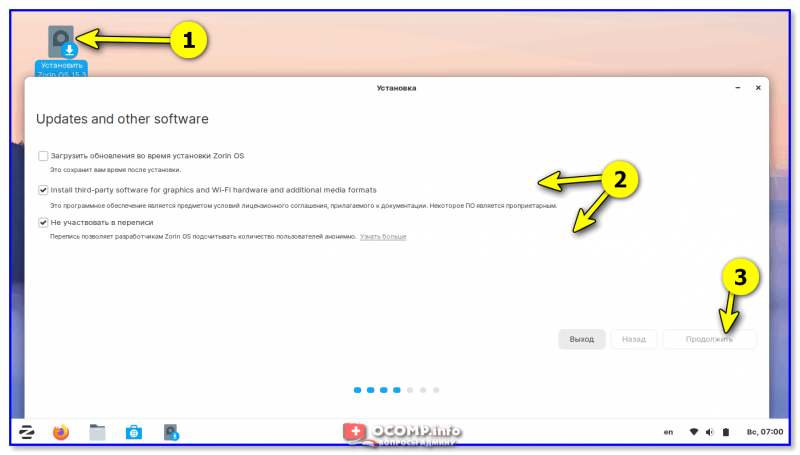
Для запуска установки ОС — обратите внимание на рабочий стол: в левом верхнем углу должна быть ссылочка «Установить Zorin OS» . Также она продублирована и есть в меню ПУСК.
Кстати, после запуска инсталляции — отметьте галочками, чтобы в процессе были также установлены кодеки и драйвера ( примечание: также установщик попросит указать язык — это окно я опустил. ) .
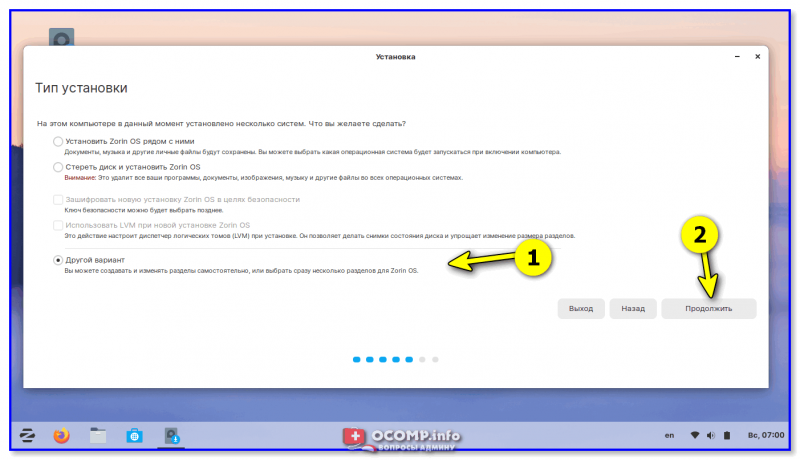
Следующий важный шаг: тип установки. Именно здесь задается место (диск), куда мы установим ОС. Т.к. вначале заметки я оговорил, что мы будем «ставить» ОС рядом с Windows (так, чтобы никакие данные не пострадали) — мы эту операцию сделаем вручную (ничего сложного тут нет).
Для этого нужно выбрать «Другой вариант» и нажать «Продолжить» .
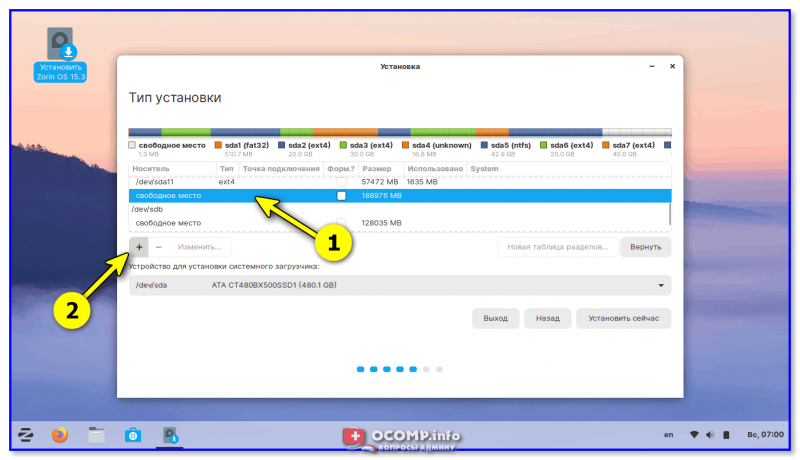
Установщик должен отобразить нам все подключенные накопители (они будут отображаться, как SDA, SDB и пр.). Нам нужно найти среди них тот, на котором мы подготовили «свободное место» (в шаге 1).
Затем выбираем это «свободное место» и кликаем на «плюсик».
Создать новый раздел на свободном месте
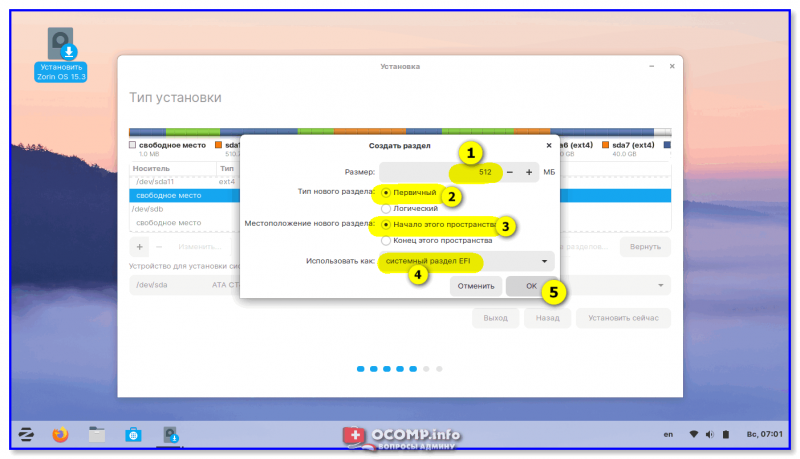
Далее создаем системный раздел EFI на 512 МБ (пример с настройками указан на скрине ниже 👇).
Создать системный раздел EFI
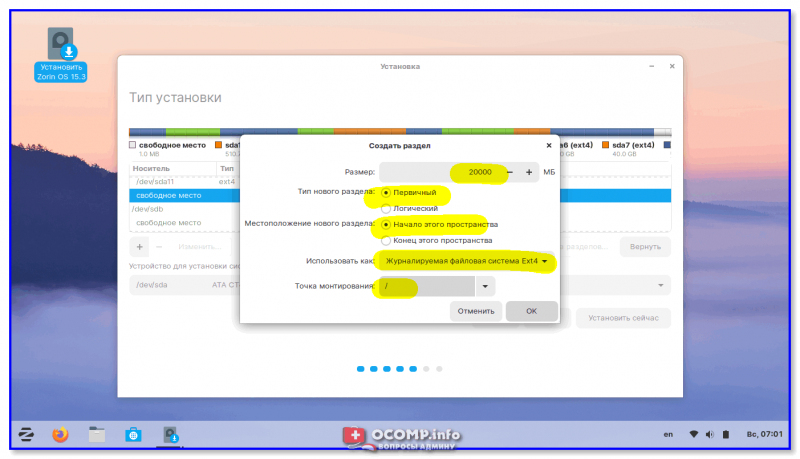
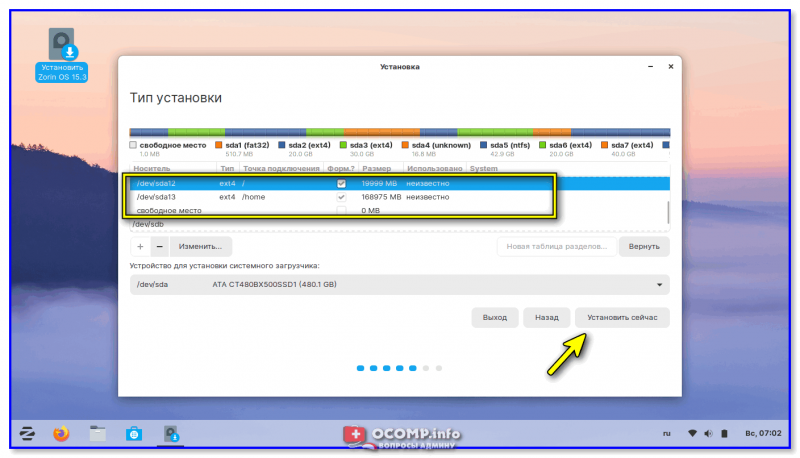
Далее снова выбираем «наше свободное место» и снова жмем на «плюсик» — теперь создаем корневой раздел (на него будет установлена ОС). Я в своем примере выделил 20 000 МБ под него.
Пример настроек — см. на скрине ниже, выделено желтым. 👇
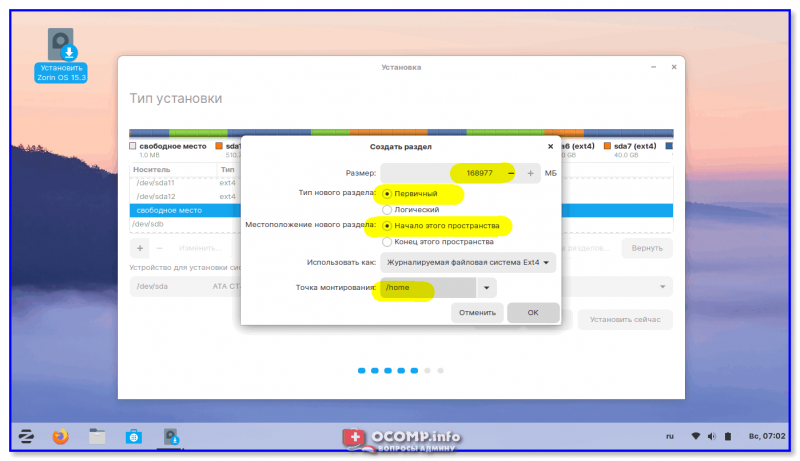
Снова находим свободное место, жмем «на плюс» и создаем домашний раздел: на нем будут расположены все пользовательские данные: музыка, фильмы и т.д.
Теперь, когда все настройки заданы — можно нажать на кнопку «Установить сейчас» . 👇
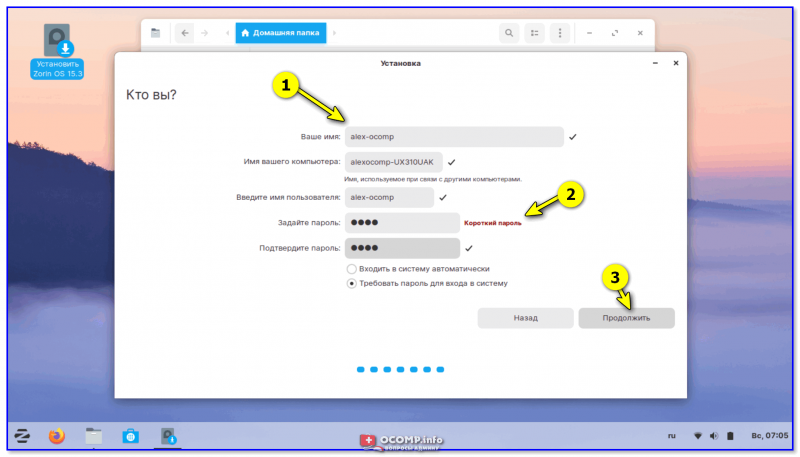
При задании имени и пароля — рекомендую использовать латиницу (без русских символов).
Задание имени пользователя и пароля
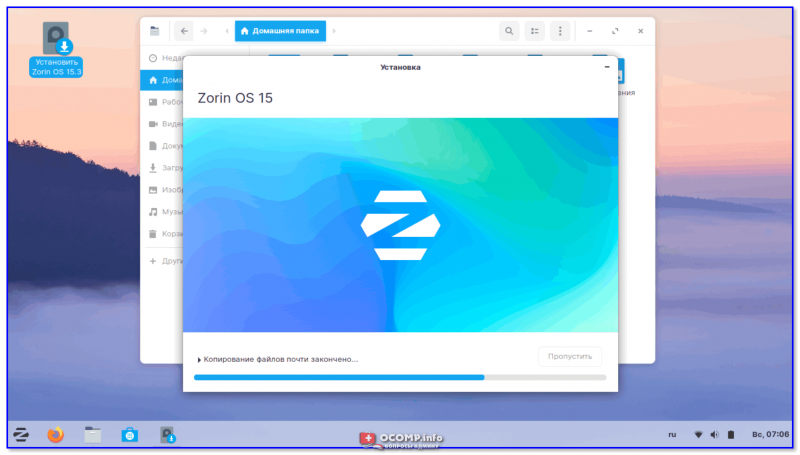
Собственно, на этом вроде как всё: далее достаточно просто дождаться копирования всех установочных файлов и перезагрузить ПК (когда появится соответственное окно).
Завершение копирования файла
На сим вроде как всё (дополнения лишними не будут).
