How to install Linux on a USB drive with UEFI support using VirtualBox
That’s the third post on installing Linux on a USB drive!
Remember that the idea is to have a USB drive that will work as a portable Linux operating system on any computer.
In the first post, How to install Linux on a USB drive using Virtualbox, the USB drive with Linux installed could be used when booting from a computer with “Legacy boot” enabled: it could not boot if UEFI were the only choice in that computer.
In the second post, How to install Linux on a USB with UEFI support, I showed how to install Linux on the USB drive directly, without using VirtualBox, while creating a UEFI bootable device. However, you had to be careful during the installation to avoid overwriting the UEFI boot loader of your computer.
In this post, I’ll show how to install Linux on a USB drive, with UEFI support, using VirtualBox. In the end, we’ll get a UEFI bootable device, but without being scared of breaking the UEFI boot loader of your computer, since we’ll do that using a virtual machine.
The scenario
First of all, let’s summarize what I want to do. I want to install Linux on a portable external USB SSD. I don’t want a live distribution: a live distribution only allows you a little testing experience, it’s not easily maintainable and upgradable, it’s harder to keep your data in there. On the contrary, installing Linux on a USB drive will give you the whole experience (and if the USB drive is fast, it’s almost like using Linux on a standard computer; that’s undoubtedly the case for an external SSD, which are pretty cheap nowadays).
In the previous post, I described how to create such an installation from VirtualBox. As I said, you can boot the USB drive only in Legacy mode. This time, we’ll be able to boot the USB drive in any UEFI computer.
I’m going to perform this experiment:
- I’m going to use VirtualBox installed on a Dell XPS 13 where I already have (in multi-boot, UEFI), Windows, Ubuntu, Kubuntu, and Manjaro GNOME
- I’m going to install Ubuntu 21.10 into an external USB SanDisk SSD (256 Gb)
- then I’m going to install on the same external USB drive also EndeavourOS (an excellent distribution I’ve just started to enjoy) along with the installed Ubuntu
I have already downloaded the two distributions’ ISOs.
I’ve installed VirtualBox in Ubuntu following this procedure
By the way, since the second distribution will take precedence over an existing UEFI configuration on the USB, it’s better to start with Ubuntu and then proceed with EndeavourOS (Arch based). While an Arch GRUB configuration has no problem booting other distributions, Ubuntu cannot boot an Arch-based distribution. Of course, the second distribution’s GRUB menu will let you also boot the first one. We could solve the booting problem later, but I prefer to keep things easy and install them in the above order.
In the screenshots of the running virtual machine, the USB SanDisk is /dev/sda.
I will boot a virtual machine where I set the ISO of the current distribution as a LIVE CD. I’m going to use a different virtual machine for each distribution. Maybe that’s not strictly required, but since the two OSes are different (the first one is an Ubuntu OS, while the second one is an Arch Linux), I prefer to keep the two virtual machines separate, just in case.
Create the first virtual machine and install Ubuntu on the USB drive
I’m assuming you’re already familiar with VirtualBox, so I’ll post the main screenshots of the procedure.
Let’s create a virtual machine.

We don’t need a hard disk in the virtual machine since we’ll use it only for installing Linux on a USB drive, so we’ll ignore the warning.
Now it’s time to configure a few settings.
The important setting is “Enable EFI” to make our virtual machine aware of UEFI, and the booted Live OS will also be aware of it. As we will see later, the booted Live OS will correctly install GRUB in a UEFI partition.


We also specify to insert the ISO of the distribution (Ubuntu 21.10) so that when the virtual machine starts, it will boot the Live ISO.
Let’s start the virtual machine, and we will see the boot menu of the Live ISO.

We choose to Try Ubuntu, and then we plug the external SanDisk in the computer, and we make the virtual machine aware of that by using the context menu of the USB connection icon and selecting the item corresponding to the USB hard disk (in your case it will be different)
After that, the Ubuntu Live OS should notify about the connected disk. We can start the installation, and when it comes to the disk selection and partition, I chose to erase the entire disk and install Ubuntu:
Of course, you can choose to partition the hard disk manually, but then you’ll have to remember to create a GPT partition table, and you’ll also have to create the FAT32 partition for UEFI manually. By using “Erase disk and install Ubuntu,” I’ll let the installer do all this work.
You can see the summary before actually performing the partition creation. Note that we are doing such operations on the external USB drive, which, as I said above, corresponds to /dev/sda.
Now, we have to wait for the installation to finish. In the end, instead of restarting the virtual machine, we shut it down.
Let’s restart the computer with the USB drive connected. Depending on the computer setup, you’ll have to press some function key (e.g., F2 or, in my Dell XPS 13, F12, to choose to boot from a different device). Here’s the menu in my Dell XPS 13, where we can see that the external USB (SanDisk) is detected as a UEFI bootable device. It’s also detected as a Legacy boot device, but we’re interested in the UEFI one:
We can then verify that we can boot the Ubuntu distribution installed in the USB drive.
By the way, I also verified that, without the USB drive connected, I can always boot my computer: indeed, the existing UEFI Grub configuration is intact (remember, I have Windows, Ubuntu, Kubuntu, and Manjaro GNOME; the grub menu with higher priority is the one of Manjaro):
Create the second virtual machine and install EndeavourOS on the USB drive
Let’s create the second virtual machine to install on the same USB drive EndeavourOS, along with the Ubuntu we have just installed.
To speed up things, instead of creating a brand new machine, we clone the previous one, and we change a few settings (basically the name, the version of Linux, which now is Arch, and finally we change the Live ISO):


Let’s start the virtual machine and land into the EndeavourOS Live system
As before, we have to connect the USB drive to the computer and let the virtual machine detect that (see the procedure already shown in the first installation section).
We start the installer and choose the “Online” version so that we can choose what to install next (including several Desktop Environments). The installer is Calamares (if you used Manjaro before, you already know this installer).
When it comes to the partitioning part, we make sure we select the SanDisk external drive (as usual, /dev/sda). Note that the installer detects the existing Ubuntu installation. This time, we choose to install EndeavourOS alongside:

And we use the slider to specify how much space the new installation should take:
Let’s select a few packages to install (a cool feature of EndeavourOS)
And this is the summary before starting the installation:
Once the installation has finished, we shut down the virtual machine and reboot the computer with the USB drive inserted. This time we see the EndeavourOS grub configuration, including the previously installed Ubuntu. Remember, these are the installations in the USB drive (as usual, note the /dev/sda representing the USB drive):
And now we have a USB drive with two Linux distributions installed that we can use to boot our computers! However, some drivers for some specific computer configurations might not be installed in the Linux installation of the external USB. Also, other configurations like screen resolutions and scaling might depend on the computer you’re booting and might have to be adjusted each time you test the external USB drive in a different computer.
I hope you enjoyed the tutorial!
Happy installations and Happy New Year! 🙂
Установка linux usb virtualbox
Библиотека сайта rus-linux.net
Теперь запустите терминал и выполните одну из следующих команд, чтобы создать файл vmdk:
$ sudo vboxmanage internalcommands createrawvmdk -filename ~/usb.vmdk -rawdisk /dev/sdc
В некоторых дистрибутивах Linux команда vboxmanage чувствительна к регистру символов. В этом случае команда создания vmdk-файла должна иметь вид:
$ sudo VBoxManage internalcommands createrawvmdk -filename ~/usb.vmdk -rawdisk /dev/sdc
В результате будет создан новый vmdk-файл с именем “usb.vmdk” в вашем домашнем каталоге $HOME. Если создание vmdk-файла пройдет успешно, вы увидите сообщение следующего вида:
RAW host disk access VMDK file /home/sk/usb.vmdk created successfully.
Задайте нужные разрешения для вновь созданного vmdk-файла:
$ sudo chown $USER:$USER ~/usb.vmdk
Затем добавьте пользователя в группы “vboxusers” и “disk”, используя следующие команды:
$ sudo usermod -a -G vboxusers sk
Конечно, не забудьте заменить “sk” на ваше имя пользователя. Пожалуйста, помните, что добавление пользователя в группу “disk” опасно и представляет угрозу безопасности.
После этого извлеките USB-диск и перезагрузите систему, чтобы изменения вступили в силу. Если вы не извлечете ваш USB-диск, имя вашего диска может измениться при последующей загрузке. Так что это важно: вначале удалите USB-диск, а потом перезагружайте систему.
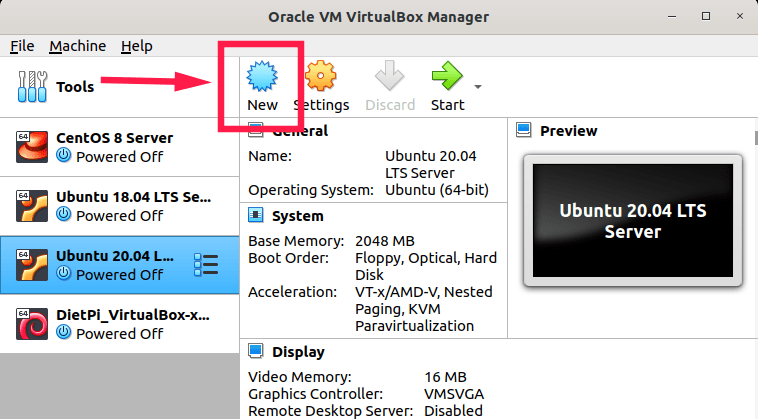
Теперь откройте приложение Oracle Virtualbox и создайте новую виртуальную машину:
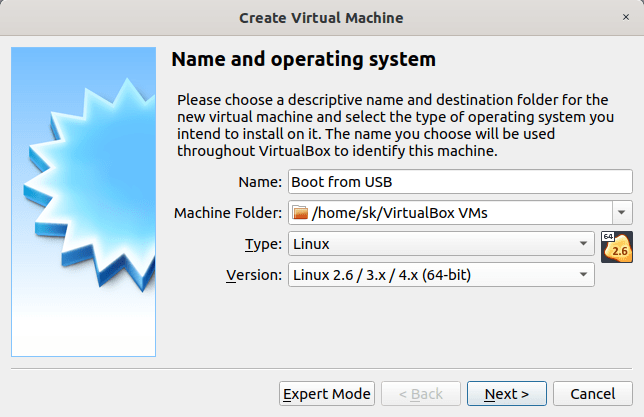
Укажите имя виртуальной машины, тип и версию ОС и щелкните по кнопке Next:
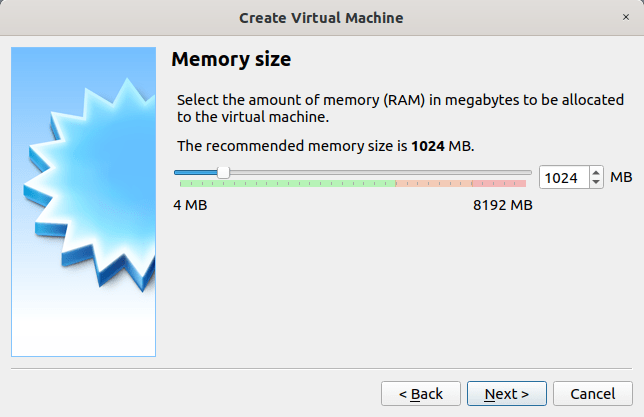
Задайте объем оперативной памяти:
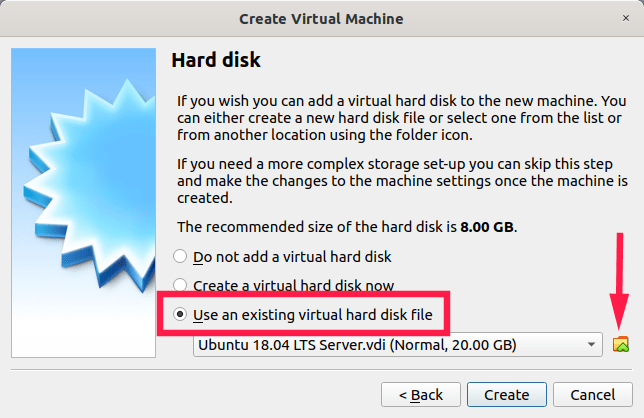
Следующий шаг очень важен. Выберите вариант “Use an existing virtual hard disk file” и щелкните по экранной кнопке с изображением стрелки ВВЕРХ:
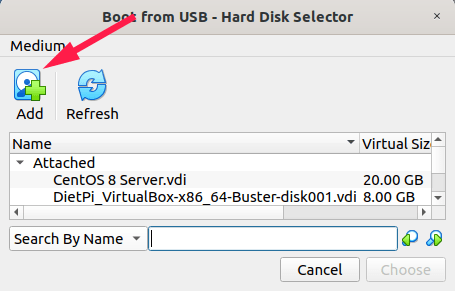
В открывшемся окне щелкните по иконке “Add” чтобы выбрать вновь созданный vmdk-файл:
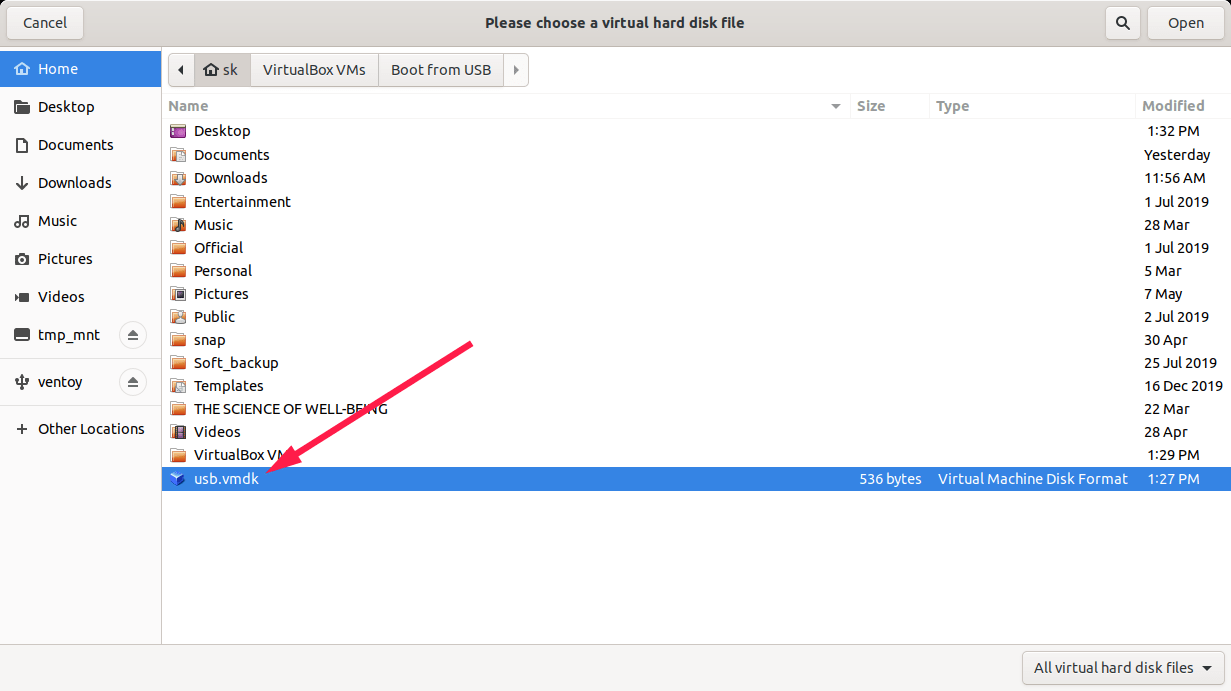
Выберите созданный вами vmdk-файл на вашем локальном диске:
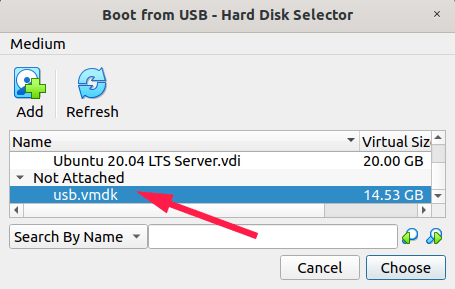
После добавления файла vmdk нажмите кнопку «Choose» (Выбрать) для подтверждения:
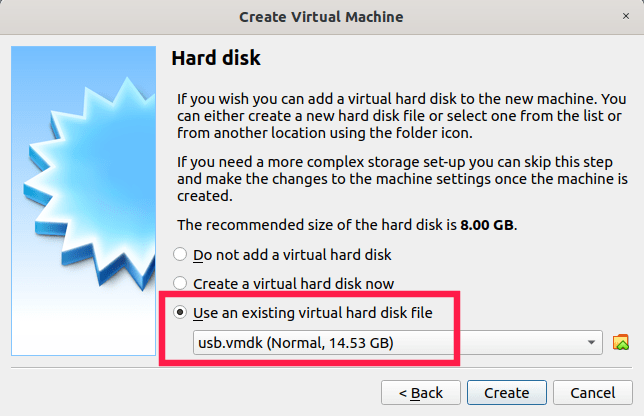
После этого вы увидите, что файл vmdk выбран в качестве виртуального жесткого диска для нового виртуального компьютера. Нажмите Next (Далее), чтобы продолжить:
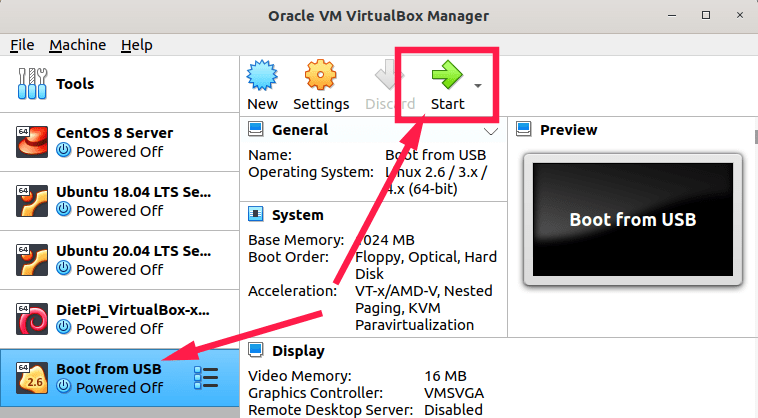
Все сделано! Подключите ваш загрузочный USB-диск и запустите виртуальную машину:
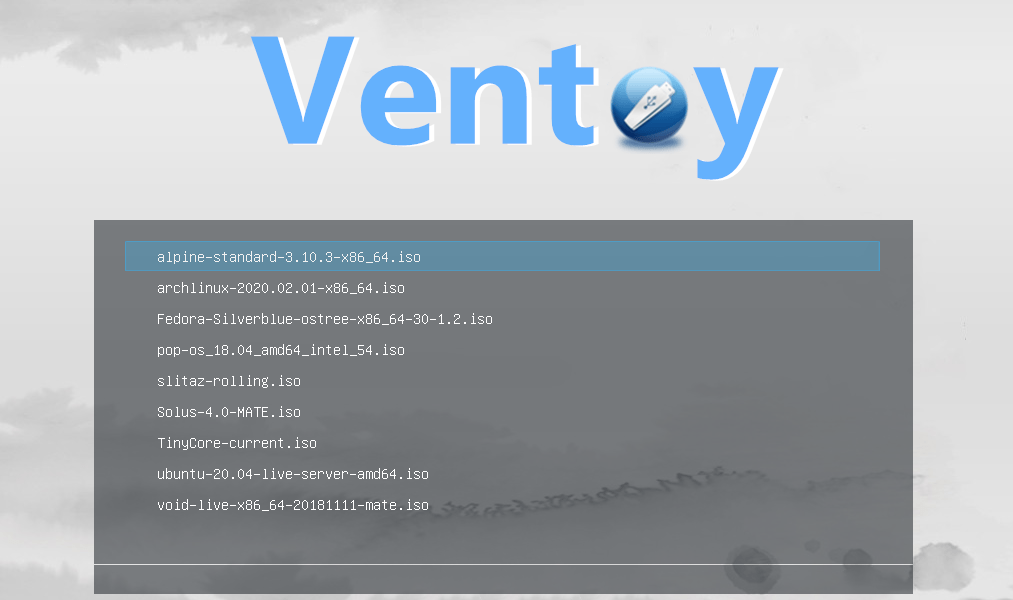
Теперь вы можете загружать одну из ОС, имеющихся на вашем USB-диске, в Oracle Virtualbox. На следующей картинке вы видите момент загрузки с загрузочного USB-диска, созданного с помощью скрипта Ventoy, в Virtualbox:
Создание ISO-образа загрузочного USB-диска
Существует другой способ загрузки с USB-диска в Virtualbox. В этом методе не требуется создавать vmdk-файл. Вместо этого создайте ISO-образ вашего загрузочного USB-диска, используя утилиту “GNOME disk utility” или команду “dd” как описывается в следующей статье:
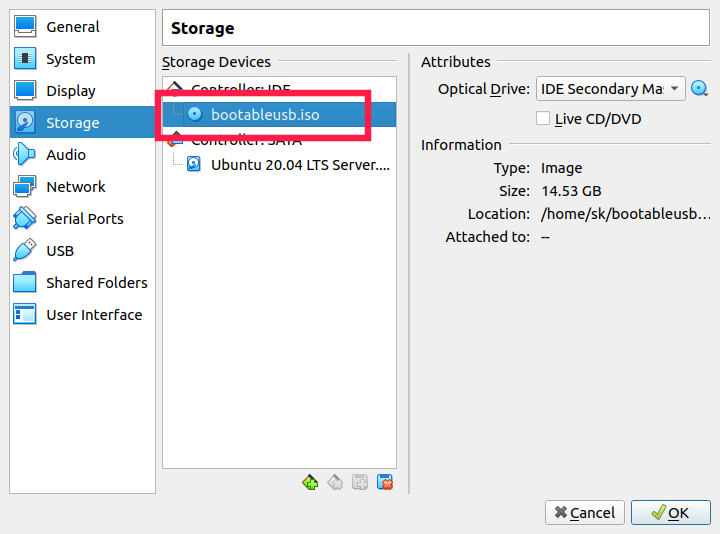
После создания ISO-образа, откройте приложение Virtualbox и перейдите на вкладку Settings любой из имеющихся у вас виртуальных машин, после чего добавьте (смонтируйте) вновь созданный .iso-файл как оптический диск в секции “Storage Controller: IDE”.
Теперь запустите виртуальный компьютер и загрузите систему с этого ISO-образа.
Пожалуйста, обратите внимание, что этот метод работает не со всеми образами USB-дисков, в частности, с USB-дисками разбитыми на несколько разделов.


