- How to Install and Configure the MongoDB on Linux Mint 20
- To Install and Configure the MongoDB on Linux Mint 20
- Introduction:
- Installation Procedure:
- How to Install and Use MongoDB on Linux Mint
- MongoDB on Linux Mint
- Install MongoDB on Linux Mint
- Install MongoDB from Ubuntu package server
- Install MongoDB from MongoDB repo
- Using MongoDB
- Final thoughts
- About the author
- Sidratul Muntaha
- How To Install MongoDB on Linux Mint 21
- Install MongoDB on Linux Mint 21 Vanessa
How to Install and Configure the MongoDB on Linux Mint 20
To Install and Configure the MongoDB on Linux Mint 20
Introduction:
MongoDB is a document-oriented DB that stores data in Jason like documents with a dynamic schema. It means you can store your records without worrying about the data structure such as the number of fields to store values. MongoDB documents are similar to JSON objects. This tutorial will cover the installation and configuration of the MongoDB on Linux Mint 20.
Installation Procedure:
Check the version of OS.
[email protected]:~# cat /etc/os-release NAME="Linux Mint" VERSION="20 (Ulyana)" ID=linuxmint ID_LIKE=ubuntu PRETTY_NAME="Linux Mint 20" VERSION_ID="20" Add the MongoDB repository by using the following command
[email protected]:~# wget -qO - https://www.mongodb.org/static/pgp/server-4.2.asc | apt-key add - ok Create a list file for MongoDB
[email protected]:~# echo "deb [ arch=amd64 ] https://repo.mongodb.org/apt/ubuntu bionic/mongodb-org/4.2 multiverse" | tee /etc/apt/sources.list.d/mongodb-org-4.2.list deb [ arch=amd64 ] https://repo.mongodb.org/apt/ubuntu bionic/mongodb-org/4.2 multiverse Run the update command for update the repositary
[email protected]:~# apt update Hit:1 http://archive.ubuntu.com/ubuntu focal InRelease Ign:2 http://packages.linuxmint.com ulyana InRelease . Reading package lists. Done Building dependency tree Reading state information. Done 399 packages can be upgraded. Run 'apt list --upgradable' to see them. Now install MongoDB by using the following command
[email protected]:~# apt install mongodb -y Reading package lists. Done Building dependency tree Reading state information. Done The following additional packages will be installed: libboost-program-options1.71.0 libgoogle-perftools4 libpcrecpp0v5 libtcmalloc-minimal4 libyaml-cpp0.6 mongo-tools mongodb-clients mongodb-server mongodb-server-core . . . Setting up mongodb-server (1:3.6.9+really3.6.8+90~g8e540c0b6d-0ubuntu5) . Created symlink /etc/systemd/system/multi-user.target.wants/mongodb.service → /lib/systemd/system/mongodb.service. Setting up mongodb (1:3.6.9+really3.6.8+90~g8e540c0b6d-0ubuntu5) . Processing triggers for man-db (2.9.1-1) . Processing triggers for libc-bin (2.31-0ubuntu9) . Processing triggers for systemd (245.4-4ubuntu3) . Once the installation is completed. Start the service of MongoDB
Now enable the MongoDB service
[email protected]:~# systemctl enable mongodb Synchronizing state of mongodb.service with SysV service script with /lib/systemd/systemd-sysv-install. Executing: /lib/systemd/systemd-sysv-install enable mongodb Now enter into the MongoDB shell and create database and user for admin
[email protected]:~# mongo MongoDB shell version v3.6.8 connecting to: mongodb://127.0.0.1:27017 Implicit session: session < "id" : UUID("7479068f-7ff6-440c-b440-12fd9fa1ca6e") >MongoDB server version: 3.6.8 Welcome to the MongoDB shell. For interactive help, type "help". For more comprehensive documentation, see http://docs.mongodb.org/ Questions? Try the support group http://groups.google.com/group/mongodb-user Server has startup warnings: 2020-12-09T15:55:40.401+0530 I STORAGE [initandlisten] 2020-12-09T15:55:40.401+0530 I STORAGE [initandlisten] ** WARNING: Using the XFS filesystem is strongly recommended with the WiredTiger storage engine 2020-12-09T15:55:40.401+0530 I STORAGE [initandlisten] ** See http://dochub.mongodb.org/core/prodnotes-filesystem 2020-12-09T15:55:41.965+0530 I CONTROL [initandlisten] 2020-12-09T15:55:41.965+0530 I CONTROL [initandlisten] ** WARNING: Access control is not enabled for the database. 2020-12-09T15:55:41.965+0530 I CONTROL [initandlisten] ** Read and write access to data and configuration is unrestricted. 2020-12-09T15:55:41.965+0530 I CONTROL [initandlisten] > use admin switched to db admin > > > > db.createUser(]>) Successfully added user: < "user" : "mongodadmin", "roles" : [ < "role" : "userAdminAnyDatabase", "db" : "admin" >] > >exit Bye Now login to MongoDB using admin credentials and configure the collection and drop collection
> mongo -u mongodadmin -p --authenticationDatabase admin 2020-12-09T15:57:11.007+0530 E QUERY [thread1] SyntaxError: missing ; before statement @(shell):1:9 > show dbs admin 0.000GB config 0.000GB local 0.000GB Now create a collection by using the following command
> db.produxt.insert() WriteResult(< "nInserted" : 1 >) Now show the table by using the following command
> show collections produxt system.users system.version > db.product.insert() WriteResult(< "nInserted" : 1 >) > show collections product produxt system.users system.version Delete the existing table by using the following command
> show collections product system.users system.version With this method the installation and configuration of MongoDB on Linux Mint comes to an end.
How to Install and Use MongoDB on Linux Mint
![]()
In the world of database solution, MongoDB is a relative newcomer. However, it has quickly gained enormous popularity because of the features it offers. MongoDB is a general-purpose, cross-platform, document-based database solution that falls under the NoSQL classification. It doesn’t follow the rules of traditional relational databases (for example, MySQL). Instead, it uses JSON-like documents for storing data. In this article, let’s check out how to install and use MongoDB on Linux Mint.
MongoDB on Linux Mint
MongoDB is an open-source cross-platform NoSQL database solution. As it’s a NoSQL database, it’s free from the restricted nature of the traditional databases (for example, MySQL), offering more flexibility for storing data. MongoDB can also be treated as a file storage solution! MongoDB offers efficient scaling, thanks to its sharding feature.
There are two editions of MongoDB available to the customers – the Community and Enterprise version. Now, for general users, the MongoDB Community edition will be enough for testing/developing purposes. However, for large-scale implementation, it’s a good idea to get the Enterprise one. MongoDB Enterprise comes with additional features like customer support, Kubernetes integration, faster memory performance, certification, etc. Check out MongoDB Enterprise Advanced.
In this article, however, I’ll be showcasing how to install and use the MongoDB Community edition.
Install MongoDB on Linux Mint
There are multiple ways we can install MongoDB. Because of its popularity, it’s already a part of the Ubuntu package servers. Linux Mint, being an Ubuntu derivative, can directly grab MongoDB from the package server. However, the official recommendation of MongoDB is to use its own repository for installing the database software.
Ready? Let’s jump right into it!
Install MongoDB from Ubuntu package server
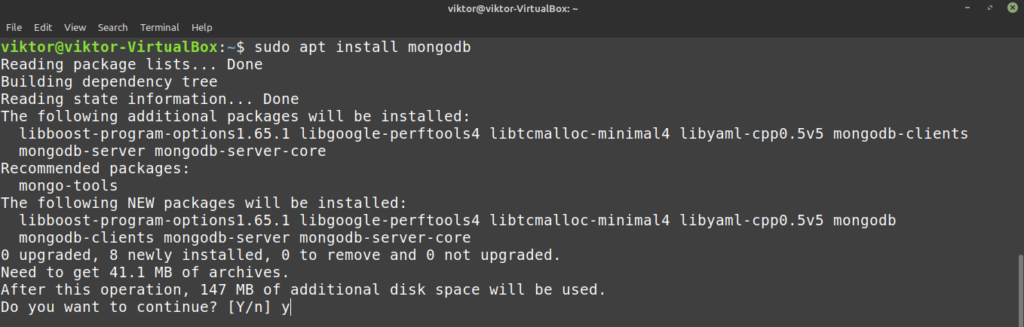
MongoDB is directly available from the Ubuntu package server. All you need is to tell APT to grab and install the mongodb package. Although it’ll work just fine, according to official MongoDB documentation, it’s not recommended method. Follow it at your own responsibility.
First, fire up a terminal and update the APT cache.

Now, tell APT to install MongoDB.
Install MongoDB from MongoDB repo
MongoDB officially offers repo for Ubuntu, Debian, SUSE Linux, and Amazon. MongoDB officially recommends this method of installing MongoDB. This makes sure that you’re always using the latest version. Linux Mint is Ubuntu-based, so the Ubuntu repo will work just fine.
Note: The repo is version-dependent. This method will showcase the installation of the current latest MongoDB stable version (MongoDB 4.2). For other versions, check out the MongoDB installation document.
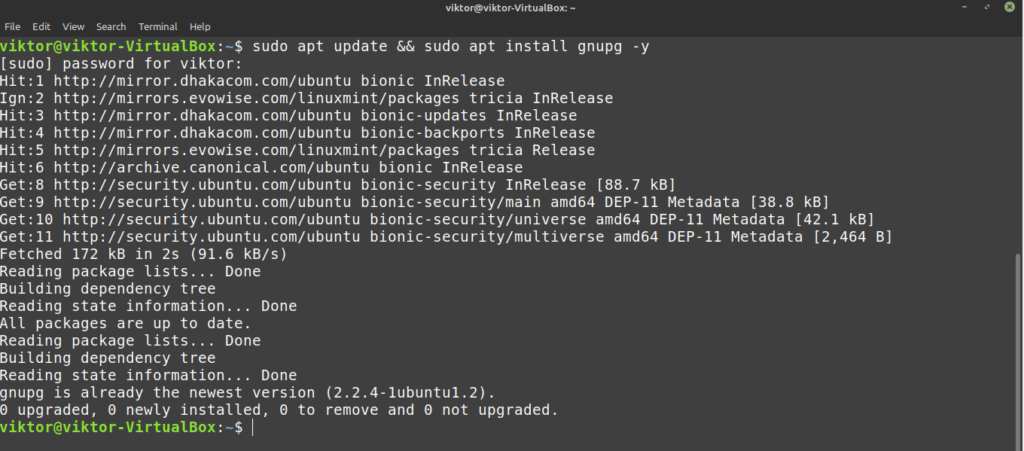
Fire up a terminal and start running the following commands. First, let’s check out if GnuPG is installed. GnuPG comes preinstalled with Linux Mint. However, if it was uninstalled previously, then this command will install it right away.
Now, add the public GPG key of MongoDB repo.
APT is ready to communicate with the MongoDB repo. Add the MongoDB repo in the list of APT package servers.
$ echo «deb [ arch=amd64,arm64 ] https://repo.mongodb.org/apt/ubuntu bionic/
mongodb-org/4.2 multiverse» | sudo tee / etc / apt / sources.list.d / mongodb-org- 4.2 .list
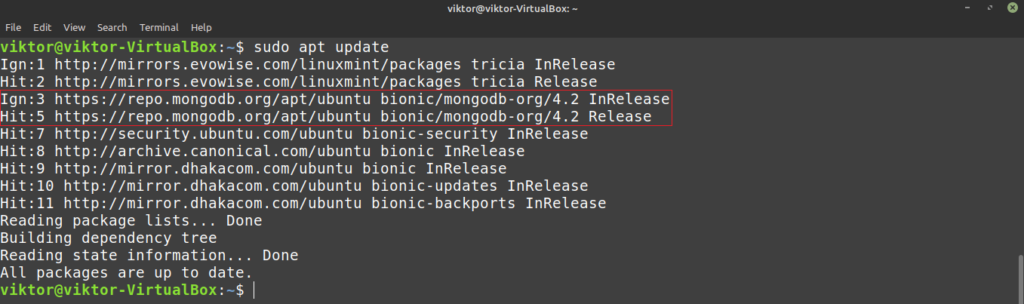
The MongoDB repo is added successfully. Now, tell APT to install MongoDB. The package name is mongodb-org. Note that mongodb is from Ubuntu repo whereas mongodb-org is from MongoDB repo.

Using MongoDB
Once the installation is complete, let’s make sure that MongoDB is running. Run this command in the terminal.
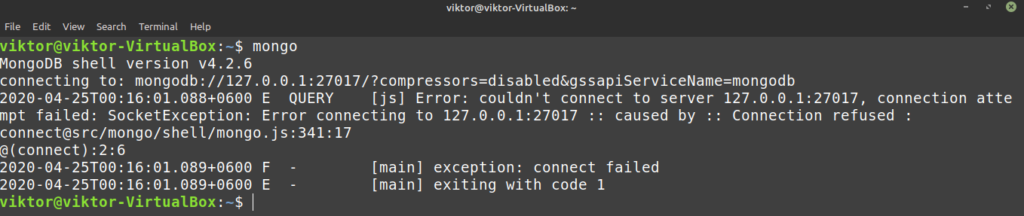
The command threw some error. It’s because MongoDB, by default, doesn’t start with boot. To fix this, run the next two command. Essentially, we’re telling systemctl to start and enable MongoDB service at boot.

Voila! MongoDB is running perfectly! It’s the MongoDB shell that’s running. It serves as the MongoDB control center. MongoDB has its own commands and functions. The following command will print a shortlist of available commands and functions.

Final thoughts
MongoDB is a powerful database software. It’s even incorporated by Google, Facebook, PayPal, EA, Adobe, eBay etc. giants. Check out companies using MongoDB. That, by itself, is a testimony of the power of MongoDB.
This article just discusses how to install MongoDB. There is a lot to learn about it. You can find plenty of tutorials on the internet on getting started with MongoDB. Check out this beginner’s guide to MongoDB.
About the author
Sidratul Muntaha
Student of CSE. I love Linux and playing with tech and gadgets. I use both Ubuntu and Linux Mint.
How To Install MongoDB on Linux Mint 21
In this tutorial, we will show you how to install MongoDB on Linux Mint 21. For those of you who didn’t know, MongoDB is a very popular NoSQL database that can be used with both Linux and Windows operating systems. It stores data in JSON-like documents which offers high flexibility and dynamism and is therefore used in creating powerful applications and websites and makes it differs fundamentally from conventional relational databases.
This article assumes you have at least basic knowledge of Linux, know how to use the shell, and most importantly, you host your site on your own VPS. The installation is quite simple and assumes you are running in the root account, if not you may need to add ‘ sudo ‘ to the commands to get root privileges. I will show you the step-by-step installation of the MongoDB NoSQL database on Linux Mint 21 (Vanessa).
Prerequisites
- A server running one of the following operating systems: Linux Mint 21 (Vanessa).
- It’s recommended that you use a fresh OS install to prevent any potential issues.
- SSH access to the server (or just open Terminal if you’re on a desktop).
- A non-root sudo user or access to the root user . We recommend acting as a non-root sudo user , however, as you can harm your system if you’re not careful when acting as the root.
Install MongoDB on Linux Mint 21 Vanessa
Step 1. Before running the tutorial below, it’s important to make sure your system is up to date by running the following apt commands in the terminal:
sudo apt update sudo apt install software-properties-common apt-transport-https wget ca-certificates gnupg2
Step 2. Installing MongoDB on Linux Mint 21.
By default, MongoDB is not available on the Linux Mint 21 base repository. Now run the following command below to add the MongoDB repository to your Linux Mint system:
echo "deb http://security.ubuntu.com/ubuntu impish-security main" | sudo tee /etc/apt/sources.list.d/impish-security.list
Next, import the GPG key using the following command:
wget -qO - https://www.mongodb.org/static/pgp/server-6.0.asc | sudo apt-key add -
After that, update your system and you can install MongoDB on it with the help of the command shown below:
sudo apt update sudo apt install mongodb-org
Check the installed database version:
After installation is complete, start MongoDB and enable it at reboot:
sudo systemctl start mongod sudo systemctl enable mongod sudo systemctl status mongod
Step 3. Accessing MongoDB in Linux Mint 21.
Once verifying that the MongoDB service is active and running, we can easily access it by running the following command on your terminal:
To get the existing database we can use this command:
To create our database with the command:
MongoDB has its own commands and functions. The following command will print a shortlist of available commands and functions:
Congratulations! You have successfully installed MongoDB. Thanks for using this tutorial for installing the latest version of MongoDB NoSQL database on the Linux Mint system. For additional help or useful information, we recommend you check the official MongoDB website.
If you don’t have time to do all of this stuff, or if this is not your area of expertise, we offer a service to do “VPS Manage Service Offer”, starting from $10 (Paypal payment). Please contact us to get the best deal!