- Установка на synology linux
- How To Install Linux Ubuntu on Synology NAS
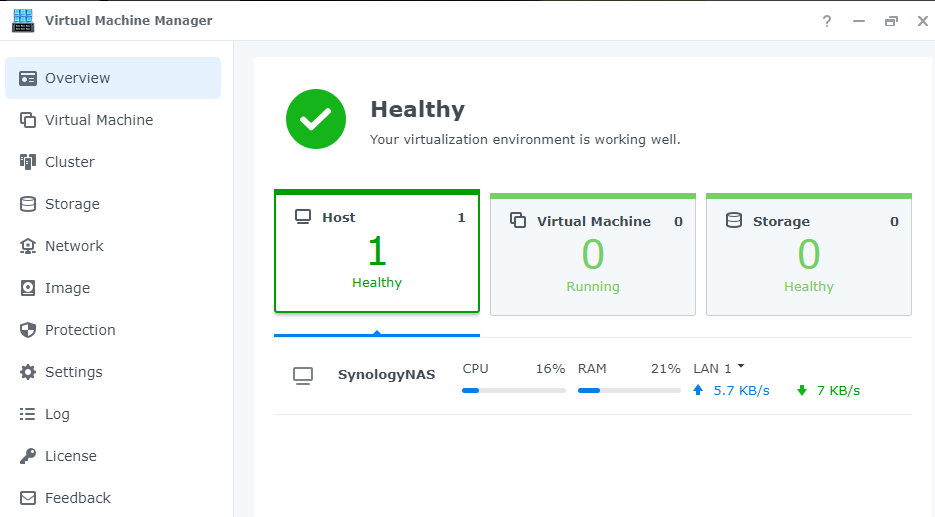
- Install Ubuntu on Synology NAS
- Step 1. Set Up Your Synology NAS (Compatible With Ubuntu)
- Step 2. Download an Ubuntu ISO Image
- Step 3. Download and Install Virtual Machine Manager
- Step 4. Create a System Image and Configure
- Step 5. Create a Virtual Machine and Configure
- Step 6. Install Your Ubuntu OS on Synology NAS
- Step 7. Install a Guest Agent
- Bonus Tip — Secure Your Synology Data With a Data Recovery Tool
- Blog
- Creating an Ubuntu Server VM on Synology NAS
- Andy Yang
- 1) Download the ISO
- 2) Install Virtual Machine Manager
- 3) Create an Ubuntu image
- 4) Create the Ubuntu Virtual Machine
- 5) Initial bootup
- Sign up for more like this.
- Upgrading Ghost (Docker) whilst keeping SQLite database
- Installing Samsung Printer Drivers on Pop!_OS
- Create a static home page in Ghost
Установка на synology linux
A community to discuss Synology NAS and networking devices
So I am looking to buy or build my own NAS aka mini server thats mainly for multimedia stuff, but should also double as a machine where i can host a few other things like small servers (a teamspeak and stuff for example). So i went looking for good nas servers which are not to expensive and I came across the DS1515+ and a few otehrs which had good specs and are looking pretty sweet, yet the Price is not cheap for me so I thought: It might be the same as it is with buying a PC, if you search for parts and build it yourself you are going to get away with much better specs than a prebuild PC so I went looking for the parts I want in my NAS (excluding the harddrive, cause most prebuild nas systems come without any) and I soon realised that a DIY (do it yourself, in case you dont know) nas with specs like the DS1515+ is coming pretty close to the DS1515+ (its still cheaper but I was not able to find a case that offers the same amout of features while still looking sick like the DS1515+ does, and you also cant buy only the cases from a synology nas(to bad actually). So I evaluated if the more expensive DS1515+ would be worth its money, but that depends on my question I stated in the Topic, Will I be able to install a linux image of any kind (in my case it should be a desktop image of ubuntu 15.04) and I dont want a modified one or something synology might offer (i dont know if they do). Also am I able to boot into the Bios of the DS1515+ and maybe boot from another harddrive with another OS on it (lets take ubuntu 15.04 desktop again)? I basically want complete freedom concerning the software/os. And ym last question: On what is the synology system saved on? is it a little harddrive you could remove/install ubuntu on or is that something build into the mainboar of the nas?
Thanks for your help in advance 🙂
Edit: also if there is a site where I could get synology cases only I would be more than happy if you told me 😉 I just cant find casings that looks as good as the synology ones and also have the ability to suppost 5+ 3.5 bays
How To Install Linux Ubuntu on Synology NAS
If you have been tirelessly trying to install Linux on Synology NAS without satisfying results, know that you’re not the only one to experience this issue. Although it may seem like an easy step-by-step process, there are some nuisances that puzzle most people, especially those who aren’t tech-savvy or familiar with Synology Ubuntu.
Luckily, this guide should help you address such problems and learn the best ways to build your Synology virtual machine Ubuntu powerhouse.
First, you’ll need a compatible Synology NAS and Ubuntu ISO image. Once you have these readily available, we can move to the hard part of Installing Ubuntu on Synology NAS.
Install Ubuntu on Synology NAS
Step 1. Set Up Your Synology NAS (Compatible With Ubuntu)
Before you install Linux on Synology NAS, you should ensure compatibility with Ubuntu. You can do that by connecting the Synology Diskstation with the Ubuntu server.
Setting up this connection will also require a successfully configured DiskStation and shared folder for saving your content to the Ubuntu server.
Follow these steps to connect Synology NAS to Ubuntu:
- Open the Diskstation Web Application;
- Navigate to Control Panel > Shared Folder;
- Select NFS-Access;
- Create a new connection and open a shell on your Ubuntu server.
There, you just connected a Synology NAS to your Ubuntu server. Now, set up your NAS using Web Assistant by following these tips:
- Select Set Up;
- Click Install Now to install the DiskStation Manager;
- Complete the installation process and allow the NAS to restart;
- Create a new admin user account by following the instructions on display;
- Select Go to get to the Synology Web GUI.
Once you complete these steps, your Synology NAS should be ready for Ubuntu. The recommended practice is to use a Synology NAS with 8GB or more memory to ensure successful Linux Ubuntu installation.
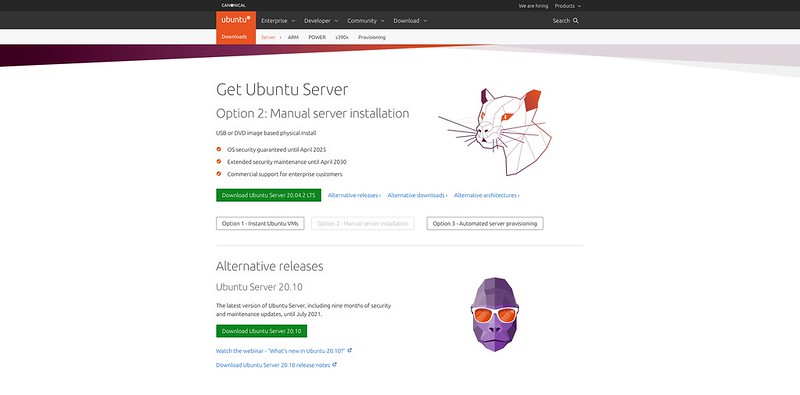
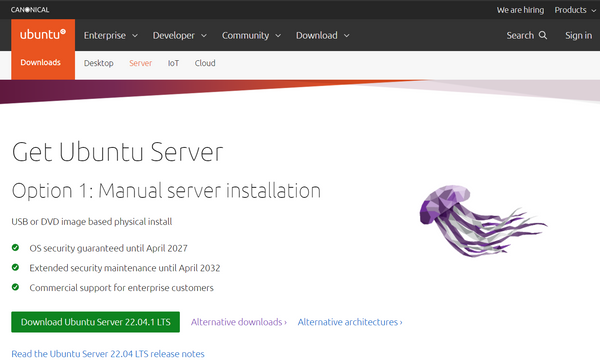
Step 2. Download an Ubuntu ISO Image
Run your Synology NAS and visit the official Ubuntu website to download the ISO image. Navigate the site to the Ubuntu Desktop tab and select Download. You’ll see the latest available version of the image. Download the image file and choose the destination where you want to save it.
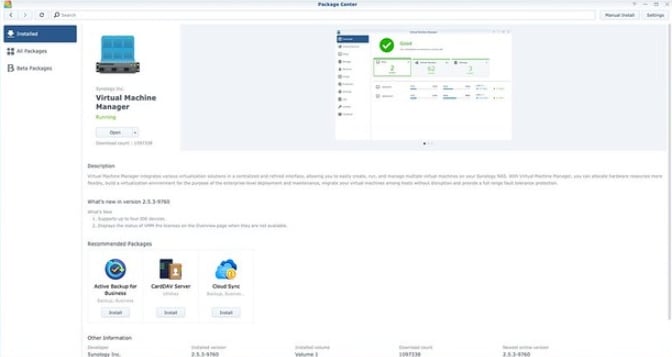
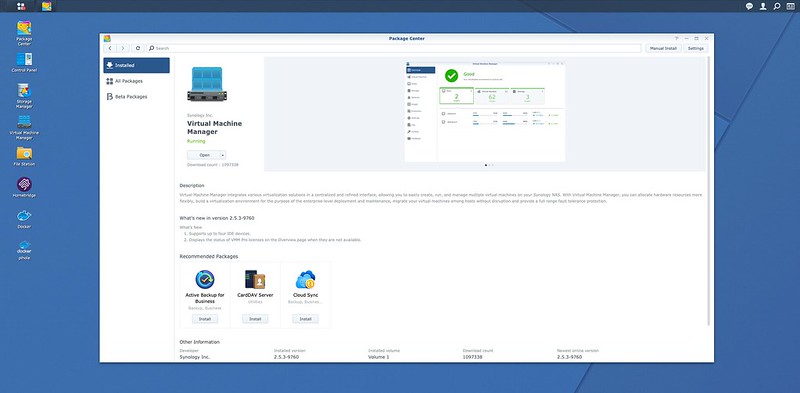
Step 3. Download and Install Virtual Machine Manager
The following steps and images will take you through the process of downloading and installing the Virtual Machine Manager:
- Open Synology DiskStation web interface;
- Select the Package Center from the top menu on the left;
- Sign up for the Beta Program by visiting the Beta section and checking the “Yes, I want to see beta versions” tab;
- Find the Utilities section and navigate it to the Virtual Machine Manager tab;
- Select Install.
You should see the Virtual Machine Manager icon in the DiskStation menu if the installation process was successful.
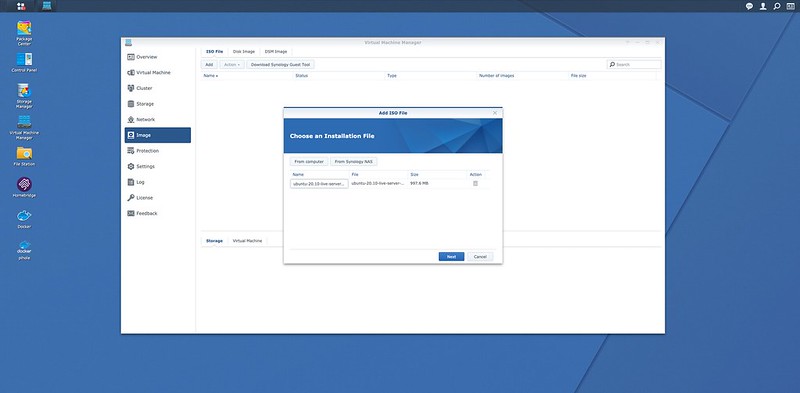
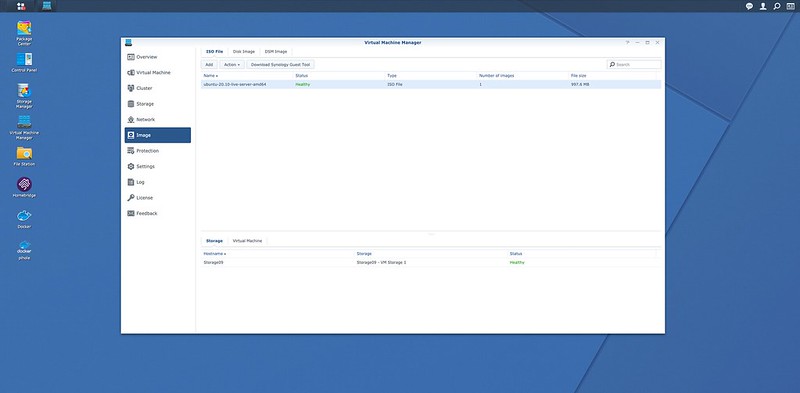
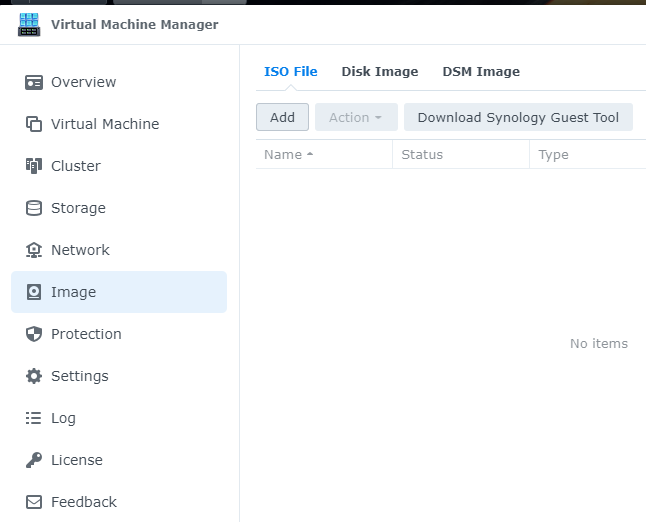
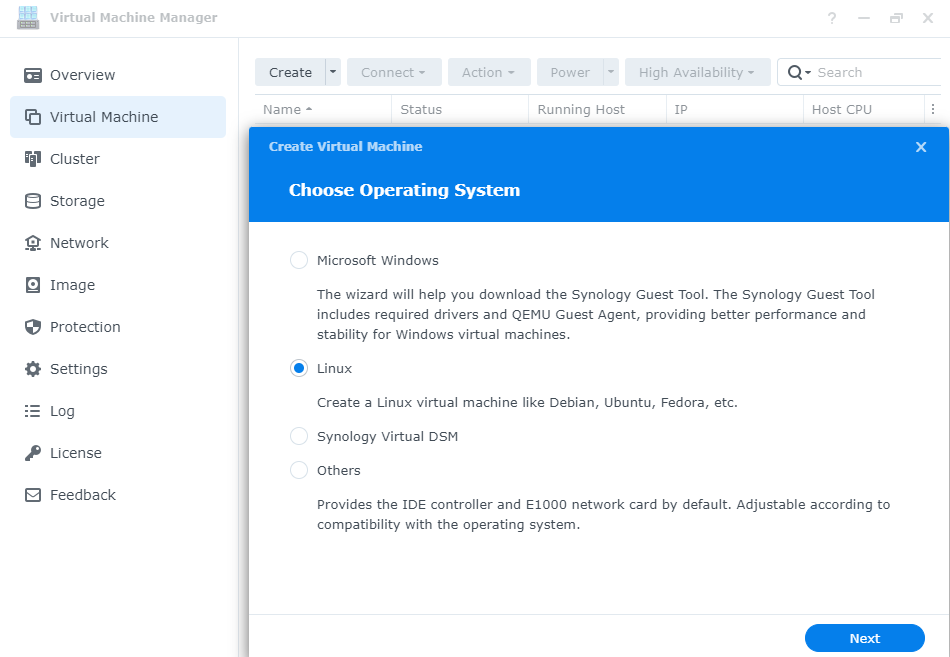
Step 4. Create a System Image and Configure
Navigate the Virtual Machine Manager user interface to the System Image section to set up the Ubuntu ISO image by doing the following:
- Select Create;
- Choose the name of your System Image in the Name section;
- Choose ISO File in the Type section;
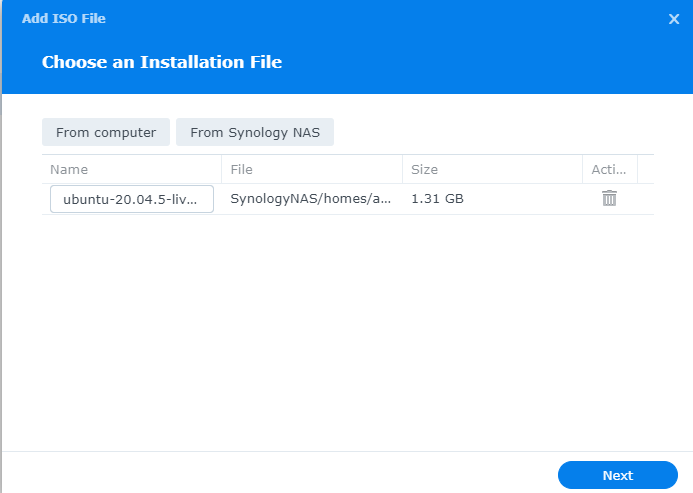
- Click on the Select a file from DiskStation section, select Browse to upload the Ubuntu image, and click Next;
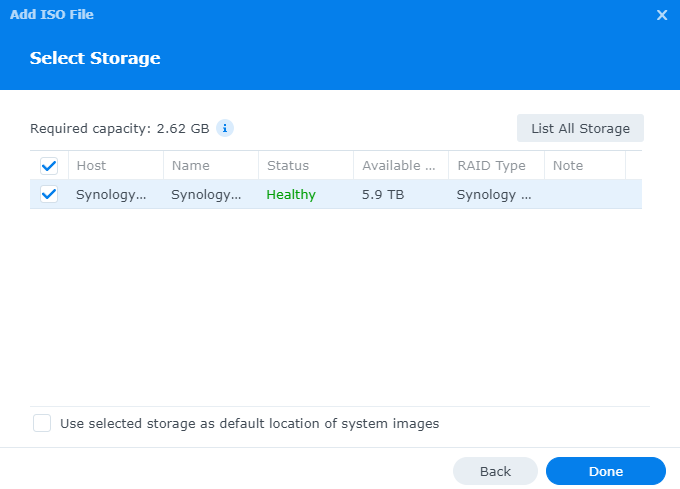
- Choose Your NAS and hit Apply.
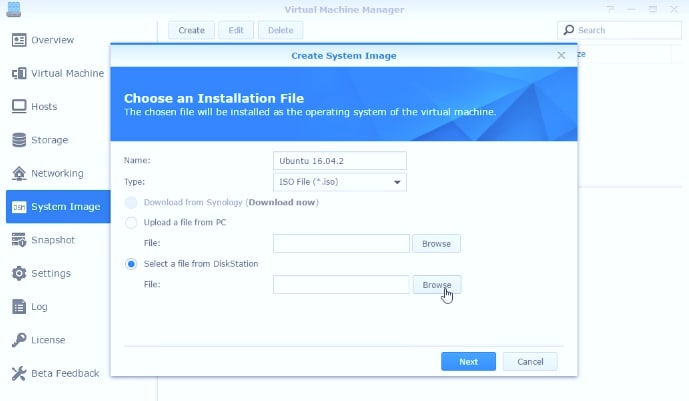
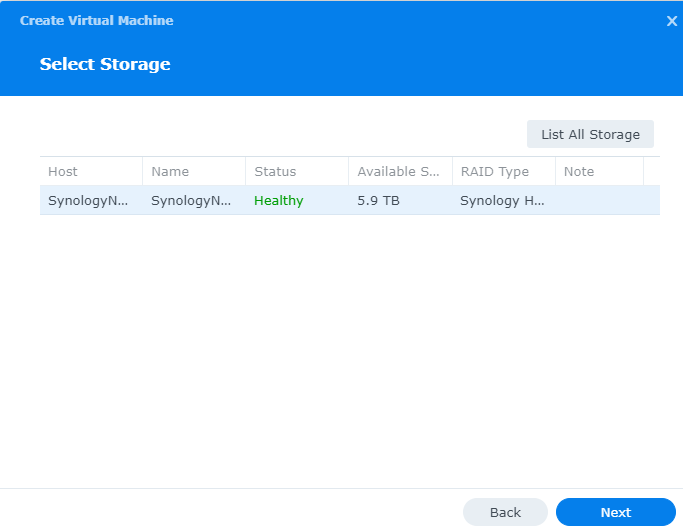
It will take a while for your system to create the image. Once the system creates the image, configure your system by selecting the storage option for saving system images.
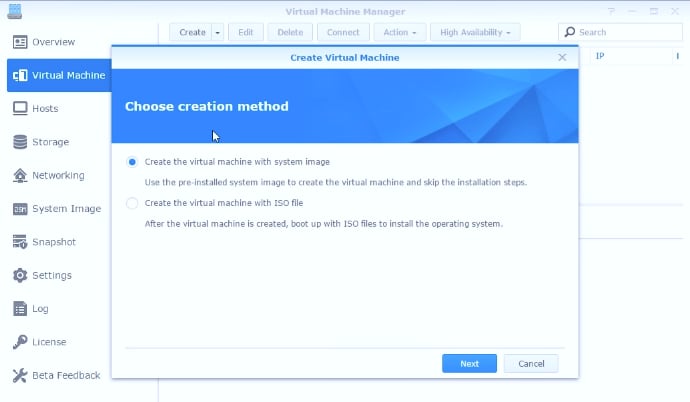
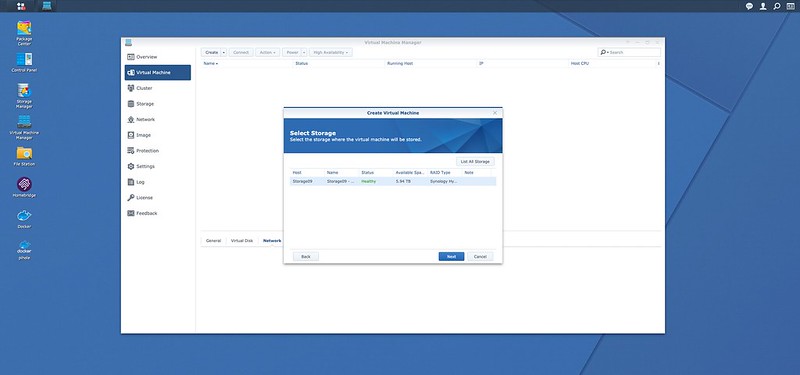
Step 5. Create a Virtual Machine and Configure
Here are the instructions to create and configure your virtual machine:
- Run the Virtual Machine Manager app and click on the Virtual Machine tab;
- Select the “Create the virtual machine with system image” option;
- Click Create > Next.
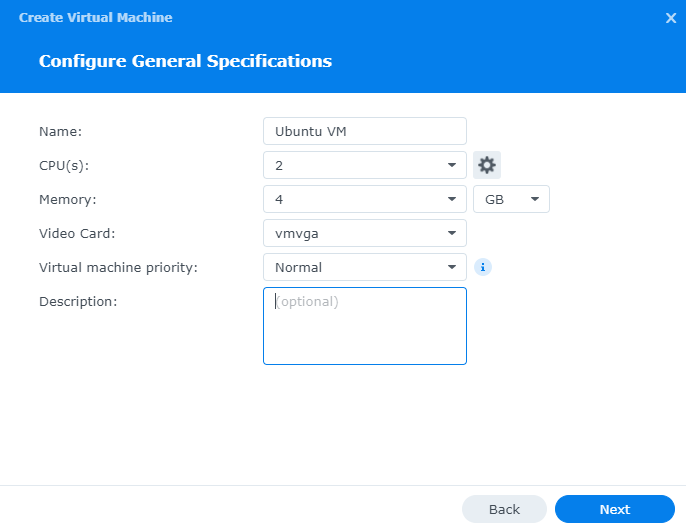
Once the system creates a Virtual Machine, proceed to configure your new setup by fine-tuning all the specifications:
- Name your VM in the Name tab;
- Choose how many CPU cores you want to use (a friendly piece of advice is to opt for at least two CPUs to ensure smooth running and maximum efficacy);

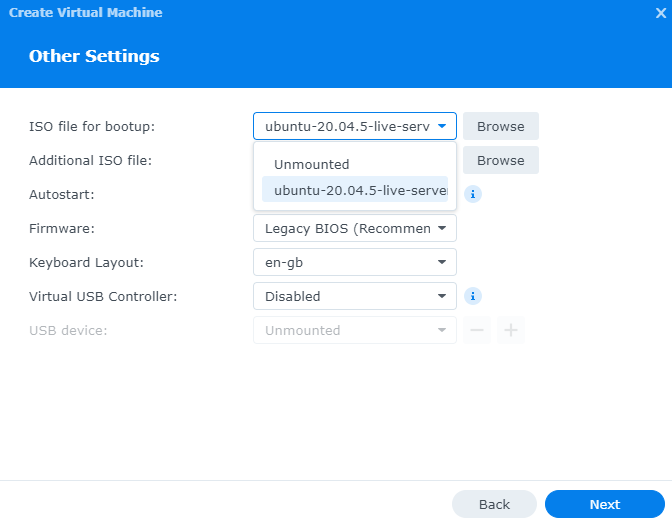
- Boot up your ISO system file by selecting System Image in the “ISO file for bootup” section;
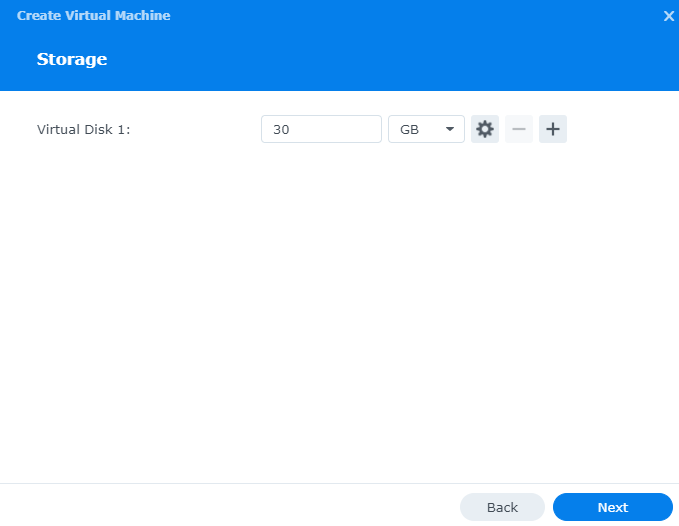
- Choose the required amount of space for your Virtual Machine (25-30GB);
- Click Next > Apply.

Step 6. Install Your Ubuntu OS on Synology NAS
Here is how to install your Synology NAS Ubuntu system:
- Run the Virtual Machine app;
- Select Action > Power On;
- Select Synology NAS > Apply;
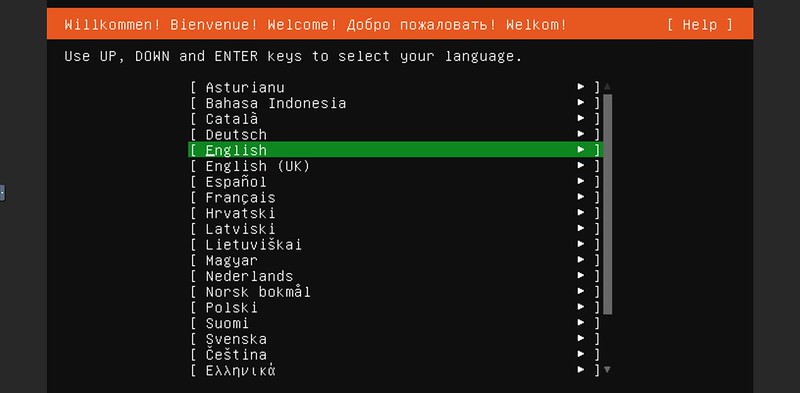
- Click Install Ubuntu in the Welcome window;
- Opt for Install Updates > Install Third Party Software While Ubuntu is Being Setup > Continue;
- Follow the instructions in the User Account section and click on Continue;
- After the installation process, run DiskStation and choose Edit;
- Change the ISO file for bootup setting to Unmounted.
Restart your Virtual Machine to ensure Linux Ubuntu is successfully installed on your machine.
Step 7. Install a Guest Agent
Choose your Synology Ubuntu virtual machine and click Connect to install a Guest Agent on Linux. Follow these steps:
- Type in sudo -i to access the administrator’s permissions;
- Use the apt-get install qemu-guest-agent command for the Ubuntu operating system;
- Enable the Ubuntu Guest Agent using the systemctl enable qemu-guest-agent command;
- Verify the Guest Agent using the systemctl status qemu-guest-agent
The Guest Agent allows your Synology NAS to connect with the Virtual Machine, exchange information, and enable you to restart or shut down the virtual setup.
Bonus Tip — Secure Your Synology Data With a Data Recovery Tool
You’ve probably experienced the pain of deleting valuable and important data by mistake or due to virus infection, disk damage, or power outage. If you don’t want to go through this nightmare again, you should secure your data with a user-friendly NAS data recovery tool.
One highly recommended NAS recovery software is Wondershare Recoverit. You can use it to recover deleted files from Synology NAS quickly and safely. The best part about Recoverit – it can recover files from Linux, Windows, and Mac systems.
Blog
Before we start the installation of Ubuntu Server to Synology NAS, you will need to download the Ubuntu Server ISO image from Ubuntu.com. As of the time of writing, the version of Ubuntu Server stands at 20.10, and the file size is almost 1GB.
Once the download started, you can log in to your Synology NAS’s DiskStation Manager (DSM) to install the Virtual Machine Manager from Package Center.

After the Ubuntu Server ISO image has been downloaded, you can create an image from the ISO file under Image in Virtual Machine Manager. It is a two-step process and takes about 5 minutes.

Next, you can proceed to create the Virtual Machine (VM). It is an eight-step process and also takes about 5 minutes.
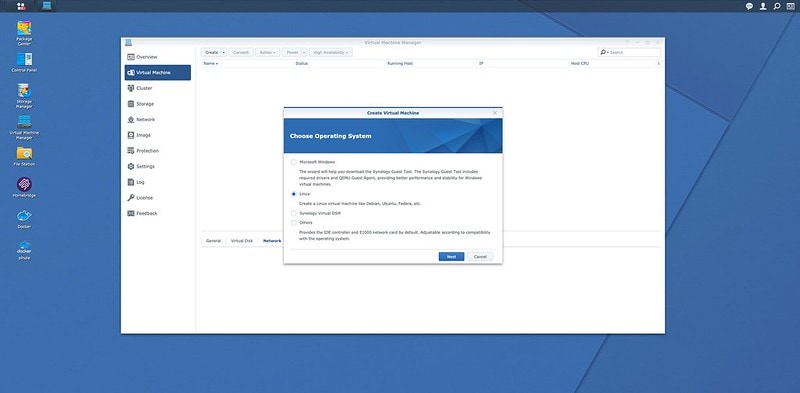
Choose Linux as we are creating an Ubuntu Server VM.

I would recommend at least 2 CPUs and 2GB of memory. In the screenshot below, I have chosen 2 CPUs and 4GB of memory.

Storage is really up to you what you are going to use the VM for. For me, 40GB is more than enough.


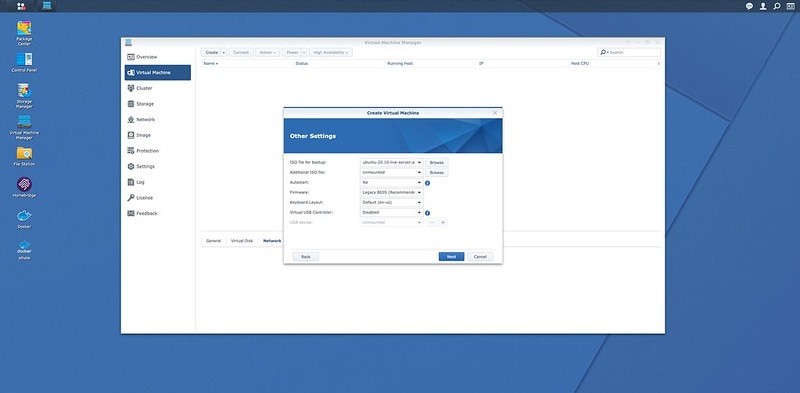
For the “ISO file for bootup,” choose the image which you have created earlier. For the other fields, you can leave it as the default.

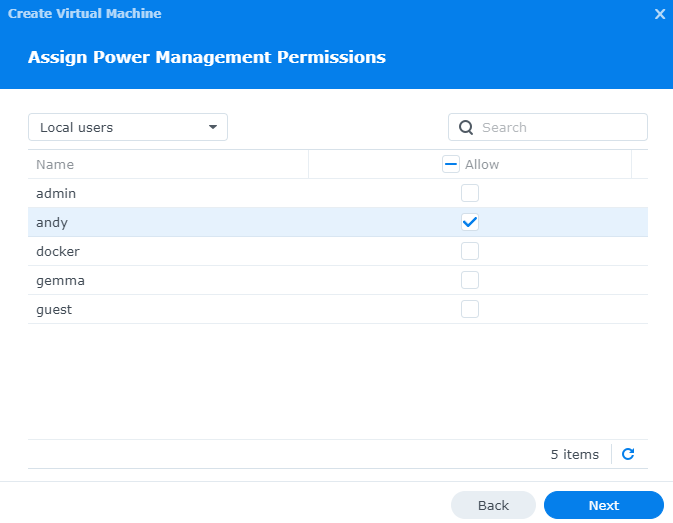
This is also up to you who you want to give permission to power cycle your VM. I would choose just my username as my admin account is deactivated.

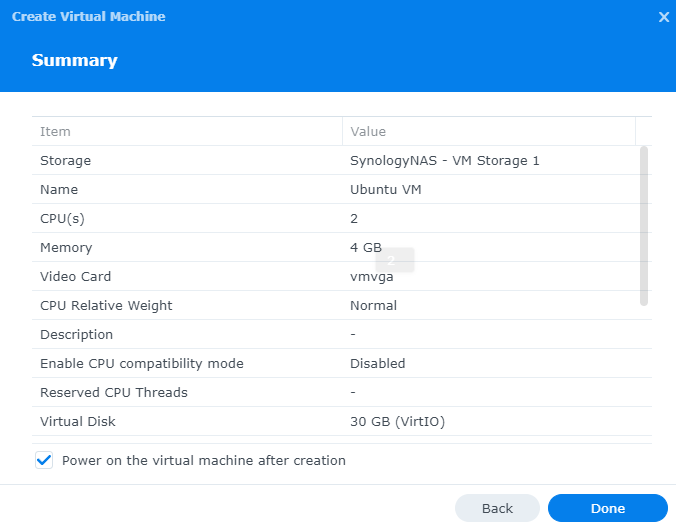
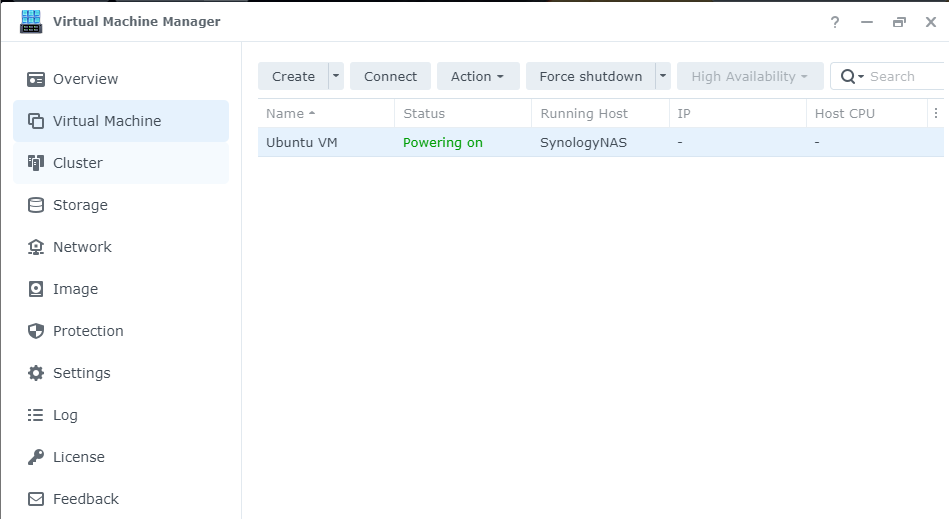
Remember to check the box “Power on the virtual machine after creation” so that the VM will boot up automatically after you created it.

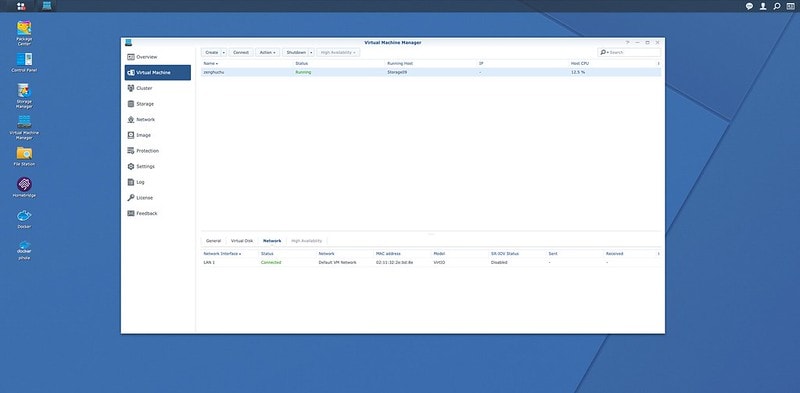
As you can see from the IP column, it is a dash, so you will not know your VM’s IP. You can click on the Connect button at the top and then do an ifconfig to see the IP it is getting from your router.
If you need a local static IP for your VM, you can copy the Mac Address as shown in the bottom network tab and add it to your router’s DHCP reservations.

The installation is successful when you can connect to your VM via the Connect button. A new tab will be opened, allowing you to control your VM via the new tab.
Once you complete the Ubuntu Server installation, you can use Terminal to SSH into the instance directly.
Creating an Ubuntu Server VM on Synology NAS
A step by step guide to creating an Ubuntu Server virtual machine on a Synology NAS.
Andy Yang

1) Download the ISO
To begin, let’s download the relevant Ubuntu Server ISO file from the official Ubuntu website: https://ubuntu.com/download/server.
Download it to your desktop or use the built in download manager within Synology DSM.
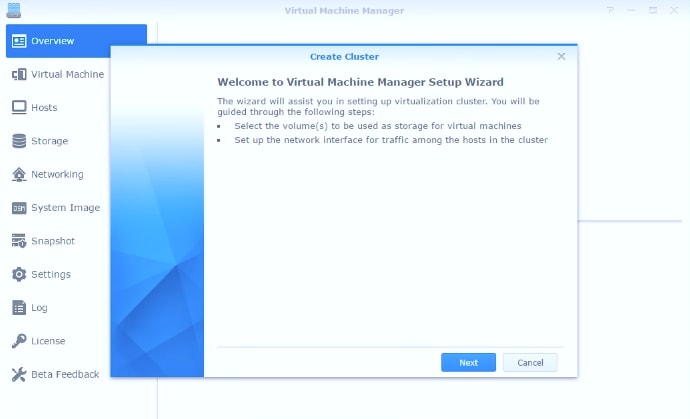
2) Install Virtual Machine Manager
While that’s downloading, log on to your NAS and open up Package Center, then search for Virtual Machine Manager (VMM) and click Install.

Now open up VMM and go through the initial setup wizard, once done you’ll be greeted with a window that looks very much like the screenshot above.
3) Create an Ubuntu image
Go to the Image tab and click on Add:
Depending on how you downloaded the Ubuntu ISO file, click either From computer or From Synology NAS, and then select the file.
Next, select the storage medium for your Virtual Machine and this step is complete.
4) Create the Ubuntu Virtual Machine
Now go to the Virtual Machine tab and click Create
Select the relevant storage for your VM:
Enter the relevant info for your VM (I gave mine 2 CPU and 4GB RAM, generally enough for most VMs)
Give it as much Disk Space as you think you’ll need
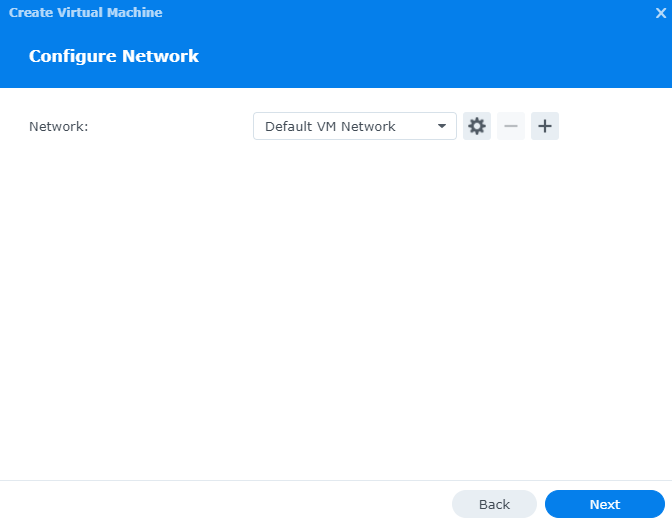
On the next window, select the image that we created earlier in the «ISO file for bootup» field. The rest can be left as default.
User permissions for power management — select the users that will need to be able to power on / off your virtual machine:
On the final page, make sure to tick «Power on the virtual machine after creation».
Your Ubuntu Virtual Machine should now be powering on
5) Initial bootup
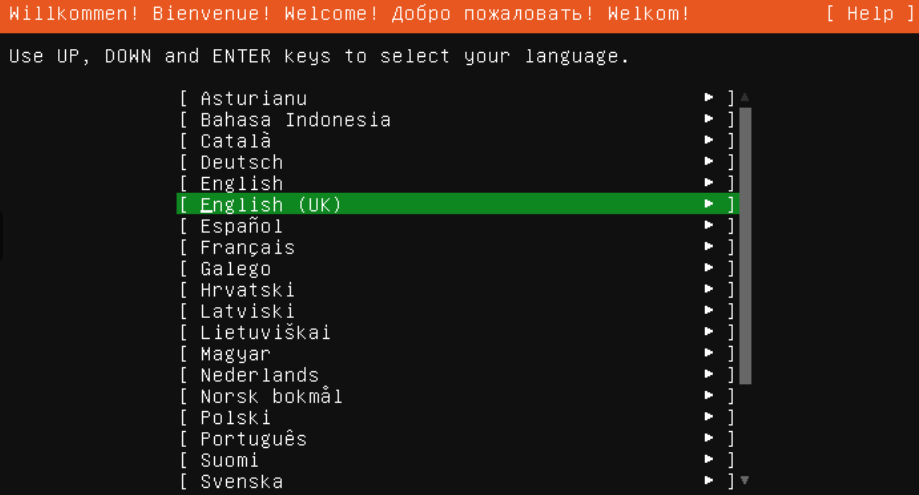
Click on Connect within the Virtual Machine Manager and a new window will open up.
You can now access the Virtual Machine and go through the usual installation steps.
If you have followed this guide previously to setup all your SSH keys within Github, then during the VM installation you have the option to bring in all these keys to enable access via SSH with keys only.
It’s recommended that you install the Synology Guest Tool after your VM has been setup, read more about it here: https://kb.synology.com/en-global/DSM/tutorial/How_to_install_Synology_Guest_Agent_for_VMM_on_your_virtual_machine
Sign up for more like this.

Upgrading Ghost (Docker) whilst keeping SQLite database

Installing Samsung Printer Drivers on Pop!_OS

Create a static home page in Ghost
Ghost is a great platform, but it lacks one little functionality that I’m looking for. a static home page. So let’s fix that.