- Free Tier: Install Apache and PHP on an Ubuntu Instance
- Before You Begin
- 1. Set up a Compartment for Development
- 2. Install an Ubuntu Linux Instance
- 3. Enable Internet Access
- 4. Set up Apache and PHP
- PHP Packages for Oracle Linux
- Available PHP Releases
- Installation on Oracle Linux 7
- Set up Required Repositories
- Installing PHP
- Updating PHP
- Connecting PHP to Oracle Database with the PHP OCI8 Extension
- Installing PHP OCI8
- About Oracle Instant Client
- Installing PHP on Oracle Linux 8 via AppStream Modules
- Installing PHP OCI8 on Oracle Linux 8
- Installation on Oracle Linux 9
- PHP in Containers
- Getting Help
Free Tier: Install Apache and PHP on an Ubuntu Instance
In this tutorial, you use an Oracle Cloud Infrastructure Free Tier account to set up a compute instance on the latest version of Ubuntu. Then, you install an Apache web server and PHP and access your new server from the internet. Finally, this tutorial covers all the steps necessary to set up a virtual network for your host and connect the host to the internet.
- Set up a compartment for your development work.
- Install your Ubuntu instance and connect it to your Virtual Cloud Network (VCN).
- Set up an Oracle Cloud Infrastructure virtual cloud network and related network services required for your host to connect to the internet.
- Set up ssh encryption keys to access your Ubuntu server.
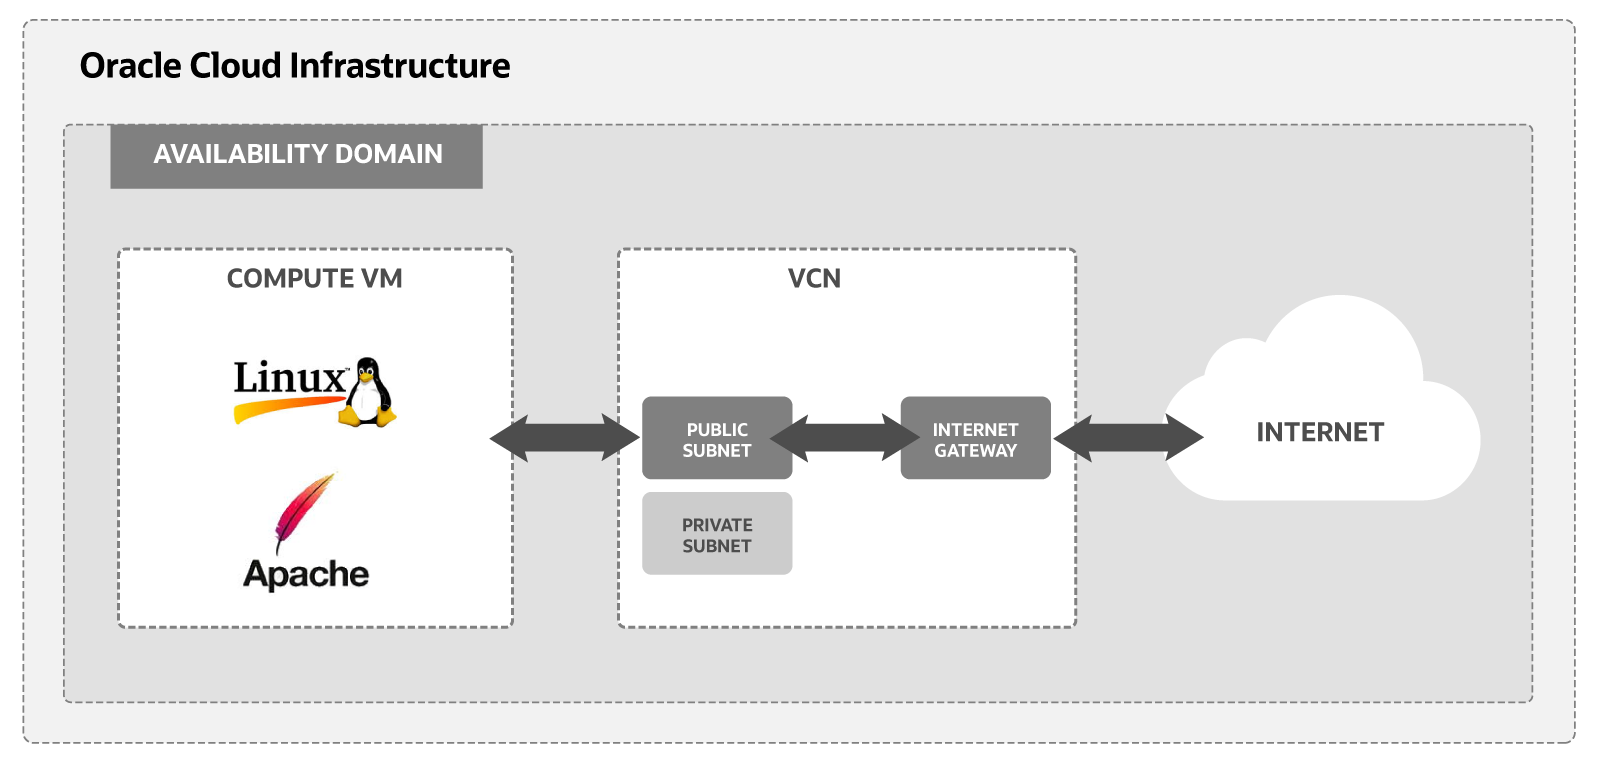
Here is a simplified diagram of the setup for your Linux VM.

For additional information, see:
Before You Begin
To successfully complete this tutorial, you must have the following:
- An Oracle Cloud Infrastructure Free Tier account. Start for free.
- A MacOS, Linux, or Windows computer with ssh support installed.
1. Set up a Compartment for Development
Configure a compartment for your development.
Create a compartment for the resources that you create in this tutorial.
- Sign in to the Oracle Cloud Infrastructure Console.
- Open the navigation menu and click Identity & Security. Under Identity, click Compartments.
- Click Create Compartment.
- Fill in the following information:
- Name:
- Description: Compartment for .
- Parent Compartment:(root)
- Click Create Compartment.
2. Install an Ubuntu Linux Instance
Use the Create a VM Instance workflow to create a new compute instance.
The workflow does several things when installing the instance:
- Creates and installs a compute instance running Ubuntu Linux.
- Creates a VCN with the required subnet and components needed to connect the Ubuntu Linux instance to the internet.
- Creates an ssh key pair you use to connect to the instance.
To get started installing an instance with the Create a VM instance workflow, follow these steps:
The steps provided are for a Free Tier account. If you are using a paid account, the steps might differ from those shown here.
- Scroll down to Launch Resources.
- Select Create a VM instance workflow.
Enter a value for the name or use the system supplied default. For compartment, select the compartment you created.
The data might look similar to the following:
Availability domain
- Availability domain: AD-1
- Capacity type: On-demand capacity
- Fault domain: Let Oracle choose the best fault domain
For Free Tier, use the Always Free Eligible option for availability domain.
The data might look similar to the following:
- Shielded instance: Disabled
- Confidential computing: Disabled
The following is sample data for an AMD virtual machine. The actual values might differ.
Image and shape
For Free Tier, use Always Free Eligible shape options.
- Click Edit.
- Primary Network: Select Create new virtual cloud network.
- New virtual cloud network name: Take the generated VCN name or provide a name.
- Create in compartment: .
- Subnet: Select Create new public subnet.
- New subnet name: Take the generated subnet name or provide a name.
- Create in compartment: .
- CIDR block: Take the default value (for example, 10.0.0.0/24).
- Public IPv4 address, take the default value of Assign a public IPv4 address.
- Continue to the next section.
- Select the Generate a key pair for me option.
- Click Save Private Key and Save Public Key to save the private and public SSH keys for this compute instance.
If you want to use your own SSH keys, select one of the options to provide your public key.
Put your private and public key files in a safe location. You can’t retrieve keys again after the compute instance has been created.
Uncheck the Specify a customer boot volume size setting. Check the Use in-transit encryption setting. Uncheck the Encrypt this volume with a key that you manage setting.
3. Enable Internet Access
The Create a VM Instance wizard automatically creates a VCN for your VM. You add an ingress rule to your subnet to allow internet connections on port 80.
Follow these steps to select your VCN’s public subnet and add the ingress rule.
- Open the navigation menu and click Networking, and then click Virtual Cloud Networks.
- Select the VCN you created with your compute instance.
- With your new VCN displayed, click subnet link.
The public subnet information is displayed with the Security Lists at the bottom of the page. A link to the Default Security List for your VCN is displayed.
- Stateless: Checked
- Source Type: CIDR
- Source CIDR: 0.0.0.0/0
- IP Protocol: TCP
- Source port range: (leave-blank)
- Destination Port Range: 80
- Description: Allow HTTP connections
Click Add Ingress Rules. Now HTTP connections are allowed. Your VCN is configured for Apache server.
4. Set up Apache and PHP
Next install and configure Apache web server and PHP to run on your Ubuntu Linux instance.
To install and set up Apache and PHP, perform the following steps:
- Open the navigation menu and click Compute. Under Compute, click Instances.
- Click the link to the instance you created in the previous step.
From the Instance Details page look under the Instance Access section, the Public IP Address field. Write down the public IP address the system created for you. You use this IP address to connect to your instance.
Since you identified your public key when you created the instance, this command logs you into your instance. You can now issue sudo commands to install and start your server.
sudo apt update sudo apt -y install apache2sudo systemctl restart apache2The Ubuntu firewall is disabled by default. However, you still need to update your iptables configuration to allow HTTP traffic. Update iptables with the following commands.
sudo iptables -I INPUT 6 -m state --state NEW -p tcp --dport 80 -j ACCEPT sudo netfilter-persistent saveThe commands add a rule to allow HTTP traffic and saves the changes to the iptables configuration files.
You can test your server from the command line with curl localhost . Or, you can connect your browser to your public IP address assigned to your instance: http:// . The page looks similar to:
sudo apt -y install php libapache2-mod-php$ php -v $ sudo systemctl restart apache2PHP Packages for Oracle Linux
This page describes PHP and related packages for current releases of Oracle Linux. For Oracle Linux 8, the packages are provided via AppStream modules and are covered under Oracle Linux support. Consult the Application Stream Module Life Cycle appendix in the Managing Software in Oracle Linux manual for support timelines. For Oracle Linux 7, these packages are published in developer repositories, for which support is limited to package installation assistance only.
Available PHP Releases
PHP Version Oracle Linux Release Repository/Module Name 8.0 Oracle Linux 9 OL9 AppStream / php:8.0 8.0 Oracle Linux 8 OL8 AppStream / php:8.0 7.4 Oracle Linux 8 OL8 AppStream / php:7.4 7.3 Oracle Linux 8 OL8 AppStream / php:7.3 7.2 Oracle Linux 8 OL8 AppStream / php:7.2 7.4 Oracle Linux 7 OL7 Developer / php74 Installation on Oracle Linux 7
These are the steps to install PHP.
Set up Required Repositories
To configure the yum repositories shown above on your system, install the repository setup packageoracle-php-release-el7. After installing this package, the default enabled repository is that for the latest available PHP release. To install the repository setup package for Oracle Linux 7:
$ sudo yum install -y oracle-php-release-el7
Installing PHP
Then, to install the latest available release of PHP on Oracle Linux 7:
Updating PHP
If you have PHP already installed, and a newer release has been published, make sure you update oracle-php-release-el7 first.
$ sudo yum update oracle-php-release-el7
$ sudo yum update phpConnecting PHP to Oracle Database with the PHP OCI8 Extension
The PHP OCI8 database extention enables access to Oracle Database with support for SQL, PL/SQL, bind variables, large object (LOB) types as well connection pooling and result caching features of Oracle Database. Read this blog post for a complete example connecting a PHP 7.4 application to Oracle Database.
Installing PHP OCI8
Each PHP release has its own repository on Oracle Linux yum server and each of those repositories also contains a corresponding RPM for the OCI8 extension, built for a specific major release of Oracle Instant Client. These RPMs follow this naming scheme: php-oci8 . For example, on Oracle Linux 7, the PHP OCI8 RPM for PHP 7.4 is built with Instant Client 19c and is named: php-oci8-19c. To install it:
$ sudo yum install php-oci8-19c
About Oracle Instant Client
PHP OCI8 depends on Oracle Instant Client. Starting with Oracle Instant Client 21c, yum/dnf configuration files are delivered via the packages oracle-instantclient-release-el8 and oracle-instantclient-release-el7, respectively. Oracle Instant Client packages up to release 19c are in the ol7_oracle_instantclient and ol8_oracle_instantclient repositories, configured with release packages oracle-release-el7 and oracle-release-el8. Assuming you have enabled the repository for Oracle Instant Client appropriate for your Oracle Linux release, it will be installed as a dependency. More details about Oracle Instant Client on this yum server.
Installing PHP on Oracle Linux 8 via AppStream Modules
Oracle Linux 8 introduces the concept of Application Streams, where multiple versions of user-space components can be delivered and updated more frequently than the core operating system packages in RPM format or groups of related RPMs called Modules. Oracle Linux 8 offers several independently updated versions of PHP via Module Streams. For mode details, please refer to the documentation.
To list available Module Streams for PHP:
Installing PHP OCI8 on Oracle Linux 8
To install the PHP OCI8 on Oracle Linux 8, enable both the php:7.4 and the php-oci8 modules.
$ sudo dnf install oraclelinux-developer-release-el8 oracle-instantclient-release-el8
$ sudo dnf module enable php:7.4 php-oci8
$ sudo dnf install php-oci8-21cInstallation on Oracle Linux 9
To install the latest available release of PHP on Oracle Linux 9:
PHP in Containers
- PHP Command Line Interface tool (PHP CLI)
- PHP via FastCGI Process Manager (FPM)
- PHP via Apache HTTP Server with mod_php
- Variants of each of the above with Oracle Database connectivity via PHP-OCI8
Getting Help
For help with PHP on Oracle Linux, please visit the PHP space in the Oracle Developer Community.