- Как установить программу Skype (скайп) в ОС Linux Mint 17
- Установка Skype в Linux Mint 17
- How to Install Skype in Linux Mint 20
- Method 1: Install Skype Using the .deb package
- Method 2: Install Skype Using the apt Repository
- Method 3: Install Skype Using Snap
- Remove Skype from Linux Mint 20 Using Snap
- Conclusion
- About the author
- Karim Buzdar
- How to Install and Use Skype on Linux Mint
- Skype on Linux Mint
- Install Skype using DEB
- Install Skype using APT
- Install Skype using snap
- Install Skype using Flatpak
- Using Skype
- Final thoughts
- About the author
- Sidratul Muntaha
Как установить программу Skype (скайп) в ОС Linux Mint 17
Сегодня мы научимся устанавливать программы в операционной системе Linux Mint 17 и для примера установим очень популярную программу для общения Skype (скайп).
В прошлом материале мы рассмотрели установку операционной системы Linux Mint 17, также мы узнали, что дистрибутив Linux Mint является одним из самых популярных и простых дистрибутивов Linux, который ориентирован на начинающих пользователей.
Теперь давайте научимся устанавливать программы и начнем мы с программы для общения в текстовом, голосовом и видео формате Skype, так как по умолчанию она не входит в стандартный набор приложений дистрибутива Linux Mint.
Сразу скажу, что установка программ в данном дистрибутиве отличается своей простотой и даже пользователь, который ни разу не устанавливал никаких программ, сможет это сделать.
На заметку! Новичкам рекомендую почитать мою книгу « Linux для обычных пользователей » – в ней я максимально простым языком рассказываю про основы Linux и как пользоваться этой операционной системой без командной строки
Установка Skype в Linux Mint 17
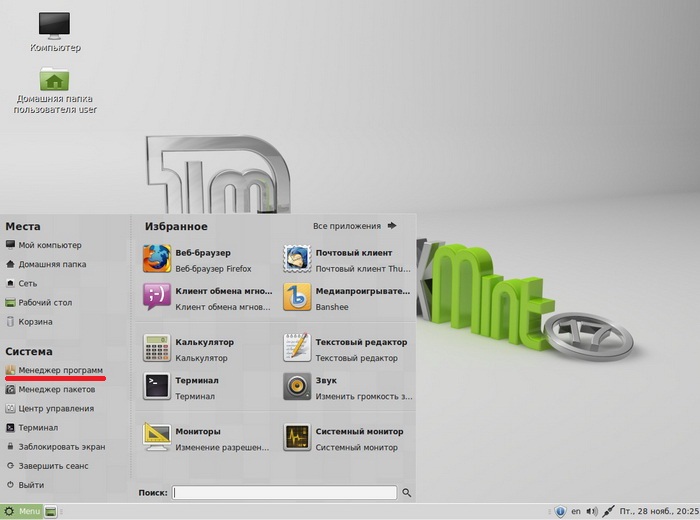
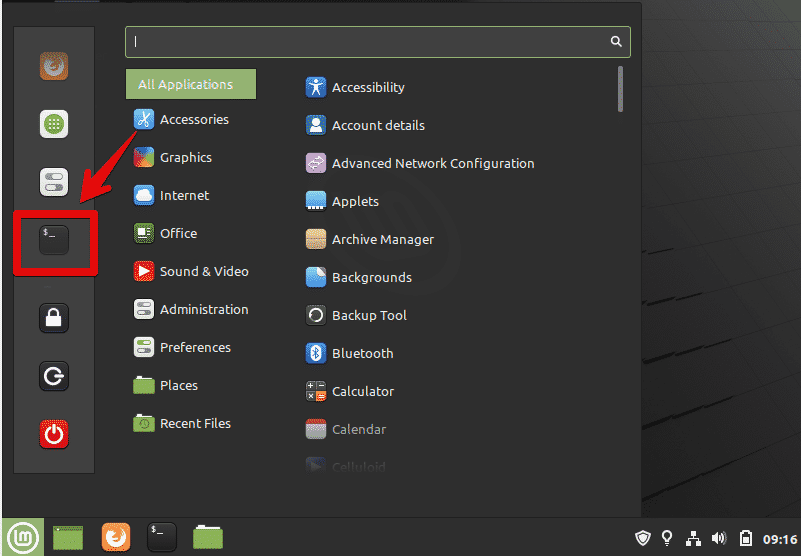
Так как данный материал для начинающих мы будем устанавливать программы с помощью «Менеджера программ» так как это действительно очень легко, и первое что нам необходимо сделать это, конечно же, запустить этот менеджер программ, а делается это следующим образом, открываем меню Mint и находим «Менеджер программ».
Примечание! Linux Mint 17 мы устанавливали в графической оболочке MATE, поэтому если у Вас другая среда рабочего стола то запуск «Менеджера программ» внешне может немного отличаться, хотя смысл одинаковый т.е. на первом шаге просто запустить «Менеджер программ».
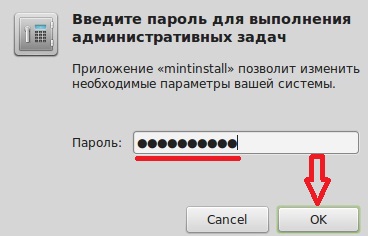
Затем для запуска mintinstall необходимо ввести пароль, это тот который Вы создавали при установке Linux Mint (если устанавливали не Вы, то необходимо узнать его у того человека кто устанавливал Вам систему). Вводим и жмем «ОК»
После чего запустится «Менеджер программ», по моему мнению, это один из самых удобных менеджеров, если сравнивать с другими дистрибутивами Linux.
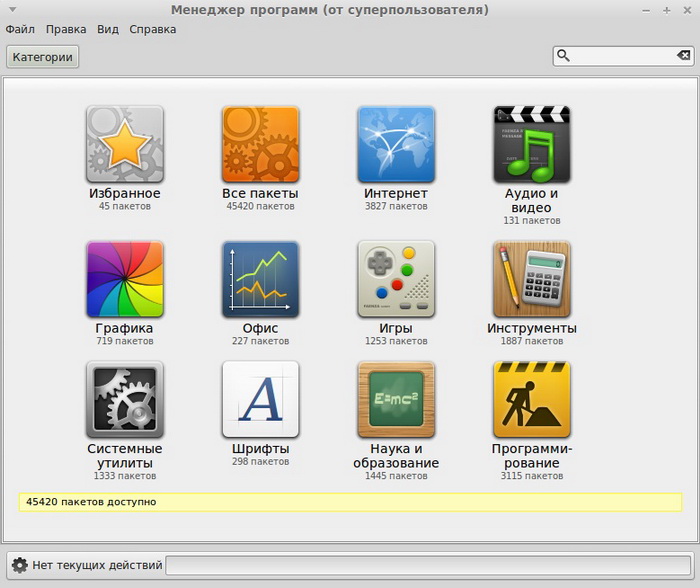
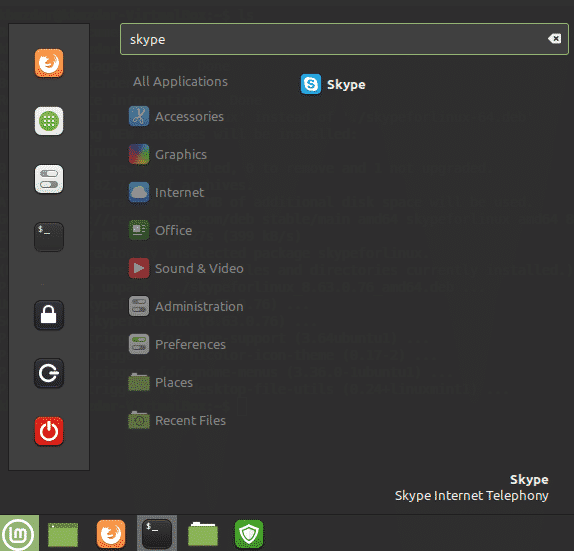
Теперь для установки программы необходимо выбрать группу, к которой относится нужная Вам программа, в нашем случае скайп относится к группе «Интернет», также можно найти интересующую Вас программу через поиск, например, написав название программы в окне поиска
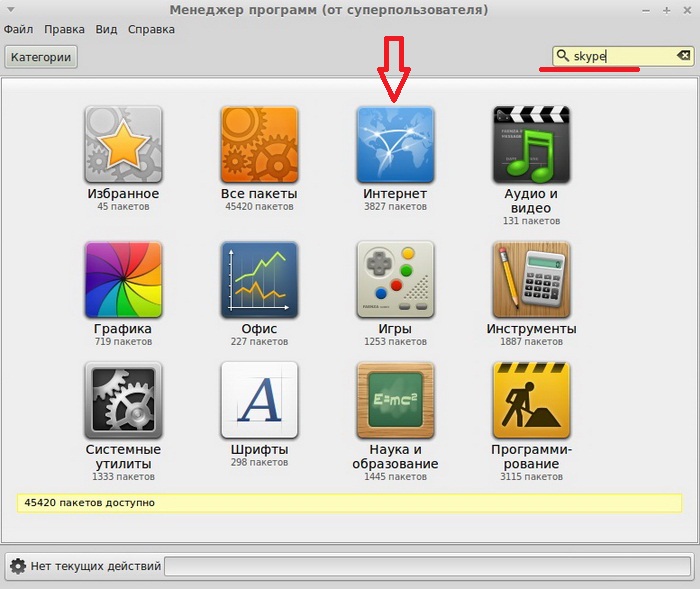

Затем щелкаем двойным кликом мышки по нужной программе, т.е. по Skype. Кстати напротив уже установленных программ будут стоять галочки.
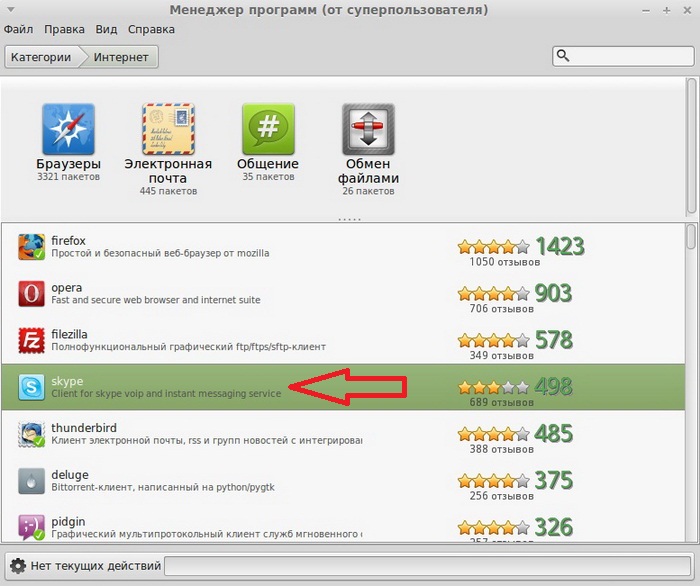
Далее откроется окно с описанием выбранной программы и если опустится чуть ниже, то там будут отзывы и оценки этой программы, а мы жмем «Установить»
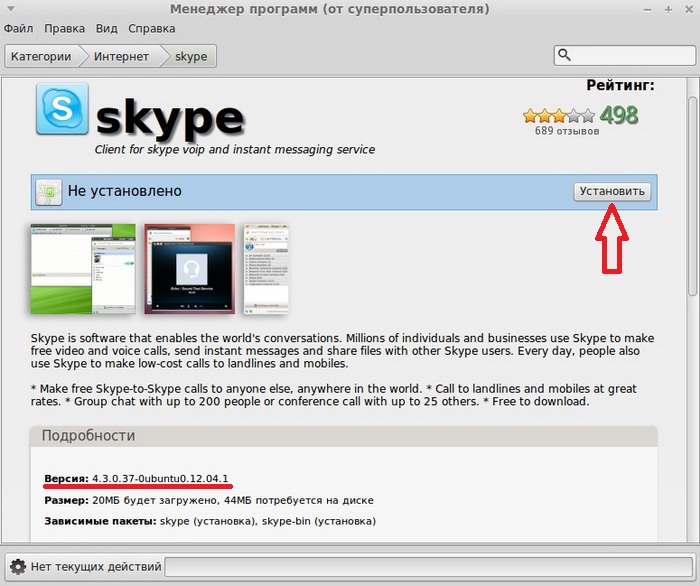
В нижней части окна мы можем наблюдать ход текущих действий
![]()
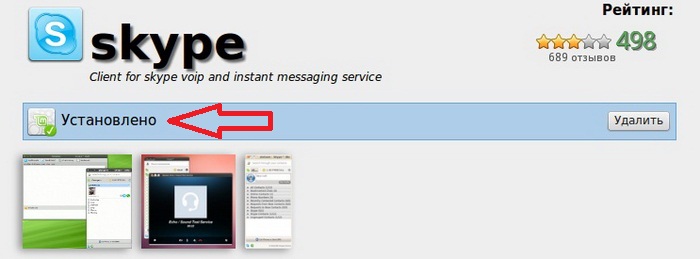
Больше от Вас никаких действий не требуется, ждем буквально минуту (в зависимости от скорости Интернета) и после появления сообщения о том, что программа установлена, можем закрывать менеджер программ
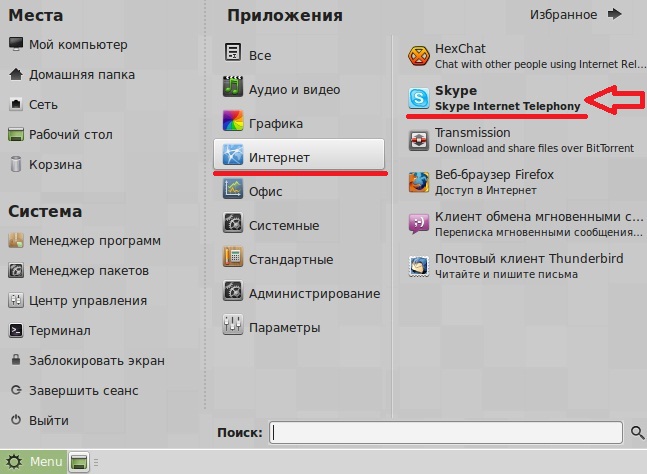
Теперь осталось запустить Skype, для этого открываем меню mint, выбираем Все приложения->Интернет->Skype
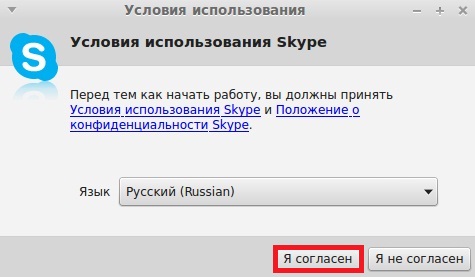
При первом запуске скайпа необходимо согласиться с условиями использования Skype, мы жмем «Я согласен»
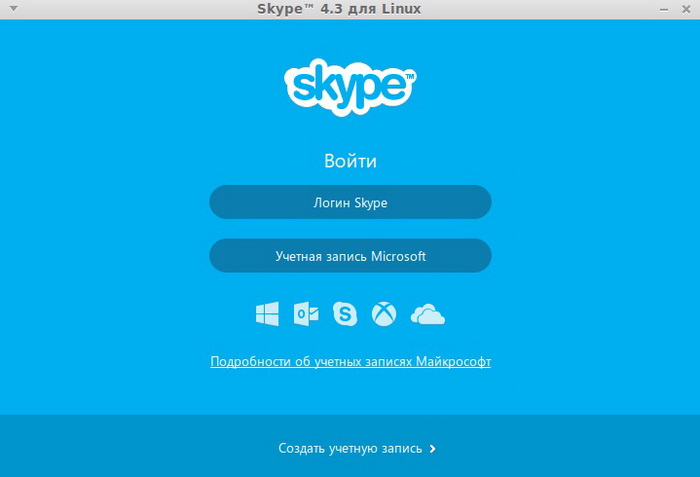
Ну а потом выбираете с помощью, каких учетных данных Вы хотите авторизоваться, т.е. кокой логин и пароль есть у Вас, либо от skype либо от Microsoft, если нет, не того не другого, то нажимаете «Создать учетную запись» и в открывшемся окне браузера заполняете форму регистрации и соответственно регистрируетесь.
Вот мы с Вами и установили одну из последних версий скайпа для linux (x86) и на момент написания статьи это 4.3.0.37. Как видите установка программ в Linux Mint производится очень легко, путем нажатия одной кнопки. На этом все, удачи в освоении Linux Mint!
How to Install Skype in Linux Mint 20
![]()
Skype is the most popular communication platform owned by Microsoft. It offers various free-of-cost features, including audio calls, video conferencing, text messages, and file-sharing. Skype also offers a desktop client application so that you do not need to open the browser each time you use this application.
This article will show you how to install Skype in Linux Mint 20 via the command-line interface. We will cover all the possible methods through which to install Skype on your system. All the steps in this article were performed using the Linux Mint 20 operating system.
There are three possible methods you can use to install Skype in Linux Mint 20:
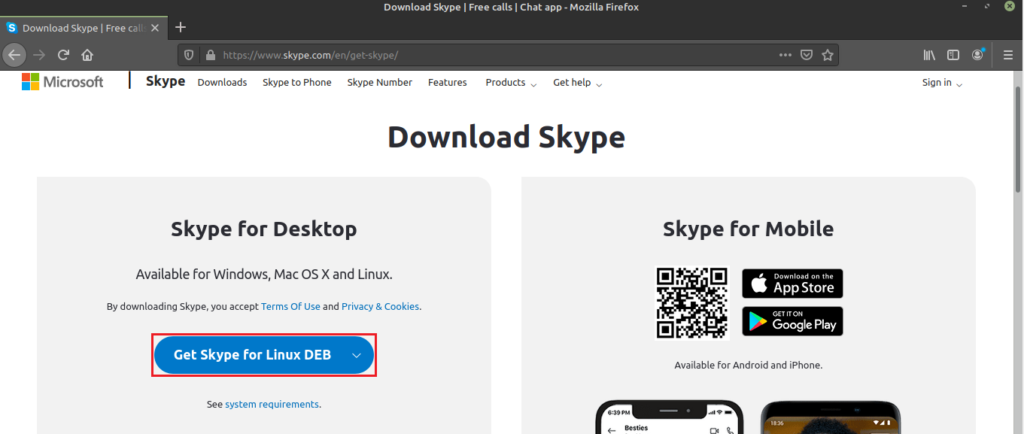
Method 1: Install Skype Using the .deb package
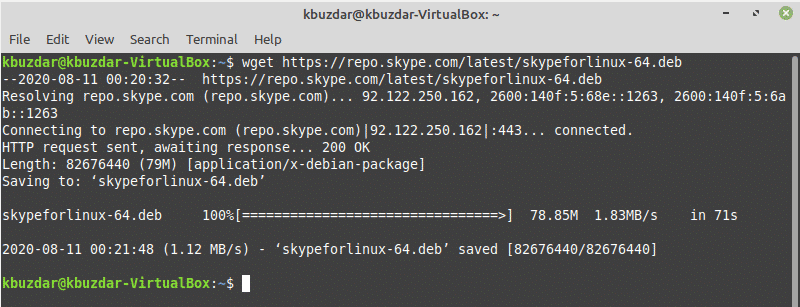
First, open the command-line terminal application in your Linux Mint 20 distro. To do so, click on the Linux Mint menu icon in the left-bottom corner and click the terminal application, as follows:
To install the latest Skype release onto your system, you will need to download the .deb package via the official download link by using the wget command. But first, update the apt repository and install the wget command on your Linux Mint 20 system by running the following commands:

Next, download the latest Skype release from the official Skype repository. To do so, run the following command:
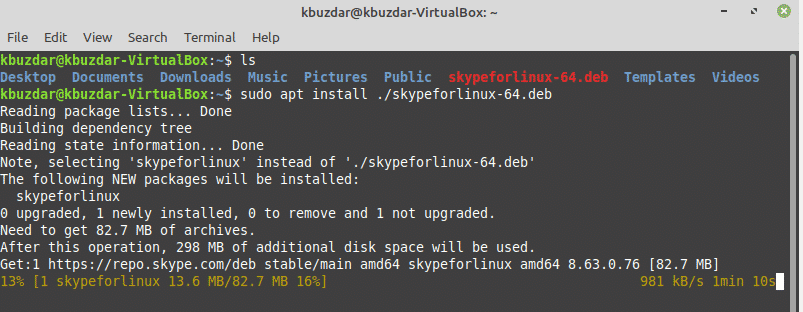
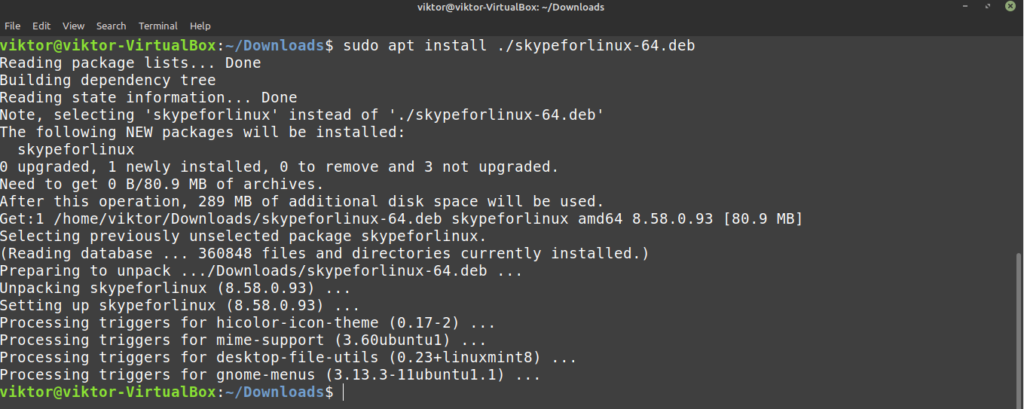
Once the download is complete, install the downloaded .deb Skype package by entering the following command in the terminal:
Method 2: Install Skype Using the apt Repository
In Linux Mint 20, you can directly access the Skype client using the package server. Linux Mint also supports the Ubuntu package repository. So, you can directly install Skype onto your Linux Mint system by using the apt package manager.
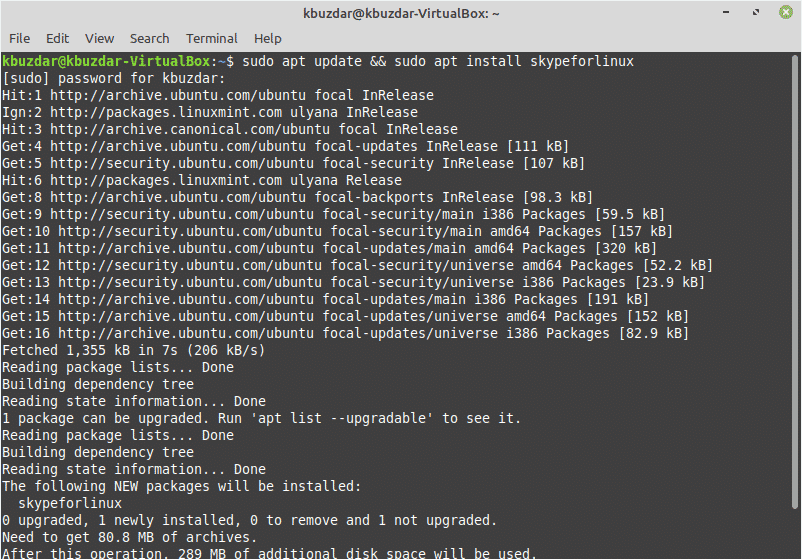
First, refresh the apt cache, and then install all available updates by entering the following command:

Skype is available in the apt repository. The package is named ‘skypeforlinux.’ Using the apt package manager, the following command will install Skype onto your system:
Method 3: Install Skype Using Snap
The Snap packages application is available on every type of Linux system, cloud, or server. Snap is easier to install and create, safe for execution, and automatically updates or refreshes the applications.
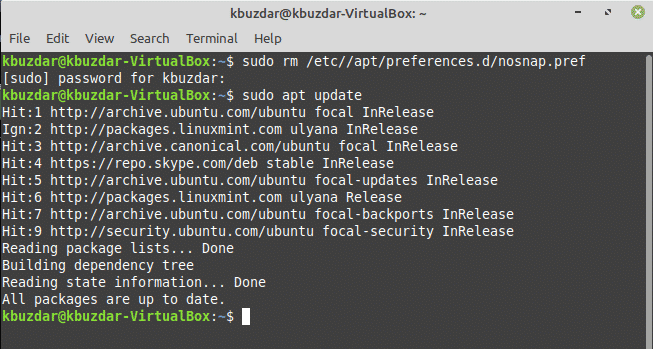
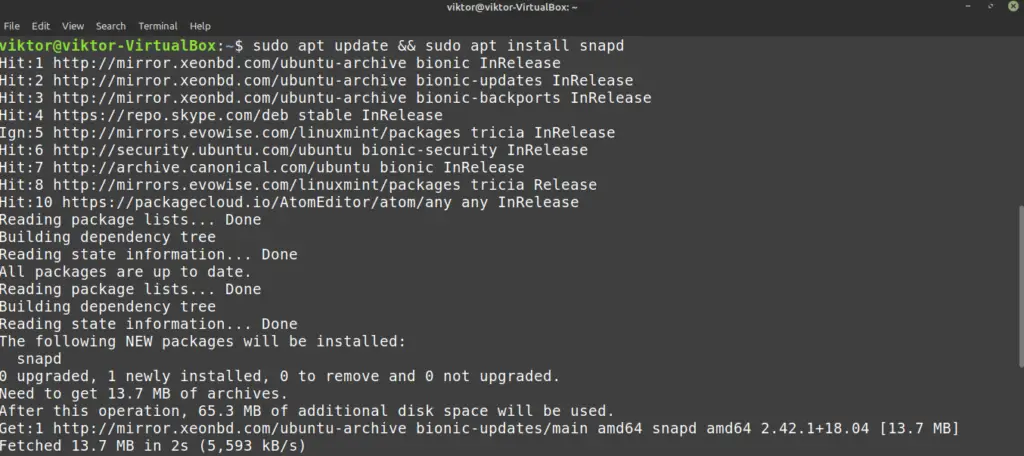
On Linux Mint 20 OS, it does not allow you to install the snap application directly. First, you will need to disable or remove the snap.pref package from your system by using the following command, and then you can install the snapd application on your system.
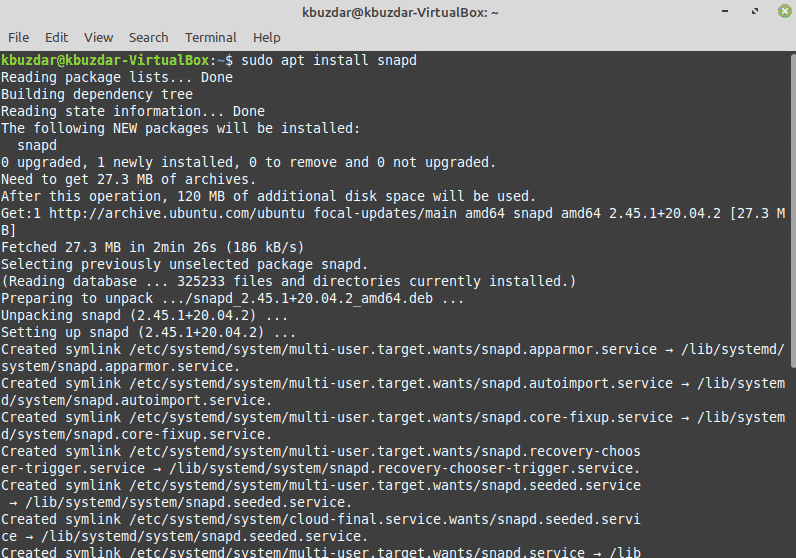
To install the snapd application, open the terminal and run the following command to install snapd on your Linux Mint 20 distribution:
Once the snapd application is installed, you can now install the Skype snap onto your Linux Mint 20 distro using the following command:

You can also list the snap packages using the following command:
Once the installation of Skype is completed, you can launch the program by typing ‘skype’ in the terminal, or by using the application launcher bar, as follows:

Click the menu icon and search ‘Skype’ in the search bar, then click on the Skype icon, as follows:
Remove Skype from Linux Mint 20 Using Snap
You can also uninstall or remove the Skype application using the snap by running the following command:

To update Skype, issue the following command:
Conclusion
Congratulations! Skype is now installed on your Linux Mint 20 distro.
This article showed you how to install Skype onto your Linux Mint 20 distro using three different methods. You also learned how to install Skype using the command-line application. Skype offers a great communication service at no cost. Skype also comes with a lot of useful features, such as end-to-end encryption, decentralized communication, and much more. Skype is available for Ubuntu, but it can also run on Linux Mint 20. You can explore more features offered by Skype once you download and install the application. Enjoy!
About the author
Karim Buzdar
Karim Buzdar holds a degree in telecommunication engineering and holds several sysadmin certifications. As an IT engineer and technical author, he writes for various web sites. He blogs at LinuxWays.
How to Install and Use Skype on Linux Mint
![]()
Whenever it comes to video/voice calls, Skype is one of the top names in the market. Currently owned and served by Microsoft, Skype offers free video/voice communication over the internet. Millions of people take benefit of Skype every single day. In March 2020, Skype reported that it has about 100 million monthly users and 40 million daily users. Needless to say, Skype is a giant platform in the market.
To make things easier, Skype offers a desktop client. No need to fire up the browser every time you want to make a call. In this article, let’s check out how you can install and use the Skype client on Linux Mint.
Skype on Linux Mint
Skype is a popular platform, no doubt. That’s why it offers a direct client on your system of choice (in this case, Linux Mint). Other than Linux, Skype client is available for Windows, Mac OS X, Android, and iOS devices.
The official Skype client is available as DEB and RPM packages. Linux Mint is an Ubuntu-based distro, so we’ll be working with the DEB package. However, that’s not the only way of getting the client. Skype is also available as snap and Flathub packages.
Ready? Let’s get right into it.
Install Skype using DEB
Once the download is complete, it’s time to install it. I recommend installing any DEB package using APT. That way, APT will take care of the dependencies simultaneously. First, update the APT cache.

Now, tell APT to install the DEB package.
Install Skype using APT
Because Skype is so popular, major Linux distros offer direct access to the Skype client through the package server. Linux Mint also uses the Ubuntu package server. Thus, we can directly grab Skype from the package server. All we need is to tell APT to do the job.
First, update the APT cache and install any available update.

Now, install the Skype client. As for the package name, it is “skypeforlinux”. Interested in learning more about the APT package manager? Check out

Install Skype using snap
This is one of my most favorite methods of installing any app on Linux. Snap is a special type of package that will run on any Linux distro as long as snappy, the snap package manager, is supported for it. In other words, snaps are universal Linux packages!
To enjoy all the glorious features of snap, however, we need the snappy package manager. Got it already? Good! Jump right to the Skype installation section. Don’t have it? This guide got you covered!
To install snappy, fire up a terminal and start running the following commands.
Now, we have to grab the snap “core”. It’s the core of the entire snap platform, hence the name “core”. Tell snappy to install the core. In my case, it’s already installed. However, if you’re fresh installing snap, then it’ll download and install automatically.
Finally, restart the snap service to take the changes into effect.
Snappy is ready to install all the snap packages you want! Let’s install the Skype snap.
Install Skype using Flatpak
This is another one of my most favorite methods of installing Linux packages. Similar to snap, flatpak is another form of universal Linux package. Both of them differ in some ways but the fundamental is all the same – universal Linux packages that can operate on any Linux distro.
Similar to snap, we also need the flatpak package manager. In the case of Linux Mint, flatpak comes by default. Unless you’ve removed it for some reason, skip to the Skype flatpak installation section. If you need to install the flatpak package manager, then follow along.
Install flatpak package manager.

Once the installation is complete, we have to add the Flathub repository. Think of Flathub as the official flatpak store.
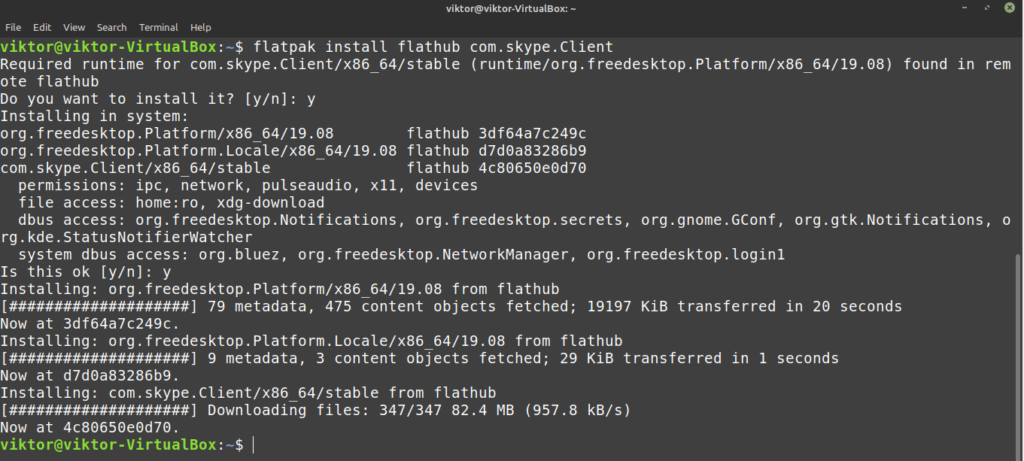
Now, the flatpak manager is ready to grab the Skype client. If you’re interested, check out Skype client at Flathub. To install Skype flatpak, run the following command.
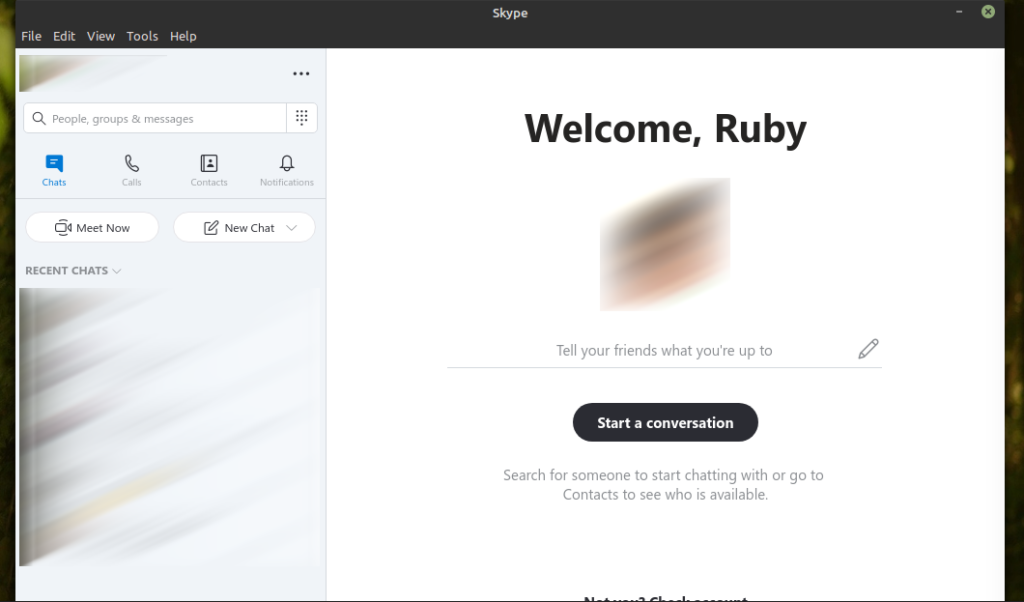
Using Skype
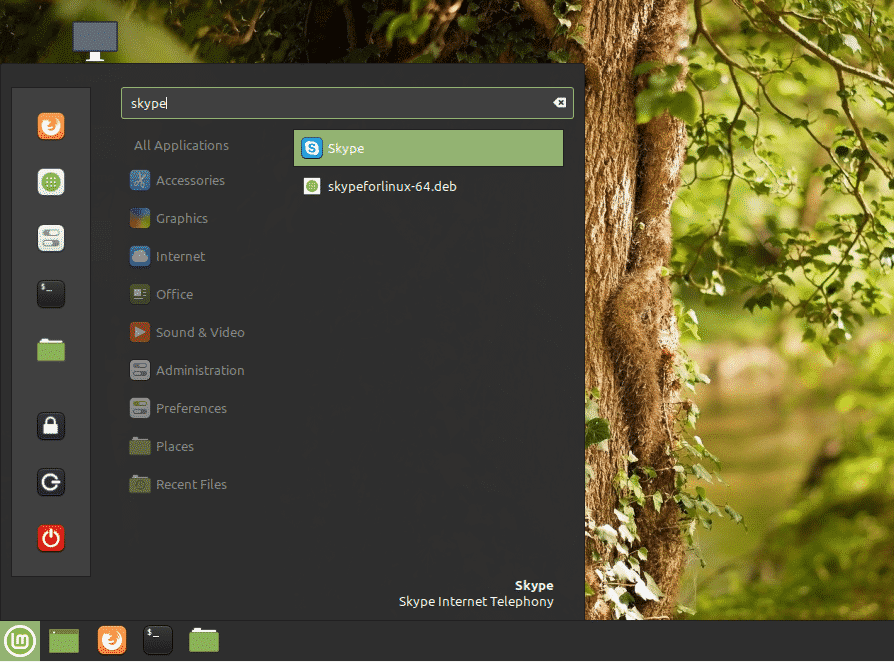
Now that the client is installed, it’s time to check it out! Start Skype from the menu.
The welcome screen will pop up. Click the button “Let’s go”.

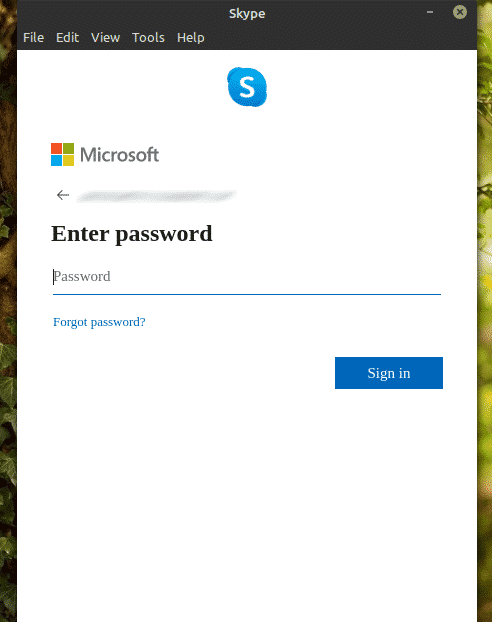
Click the “Sign in or create” button. Assuming that you already have a Skype account, I’ll be showcasing how to connect with the client. If you don’t have a Skype account yet, you can create one for free.


Skype may ask to update your profile photo. Feel free to update the profile pic or skip the step.

You can also test the audio and microphone. It’s always a good idea to make sure that everything is working fine.

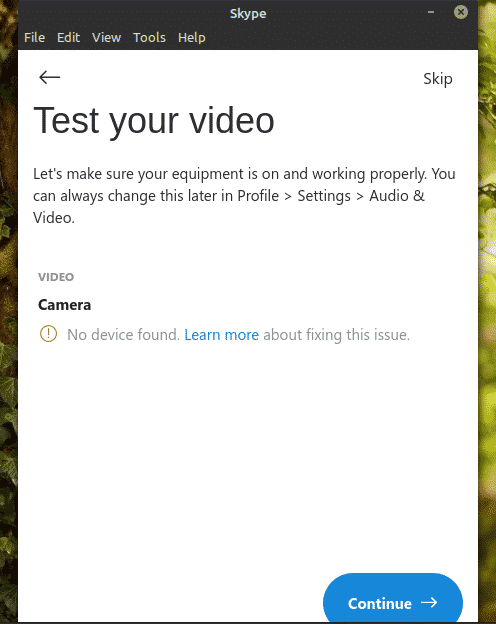
Check out if your webcam is working properly.
Skype will show a short note on contacts. Click “OK” to complete the process.

Voila! Skype client is ready to make video/voice calls and text chats!
Final thoughts
Skype offers great service at no cost. However, for video/voice chat, Skype isn’t your only option. Why not test out Ring? In my opinion, it’s a solid alternative to Skype that offers a lot more features like decentralized communication, end-to-end encryption, and others. Check out Ring. It’s officially available for Ubuntu but as I’ve mentioned earlier, it’ll run just fine on Linux Mint.
About the author
Sidratul Muntaha
Student of CSE. I love Linux and playing with tech and gadgets. I use both Ubuntu and Linux Mint.