- CentOS / RHEL 7 : How to install and configure telnet
- Installing telnet packages
- Configuring/enabling telnet
- 1. Add the service to firewalld.
- 2. Add the service to selinux.
- 3. Enable and start the telnet service.
- 4. Verify
- How to Install Telnet on Linux (CentOS, RHEL) using the YUM package manager
- Step 1: Update Your System
- Step 2: Install the Telnet Package
- Step 3: Connect to a Remote Server Using Telnet
- Commands and Their Functions:
- Conclusion
- Dimitri Nek
- Как установить Telnet на CentOS 8
- Установите Telnet на CentOS 8
- Шаг 1. Во-первых, давайте начнем с проверки актуальности вашей системы.
- Шаг 2. Установка Telnet на CentOS 8.
- Шаг 3. Настройте Firewalld.
- Шаг 4. Используйте Telnet.
- How to Install and Configure Telnet in CentOS?
- How to Install Telnet in CentOS?
- How to Configure the Telnet on CentOS?
- Step 1: Configure the Service
- Step 2: Add the Telnet Port to the Firewall
- Step 3: Reload the Firewall Services
- Step 4: Create a User Account
- Step 5: Set Password to User Account
- Step 6: Verify the Telnet Connection
- How to Remove Telnet From CentOS?
- Conclusion
CentOS / RHEL 7 : How to install and configure telnet
It’s not recommended to use telnet as it is not secure. The passwords are transferred using a plain text and any packet sniffer can easily track you. Nevertheless, it’s sometimes required to install telnet anyways. To check if you have telnet package already installed on your system, use :
# rpm -qa | grep telnet telnet-server-0.17-59.el7.x86_64 telnet-0.17-59.el7.x86_64
In order to turn Telnet on make sure that you have the packages telnet-server and telnet installed:
Installing telnet packages
If the 2 required packages are not installed, install it using yum.
# yum install telnet-server telnet
Configuring/enabling telnet
1. Add the service to firewalld.
The built in firewalld blocks Telnet port 23 by default because the protocol is not considered secure. Please make sure that the port is open or if a non-default port is being used, that the port associated with Telnet is open for telnet traffic to pass through.
# firewall-cmd --add-service=telnet --zone=public
Run the rule again with the “–permanent” flag for it to persist across firewalld restarts.
# firewall-cmd --add-service=telnet --zone=public --permanent
2. Add the service to selinux.
You will have to also add the service to SELinux. This is required only in the case where SELinux is enabled on the system.
# semanage port -a -t telnetd_port_t -p tcp
3. Enable and start the telnet service.
Start the service using the systemctl command.
# systemctl start telnet.socket
Enable the telnet service to start at boot.
# systemctl enable telnet.socket
4. Verify
Once you are done with the configuration, verify if the telnet to a server works.
# telnet geeklab02 Trying 10.10.10.10. Connected to 10.10.10.10. Escape character is '^]'. Kernel 3.10.0-327.el7.x86_64 on an x86_64 geeklab02 login: testuser Password: Last login: Sat Jan 23 18:19:43 from geeklab [testuser@geeklab02 ~]$ hostname geeklab02
How to Install Telnet on Linux (CentOS, RHEL) using the YUM package manager
Although Telnet is not considered the most secure protocol for remote access, it can still be helpful for certain network administration tasks, such as testing and troubleshooting network services.
In this guide, we will specifically focus on how to install Telnet on Red Hat-based Linux distributions (e.g., CentOS, RHEL) using the YUM package manager. By the end of this guide, you will have successfully installed Telnet on your system and be ready to use it for your specific needs.
Step 1: Update Your System
Before installing Telnet, it is essential to update your system’s package list to ensure you are installing the latest version of the software. To update your system, open a terminal and run the following command:
Step 2: Install the Telnet Package
With your system updated, you can now install the Telnet package using YUM. Run the following command in your terminal:
YUM will automatically resolve any dependencies and proceed with the installation. Once the installation is complete, you can verify the Telnet installation by running the following command:
If you see the Telnet command prompt, the installation was successful.
Step 3: Connect to a Remote Server Using Telnet
To connect to a remote server using Telnet, enter the following command in the terminal, replacing “webhostinggeeks.com” with the server’s address and “port_number” with the appropriate port:
telnet webhostinggeeks.com port_number
Press Enter to establish the connection. You can now interact with the remote server using the Telnet protocol.
Commands and Their Functions:
- sudo yum update – Updates the system’s package list.
- sudo yum install telnet – Installs the Telnet package using YUM.
- telnet – Connects to a remote server using the Telnet protocol.
Conclusion
This guide has provided you with the necessary steps to install Telnet on a Red Hat-based Linux distribution using the YUM package manager. Now that Telnet is installed on your system, you can use it for network administration tasks, such as testing and troubleshooting network services. Keep in mind that Telnet is not a secure protocol, so consider using more secure alternatives like SSH for remote connections whenever possible.
We encourage you to leave comments and suggest improvements to this guide. Your feedback helps us improve our content and better serve our audience.
Dimitri Nek
Dimitri is a Linux-wielding geek from Newport Beach and a server optimization guru with over 20 years of experience taming web hosting beasts. Equipped with an arsenal of programming languages and an insatiable thirst for knowledge, Dimitri conquers website challenges and scales hosting mountains with unmatched expertise. His vast knowledge of industry-leading hosting providers allows him to make well-informed recommendations tailored to each client’s unique needs.
Как установить Telnet на CentOS 8

В этом руководстве мы покажем вам, как установить Telnet на CentOS 8. Для тех из вас, кто не знал, Telnet — это протокол прикладного уровня, который обеспечивает двунаправленную интерактивную текстовую связь. Он работает в режиме сервер / клиент, когда приложение Telnet Server установлено на главном компьютере, а все остальные компьютеры подключаются к нему с помощью клиентского приложения Telnet. По умолчанию telnet не будет установлен в вашей системе.
В этой статье предполагается, что у вас есть хотя бы базовые знания Linux, вы знаете, как использовать оболочку, и, что наиболее важно, вы размещаете свой сайт на собственном VPS. Установка довольно проста и предполагает, что вы работаете с учетной записью root, в противном случае вам может потребоваться добавить ‘ sudo ‘ к командам для получения привилегий root. Я покажу вам пошаговую установку Telnet на CentOS 8.
Установите Telnet на CentOS 8
Шаг 1. Во-первых, давайте начнем с проверки актуальности вашей системы.
sudo dnf update sudo dnf install epel-release
Шаг 2. Установка Telnet на CentOS 8.
Теперь мы запускаем следующую команду для установки telnet в системе CentOS:
Шаг 3. Настройте Firewalld.
Telnet взаимодействует через порт 23 и должен быть разрешен во встроенном firewalld:
sudo firewall-cmd –add-service=telnet –zone=public sudo firewall-cmd –add-service=telnet –zone=public — permanent
Шаг 4. Используйте Telnet.
Теперь вы можете запустить telnet:
[root@infoit.com.ua ~]# telnet telnet>
Теперь вы можете использовать telnet команду для проверки связи порта с удаленным сервером. В приведенном ниже примере мы используем telnet команду для проверки подключения к порту 443 google.com, выполнив команду: telnet google . com 443
[root@infoit.com.ua ~]# telnet google.com 443 Trying 74.125.68.113. Connected to google.com.
Поздравляю! Вы успешно установили Telnet. Благодарим за использование этого руководства для установки Telnet в вашей системе CentOS 8. Для получения дополнительной помощи или полезной информации мы рекомендуем вам посетить официальный сайт CentOS
How to Install and Configure Telnet in CentOS?
Telnet is a network protocol that allows users to connect to remote systems over a network and execute commands as if they were physically present in the system. The telnet in CentOS allows users to access and manage other network systems remotely. Telnet allows users to log in to a remote system, execute commands, and transfer files over a network connection.
This article will demonstrate the step-by-step instructions to install and configure the telnet in CentOS. The content is provided below:
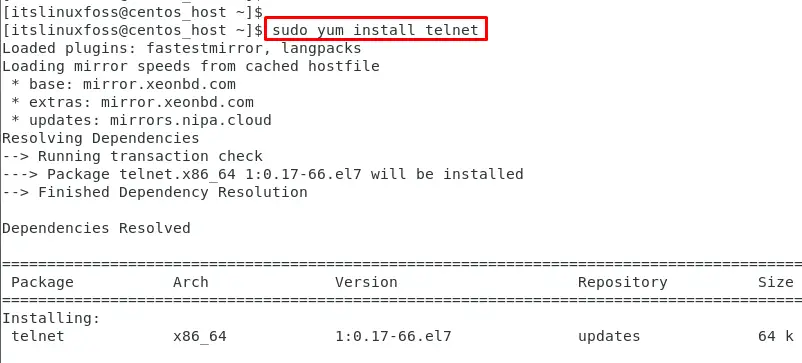
How to Install Telnet in CentOS?
In CentOS, the telnet service is typically not installed by default, but it can be easily installed using the following command:
How to Configure the Telnet on CentOS?
The following steps are carried out to configure the Telnet service on CentOS:
Step 1: Configure the Service
First, start the telnet service using the “systemctl” command:
$ systemctl start telnet.socket

Then, enable the Telnet services to be effective after every reboot:
$ sudo systemctl enable telnet.socket

Lastly, check the service status via the command:
$ sudo systemctl status telnet.socket
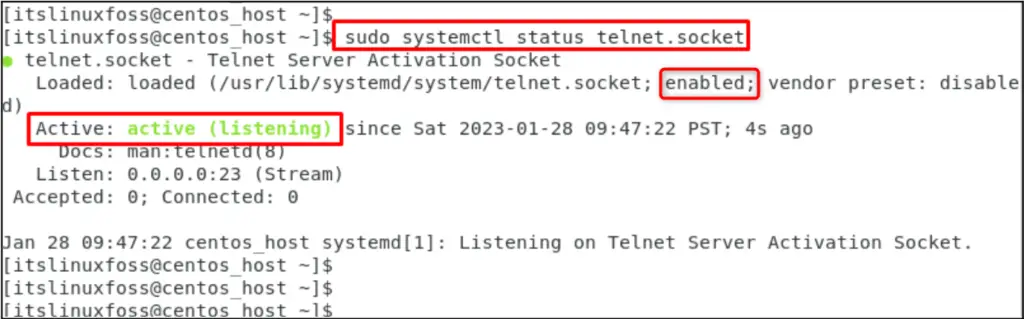
The output shows that the telnet service is actively running and is enabled as well.
Step 2: Add the Telnet Port to the Firewall
In Telnet configuration, users can add a specific port to the firewall for sending or receiving packets over the network. In our case, assign the “23/tcp” port value to the firewall:
$ sudo firewall-cmd --permanent --add-port=23/tcp

The output shows that port 23 has been added to the telnet port in the firewall.
Step 3: Reload the Firewall Services
It is necessary to reload the firewall services that configure all the dependencies:

The “success” message shows that firewall services have been reloaded.
Step 4: Create a User Account
To create a new user account for telnet access, execute the “useradd” command by specifying the “username”. For instance, “rogerr” is selected as the user account:

The output shows that “rogerr” has been created in the terminal.
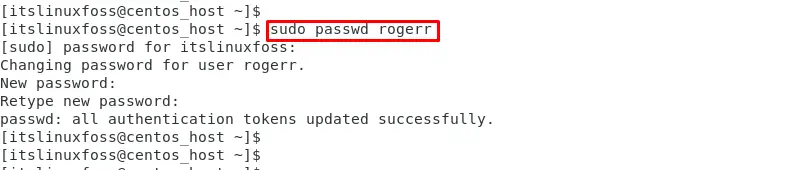
Step 5: Set Password to User Account
Users can set the password through the “passwd” command by specifying the username. In our case, the “rogerr” is specified as the username:
Step 6: Verify the Telnet Connection
Users can verify the configuration of telnet by specifying the “telnet” command along with the “IP address” or “hostname”. In our case, specify the hostname as “localhost” to connect the telnet connection:
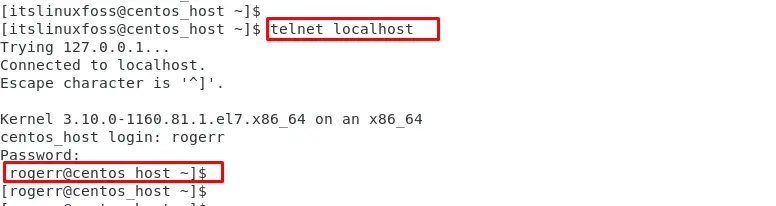
The output confirms that the “roger” username has been successfully logged using the telnet.
How to Remove Telnet From CentOS?
The Telnet package can be removed from the CentOS system via the command:
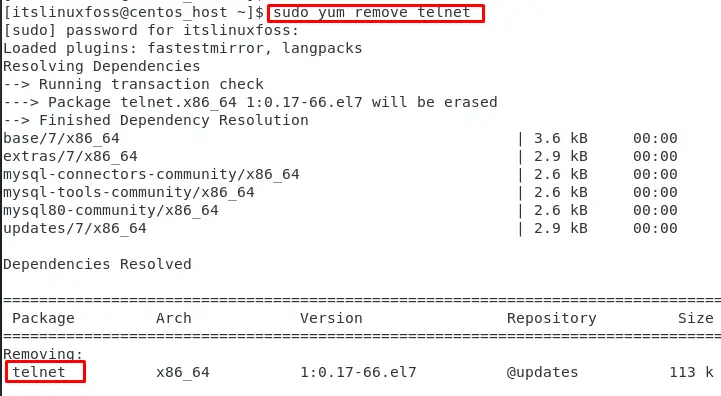
The output shows that “telnet” has been removed from CentOS.
Conclusion
CentOS offers the “yum” package manager to install the telnet package via the “sudo yum install telnet” command in the Operating System. After that, configure the telnet by enabling the “telnet.socket” services and create a user account with the password to log in. Telnet is particularly useful for managing servers and other networked devices that do not have a graphical user interface. This article has explained the step-by-step instructions to install and configure the telnet in CentOS.