- How to Install VirtualBox 7.0 on Linux Mint 21/20
- Section 1: Import VirtualBox Repository
- Step 1: Update Linux Mint
- Step 2: Install the Required Packages
- Step 3: Import the GPG Key
- Step 4: Import VirtualBox Repository
- For Linux Mint 21.xx users:
- For Linux Mint 20.xx users:
- Section 2: Install VirtualBox 7.0
- Step 1: Install VirtualBox 7.0 and Linux Headers
- Step 2: Verify the Installation
- Step 3: Check VirtualBox Service Status
- Step 4: Enable and Start the VirtualBox Service (If Necessary)
- Section 3: Launch VirtualBox 7.0
- Step 1: Launch VirtualBox from the Terminal (Optional)
- Step 2: Launch VirtualBox from the Desktop
- Section 4: Install VirtualBox Extension Pack (Optional)
- Step 1: Download VirtualBox 7.0 Extension Pack
- Step 2: Install VirtualBox 7.0 Extension Pack
- Step 3: Verify Installed Extension Pack Version
- Step 4: Add User to vboxusers Group
- Section 5: Additional Commands & Tips
- Step 1: Update VirtualBox
- Step 2: Remove/Uninstall VirtualBox 7.0
- Step 3: Remove the Repository Sources File
- Step 4: Optionally Remove GPG Key
- Conclusion: Installing VirtualBox 7.0 on Linux Mint
- Additional Resources and Links
How to Install VirtualBox 7.0 on Linux Mint 21/20

VirtualBox, a powerful and widely used open-source virtualization solution, has recently released its major update – VirtualBox 7.0.0 on October 10, 2022. This release brings a plethora of new features, enhancements, and fixes, making it even more robust and user-friendly. Meanwhile, Linux Mint, a popular and user-friendly Linux distribution based on Ubuntu and Debian, continues to provide a stable, secure, and feature-rich operating system. This introduction will explore the significant changes in VirtualBox 7.0 and how it can be utilized alongside Linux Mint 21 or 20.
VirtualBox 7.0 Highlights:
- Full VM Encryption: Virtual machines can now be fully encrypted, including the VM config logs and saved states (CLI only for now).
- Cloud VM Integration: Cloud virtual machines can be added to Virtual Machine Manager and controlled as local VMs.
- Cloud Network Configuration: Cloud networks can now be configured via the Network Manager tool.
- GUI Enhancements: The new version comes with several graphical user interface improvements, such as a new utility similar to “top” or “resource monitor,” a reworked VM creation wizard, a new help viewer widget, and an updated notification center.
- Audio Recording and Driver Changes: Vorbis is now used as the default audio format for WebM containers, and a new “default” host driver type has been introduced.
- Guest Additions Updates: Automatic updating of Guest Additions for Linux guests is now supported, along with the ability to wait for and/or reboot the guest during updates.
- New Devices and Support: VirtualBox 7.0 introduces new devices, including virtual IOMMU, TPM 1.2 and 2.0 devices, and brings EHCI and XHCI USB controller devices to the open-source base package.
- Secure Boot and Debugging: Added support for Secure Boot and experimental support for guest debugging through GDB and KD/WinDbg.
- Other Enhancements and Fixes: Many other improvements and bug fixes have been introduced to enhance the overall experience and performance.
With the latest version of VirtualBox offering an extensive list of new features and improvements, users can take advantage of a more streamlined and efficient virtualization experience. The following guide will demonstrate how to install VirtualBox 7.0 on Linux Mint 21 or 20 using Oracle’s official APT repository for the latest version.
Section 1: Import VirtualBox Repository
Step 1: Update Linux Mint
Before installing VirtualBox 7.0, ensure your Linux Mint system is up-to-date to prevent any conflicts during installation. Run the following command to update the package list:
Next, upgrade any outdated packages using this command:
Step 2: Install the Required Packages
To install VirtualBox successfully, you must ensure that certain dependencies are installed. Most of these packages are already present on your system, but running the following command will confirm their installation:
sudo apt install dirmngr dkms ca-certificates software-properties-common apt-transport-https curl -yIf you encounter issues during installation, return to this step and run the command again.
Step 3: Import the GPG Key
To verify the authenticity of the packages, you need to add the GPG key. This step is essential for ensuring that you are installing genuine packages from the official VirtualBox repository. Run the following command to import the GPG key:
curl -fSsL https://www.virtualbox.org/download/oracle_vbox_2016.asc | sudo gpg --dearmor | sudo tee /usr/share/keyrings/virtualbox.gpg > /dev/nullStep 4: Import VirtualBox Repository
Now that you have the GPG key, it’s time to import the official VirtualBox repository. Depending on your Linux Mint distribution version, use the appropriate command:
For Linux Mint 21.xx users:
echo deb [arch=amd64 signed-by=/usr/share/keyrings/virtualbox.gpg] http://download.virtualbox.org/virtualbox/debian jammy contrib | sudo tee /etc/apt/sources.list.d/virtualbox.listFor Linux Mint 20.xx users:
echo deb [arch=amd64 signed-by=/usr/share/keyrings/virtualbox.gpg] http://download.virtualbox.org/virtualbox/debian focal contrib | sudo tee /etc/apt/sources.list.d/virtualbox.listFinally, update your repository list to include the newly added VirtualBox repository:
Section 2: Install VirtualBox 7.0
After successfully importing the VirtualBox repository, you can install VirtualBox 7.0 on your Linux Mint system.
Step 1: Install VirtualBox 7.0 and Linux Headers
To install VirtualBox 7.0, run the following command. This command also installs the appropriate Linux headers for your system’s kernel version, which is necessary for VirtualBox to function correctly:
sudo apt install virtualbox-7.0 linux-headers-$(uname -r) -yStep 2: Verify the Installation
(Optional) To ensure that the VirtualBox installation was pulled directly from the source repository, you can check the current version installed using the apt-cache policy command. This command displays the package’s priority, version number, and the repository it was installed from:
apt-cache policy virtualbox-7.0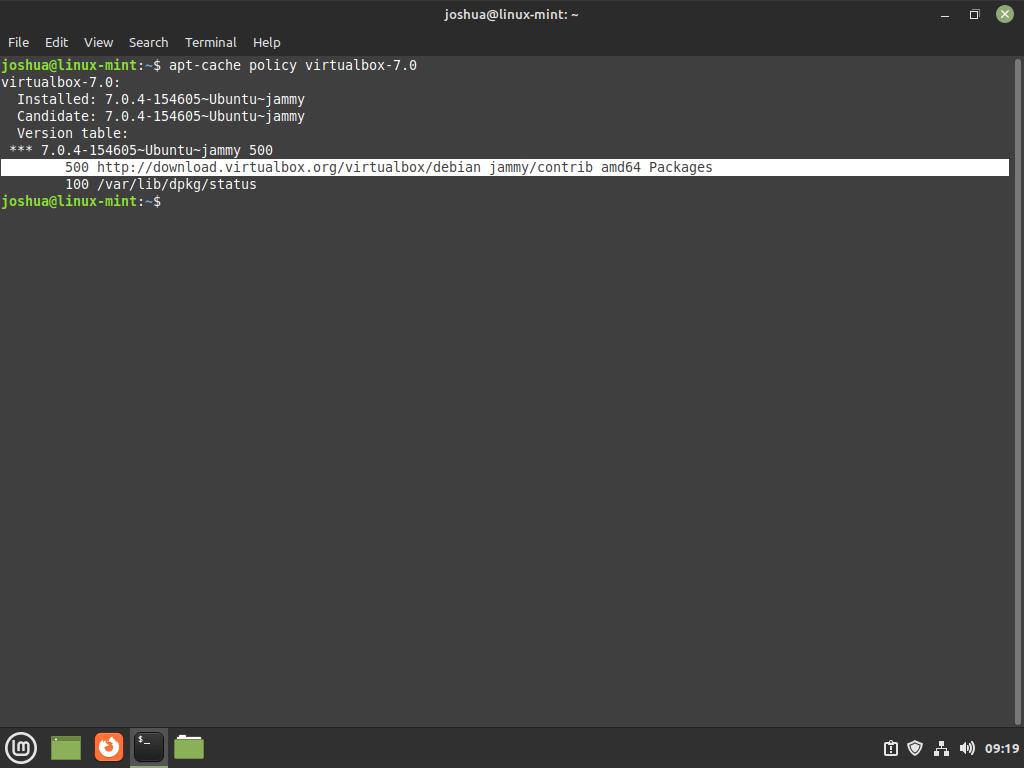
Review the output to confirm that the version number matches VirtualBox 7.0 and that the repository is the official VirtualBox repository you imported earlier.
Step 3: Check VirtualBox Service Status
To check the current status of the vboxdrv service, which is responsible for managing VirtualBox kernel modules, run the following command:
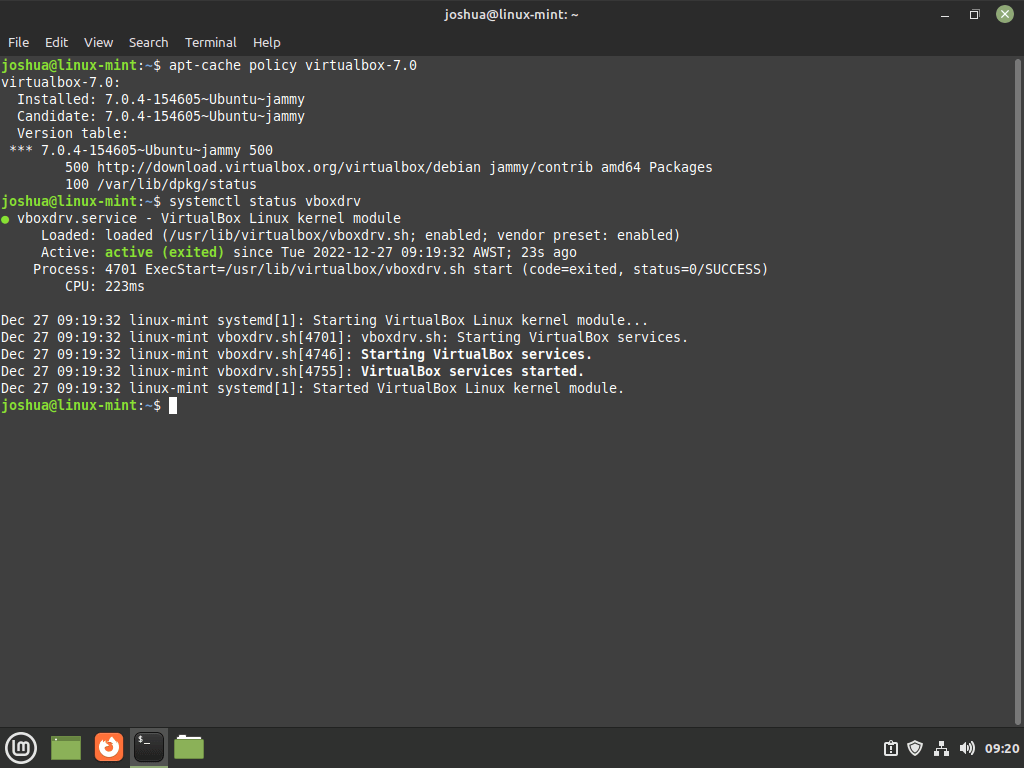
This command displays the service’s status, including whether it is active and running. You should see an output indicating that the service is active if the installation was successful.
Step 4: Enable and Start the VirtualBox Service (If Necessary)
In some cases, the vboxdrv service might not be active by default after installation. To start the service and enable it to run automatically at system boot, use the following command:
sudo systemctl enable vboxdrv --nowThis command ensures that the VirtualBox service runs correctly and your system is ready to use VirtualBox 7.0.
Section 3: Launch VirtualBox 7.0
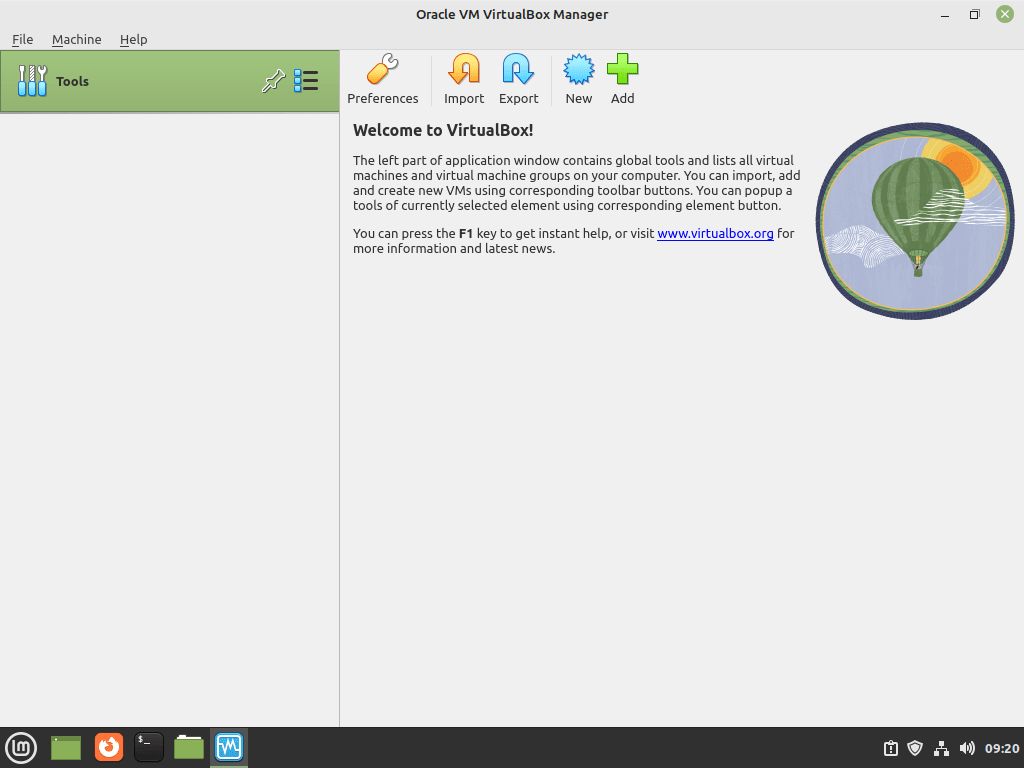
Now that you have successfully installed VirtualBox 7.0 and confirmed that the necessary service is running, you can launch the application to start creating and managing virtual machines.
Step 1: Launch VirtualBox from the Terminal (Optional)
If you prefer to launch VirtualBox directly from your terminal, run the following command:
This command opens the VirtualBox application, allowing you to manage virtual machines from the terminal.
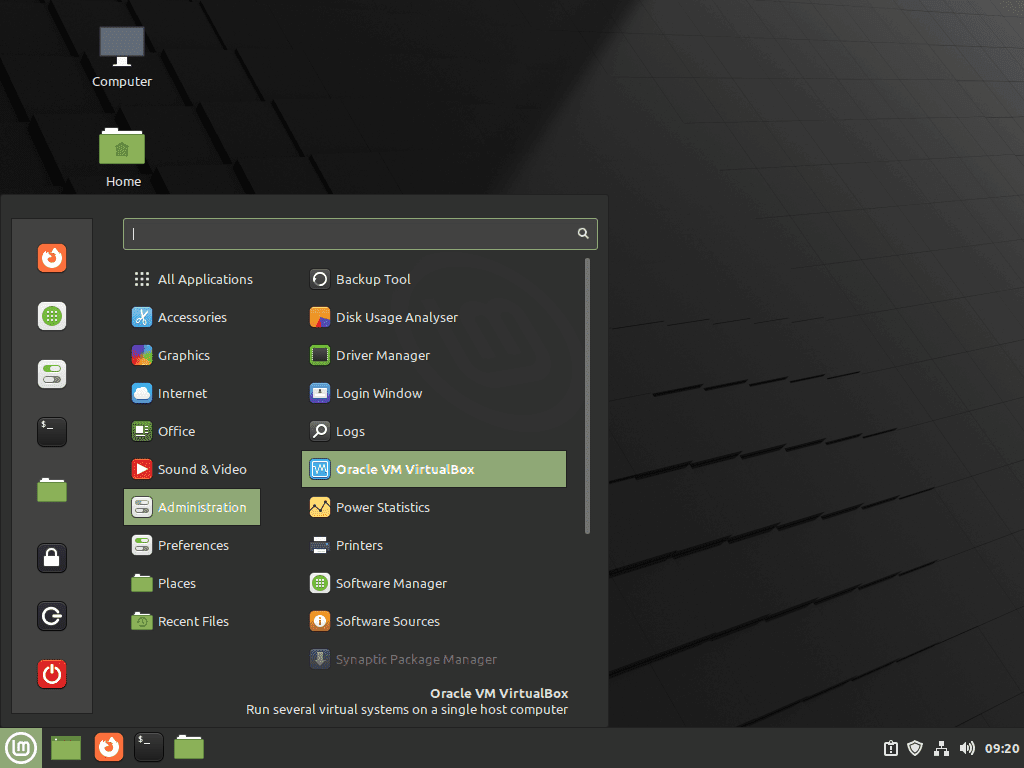
Step 2: Launch VirtualBox from the Desktop
For most desktop users, launching VirtualBox through the graphical interface is more convenient. To do this, follow the steps below:
- Click on the Taskbar or Menu button, typically located at the bottom-left corner of your screen.
- Navigate to the Administration section or search for “VirtualBox” using the built-in search functionality.
- Click on Oracle VM VirtualBox to launch the application.
Section 4: Install VirtualBox Extension Pack (Optional)
The VirtualBox Extension Pack is an optional add-on that provides several useful features, enhancing your VirtualBox experience. To install it, follow the steps below.
Step 1: Download VirtualBox 7.0 Extension Pack
The Extension Pack should match the version of VirtualBox installed on your system. To check your VirtualBox version, run the following command:
This command returns the version number (e.g., 7.0.x). Download the corresponding Extension Pack using the wget command:
wget https://download.virtualbox.org/virtualbox/7.0.x/Oracle_VM_VirtualBox_Extension_Pack-7.0.x.vbox-extpack Replace 7.0.x in the URL with your VirtualBox version. If your version differs from the example, update both instances of 7.0.x accordingly.
Step 2: Install VirtualBox 7.0 Extension Pack
To install the downloaded Extension Pack, use the vboxmanage command:
sudo vboxmanage extpack install Oracle_VM_VirtualBox_Extension_Pack-7.0.x.vbox-extpackYou’ll be prompted to agree to Oracle’s license terms and conditions. Type “y” and press Enter to confirm.
Step 3: Verify Installed Extension Pack Version
To check the installed Extension Pack version, run:
This command displays information about the installed Extension Packs, including version numbers.
Step 4: Add User to vboxusers Group
Before using VirtualBox, add your user account to the vboxusers group:
sudo usermod -a -G vboxusers $USERReboot your system to apply the changes. After logging back in, verify that your user account is now a member of the vboxusers group:
This command displays a list of groups your user account belongs to. Ensure that vboxusers is included in the list.
Section 5: Additional Commands & Tips
This section provides additional commands and tips for managing VirtualBox on your system.
Step 1: Update VirtualBox
To keep your VirtualBox installation up-to-date, use the command line terminal to check for and apply updates:
sudo apt update && sudo apt upgradeChecking for updates using the terminal at least once a week is a good practice. This method ensures you don’t miss any updates and keeps your system current.
Step 2: Remove/Uninstall VirtualBox 7.0
If you decide to remove VirtualBox entirely, use the following command:
sudo apt autoremove virtualbox-7.0 --purgeNote that the —purge flag deletes all data, including any database data associated with VirtualBox. If you want to keep your data, omit the —purge flag.
Step 3: Remove the Repository Sources File
To remove the repository sources file, run the following:
sudo rm /etc/apt/sources.list.d/virtualbox.listStep 4: Optionally Remove GPG Key
If you prefer to remove the GPG key as well, use the following command:
sudo rm /usr/share/keyrings/virtualbox.gpgConclusion: Installing VirtualBox 7.0 on Linux Mint
In conclusion, installing VirtualBox 7.0 on Linux Mint is a straightforward process that enables you to take advantage of powerful virtualization features. Following the steps, you can easily set up VirtualBox and configure it for your needs. This guide has outlined the necessary steps and commands to install, update, and remove VirtualBox and shared tips on managing the software effectively.
Additional Resources and Links
The following resources are from official sources, including documentation and wikis. These will provide you with in-depth information on VirtualBox and its features.
- VirtualBox Official Website:https://www.virtualbox.org/
- The official website for VirtualBox provides downloads, documentation, and support resources.
- A comprehensive user manual covers all VirtualBox aspects, including installation, configuration, and troubleshooting.
- The official changelog for VirtualBox 7.0 detailing new features, improvements, and bug fixes.
- Official forums where you can ask questions, seek assistance, and share your experiences with other VirtualBox users.