- How to install a VPN on Kali Linux
- Notes
- 1. Uninstall the Proton VPN app
- To remove the Proton VPN app from your Kali system, open the terminal and run:
- 2. Disable the kill switch if you have uninstalled the official app
- 3. Required dependencies
- 4. Help Proton iron out bugs with the early release version of this app
- Secure your internet
- How to Install VPN on Kali Linux Using OpenVPN and VPNBook
- Why do you need a VPN on your Kali Linux?
- Why open-source VPN?
- How to Install a VPN on Kali Linux?
- Configuring OpenVPN
- Configuring OpenVPN with GUI (Graphical User Interface)
- Configuring OpenVPN from the Terminal
- Conclusion
- How to set up own VPN server in 10 minutes on Kali Linux using OpenVPN
How to install a VPN on Kali Linux
This package contains the repository configuration and keys that are required to install the Proton VPN app.
2. Install the Proton VPN repository
In the terminal, enter the following text (followed by ).
sudo apt-get install protonvpn-stable-release_1.0.3_all.deb Replace with the path to where you download the file. For example:
sudo apt-get install ~/Downloads/protonvpn-stable-release_1.0.3_all.deb Please don’t try to check the GPG signature of this release package (dpkg-sig –verify). Our internal release process is split into several part and the release package is signed with a GPG key, and the repo is signed with another GPG key. So the keys don’t match.
If you want to check the repo package integrity, you can check its checksum with the following command:
echo "c409c819eed60985273e94e575fd5dfd8dd34baef3764fc7356b0f23e25a372c protonvpn-stable-release_1.0.3_all.deb" | sha256sum --check -
3. Update the apt-get package list
The following command updates the list of available packages and their versions. Doing this allows you to install the Proton VPN App. Run:
sudo apt-get install protonvpn Reboot your Linux PC and log in to the Proton VPN app with your Proton Account details. If you do not already have a Proton Account, you can sign up for a Proton VPN Free plan for Linux .
The Proton VPN Linux app is now ready to secure your internet browsing and allow you to access the free and open internet. However, please note that the system tray icon may not work on Kali Linux . This is because the system tray icon requires dependencies that have been deprecated in Kali.
Notes
1. Uninstall the Proton VPN app
To remove the Proton VPN app from your Kali system, open the terminal and run:
sudo apt-get autoremove protonvpn Remove any leftover files:
2. Disable the kill switch if you have uninstalled the official app
You should disable the kill switch before uninstalling our official app. Failure to do this will likely prevent you from accessing the internet. Fortunately, this is easily fixed:
a) Open the terminal and use the following command to identify connections belonging to Proton VPN:
nmcli connection show --active b) You will see a list of active connections. Look for any of them with the prefix pvpn- This usually includes pvpn-killswitch and pvpn-ipv6leak-protection , and may include pvpn-routed-killswitch . Delete all these connections using the following command:
nmcli connection delete [connection name] nmcli connection delete pvpn-killswitch c) Run the following command again to ensure that you have deleted all Proton VPN connections:
nmcli connection show --active If any remain, delete them as described above.
3. Required dependencies
You’ll need one of the following Linux keyrings installed on your Kali system for our Linux app to work. But the chances are that one of them is already installed (you don’t want both, though, as this can cause problems).
Also needed (but probably already installed) is:
4. Help Proton iron out bugs with the early release version of this app
Proton is a community-based project that relies on your support. If you want to help us identify bugs before this app is made available to the general public, you can download the following early access version instead of the one we link to in step 1 of this guide.
To check the integrity of the package, use the following command:
echo "caba770e3544a4f33b7d5718dedd8bc1d06cfcd2b2f8c4f33b5a42d15a78e74a protonvpn-beta-release_1.0.3_all.deb" | sha256sum --check -
Setup instructions are otherwise as described above.
Helping us in this way will give you access to the latest features before they are available for general release, but it’s only recommended if you are an experienced Linux user who is relaxed about your threat model.
Secure
your internet
- Strict no logs policy
- All apps are open source and audited
- High-speed connections (up to 10 Gbit)
- Based in Switzerland
- 30-day money-back guarantee
How to Install VPN on Kali Linux Using OpenVPN and VPNBook
Kali Linux, formerly known as BackTrack, is synonymous with security and forensics. It is a Linux distro; based on Debian and built for cyber security experts, penetration testers, and white-hat hackers for digital forensics and penetration testing. Having a VPN on your Kali Linux increases invisibility (private mode) while you keep testing for vulnerabilities. In this article, we’ll show you how to install a VPN using OpenVPN and VPNBook on Kali Linux.
Why do you need a VPN on your Kali Linux?
Despite being built for digital forensics and penetration testing, Kali is just like every other Linux distro or operating system (OS), and as a user, you need to protect your activities while using it. Failure to do so is like using an umbrella with holes,you’ll definitely get soaked when it rains. Installing a VPN helps cloak your IP address, bypass censorship/geographical limitations, and encrypt your network traffic. Or, in this case, you can view it as patching the umbrella. Please note that despite doing all the things stated above, you may still need more than a VPN to protect yourself, depending on the task.
Why open-source VPN?
This article will focus on an open-source VPN, as they provide higher transparency compared to closed-source VPNs. Some closed-sourced VPNs even rely on open-source VPNs to function. The selected VPN for today is OpenVPN because it is compatible with various OSes.
How to Install a VPN on Kali Linux?
- Next, open your terminal by navigating to your apps menu.
- Then click the icon or use the command Ctrl + Alt + T.
Sudo apt-get install OpenVPN 
- Depending on your setup, you might be asked to input your password.
- To confirm a correct installation after the download,, type the command Openvpn into the terminal, “”.

- Next, you’ll need to get the required configuration files for your VPN to work properly. Open your browser and go to www.vpnhooks.com.


For the purpose of this guide, we will be using US1 Server.

Configuring OpenVPN
There are two ways to proceed with the configuration from this point. It’s either through the GUI or the Terminal.
Configuring OpenVPN with GUI (Graphical User Interface)
Using the GUI option is typically easier, but the images provided could be slightly different on your version of Kali.


- Input the username and password found on the VPNBook website and click Save.
- After this, you’re good to go!
Congratulations! You have successfully installed OpenVPN on your Kali Linux using the GUI method.
Configuring OpenVPN from the Terminal
Unlike the GUI method, the terminal stays the same on various Kali versions. Other Linux distros on the other hand would require different commands.
- For this method, simply right-click on the folder where you have extracted the configuration files

Sudo vpnbook-us2-tcp443.ovpn 

You’ve now successfully installed OpenVPN on your Kali Linux using the terminal.

Conclusion
We have successfully installed a VPN in our Kali through the GUI process and using the terminal.
If you made it to the end, congratulations.
How to set up own VPN server in 10 minutes on Kali Linux using OpenVPN
VPN is stands for Virtual Private Network. It extends a private network across a public network, and enables users to send and and receive data across shared or public networks as if their device were directly connected to the private network. Previously we have discussed about VPN and other things in this detailed post. We will got many free or paid VPN on internet but in this tutorial we will learn how we can create our own VPN server in our Kali Linux operating system.

To create our own VPN server we use OpenVPN software. OpenVPN is a free and open source software that implements virtual private network. This is also very secured. Now we configure our VPN server.
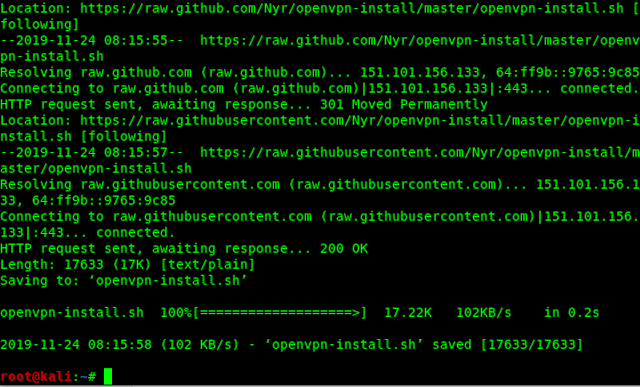
First of all we need to download the installation file for OpenVPN software, to do this we open our terminal in Kali Linux and enter the following command:
wget https://git.io/vpn -O openvpn-install.sh
Then it will start download as following screenshot :
If we are in lower version of Debian (Some of Kali Linux 2020.3 may need) then we need to download it by using this following command:
wget https://git.io/vpn1604 -O openvpn-install.sh
This bash script will download and install OpenVPN for us. First we need to to give permission to run using this command:
we just need to run this script using following command:
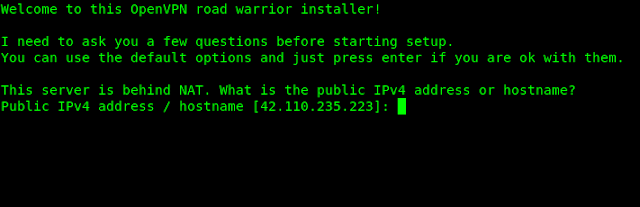
Now this script will ask our public IP and it will automatically collect our public IP address, if not then we need to manually put our public IP, If we have IPV6 then this tool will ask for it. To find IP address manually we can use following command:
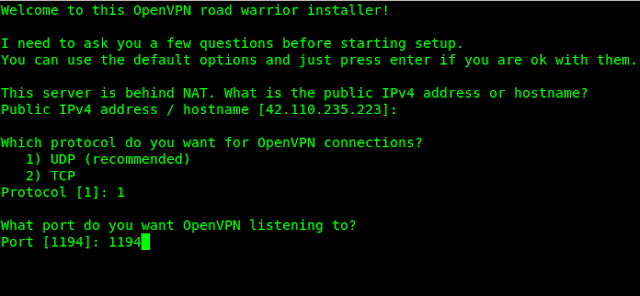
Then we need to choose a connection type for OpenVPN. Here UDP protocol is recommended so we choose 1.

Now we need to select the port where we want to set listening of OpenVPN. Here the default port is 1194, and we are going with default. The screenshot is following:
- Current system resolver
- 1.1.1.1 (Cloudflare)
- OpenDNS
- Verisign
Here we use Google’s DNS so we type 3 and press enter.
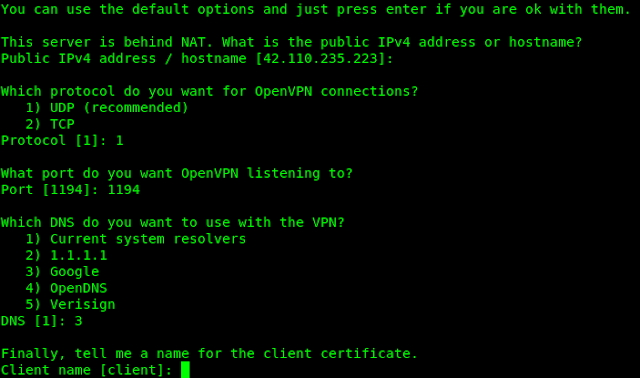
Finally, we need to type a name for the client certificate, here we can choose any client name:
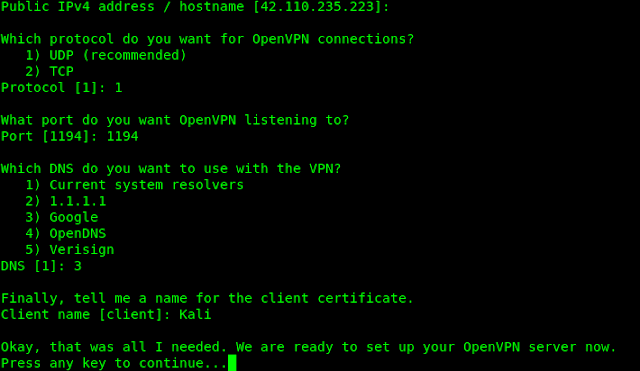
Now we have set everything to run OpenVPN server. Now we need to press any key to configure our OpenVPN server. Configuring OpenVPN server in Our Kali Linux system will take some time depending our system’s speed. After process complete we got our OpenVPN client configuration file as shown in following screenshot:
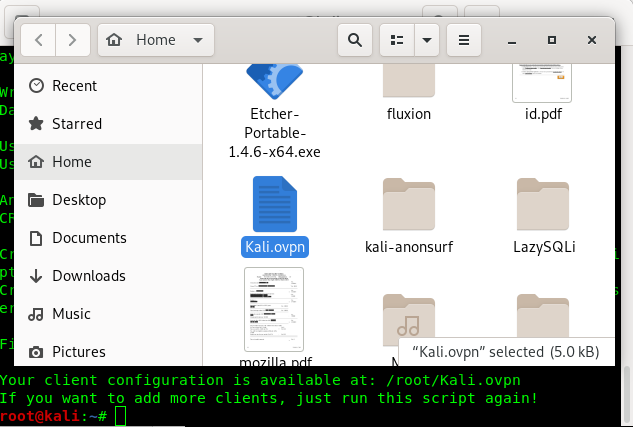
Now using this kali.ovpn config file we can connect with our VPN server, from any other device, but here we must run OpenVPN server in our Kali Linux machine. To check the OpenVPN server status we run following command in our Kali Linux terminal:
sudo service openvpn-server@server status
After running the command we can see the screenshot of OpenVPN server in the following screenshot:

We can see the server is running.
This server will automatically starts when the system boot up. To turn it off manually we can enter following command:
sudo service openvpn-server@server stop
To start it manually we can use this following command:
sudo service openvpn-server@server start
Let’s see how we can connect our VPN over internet means when we are out of our local network. To do this we need port forwarding and a ststic IP. First of all we fix our local IP from the wifi settings IPV4 tab.
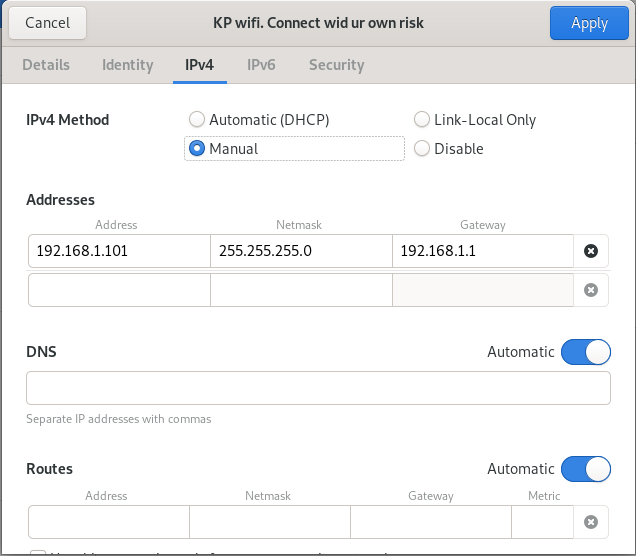
Now we need to forward our 1194 port (Default port for OpenVPN) in UDP, from our router’s settings. Then we need a static public IP. Usually we get dynamic IP from our internet service provider. We can ask them to provide to provide us a static IP or we can use some tool like noip.
Then we can connect any device with our VPN server from anywhere.
For this we need the OpenVPN file in connecting device. OpenVPN client is available for almost every major operating system for free. We can run the ovpn file using OpenVPN software in Windows, Mac, Linux, Android, iOS etc.
That is how we can set our own VPN server in Kali Linux and connect with them from anywhere.
Please don’t forgot to follow us by using e-mail from the sidebar. Also follow us on GitHub and Twitter we posts updates there and for any queries or suggestions freely ask anything in the comment section. We always reply.