- Простейший способ установить VPN на Linux
- Настройки VPN:
- Создание VPN соединения:
- Вывод:
- Installing VPN on Linux
- Using OpenVPN to Install VPN on Linux
- Step 1: Checking to see which version of Ubuntu you have
- Step 2: Updating System Apt Cache and Packages
- Step 3: Installation of OpenVPN
- Step 4: Installation of Network Manager Packages
- Step 5: Download the OpenVPN Configurations
- Step 5: Setting up the VPN
- For Ubuntu 18.04 and 19.10 Users:
- For Ubuntu 16.04 and early version Users:
- Conclusion
Простейший способ установить VPN на Linux
В этой статье я хотел рассказать о простом способе подключение VPN на Linux, делать это буду на Ubuntu 19.04, но в принципе эта инструкция подойдёт и для других дистрибутивов, единственное, путь к настройкам VPN будет отличатся возможно.
Настройки VPN:
Сначала надо зайти в сами настройки, для этого соответственно открываем их, и ищем сеть, там же будет и VPN, что бы создать VPN соединение нажимаем на плюс.
Создание VPN соединения:
Теперь выбираем тип VPN соединения, нам нужен PPTP , также, мы будем использовать VPN сервер на сайта FreeVPN4you , на мой взгляд он наиболее быстрый и при этом бесплатный ( Ссылка на VPN сервер ), также надо сказать, чтобы вы сохранили в себе закладки эту ссылку, потому что пароль периодически меняется, и что бы не потерять его и знать какой сейчас там пароль.
После этого в поле шлюз вписываем имя хоста, ну а дальше соответственно в имя пользователя вписываем в поле имя пользователя и пароль в поле пароль.
Дальше нажимаем « Дополнительно… » и там вставить галочку у параметра « Использовать шифрование MPPE », нажимаем «OK».
Теперь сверху нажимаем «Добавить», и всё, после этого должно всё работать.
Вывод:
Как видите этот способ подключение VPN на Linux очень простой, и вам даже не надо нечего вписывать в терминал, на мой взгляд это самый оптимальный способ установить VPN.
Также скажу что этот способ подойдёт и другим дистрибутивом Linux, единственное, может путь к настройкам будет отличатся.
Подписываетесь на этот канал Яндекс дзен , тут будет ещё очень много интересных статей на тему операционных систем и программирование, заходите в группу ВК , Telegram канал и в Twitter , ну и конечно на наш сайт ProgNote.ru .
Installing VPN on Linux
![]()
You want to install a VPN on Linux right? We will show you how to install VPN in this article. But before we get started on the steps, let’s start with some background info to make sure you have the context.
With the rise of digital era, the world has undergone some fascinating technological changes. Moving on from landlines to mobile phones and then to smartphones, the world has reached a new horizon and it keeps on growing and growing. However, this growth hasn’t come without any repercussions. Data privacy is also at risk, and your data could be potentially accessed.
This is where we start to ask our self “How do we protect our data?” Choosing your Operating System should be your first step when defending your personal data. A popular choice by many users today would be Windows. But this popularity of Windows has itself proven to be a problem, as it has become a massive playing field for malware. A more reliable and secure alternative would be Linux, as it being open-source allows anyone to read and comment out on its code and thus there are much fewer vulnerabilities, bugs and threats to look out for. However, Linux itself isn’t flawless. It still further needs some extra resources to provide better security. One of these is a virtual private network (VPN), a private controlled network that secures your computer’s internet connection by ensuring that all data that you’re sending or receiving is encrypted which makes it difficult for anyone from the outside to eavesdrop on what you’re doing.
Using OpenVPN to Install VPN on Linux
OpenVPN is an open-source VPN protocol that itself is not a VPN provider but rather acts as a bridge between the VPN software and the VPN server. Using this, we will be able to install VPN on Linux. Let us go through the steps now.
Step 1: Checking to see which version of Ubuntu you have
Since there are 32 bit and 64 bit flavors of VPN Softwares available, the first thing you’ll want to do before getting started is checking to see which version of Ubuntu you’re currently using. To do this, first open the Terminal through either Ubuntu Dash or Ctrl+Alt+T shortcut. Once the Terminal is opened, enter the following command:

The CPU op-mode(s) entry tells you which bit version of Ubuntu you’re currently running.
Step 2: Updating System Apt Cache and Packages
Next we want to update our system’s apt cache and packages to the latest versions so that no issues arise during installation. This can be done by running the following commands:
Step 3: Installation of OpenVPN
In most Linux distros, OpenVPN is already installed. But it is better to verify this beforehand. Enter the following command to do this:
If OpenVPN is already installed in your desktop, you’d be presented with something like this:

Step 4: Installation of Network Manager Packages
The easiest way to set up and install VPN in Linux is through the Network Manager. It basically is a mandatory package that allows us to import and use the OpenVPN Config files. Installation of this package can be done by the following commands:
Step 5: Download the OpenVPN Configurations
Now you have to select your VPN service that you’ll be using to set up VPN on your Linux distro. It is important to note that you have to select the OpenVPN configuration files of your VPN service for the set up. To get your OpenVPN configurations, you have to sign in to your VPN account and check in the Linux support or OpenVPN support slot (different for all VPN Services). The files you’d get would be in a Zip Archive. For efficient running of our VPN, it would be better to create a separate directory for it. To do this, enter in the terminal:
filename here refers to the name of your directory. For example, in my case, it was:

Next we have to enter into this directory that we just created. To do this, we have to enter the command:
Again filename here refers to your directory name that you created before. Something like this:

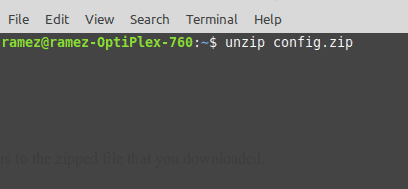
Since our file is in a Zip format, we have to first unzip to access it. This can be done by entering the following command:
filename.zip here refers to the zipped file that you downloaded. This will look like this:
Step 5: Setting up the VPN
Now finally we will be using the Network Manager to set up our VPN Connection.
For Ubuntu 18.04 and 19.10 Users:
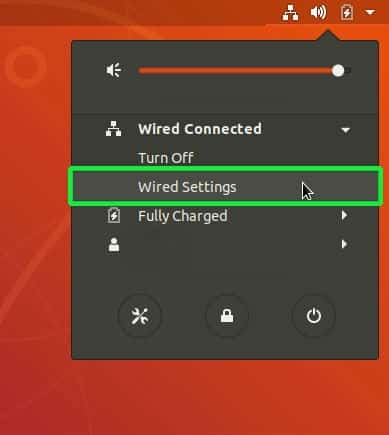
First of all, close the Terminal and click on the Network icon in the top right of the screen as shown below. Now click on Wired Connected and choose Wired Settings.
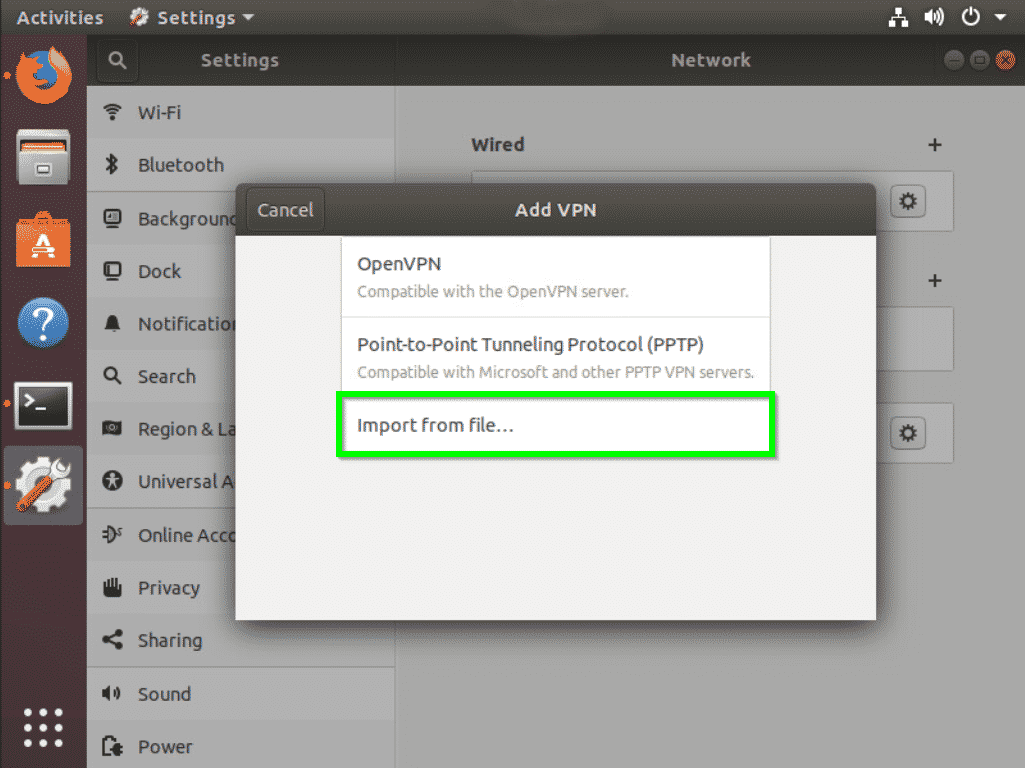
From here, you’d be directed to Settings and the Network tab will automatically open. Find the VPN heading, and click the plus sign icon (+) next to it.

You’d be greeted with the Add VPN window. Choose Import from file.
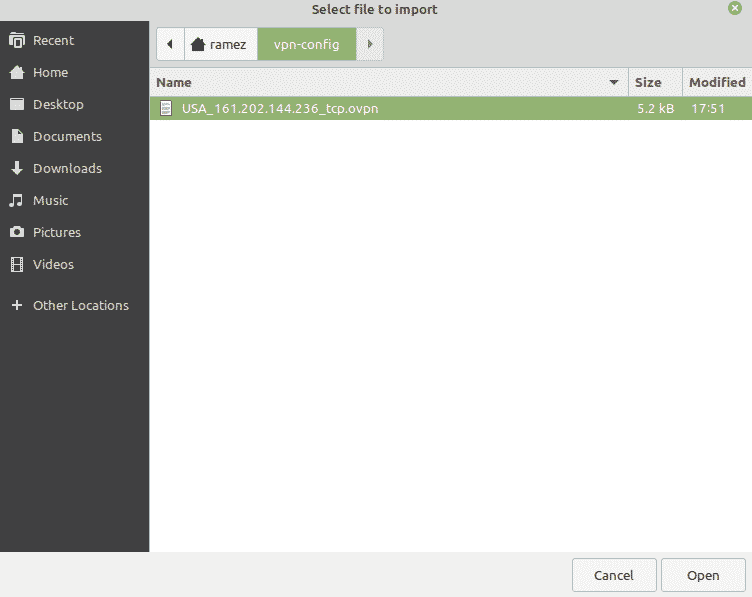
Now we have to import the OpenVPN config file of the VPN server that we want to connect to. This can be done by browsing to the directory where we unpacked the zipped config file that we downloaded before. Click on the file and select Open.
All the OpenVPN settings from that config file will be imported. Now you just have to input your Username and Password of your VPN Service and hit Save.
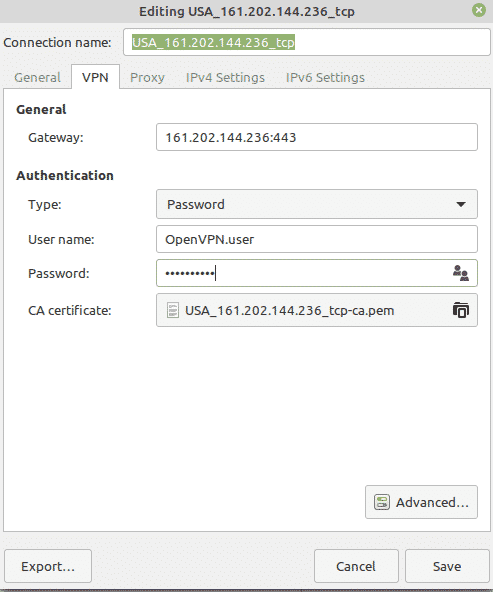
The VPN Connection has been added to your Network Manager now. You can now click on the Network icon in the top right of the screen and be able connect or disconnect the VPN from your home screen.
For Ubuntu 16.04 and early version Users:
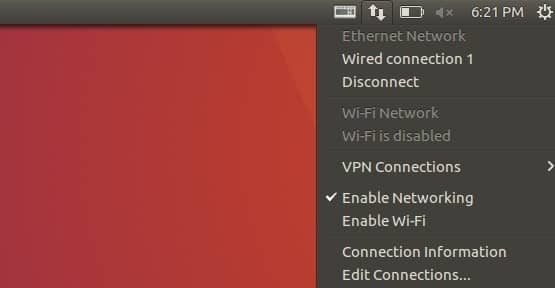
Similarly, close the Terminal and click on the connection symbol icon in the top right of the screen as shown below and select Edit Connections.
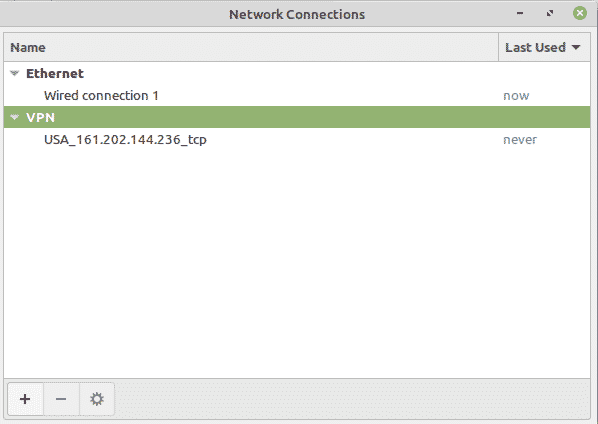
In the Network Connections, click on Add.

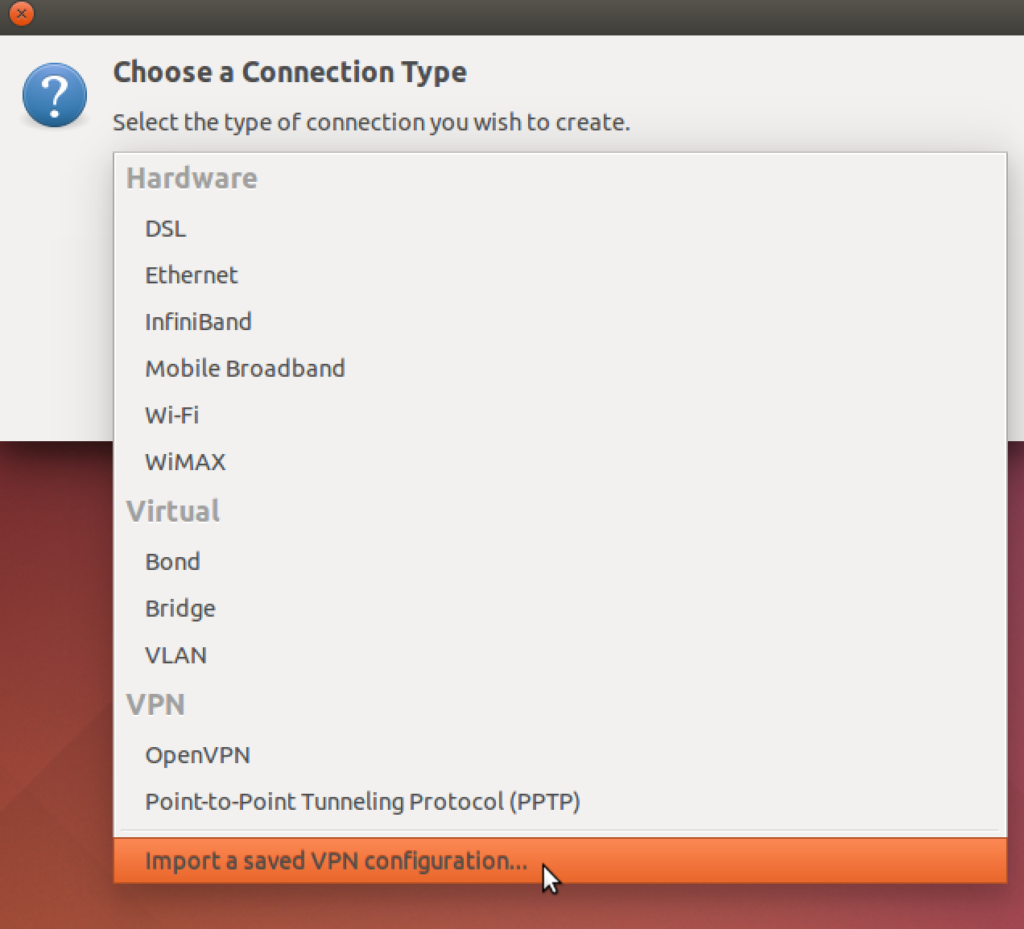
This is will then lead you to a prompt asking you to choose a Connection Type. Choose the I mport a saved VPN configuration option in the drop-down menu and click Create.
Now we have to import the OpenVPN config file of the VPN server that we want to connect to. This can be done by browsing to the directory where we unpacked the zipped config file that we downloaded before. Click on the file and select Open.

All the OpenVPN settings from that config file will be imported. Now you just have to input your Username and Password of your VPN Service and hit Save.

The VPN Connection has been added to your Network Connections now.
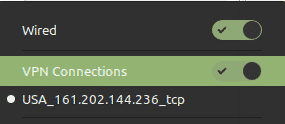
You can now click on your connection symbol icon in the top right of the screen, select VPN Connections and then click on the name of your VPN Server that you want to connect to. You should get this after a successful connection:

Conclusion
With the encryption provided by a VPN you can feel confident your communications and data are fairly safe.