- How to Install and Use Visual Studio Code on Linux Mint 20
- Installing Visual Studio Code on Linux Mint 20 from the Debian package
- Installing Visual Studio Code on Linux Mint 20 from the snap application manager
- Installing Visual Studio Code flatpak package on Linux Mint 20
- Getting started with Visual Studio Code
- Conclusion
- About the author
- Kamran Sattar Awaisi
- How to install VSCode on Linux Ubuntu and Mint
- What is VSCode, the Visual Studio Code
- Installing VSCode on Linux Mint or Linux Ubuntu
- 1. Add the repository and the key to Visual Studio Code
- 2. Add the APT repository to Linux
- 3. Update the APT and install the vscode
- VSCode Extensions
- Final considerations
- Как установить Visual Studio Code в Linux Mint 20
- Установите код Microsoft Visual Studio с помощью оснастки
- Установите Visual Studio Code из репозитория Microsoft.
- Запуск Visual Studio Code
- Как установить Visual Studio Code на
- Установить Visual Studio Code на Linux Mint 20 Ulyana
- Шаг 1. Перед запуском приведенного ниже руководства важно убедиться, что ваша система обновлена, выполнив следующие apt команды в терминале:
- Шаг 2. Установка кода Visual Studio на Linux Mint 20.
- Шаг 3. Доступ к коду Visual Studio в Linux Mint.
How to Install and Use Visual Studio Code on Linux Mint 20
![]()
Developed by Microsoft, Visual Studio (VS) Code is a multi-platform, modern, and comprehensive code editor. The Visual Studio Code supports TypeScript, Node.JS, JavaScript by default. Moreover, a plethora of extensions are available for visual studio code, enabling us to support other programming languages like C, C++, GO, etc. The Visual Studio Code is available as a Debian package, flatpak package, and snap application.
Installing Visual Studio Code on Linux Mint 20 from the Debian package
To download the VS Code official Debian package, open your browser and visit the VS Code webpage (https://code.visualstudio.com/Download).

The VS code Debian package, is available for Linux. Click on the Debian package to download it.
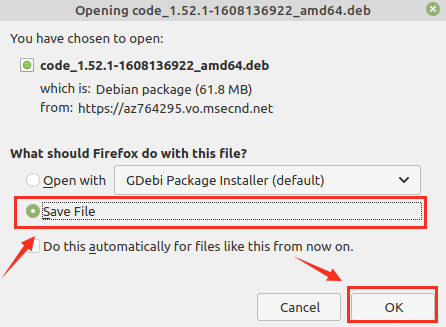
Next, choose ‘Save File’ and click on ‘OK’.
The VS, code Debian package, will be downloaded in the ‘Downloads’ directory.
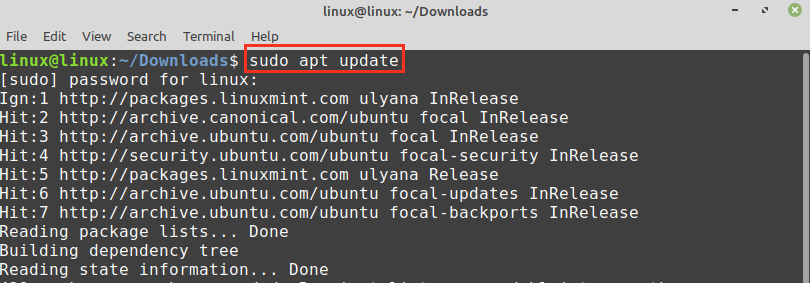
Once the Debian package is downloaded, fire up the terminal and navigate to the ‘Downloads’ directory with the command:

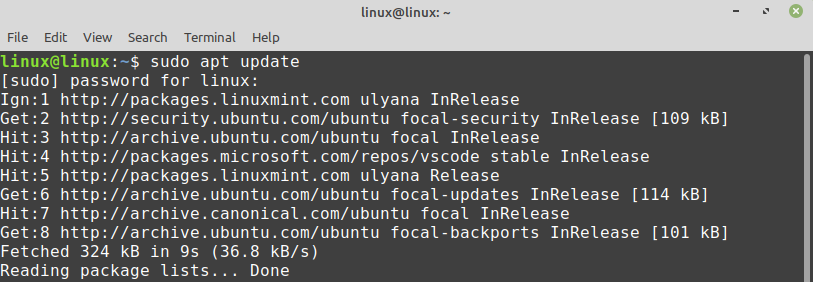
Next, update the apt cache because it is recommended to update the apt cache before installing any new application:
Type the below-given command to install the VS code .deb package:
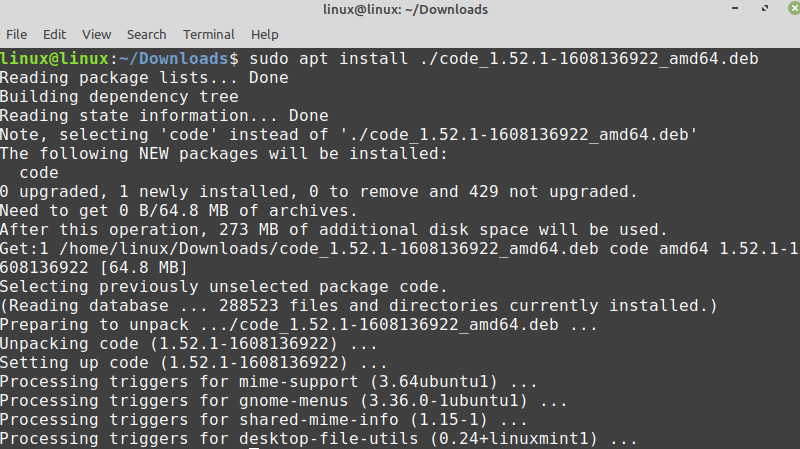
When the VS code is successfully installed, verify the installation and check the installed version using the command:

The VS code 1.52.1 is successfully installed on my Linux Mint 20.
Installing Visual Studio Code on Linux Mint 20 from the snap application manager
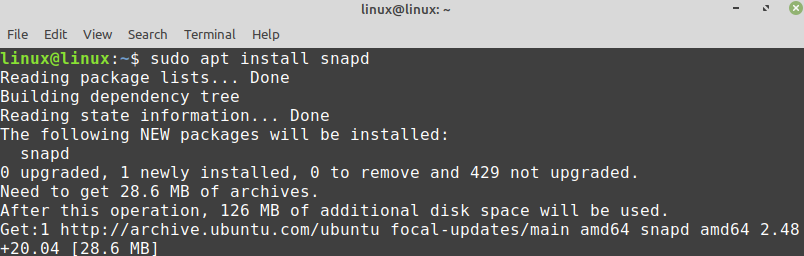
Snap is the universal package manager for various Linux distribution. However, it is disabled on Linux Mint 20 by default. To install VS Code from the snap application manager, we need to enable and install the snapd on Linux Mint 20.
Before installing snap on Linux Mint 20, remove the nosnap.pref file with the command:

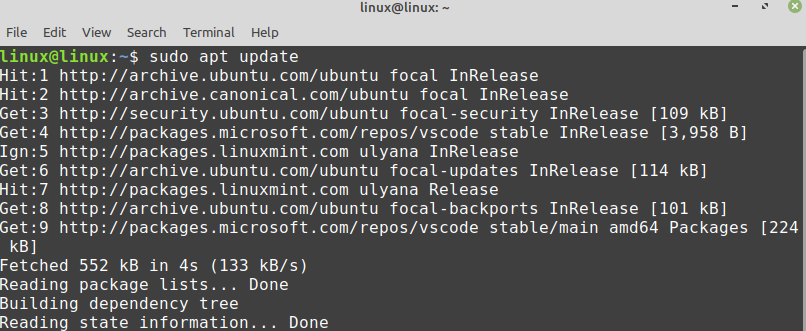
Next, update the apt cache and install the snapd with the commands:
To install VS Code from the snap application manager, execute the command:

Verify the installation using the command:
Installing Visual Studio Code flatpak package on Linux Mint 20
Flatpak is also a package manager for Linux. It comes pre-installed on Linux Mint 20.
Fire up the terminal and update the apt cache before installing the Visual Studio Code flatpak package:
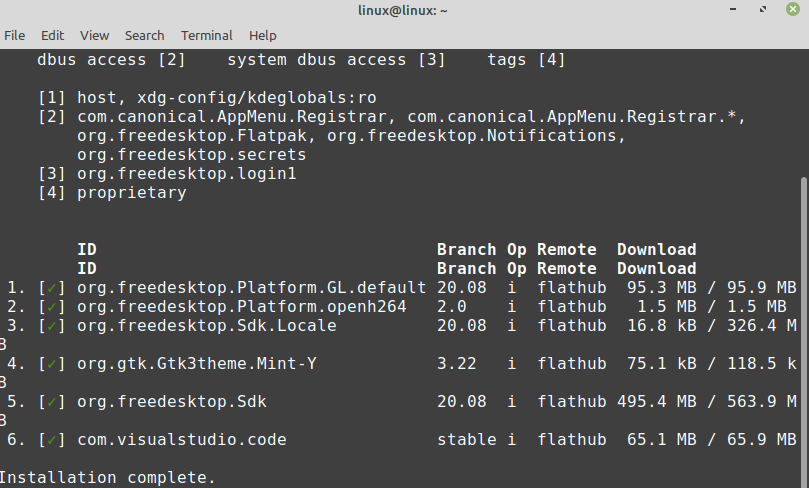
Now, install the Visual Studio Code flatpak package with the command:
The Visual Studio Code flatpak package is successfully installed.

Press ‘y’ to continue installing the Visual Studio Code flatpak package.
Getting started with Visual Studio Code
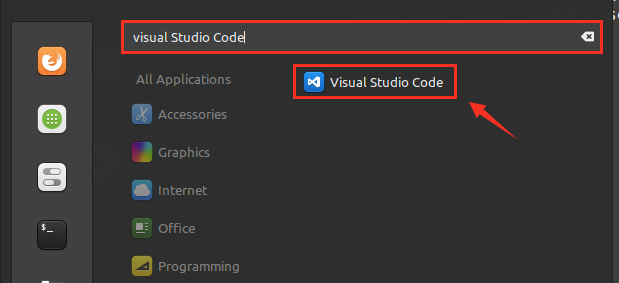
Once you have installed the Visual Studio Code application using any of the described methods, click on the Application Menu and search for Visual Studio Code.
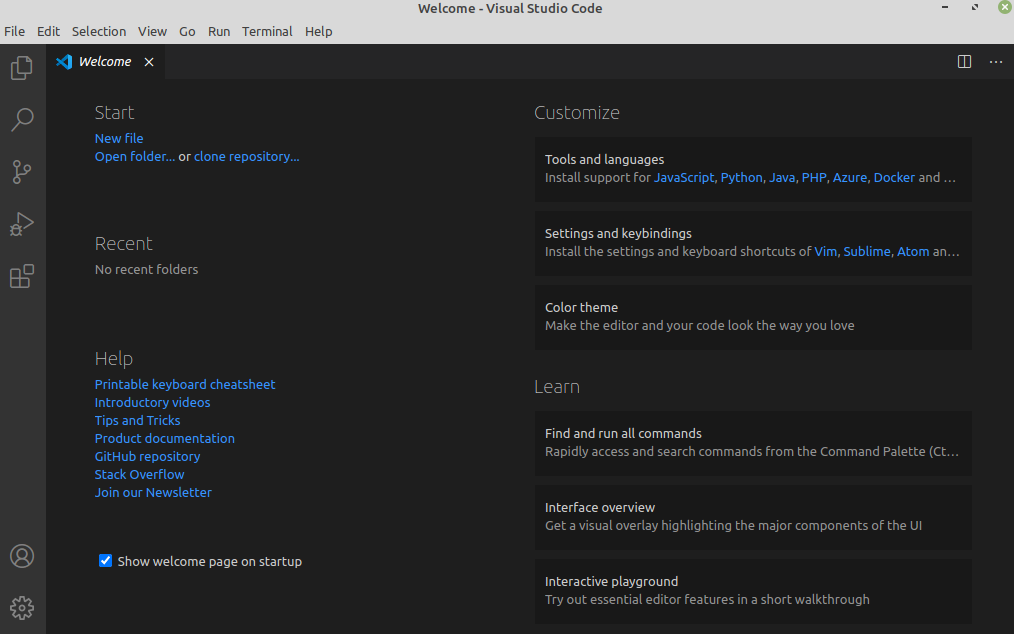
Open the Visual Studio Code application, and a dashboard screen will appear. The default theme of Visual Studio Code is dark, but it can be changed as well.
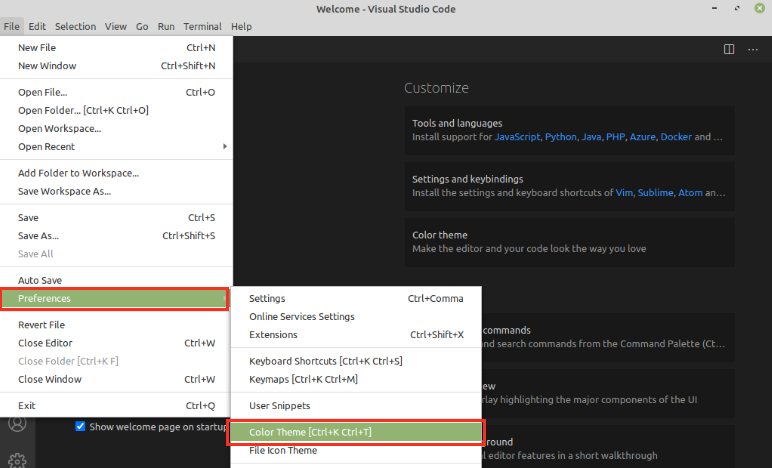
To change the theme, click on File, choose preferences and select ‘Color Theme’.
Select the theme for the given list of themes.
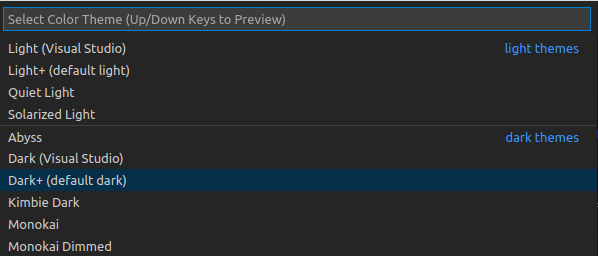
The theme will be updated successfully.
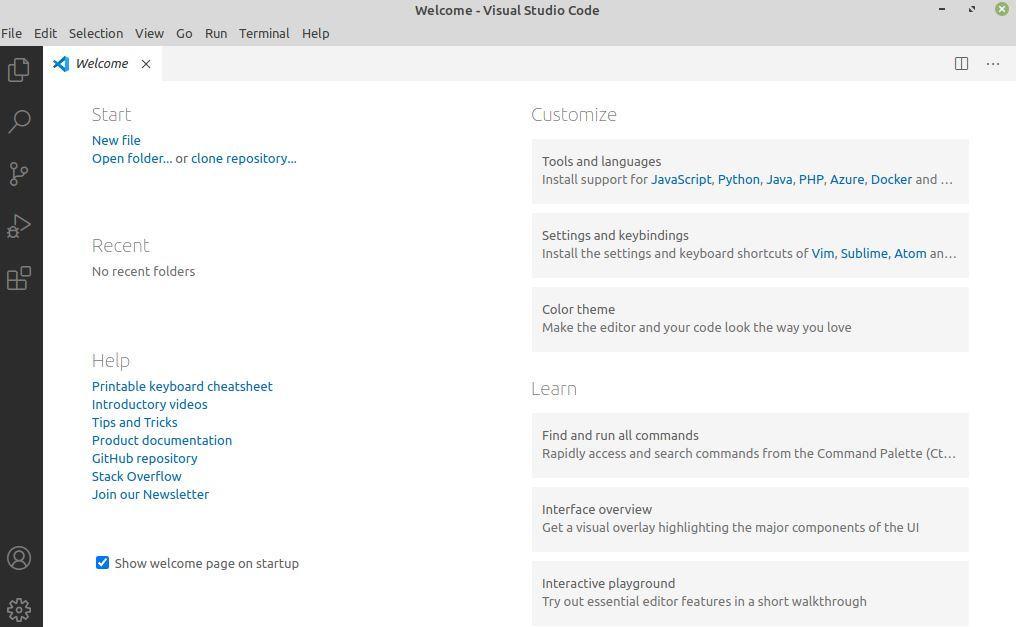
To create a new file, press ctrl+n and start using Visual Studio Code.
Conclusion
Visual Studio Code is a free and popular code editor. It is a multi-platform tool installed on Linux Mint 20 through the Debian package, flatpak, and snap application manager. It provides a wide variety of extensions that enable us to use famous programming languages. This post explains the Visual Studio Code installation on Linux Mint 20.
About the author
Kamran Sattar Awaisi
I am a software engineer and a research scholar. I like to write article and make tutorial on various IT topics including Python, Cloud Computing, Fog Computing and Deep Learning. I love to use Linux based operating systems.
How to install VSCode on Linux Ubuntu and Mint
Dive into this comprehensive guide on “How to install VSCode on Linux Ubuntu” and “How to install VSCode on Linux Mint”. We’ll walk you through the straightforward steps to install Microsoft’s Visual Studio Code, commonly known as VSCode, on these popular Linux distributions. Whether you’re using Ubuntu, Mint, or any other Debian-based Linux distribution, we’ve got you covered with the official packages for a seamless installation experience.
What is VSCode, the Visual Studio Code
Visual Studio Code, or simply VSCode, is a mild source code editor that provides comprehensive support and easy understanding for editing, navigation and code clearance.
Based on a rich extensibility model and mild integration with existing tools. VSCODE is free and based on open source for Linux, Windows and MacOS.
VS Code comes with integrated support for JavaScript, TypeScript and Node.js, has a rich ecosystem of extensions (plugins) for other programming languages, such as C++, C#, Java, Python, PHP, Go; and runtimes like .Net and Unity.
You can easily install VSCode extensions to add new interface languages, programming languages, themes, debugers and for connect to additional services such as databases or APIs.
In this tutorial I will show you how to install Visual Studio Code (VSCODE) on Linux Mint or Ubuntu.
Installing VSCode on Linux Mint or Linux Ubuntu
A VSCode installation package is supplied for use in Debian based systems, like Linux Ubuntu, Linux Mint, Kali Linux, etc.
You can check the latest packages on the VSCode download page . If you want to use the wget command line to get the .deb package directly, first install WGET as below.
Install the WGET if not present.
sudo apt-get update sudo apt-get -y install wget However, we will use an APT package of the Microsoft repository to install and keep up to date our Visual Studio Code editor.
1. Add the repository and the key to Visual Studio Code
The APT repository key is required to validate the signed packages to be installed.
Add the key to the system using the commands below:
sudo apt-get update sudo apt-get install apt-transport-https curl https://packages.microsoft.com/keys/microsoft.asc | gpg --dearmor > microsoft.gpg sudo install -o root -g root -m 644 microsoft.gpg /etc/apt/trusted.gpg.d/ 2. Add the APT repository to Linux
With the APT key imported to the system, proceed to add the contents of the repository.
sudo sh -c 'echo "deb [arch=amd64] https://packages.microsoft.com/repos/vscode stable main" > /etc/apt/sources.list.d/vscode.list' The contents are recorded in the file /etc/apt/sources.list.d/vscode.list .
3. Update the APT and install the vscode
Run the update of the APT package catalog and then install Visual Studio Code:
sudo apt-get update sudo apt-get install code After waiting for the installation to finish you can run the editor by calling it directly on the command line, or through the system menu:
If you want to execute Visual Studio Code with a specific folder opened in IDE, browse it through the command line console at the terminal, and run the code command with a point ( . ):
VSCode Extensions
One of the advantages of VSCode is the possibility of improving the environment with extensions developed by the community.
With them you can config the IDE to better meet your stack needs and preferences as a software developer.
Read in this article what extensions you should install to improve your productivity: VSCode extensions for developers.
Final considerations
Very well, now that you have learned how to install the VSCode on Linux Ubuntu and Mint, hands on and a lot of productivity in programming.
Как установить Visual Studio Code в Linux Mint 20

Visual Studio Code , также называемый в просторечии VS Code, — это бесплатный кроссплатформенный редактор кода от компании Microsoft. Это чрезвычайно популярный редактор кода благодаря аккуратному и удобному пользовательскому интерфейсу, широкому набору функций и многочисленным плагинам, расширяющим его функциональность. VS Code поддерживает широкий выбор языков, таких как Python, Java, C, C++, Go, Lua, PHP, JavaScript, TypeScript и многие другие. Он даже поддерживает языки интерфейса, такие как HTML и CSS.
Есть два основных способа установки VS Code на Mint 20. Давайте рассмотрим каждый из них.
Установите код Microsoft Visual Studio с помощью оснастки
Это, безусловно, самый быстрый способ установки VS Code на Mint 20. Чтобы начать работу, запустите свой терминал и обновите индекс пакета в своей установке Mint 20 следующим образом:
$ sudo apt update -y
Как только система будет обновлена, следующим шагом будет включение привязки на Mint 20, поскольку Mint 20 по умолчанию не имеет включенной привязки.
Перед этим удалите файл nosnap.pref .
$ sudo rm /etc/apt/preferences.d/nosnap.pref
Еще раз обновите индекс пакета.
$ sudo apt update -y
Затем включите оснастку в вашей системе. В этом случае snap уже установлен.
$ sudo apt install snapd
Затем установите VS Code с помощью оснастки следующим образом.
$ sudo snap install code –classic
При стабильном интернет-соединении это должно занять несколько минут.
Чтобы убедиться, что VSCode установлен, проверьте его версию, как показано ниже.
$ code —-version
Установите Visual Studio Code из репозитория Microsoft.
Второй подход к установке VS Code заключается в включении официального репозитория VS Code в системе.
Мы начнем с установки зависимостей, как показано.
$ sudo apt install curl software-properties-common apt-transport-https
Затем импортируйте ключ подписи GPG, выполнив следующие команды:
$ curl https://packages.microsoft.com/keys/microsoft.asc | gpg --dearmor > microsoft.gpg
$ sudo install -o root -g root -m 644 microsoft.gpg /etc/apt/trusted.gpg.d/

Затем создайте файл репозитория и добавьте репозиторий VS Code APT. Здесь репозиторий определяется в файле vscode.list внутри каталога /etc/apt/sources.list.d .
$ sudo sh -c 'echo "deb [arch=amd64] https://packages.microsoft.com/repos/vscode stable main" > /etc/apt/sources.list.d/vscode.list'
Затем синхронизируйте новый репозиторий, обновив индекс пакетов вашей системы Mint.
$ sudo apt update
Наконец, установите VSCode на Mint 20 с помощью APT.
$ sudo apt install code
На этом этапе VS Code установлен в вашей системе Mint.
Запуск Visual Studio Code
Наконец, чтобы запустить VS Code, выполните:
Это запускает VS Code в фоновом режиме и освобождает ваш терминал. После запуска вы можете начать кодировать свои приложения или веб-сайты.

На этом наше руководство по установке VS Code в Linux Mint 20 завершается.
Как установить Visual Studio Code на
В этом руководстве мы покажем вам, как установить Visual Studio Code на Linux Mint 20. Для тех из вас, кто не знал, Visual Studio Code — это бесплатный кроссплатформенный редактор исходного кода, разработанный Microsoft для Windows, Linux, и macOS. VS Code поставляется со встроенной поддержкой JavaScript, TypeScript и Node.js и имеет богатую экосистему расширений для других языков (таких как C ++, C #, Java, Python, PHP, Go) и среды выполнения (например, .NET и Единство). Вы можете легко установить расширения, чтобы добавить новые языки, темы, отладчики и подключиться к дополнительным сервисам.
В этой статье предполагается, что у вас есть хотя бы базовые знания Linux, вы знаете, как использовать оболочку, и, что наиболее важно, вы размещаете свой сайт на собственном VPS. Установка довольно проста и предполагает, что вы работаете с учетной записью root, в противном случае вам может потребоваться добавить ‘ sudo ‘ к командам для получения привилегий root. Я покажу вам пошаговую установку Visual Studio Code на Linux Mint 20 (Ульяна).
Установить Visual Studio Code на Linux Mint 20 Ulyana
Шаг 1. Перед запуском приведенного ниже руководства важно убедиться, что ваша система обновлена, выполнив следующие apt команды в терминале:
sudo apt update sudo apt install apt-transport-https
Шаг 2. Установка кода Visual Studio на Linux Mint 20.
Выполните следующее, чтобы установить пакеты Snap и Visual Studio Code:
sudo rm /etc/apt/preferences.d/nosnap.pref sudo apt install snapd sudo apt update
Чтобы установить Visual Studio Code, просто используйте следующую команду:
sudo snap install code --classic
Теперь добавьте ключ в систему, используя следующие команды:
curl https://packages.microsoft.com/keys/microsoft.asc | gpg --dearmor > microsoft.gpg sudo install -o root -g root -m 644 microsoft.gpg /etc/apt/trusted.gpg.d/
Затем добавьте репозиторий, используя следующие команды:
sudo sh -c 'echo "deb [arch=amd64] https://packages.microsoft.com/repos/vscode stable main" > /etc/apt/sources.list.d/vscode.list'
После этого установите Visual Studio Code на Linux Mint:
sudo apt update sudo apt install code
Шаг 3. Доступ к коду Visual Studio в Linux Mint.
После успешной установки VS Code в вашей системе Linux Mint в строке поиска действий введите «Visual Studio Code» и щелкните значок, чтобы запустить приложение, или скопируйте и вставьте приведенную ниже команду в свой терминал и выполните ее:
Поздравляю! Вы успешно установили Visual Studio Code . Благодарим за использование этого руководства для установки последней версии Visual Studio Code в системе Linux Mint. Для получения дополнительной помощи или полезной информации мы рекомендуем вам посетить официальный веб-сайт Visual Studio Code .