- Устанавливаем ZFS в Linux. Установка и настройка
- Arch или Manjaro linux
- Debian
- Ubuntu
- Fedora
- Gentoo
- Creating a ZFS “partition”
- Использование ZFS в Linux
- Install ZFS Filesystem on Ubuntu 20.04
- ZFS features
- Installing ZFS Filesystem on Ubuntu
- Creating the ZFS storage pool
- Removing the ZFS storage pool
- About the author
- Karim Buzdar
Устанавливаем ZFS в Linux. Установка и настройка

Допускаете ли вы возможность того, что можете не сделать своевременно резервную копию важных файлов или папки и по какой-то роковой случайности можете их потерять? Возможна ли ошибочная команда «rm -rf» в вашей музыкальной библиотеке? Могут ли у вас быть повреждены основные системные файлы виртуальной машины? Люди не совершенны и все способны на ошибки, так что, чем скорее вы перейдете на ZFS, тем скорее сможете перестать беспокоиться о безвременной утрате драгоценных данных.
Установка и настройка ZFS в Linux очень проста для большинства дистрибутивов.
Arch или Manjaro linux
У пользователей Arch есть несколько вариантов установки ZFS. Так пакет AUR «zfs-dkms» целесообразен, если вы хотите использовать ветвь ядра LTS. Если нет, то другие два варианта — «zfs-linux-git» и «zfs-linux». Первый пакет, как видно из названия, собран из репозитория ZFS Git и, как следствие, будет получать обновления для более новых ядер намного быстрее. Последнее иногда отстает и порой блокирует обновления ядра ядра на вашем компьютере.
Как правило, лучше использовать «zfs-linux-git», поскольку обновления ядра будут очень быстрыми. Скомпилируйте его следующей командой:
yaourt -S zfs-linux-git # для пользователей yaourt pacaur -S zfs-linux-git # для пользователей pacaur sudo systemctl enable zfs.target sudo systemctl enable zfs-import-cache sudo systemctl enable zfs-mount sudo systemctl enable zfs-import.targetБолее подробную информацию можно найти на Arch Wiki
Debian
В Debian начало использования ZFS происходит с добавления в файл /etc/apt/sources.list следующего репозитория:
deb http://mirrors.kernel.org/debian/ stretch main contribsudo apt update sudo apt install linux-headers-$(uname -r) zfs-dkmsApt автоматически включает службы systemd, поэтому все, что вам останется сделать, это перезагрузить машину.
Ubuntu
Начиная с Xenial, Ubuntu включает в себя модуль ядра ZFS. Все, что вам следует сделать, это добавить пользовательские инструменты и перезагрузиться:
sudo apt install zfsutils-linuxFedora
Если верить ZFSOnLinux Wiki, то пользователи Fedora могут установить ZFS используя следующие простые команды:
sudo dnf install http://download.zfsonlinux.org/fedora/zfs-release$(rpm -E dist).noarch.rpm gpg --quiet --with-fingerprint /etc/pki/rpm-gpg/RPM-GPG-KEY-zfsonlinux sudo dnf install kernel-devel zfsЭти команды добавят ZoL репозиторий и установят ZFS.
Gentoo
Будучи source-based дистрибутивом, ZFS на Gentoo не требует DKMS. Чтобы установить его, сначала убедитесь, что у вашего ядра есть поддержка сжатия Deflate. В «make menuconfig» включите его:
Cryptographic API --> Deflate compression algorithmЗатем разрешите использовать git-версии ZFS, выполнив следующие команды с правами root:
echo "=sys-kernel/spl-9999 **" >> /etc/portage/package.accept_keywords/zfs echo "=sys-fs/zfs-kmod-9999 **" >> /etc/portage/package.accept_keywords/zfs echo "=sys-fs/zfs-9999 **" >> /etc/portage/package.accept_keywords/zfsПосле чего установите и активируйте ZFS:
Creating a ZFS “partition”
Теперь, когда вы установили поддержку файловой системы, вам нужно создать пул. Пулы могут быть очень сложными, охватывая многие диски и предлагая избыточность. Однако в этом примере будет использоваться один раздел без избыточности. Во-первых, требуется пустой раздел. ZFS в Linux можно использовать в качестве корневой файловой системы, но это не рекомендуется. Поэтому перераспределите другой диск, используя привычный вам инструмент управления разделами, например, GParted. Если вы изменяете размер корневой файловой системы, чтобы освободить место, вам понадобится Live образ, например, GParted Live Disk.
После разбивки и перераспределения создадим новый zpool:
sudo zpool create -m /your/mount/point yourpoolname /dev/sdXY
Использование ZFS в Linux
ZFS оперирует наборами данных(dataset) — которые по сути ячлвются, мини-разделами в томе ZFS. Вы можете монтировать датасеты в любом месте в котором пожелаете. Когда вы делаете снэпшот(snapshot), вы делаете снимок набора данных. Для создания снэпшота, выполните следующую команду:
sudo zfs snapshot yourpoolname/dataset1@snapshotnameZFS позволяет создавать практически неограниченное количество снэпшотов в датасете. К сожалению, возврат к более раннему снимку требует удаления всех снимков, созданных после него. Откат к более раннему снимку осуществляется так
sudo zfs rollback yourpoolname/dataset1@snapshotnameЕще одна полезная функция ZFS — это функция клонирования. Клоны позволяют дублировать датасеты, не занимая при этом все пространство на диске повторно. Разумеется, все записи в датасет будут использовать дополнительное дисковое пространство. Вы должны сделать снимок датасета, прежде чем сможете клонировать его. Чтобы клонировать датасет, выполните в терминале:
sudo zfs list -t snapshot # List all available snapshots sudo zfs clone yourpoolname/dataset1@snapshotname yourpoolname/clonenameЧтобы удалить снэпшот выполните:
sudo zfs destroy yourpoolname/dataset1@snapshotnameДля удаления клона выполните:
sudo zfs destroy yourpoolname/clonenameОдним из интересных вариантов использования ZFS в Linux является виртуализация. Сохранение файла образа VM в датасете позволяет легко откатываться и клонировать с минимальными потерями в производительности.
ZFS — очень мощная файловая система с огромным количеством функций. Поскольку невозможно описать их все в одной статье, я пошлю вас знакомиться с фантастической документацией FreeBSD. Хоть документация и написана для FreeBSD, очень многое применимо в Linux (а также OSX, IllumOS и возможно Windows). Если вы намерены использовать ZFS, то я рекомендую ознакомиться с понятием наборов данных(dataset).
Статья является переводом с английского статьи Ryan El Kochta: ZFS Configuration on Linux – Setup and Basics
Install ZFS Filesystem on Ubuntu 20.04
![]()
ZFS is a file system created by Sun Microsystems. It was first shipped with Solaris but now available in other LINUX and UNIX operating systems. ZFS uses virtual storage pools known as zpools that can deal with the storage and management of a large amount of data. In this article, we will explain how to install the ZFS file system on Ubuntu OS. We will cover the following topics:
- Installing the ZFS file system
- Creating the ZFS storage pool
- Removing the ZFS storage pool
ZFS features
Let’s take a look at some of the features of ZFS file system:
- High storage capacity
- Data integrity
- Protection against data corruption
- Efficient data protection
- Date compression
Note: We have explained the procedure and commands on Ubuntu 20.04 LTS (Focal Fossa).
Installing ZFS Filesystem on Ubuntu
We will be using the command line Terminal application for the installation of the ZFS filesystem. To launch the command line Terminal, use the Ctrl+Alt+T keyboard shortcut.
Now to install the ZFS filesystem on Ubuntu, issue the following command in Terminal:
When prompted for the password, provide the sudo password.
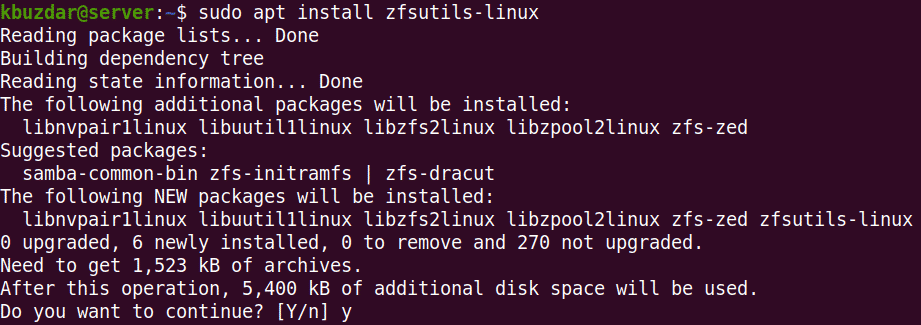
After running the above command, the system might ask for confirmation that if you want to continue the installation or not. Press y to continue; after that, the package will be installed on your system.
To verify ZFS file system installation, issue the following command in Terminal:
You will see the output similar to the following:

Creating the ZFS storage pool
After the installation is completed, we will now create a storage pool for our drives. Here are the steps to do so:
1. First, find out the names of the drives for the pool. Use the following command in Terminal to do so:
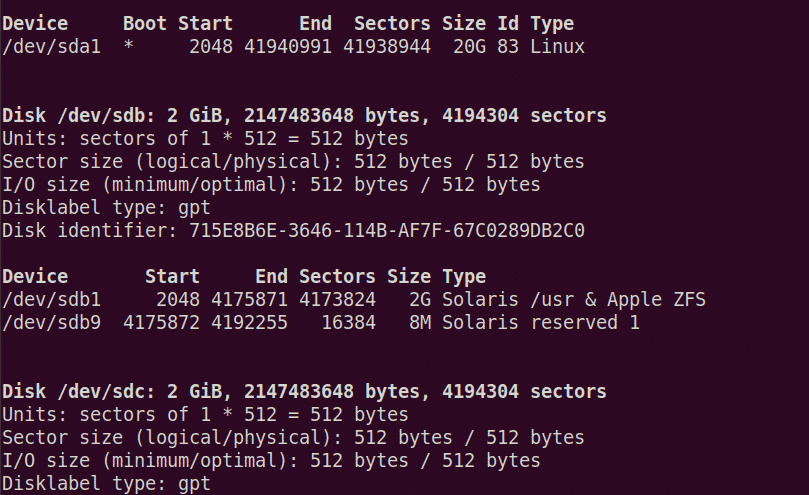
You will see the drives listed in the output. Note down the drive names that you want to pool. From the above output, we can see that there are two drives /dev/sdb and /dev/sdc are listed. We will create the storage pool using these two drives.
There are two types of storage pools: Striped and mirror. In the striped pool, data is stored in the striped across all devices. While in a mirrored pool, the copy of the data is stored across devices that make them fault-tolerant.
To create the striped pool, use the following syntax:
To create the mirror pool, use the following syntax:
If any error occurs, try forcing the command using the -f option after the zpool create command.
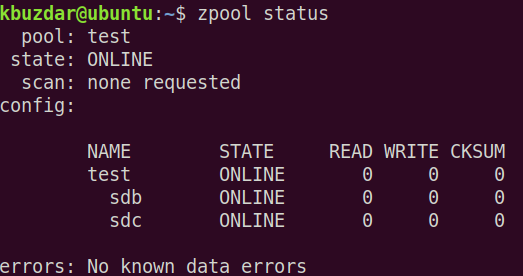
In the following example, we will create the striped pool named “test” using the /dev/sdb and /dev/sdc.

To find out where the pool has been mounted, use the following command in Terminal:

From the above command, we can see that the pool has been mounted at the /test. You can also change the mount point for the pool using the following syntax:
For example, to set export/zfs as the new mount point, the command would be:

Then use the following command to verify if the mount point has changed:

You can also create the directories under the storage pool. For example, to create a directory named files under the storage pool, the command would be:

To view all the ZFS storage pools on the system, you can use the following command in Terminal:
It lists all the pools along with their size, space usage, health, and some other information.

To view all the configurations and status of each device in the ZFS storage pool, use the following command in Terminal:
If you experience some issues related to drives in the pool, you can use the events option. Issue the following command in Terminal to view events associated with a specific pool:
Removing the ZFS storage pool
If you no longer need the pool, you can remove it. However, note that removing the pool will also remove the files contained within it.
Use the following command syntax to remove the storage pool:
In this article, you have learned how to install the ZFS file system on Ubuntu 20.04 LTS (Focal Fossa). You have also learned how to create a storage pool in the ZFS file system and remove it when you no longer need it.
About the author
Karim Buzdar
Karim Buzdar holds a degree in telecommunication engineering and holds several sysadmin certifications. As an IT engineer and technical author, he writes for various web sites. He blogs at LinuxWays.