- 3 простых способа создать загрузочную флешку на Ubuntu
- Etcher
- ROSA ImageWriter
- dd
- UNetbootin — создание загрузочной флешки
- Создание загрузочной флешки
- Частичная русификация LiveUSB
- Настройка параметров BIOS
- Ссылки
- Create a bootable USB stick with Rufus on Windows
- 2. Requirements
- 3. USB selection
- 4. Select the Ubuntu ISO file
- 5. Write the ISO
- 6. Additional downloads
- 7. Write warnings
- 8. Writing the ISO
- 9. Installation complete
- Finding help
3 простых способа создать загрузочную флешку на Ubuntu
Установку любого дистрибутива Linux всегда удобней делать с помощью загрузочной флешки, но порой её создание оказывается не таким уж простым занятием. В данной статье мы покажем несколько способов создать загрузочную флешку используя Ubuntu 20.04.
Etcher
Самый простой способ – использовать утилиту Etcher, загрузить её вы можете с официального сайта . В окне программы выберите «Flash from file», после чего выберите необходимый iso образ для записи на USB-носитель, далее выберите нужный USB-носитель и нажмите на кнопку «Flash».
После чего начнется запись образа на USB-носитель, по окончании процесса вы получите готовый загрузочный USB-носитель.
ROSA ImageWriter
ROSA ImageWriter это еще одна полезная утилита с GUI, с помощью которой можно быстро создать загрузочный носитель. Для того, чтобы загрузить и открыть утилиту выполните:
wget http://wiki.rosalab.ru/en/images/7/7f/RosaImageWriter-2.6.2-lin-x86_64.tar.xz
tar xvf RosaImageWriter-2.6.2-lin-x86_64.tar.xz
После запуска нажмите кнопку рядом с полем «Image» и выберите необходимый iso образ для записи, после чего в поле USB Device выберите нужное устройство и нажмите на кнопку «Write», по окончании процесса вы получите готовый загрузочный USB-носитель.
dd
Если вы, как и я, предпочитаете терминал, тогда вы можете создать загрузочный носитель с помощью команды dd. Перед началом записи нам понадобится узнать путь до нашего USB-носителя, для этого выполните
Ваш USB-носитель будет отличаться объемом и полем Disk model, если вам не удалось найти свой USB-носитель с помощью fdisk, попробуйте выполнить команду lsblk и обнаружить путь для носителя.
После того, как путь вида /dev/sdX был найден осталось лишь записать образ, для этого выполните команду:
sudo dd if=/dev/sdX of=$HOME/linux.iso status=progress
Где /dev/sdX – путь для вашего носителя, а $HOME/linux.iso – путь для необходимого iso образа.
По окончании процесса записи вы получите готовый загрузочный USB-носитель.
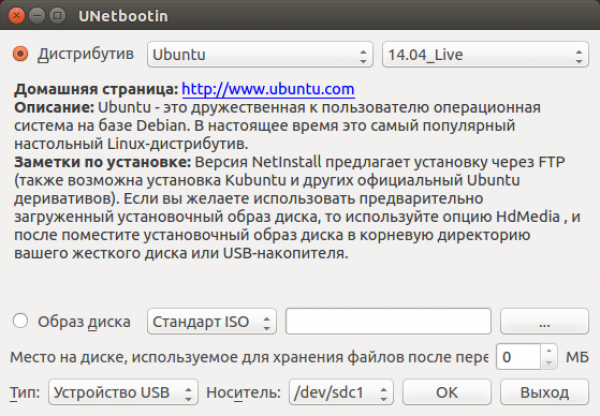
UNetbootin — создание загрузочной флешки
UNetbootin — Universal Netboot Installer — позволяет вам создавать загрузочные LiveUSB-диски для Ubuntu, Fedora и любых других дистрибутивов Linux без записи CD (Brasero или k3b). Он работает на Windows, Linux и Mac OS X. Вы можете либо загрузить какой-либо поддерживаемый дистрибутив прямо в окне программы, либо предложить свой собственный файл ».iso» Linux. Распространяется на условиях лицензии GNU GPLv2
Создание загрузочной флешки
Загрузите пакет unetbootin для Windows 
![]() Пакет из репозитория universe
Пакет из репозитория universe
![]()
Носитель: /dev/sdc1.
Если в этом поле несколько носителей — отсоедините лишние флешки, и перезапустите программу.
Частичная русификация LiveUSB
Настройка параметров BIOS
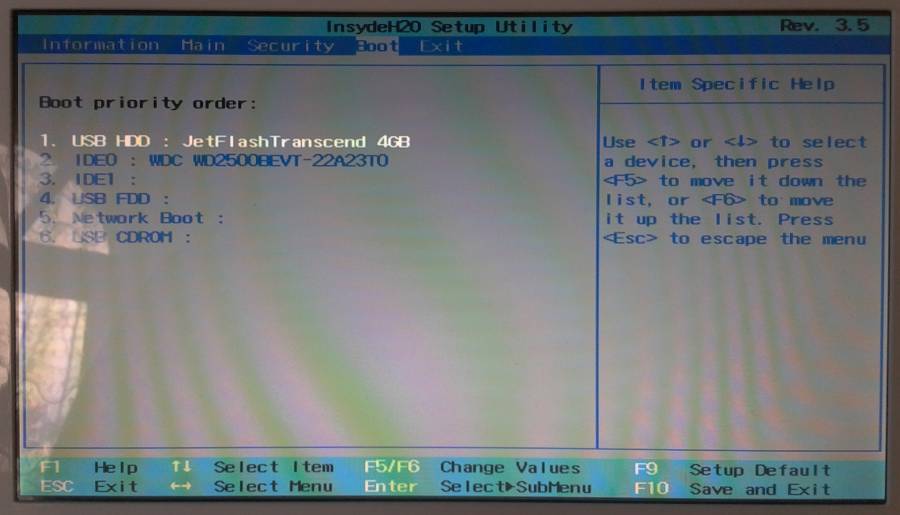
Для запуска загрузочной флешки с Ubuntu необходимо настроить ваш BIOS таким образом, чтобы он в первую очередь загружал данные с Flash-диска, а не с HDD. Для этого вам необходимо зайти в окно управления BIOS вашего компьютера, это делается нажатием специальной кнопки ( Del , F2 или другие) в момент после включения компьютера и до загрузки операционной системы.
Выставите необходимую очередь загрузки так, чтобы загрузочный Flash-диск с Ubuntu загружался первым, после чего сохраните настройки и перезагрузите компьютер назначенной клавишей, на примере это F10 1) .
Ссылки
Create a bootable USB stick with Rufus on Windows
This tutorial will show you how to create a bootable USB stick on Microsoft Windows using Rufus.
For most users we recommend balenaEtcher instead of Rufus which is simpler to use and also available on MacOS and Ubuntu. Instructions are now included in the primary Install Ubuntu Desktop tutorial.
Creating a bootable Ubuntu USB stick from Microsoft Windows is very simple and we’re going to cover the process in the next few steps.
Alternatively, we also have tutorials to help you create a bootable USB stick from both Ubuntu and Apple macOS.

2. Requirements
- A 4GB or larger USB stick/flash drive
- Microsoft Windows XP or later
- Rufus, a free and open source USB stick writing tool
- An Ubuntu ISO file. See Get Ubuntu for download links

Take note of where your browser saves downloads: this is normally a directory called ‘Downloads’ on your Windows PC. Don’t download the ISO image directly to the USB stick! If using Windows XP or Vista, download version 2.18 of Rufus.
3. USB selection
Perform the following to configure your USB device in Rufus:
- Launch Rufus
- Insert your USB stick
- Rufus will update to set the device within the Device field
- If the Device selected is incorrect (perhaps you have multiple USB storage devices), select the correct one from the device field’s drop-down menu

You can avoid the hassle of selecting from a list of USB devices by ensuring no other devices are connected.
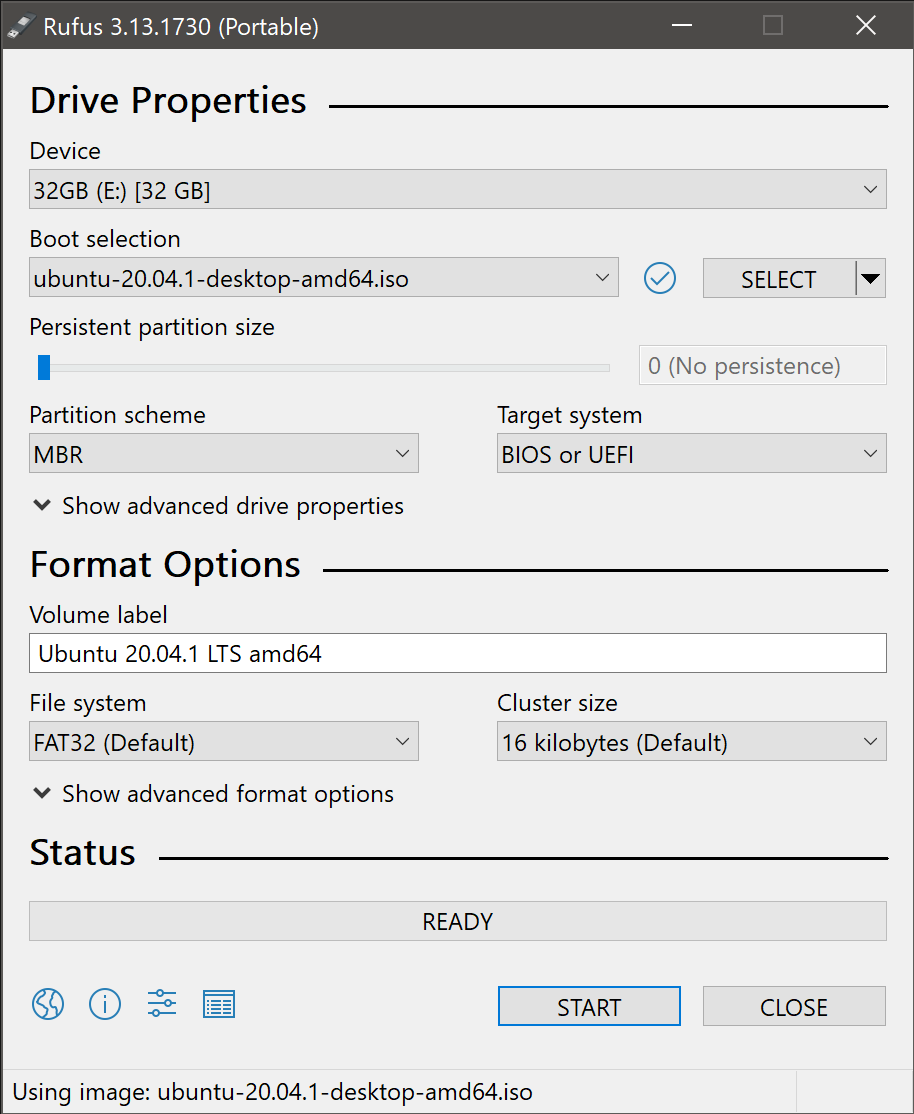
4. Select the Ubuntu ISO file
To select the Ubuntu ISO file you downloaded previously, click the SELECT to the right of “Boot selection”. If this is the only ISO file present in the Downloads folder you will only see one file listed.
Select the appropriate ISO file and click on Open.

5. Write the ISO
The Volume label will be updated to reflect the ISO selected.
Leave all other parameters with their default values and click START to initiate the write process.
6. Additional downloads
You may be alerted that Rufus requires additional files to complete writing the ISO. If this dialog box appears, select Yes to continue.

7. Write warnings
You will then be alerted that Rufus has detected that the Ubuntu ISO is an ISOHybrid image. This means the same image file can be used as the source for both a DVD and a USB stick without requiring conversion.
Keep Write in ISO Image mode selected and click on OK to continue.

Rufus will also warn you that all data on your selected USB device is about to be destroyed. This is a good moment to double check you’ve selected the correct device before clicking OK when you’re confident you have.
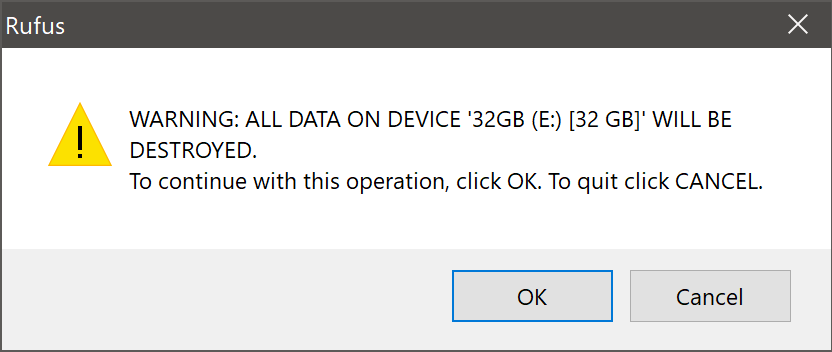
If your USB stick contains multiple partitions Rufus will warn you in a separate pane that these will also be destroyed.
8. Writing the ISO
The ISO will now be written to your USB stick, and the progress bar in Rufus will give you some indication of where you are in the process. With a reasonably modern machine, this should take around 10 minutes. Total elapsed time is shown in the lower right corner of the Rufus window.

9. Installation complete
When Rufus has finished writing the USB device, the Status bar will be filled green and the word READY will appear in the center. Select CLOSE to complete the write process.

Congratulations! You now have Ubuntu on a USB stick, bootable and ready to go.
To use it you need to insert the stick into your target PC or laptop and reboot the device. It should recognise the installation media automatically during startup but you may need to hold down a specific key (usually F12) to bring up the boot menu and choose to boot from USB.
For a full walkthrough of installing Ubuntu, take a look at our install Ubuntu desktop tutorial.
Finding help
If you get stuck, help is always at hand: