- Утилита file в linux
- Примеры использования
- Простое исследование типов файлов
- Исследование типов файлов из директории
- Исследование типов файлов из архива
- Linux File Command: How to Determine File Type in Linux
- File Command Syntax
- File Command Options
- File Command Examples
- Test Multiple Files
- Test All Files in a Directory
- Test Files in a Range
- Test Files from a List
- Test Special Files
- Test Compressed Files
- Test Parsed Version of File
- Display Brief Output
- Add Separators to Output
- Remove File Name Padding from Output
Утилита file в linux
Команда file предназначена для задействования одноименной утилиты, осуществляющей определение типов переданных элементов файловой системы (файлов, директорий, ссылок, именованных каналов и сокетов). Данная утилита исследует содержимое файлов, а не ограничивается проверкой их расширений.
Если говорить конкретно, утилита выполняет до трех проверок каждого из указанных пользователем элементов файловой системы. Первая проверка заключается в использовании системного вызова stat(), позволяющего получить доступ к содержимому структуры inode элемента файловой системы. Системный вызов обрабатывается ядром операционной системы и позволяет выяснить, является ли элемент файловой системы обычным файлом, директорией, символьной или жесткой ссылкой, именованным каналом или сокетом.
Если элемент файловой системы является обычным файлом или символьной или жесткой ссылкой, утилита читает заголовок файла и пытается идентифицировать его тип на основе магической последовательности байтов.
В том случае, если файл не содержит магической последовательности байтов, определяется тип содержимого файла. Эта проверка, к примеру, позволяет выяснить, является ли файл обычным текстовым файлом, файлом формата HTML или файлом исходного кода. Кроме того, утилита пытается распаковать файл архива и выяснить тип сжатого файла.
Базовый синтаксис команды выглядит следующим образом:
Обычно утилита используется без каких-либо параметров, вместо имен файлов могут использоваться шаблоны. Параметр -k позволяет принудительно выполнить все проверки для получения максимального объема информации об объектах файловой системы. Параметр -b позволяет не выводить имена исследуемых объектов файловой системы, что полезно в случае сбора статистики о типах файлов. Параметр -F позволяет указать символ-разделитель имени файла и строки с информацией о его типе. Параметр -f предназначен для передачи утилите имени текстового файла в строках которого приводятся имена объектов файловой системы, которые необходимо исследовать. Если вам нужны MIME-типы файлов, а не описания их типов, вы можете воспользоваться параметром -i. Для того, чтобы не обновлять метку времени доступа к объектам файловой системы может использоваться параметр -p. Для исследования содержимого сжатых файлов может использоваться параметр -z.
Примеры использования
Простое исследование типов файлов
Для простого исследования типов файлов достаточно передать имена этих файлов утилите без использования каких-либо параметров:
$ file splash1280.jpg
splash1280.jpg: JPEG image data, JFIF standard 1.02, resolution (DPI), density 72×72, segment length 16, progressive, precision 8, 1280×1024, frames 3
$ file audiobook.ogg
audiobook.ogg: Ogg data, Vorbis audio, mono, 24000 Hz, ~40222 bps, created by: Xiph.Org libVorbis I
$ file file1.txt
file1.txt: ASCII text
$ file switchcase.c
switchcase.c: C source, UTF-8 Unicode text
$ file text.txt.bz2
text.txt.bz2: bzip2 compressed data, block size = 900k
$ file debian.patch
debian.patch: unified diff output, UTF-8 Unicode text
$ file /tmp/
/tmp/: sticky, directory
$ file /tmp/.ICE-unix/1558
/tmp/.ICE-unix/1558: socket
$ file /usr/lib/libnetpbm.so.10
/usr/lib/libnetpbm.so.10: symbolic link to libnetpbm.so.10.0
Исследование типов файлов из директории
Утилита file может обрабатывать множества файлов. Для этого достаточно использовать шаблоны командной оболочки:
$ file *.jpg
nolf228.jpg: JPEG image data, JFIF standard 1.02, resolution (DPI), density 72×72, segment length 16, progressive, precision 8, 800×600, frames 3
other: directory
splash1024.jpg: JPEG image data, JFIF standard 1.02, resolution (DPI), density 72×72, segment length 16, progressive, precision 8, 1024×768, frames 3
splash1280.jpg: JPEG image data, JFIF standard 1.02, resolution (DPI), density 72×72, segment length 16, progressive, precision 8, 1280×1024, frames 3
Исследование типов файлов из архива
Утилита может выводить информацию о типе первого файла из архива в случае использования параметра -z:
$ file splash.zip
splash.zip: Zip archive data, at least v2.0 to extract
$ file -z splash.zip
splash.zip: JPEG image data, JFIF standard 1.02, resolution (DPI), density 72×72, segment length 16, progressive, precision 8, 800×600, frames 3 (Zip archive data, at least v2.0 to extract)
Linux File Command: How to Determine File Type in Linux
The Linux file command helps determine the type of a file and its data. The command doesn’t take the file extension into account, and instead runs a series of tests to discover the type of file data.
In this tutorial, we will show you how the file command works and how to use it.

File Command Syntax
The file command uses the following basic syntax:
In the syntax above, file name represents the name of the file you want to test. The file command performs three sets of tests trying to determine the file type, in this order:
- Filesystem tests perform a stat(2) system call and check the result against the system header file. This way, the file command determines if the file is a common type for your system (such as a text file, image, directory, etc.).
- Magic tests use a short string of numbers stored near the beginning of the file («magic number») to test if the file is a binary executable and, if so, determine its type. The information needed to perform these tests is stored in /etc/magic or /usr/share/misc/magic from a compiled magic file.
- Language tests use a special tag to determine which programming language a binary executable file is written in.
The command output provides a short description of the file and data type. For instance, using the file command to test a text file:

File Command Options
The file command uses the following options:
| Option | Description |
|---|---|
| —apple | Changes the command output to the one used by older versions of MacOS. |
| -b, —brief | Changes command output to brief mode. |
| -C, —compile | Creates an output file that contains a pre-parsed version of the magic file or directory. |
| -c, —checking-printout | Checks the printout for the parsed version of the magic file. |
| -d | Prints internal debugging information in the standard error format. |
| -E | On filesystem error, issues an error message and exits. |
| -e, —exclude | Excludes a test from the list of tests performed on a file. |
| —exclude-quiet | Excludes tests that the file command doesn’t know about. |
| —extension | Prints a list of valid extensions for the file type. |
| -F, —separator | Uses the provided string as a separator between the file name and file type. |
| -f, —files-from | Uses a provided text file as a list of files to test. The list must contain only one file name per line. |
| -h, —no-deference | Disables following symbolic links. |
| -i, —mime | Changes the command output to a MIME-type string. |
| —mime-type, —mime-encoding | Changes the command output to a MIME-type string and only displays the specified element (type or encoding). |
| -k, —keep-going | Keeps the test going after the first results match. |
| -l, —list | Shows a list of matching patterns in descending order of strength. |
| -L, —deference | Enables following symbolic links. |
| -m, —magic-file | Uses an alternative magic file provided by the user. |
| -N, —no-pad | Doesn’t pad the file names to align with the output. |
| -n, —no-buffer | Flushes the output after checking each file. |
| -p, —preserve-date | Attempts to preserve the last time the file was accessed to make it look like the file command didn’t test it. |
| -P, —parameter | Sets various parameters, such as max bytes or recursion, count, and length limit. |
| -r, —raw | Disables translating unprintable characters. |
| -s, —special-files | Enables reading special files. |
| -S, —no-sandbox | Disables sandboxing on systems that support it. |
| -v, —version | Displays the version of the file command. |
| -z, —uncompress | Checks compressed files. |
| -Z, —uncompress-noreport | Checks compressed files and only displays file type without the compression. |
| -0, —print0 | Displays a null character after the end of the file name. |
| —help | Displays the help message. |
File Command Examples
Below are examples of common use cases for the file command.
Test Multiple Files
To test multiple files simultaneously, append the file names to the end of the file command:
file [file name 1] [file name 2] … [file name n]For instance, testing a directory, a text file, an image, and a webpage:
file Example example.txt sample.png index.html
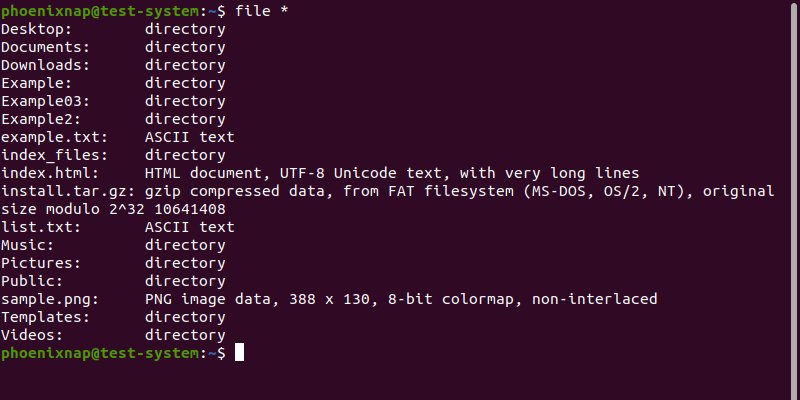
Test All Files in a Directory
Add a wildcard character ( * ) to the file command to test all the files and directories in the current working directory:
Add the path to a directory to the wildcard character to test the contents of that directory:
For instance, to test the contents of the Example directory, use:

Test Files in a Range
The file command lets you test a subset of files in a directory using Regex-style ranges. Select a range by placing the values in brackets. For instance, testing files and directories with names in the a-l range:
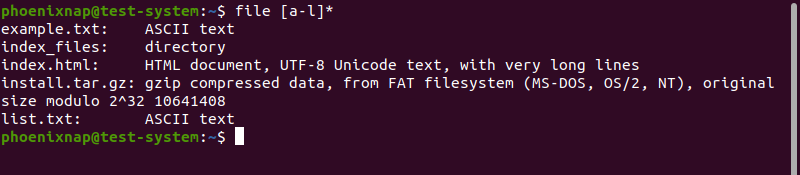
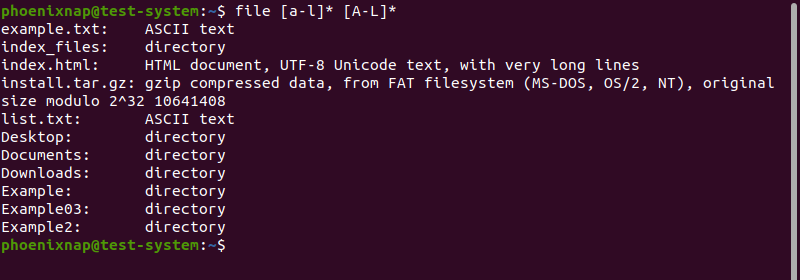
Since Regex-style ranges are case-sensitive, the output in the example above only shows file types for files starting with lowercase a-l. Adding another range lets you include uppercase characters as well:
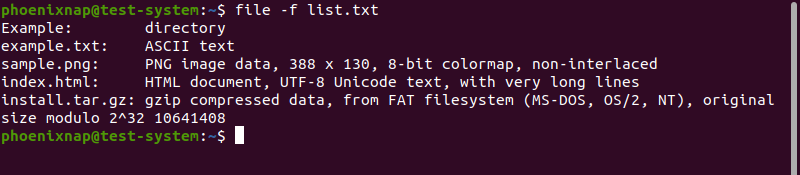
Test Files from a List
The file command lets you use a text file as a list of files to test. The text file must only contain one file name per line.

Use the -f option and add the path to the list file to file command:
Test Special Files
The file command is not always able to read special files, such as system files:

In the example above, the file command output shows that /dev/sda5 is a block special file but doesn’t offer additional details. Using the -s option lets you fully test special files:

Note: If you are not logged in as the root user, attempting to test a special file results in a no read permission error message. Add sudo to the file command to prevent this.
Test Compressed Files
Use the -z option to fully test compressed files, trying to detect their content:

Test Parsed Version of File
Using the -c option displays the check printout for the parsed version of the file:

This option is usually used with the -m option to debug and install a new magic file.
Display Brief Output
Using the -b option displays the brief version of the output. This version of the output only shows file types and omits file names.
file -b Example example.txt sample.png index.html
Add Separators to Output
Using the -F option lets you define a character that acts as a separator between the file name and file type sections of the output. For instance, add a plus sign ( + ) as a separator with:
file -F + Example example.txt sample.png index.html
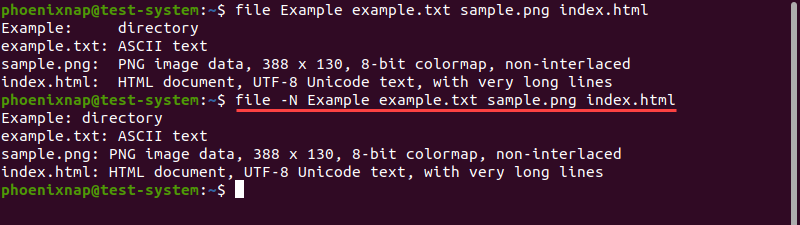
Remove File Name Padding from Output
Use the -N option to remove the padding between the file name and file type sections of the output:
file -N Example example.txt sample.png index.htmlThe resulting output is no longer vertically aligned:
After reading this tutorial, you should be able to use the Linux file command to find out the types of files on your system.
If you’re interested in learning more about Linux commands, have a look at our Linux commands cheat sheet.