- How to Use the hostname Command in Linux
- hostname Command Syntax
- hostname Command Examples
- Display Hostname
- Display Short Hostname
- Display Alias
- Search for Hostnames
- Force Default Hostname
- Display Domain Name
- Display FQDN
- Display All FQDNs
- Display NIS Domain
- Change NIS Domain Name
- Display Related Network Addresses
- Display All Network Addresses
- Change Hostname Until Reboot
- Change Hostname Permanently
- Additional hostname Options
- How to get a hostname/domain name from an IP address in Linux
- Prerequisites
- Perform DNS Reverse lookup using dig command
- Perform DNS Reverse lookup using nslookup command
- Perform DNS Reverse lookup using the host command
- Conclusion
- About the author
- Karim Buzdar
- 5 примеров команды ‘hostname’ для новичков Linux
- Курсы Cisco, Linux, кибербезопасность, DevOps / DevNet, Python с трудоустройством!
How to Use the hostname Command in Linux
The Linux hostname command is used to view or change a system’s domain and hostname. It can also check a computer’s IP address.
In this tutorial, we will cover all the ways you can use the hostname command on Linux and how to change your computer’s hostname on a Linux system.
hostname Command Syntax
The hostname command uses the following format:
hostname [options] [new_hostname]Use the [options] parameter to add more specific instructions to the hostname command. Without it, the default output shows your computer’s hostname:
Use the [new_hostname] parameter when you want to change your computer’s hostname.
hostname Command Examples
The hostname command has a number of options you can use for more specific outputs:
- -a , —alias : Displays the alias name of the host.
- -A , —all-fqdns : Displays every FQDN (Fully Qualified Domain Name) of the computer.
- -b , —boot : Always set a hostname.
- -d , —domain : Display DNS domain name.
- -f , —fqdn , —long : Display the FQDN.
- -F , —file : Check a file to recover and display the hostname.
- -h , —help : Print the help message as the output.
- -i , —ip-address : Display the computer’s IP address.
- -I , —all-ip-addresses : Display all of the computer’s network addresses.
- -s , —short : Display the short version of the hostname.
- -v , —verbose : Expand all output to verbose.
- -y , —yp , —nis : Display the NIS domain name.
Display Hostname
Using the hostname command without any additional options displays the computer’s hostname:

Display Short Hostname
Use the -s or —short option to display the short version of the hostname, which is cut off at the first dot:
hostname -s hostname --short
Display Alias
Use the -a or —alias option to display the alias (substitute hostname) of the host if one is set. There are very few cases where this option is useful, and its use is no longer recommended.
hostname -a hostname --alias
Search for Hostnames
Use the -F or —file option to search a specific file (such as hostname or hosts) and change your computer’s hostname to match the content of the file:
sudo hostname -F [file path] sudo hostname --file [file path]
Note: When using the -F or —file options, also specify the path to the file you want to check.
Force Default Hostname
If you don’t want to have a specific file containing the hostname, or want to leave that file empty, use the -b or —boot option. This makes your computer use the default hostname (localhost) until you set a different one:

Display Domain Name
Use the -d or —domain option to display the name of your DNS domain:
hostname -d hostname –domainDisplay FQDN
If you want to display a system’s FQDN, use the -f , —fqdn , or —long option:
hostname -f hostname --fqdn hostname --longA FQDN contains the short hostname and the DNS domain name.
Display All FQDNs
To display each FQDN of your machine, use the -A or —all-fqdns option:
hostname -A hostname --all-fqdnsThis option lists out all of your network addresses and their DNS domain names. It skips any addresses that it can’t translate.
Note: Different network addresses may translate to same DNS domain names. This can result in duplicate output entries when using -A or —all-fqdns options.
Display NIS Domain
If you’re using NIS (Network Information Service), you can check your NIS domain name with the -y , —yp , or —nis option:
hostname -y hostname --yp hostname --nis![]()
Change NIS Domain Name
Use this command with the following format to change your NIS domain name:
sudo hostname -y [NIS hostname] sudo hostname --yp [NIS hostname] sudo hostname --nis [NIS hostname]
Display Related Network Addresses
The hostname command also lets your display network addresses tied to a hostname. To do this, use the -i or —ip-address option:
hostname -i hostname --ip-addressThis command only works if the hostname can be resolved.
![]()
Display All Network Addresses
Use the -I or —all-ip-addresses option to display all of the host’s network addresses. Unlike -i , this option doesn’t depend on hostname resolution:
hostname -I hostname --all-ip-addresses![]()
Change Hostname Until Reboot
You can change your computer’s hostname with the hostname command. To do this, use the following format:
sudo hostname [new hostname]Any changes to the hostname you make using this command will only last until the next reboot.

Change Hostname Permanently
To change the hostname permanently, use a text editor like Nano to make changes to the hostname and hosts files:
sudo nano /etc/hostname sudo nano /etc/hostsYou can also use the hostnamectl command to permanently change the hostname:
sudo hostnamectl set-hostname [new hostname]
Additional hostname Options
Use the -V or —version option to print out the version of the hostname software package on your Linux system:
hostname -V hostname --version
If you need help with any of the commands, use the -h or —help option to print out a help message:
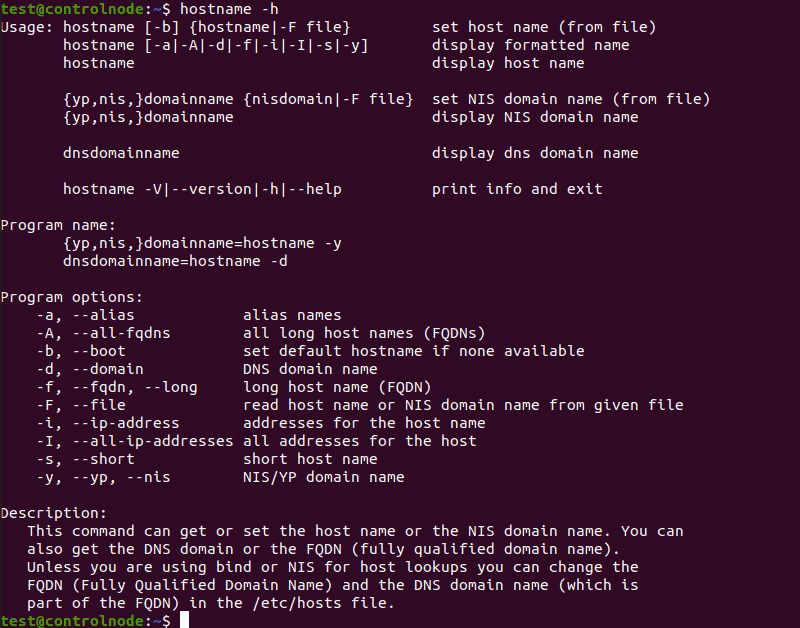
After following this guide, you now know how to use the hostname command in Linux and all the options that can extend its use.
For more Linux commands, check out our Linux Commands Cheat Sheet.
How to get a hostname/domain name from an IP address in Linux
![]()
One of the questions that many Linux users ask is how they can retrieve a system’s hostname using its IP address. It may seem an uphill task, but in the real sense, it’s quite easy. Essentially, this is known as the reverse DNS lookup. Reverse DNS lookup queries an IP address to retrieve the hostname or domain of the server. The exact opposite is the Forward DNS lookup which maps the domain name to the IP address.
In this short guide, we have explored a few ways to performs Reverse DNS lookup and get a domain name from an IP address. For demonstration purposes, I have used Ubuntu 20.04.
Prerequisites
Before you roll up your sleeves, ensure that your remote host has an A record which is a DNS entry that points or maps a domain name to an IP address
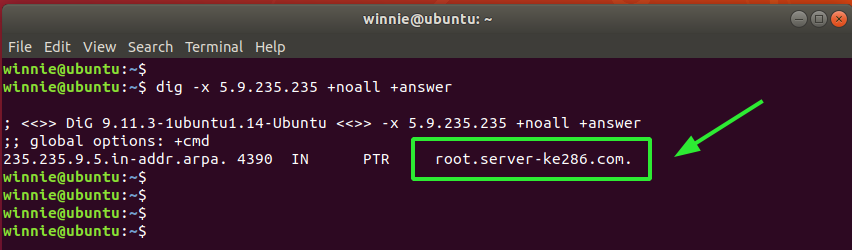
Perform DNS Reverse lookup using dig command
Dig command is a flexible and powerful tool that is used for querying or probing DNS records. It’s an acronym for domain information groper and allows you to retrieve a wide array of DNS information such as A, CNAME, MX, and SOA records.
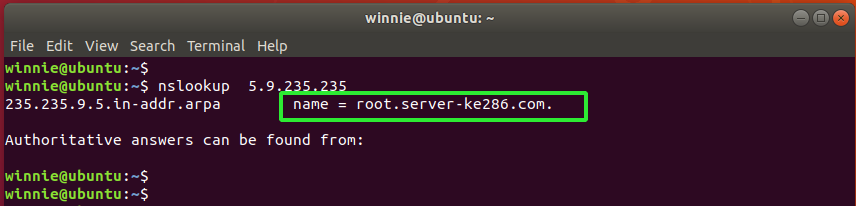
Perform DNS Reverse lookup using nslookup command
A nslookup command is a troubleshooting tool that features highly in a sysadmin’s armory. It’s a versatile tool that performs all DNS record querying such as CNAME, A, MX, and reverses or PTR records.
To retrieve a domain name from an IP address, use the command syntax:
Perform DNS Reverse lookup using the host command
Similarly, you can use the host command to obtain a hostname or domain name from an IP address using the syntax as shown.
For example, to check the domain name for the IP 5.9.235.235, execute the command:

Just like the Nslookup command, you can also use the host command with hostnames or IP addresses.
Conclusion
The few examples that we have just elaborated are a sure way of helping you obtain the domain name from an IP address. Usually, the reverse DNS lookup is trivial and not as crucial as the forward lookup, which maps domain names to IP addresses. Your feedback or contribution will be highly welcomed.
About the author
Karim Buzdar
Karim Buzdar holds a degree in telecommunication engineering and holds several sysadmin certifications. As an IT engineer and technical author, he writes for various web sites. He blogs at LinuxWays.
5 примеров команды ‘hostname’ для новичков Linux


Команда hostname используется для просмотра имени компьютера и имени домена (DNS) (службы имен доменов), а также для изменения или установки имени компьютера/домена.
hostname — это имя, которое присваивается компьютеру, подключенному к сети, которое однозначно идентифицирует в сети и, таким образом, позволяет получить доступ к нему без использования его IP-адреса.
Основной синтаксис для команды hostname:
В этой короткой статье мы объясним 5 полезных примеров команд hostname для начинающих пользователей Linux для просмотра, установки или изменения имени системного хоста (компьютера или сервера) из интерфейса командной строки Linux.
Если вы запустите команду hostname без каких-либо параметров, отобразится текущее имя хоста и доменное имя вашей системы Linux.

Используя имя хоста, вы можете отобразить сетевой адрес (IP-адрес) имени хоста с флагом -i, а параметр -I устанавливает все настроенные сетевые интерфейсы и отображает все сетевые адреса хоста.

Чтобы просмотреть имя домена DNS и FQDN (полное доменное имя вашего компьютера), используйте флаг -f и -d соответственно. Флаг -A позволяет вам видеть все данные FQDN хоста. В нашем случае имени домена DNS нету.

Чтобы отобразить псевдоним, используемый для имени узла, используйте флаг -a.
И последнее, но не менее важное: изменение или установка имени хоста вашей системы Linux. Выполните следующую команду, не забудьте заменить «NEW_HOSTNAME» на фактическое имя хоста, которое вы хотите установить или изменить.
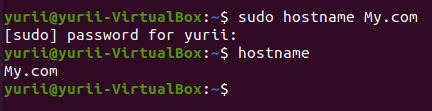

Обратите внимание, что изменения, сделанные с помощью указанной команды, будут действовать только до следующей перезагрузки. В разделе systemd – диспетчер систем и сервисов вы можете использовать команду hostnamectl для полного применения изменения имени системного хоста.
Вот и все! В этой короткой статье мы привели 5 примеров команд hostname для новичков в Linux.
Спасибо за уделенное время на прочтение статьи!
Если возникли вопросы, задавайте их в комментариях.
Подписывайтесь на обновления нашего блога и оставайтесь в курсе новостей мира инфокоммуникаций!
Чтобы знать больше и выделяться знаниями среди толпы IT-шников, записывайтесь на курсы Cisco от Академии Cisco, курсы Linux от Linux Professional Institute на платформе SEDICOMM University.
Курсы Cisco, Linux, кибербезопасность, DevOps / DevNet, Python с трудоустройством!
Спешите подать заявку! Группы стартуют 25 января, 26 февраля, 22 марта, 26 апреля, 24 мая, 21 июня, 26 июля, 23 августа, 20 сентября, 25 октября, 22 ноября, 20 декабря.
- Поможем стать экспертом по сетевой инженерии, кибербезопасности, программируемым сетям и системам и получить международные сертификаты Cisco, Linux LPI, Python Institute.
- Предлагаем проверенную программу с лучшими учебниками от экспертов из Cisco Networking Academy, Linux Professional Institute и Python Institute, помощь сертифицированных инструкторов и личного куратора.
- Поможем с трудоустройством и стартом карьеры в сфере IT — 100% наших выпускников трудоустраиваются.
- Проведем вечерние онлайн-лекции на нашей платформе.
- Согласуем с вами удобное время для практик.
- Если хотите индивидуальный график — обсудим и реализуем.
- Личный куратор будет на связи, чтобы ответить на вопросы, проконсультировать и мотивировать придерживаться сроков сдачи экзаменов.
- Всем, кто боится потерять мотивацию и не закончить обучение, предложим общение с профессиональным коучем.
- отредактировать или создать с нуля резюме;
- подготовиться к техническим интервью;
- подготовиться к конкурсу на понравившуюся вакансию;
- устроиться на работу в Cisco по специальной программе. Наши студенты, которые уже работают там: жмите на #НашиВCisco Вконтакте, #НашиВCisco Facebook.
Чтобы учиться на курсах Cisco, Linux LPI, кибербезопасность, DevOps / DevNet, Python, подайте заявку или получите бесплатную консультацию.